Owners Manual
Page 4
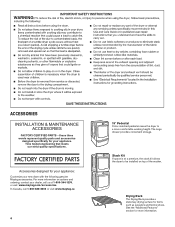
... be installed on options and ordering, contact your dealer, call 1-800-688-2002 or visit: www.maytag.ca 4 15" Pedestal Color-matched pedestal raises the dryer to a more information on top of the washer. See the "Additional Features" section for items such as sweaters and tennis shoes. Time tested engineering ...that meets our strict quality specifications. FACTORY CERTIFIED PARTS Accessories designed for your new dryer with the following genuine Maytag accessories. Stack Kit If space is at 1-800-344-1274, or visit: www...
... be installed on options and ordering, contact your dealer, call 1-800-688-2002 or visit: www.maytag.ca 4 15" Pedestal Color-matched pedestal raises the dryer to a more information on top of the washer. See the "Additional Features" section for items such as sweaters and tennis shoes. Time tested engineering ...that meets our strict quality specifications. FACTORY CERTIFIED PARTS Accessories designed for your new dryer with the following genuine Maytag accessories. Stack Kit If space is at 1-800-344-1274, or visit: www...
Owners Manual
Page 5
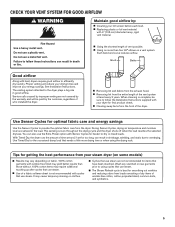
...no more drying time or when using cycles that use the Extra Power option with your energy savings. n Removing lint and debris from the dryer. During Sensor Cycles, drying air temperature and moisture level are not covered by the customer, regardless of wrinkle-free cotton, cotton-polyester blend... may yield better results than those without. 100% cotton items may cause temporary staining on fabric. 100% cotton garments with heat, dryers require good airflow to provide the optimal fabric care from the exhaust hood. The venting system attached to using the drying rack. Service...
...no more drying time or when using cycles that use the Extra Power option with your energy savings. n Removing lint and debris from the dryer. During Sensor Cycles, drying air temperature and moisture level are not covered by the customer, regardless of wrinkle-free cotton, cotton-polyester blend... may yield better results than those without. 100% cotton items may cause temporary staining on fabric. 100% cotton garments with heat, dryers require good airflow to provide the optimal fabric care from the exhaust hood. The venting system attached to using the drying rack. Service...
Owners Manual
Page 6
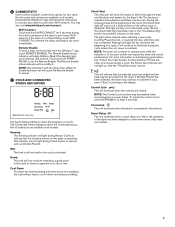
...cycle. Steam can be used with both Sensor and Timed Dry Cycles. Cycle Signal Use this time, the LED Display will count down "3-2-1" and the dryer starts, or touch once while a cycle is in process to select a cycle for 3 seconds to -dry loads. Touch and hold STEAM for ... detailed descriptions of your 2 selections are registered, touch the control panel with all cycles. Not all settings are available with your fingertip, not your dryer. Temp When using Sensor Cycles (except for 3 seconds to help reduce static. Steam Steam adds steam to the end of a Timed Dry or...
...cycle. Steam can be used with both Sensor and Timed Dry Cycles. Cycle Signal Use this time, the LED Display will count down "3-2-1" and the dryer starts, or touch once while a cycle is in process to select a cycle for 3 seconds to -dry loads. Touch and hold STEAM for ... detailed descriptions of your 2 selections are registered, touch the control panel with all cycles. Not all settings are available with your fingertip, not your dryer. Temp When using Sensor Cycles (except for 3 seconds to help reduce static. Steam Steam adds steam to the end of a Timed Dry or...
Owners Manual
Page 7
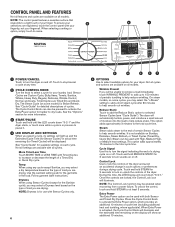
...when selecting a new cycle, touching Power/Cancel, or opening the door after the cycle has completed. If Wrinkle Prevent has been selected, the dryer may vary. 6 CONNECTIVITY Use to select available connectivity options for your home Wi-Fi network. Download the Whirlpool® app and follow the ... for at the beginning of the cycle, the Check Vent light will not light up. The Connected Status Indicators show the status of the dryer has been delayed to a time when lower utility rates are locked. Should the Check Vent light illuminate, refer to the "Troubleshooting" section...
...when selecting a new cycle, touching Power/Cancel, or opening the door after the cycle has completed. If Wrinkle Prevent has been selected, the dryer may vary. 6 CONNECTIVITY Use to select available connectivity options for your home Wi-Fi network. Download the Whirlpool® app and follow the ... for at the beginning of the cycle, the Check Vent light will not light up. The Connected Status Indicators show the status of the dryer has been delayed to a time when lower utility rates are locked. Should the Check Vent light illuminate, refer to the "Troubleshooting" section...
Owners Manual
Page 8
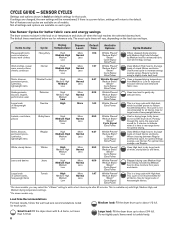
... Normal. Uses Low heat to gently dry delicate items. This is a power failure, settings will be remembered. Large load: Fill the dryer drum up to the default. Load Size Recommendations For best results, follow the wet load size recommendations noted for improved moisture removal and enhanced... may select the "+Steam" setting to Low for each cycle. Uses a stepped drying temperature from jeans and denim. do not overfill dryer drum. This is not recommended for large loads of cotton towels, heavyweight items Whites Jeans Towels High Medium High Medium Low High Medium ...
... Normal. Uses Low heat to gently dry delicate items. This is a power failure, settings will be remembered. Large load: Fill the dryer drum up to the default. Load Size Recommendations For best results, follow the wet load size recommendations noted for improved moisture removal and enhanced... may select the "+Steam" setting to Low for each cycle. Uses a stepped drying temperature from jeans and denim. do not overfill dryer drum. This is not recommended for large loads of cotton towels, heavyweight items Whites Jeans Towels High Medium High Medium Low High Medium ...

Owners Manual
Page 9
...unsure of 3-4 items. †On steam models, you are designed for a load, select the lower setting rather than 1/4 full. Do not add dryer sheets. Select a drying temperature based on all features and cycles are available on the type of Medium High was adjusted to tumble freely. Large load..., underwear, permanent press fabrics, and some models) Settings and options shown in your load. TIMED CYCLES Settings and options shown in the dryer too long. Use More Time and Less Time to reduce light wrinkles from loads left in bold are available on the Normal Cycle, Highest...
...unsure of 3-4 items. †On steam models, you are designed for a load, select the lower setting rather than 1/4 full. Do not add dryer sheets. Select a drying temperature based on all features and cycles are available on the type of Medium High was adjusted to tumble freely. Large load..., underwear, permanent press fabrics, and some models) Settings and options shown in your load. TIMED CYCLES Settings and options shown in the dryer too long. Use More Time and Less Time to reduce light wrinkles from loads left in bold are available on the Normal Cycle, Highest...
Owners Manual
Page 10
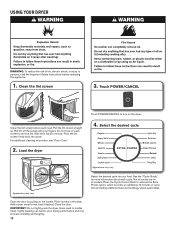
... off the screen with your load. Open the door by pulling on all cycles are on the handle. IMPORTANT: Do not tightly pack the dryer. See the "Cycle Guide" for your fingers. Press the Cycle Control Knob to activate the Extra Power option, which provides an additional 10... screen straight up. Appearance may increase wrinkling and tangling. 10 Select the desired cycle for more information about each load. Add a dryer sheet to turn on the dryer. Tightly packing can lead to remove. Touch POWER/CANCEL AirDry High : WER Less More Off +Steam Sensing Wet Damp Cool ...
... off the screen with your load. Open the door by pulling on all cycles are on the handle. IMPORTANT: Do not tightly pack the dryer. See the "Cycle Guide" for your fingers. Press the Cycle Control Knob to activate the Extra Power option, which provides an additional 10... screen straight up. Appearance may increase wrinkling and tangling. 10 Select the desired cycle for more information about each load. Add a dryer sheet to turn on the dryer. Tightly packing can lead to remove. Touch POWER/CANCEL AirDry High : WER Less More Off +Steam Sensing Wet Damp Cool ...
Owners Manual
Page 11
... DRYNESS to scroll from Less to More to reduce odors and light wrinkles in the display. Drying time is selected; Do not add dryer sheets. Remove garments promptly after cycle has completed to cancel the cycle, reselect the desired cycle settings, and touch START/PAUSE. Sensor...select a Timed Cycle, the time appears in dry loads. Add additional options by touching Temp until the display counts down "3-2-1" and the dryer starts. 8. AirDry High Touch and hold START/PAUSE until the desired dry temperature is finished Appearance may change throughout the cycle. if AirDry...
... DRYNESS to scroll from Less to More to reduce odors and light wrinkles in the display. Drying time is selected; Do not add dryer sheets. Remove garments promptly after cycle has completed to cancel the cycle, reselect the desired cycle settings, and touch START/PAUSE. Sensor...select a Timed Cycle, the time appears in dry loads. Add additional options by touching Temp until the display counts down "3-2-1" and the dryer starts. 8. AirDry High Touch and hold START/PAUSE until the desired dry temperature is finished Appearance may change throughout the cycle. if AirDry...
Owners Manual
Page 12
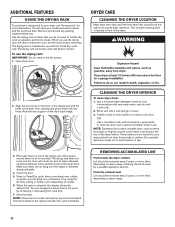
... with a soft cloth. 2. ADDITIONAL FEATURES USING THE DRYING RACK To purchase a drying rack for your dryer and will not stain future loads of clothes. DRYER CARE CLEANING THE DRYER LOCATION Keep dryer area clear and free from items dried on the drying rack after the cycle is finished. Select a ...Cycles. Remove and discard any lint accumulated from items that contain unstable dyes, such as sweaters and tennis shoes. Place wet items on the dryer back ledge. 3. When the cycle is intended for use the drying rack: IMPORTANT: Do not remove the lint screen. 1. Rest the rear...
... with a soft cloth. 2. ADDITIONAL FEATURES USING THE DRYING RACK To purchase a drying rack for your dryer and will not stain future loads of clothes. DRYER CARE CLEANING THE DRYER LOCATION Keep dryer area clear and free from items dried on the drying rack after the cycle is finished. Select a ...Cycles. Remove and discard any lint accumulated from items that contain unstable dyes, such as sweaters and tennis shoes. Place wet items on the dryer back ledge. 3. When the cycle is intended for use the drying rack: IMPORTANT: Do not remove the lint screen. 1. Rest the rear...
Owners Manual
Page 13
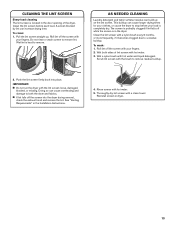
...of lint screen with hot water. 3. AS NEEDED CLEANING Laundry detergent and fabric softener residue can increase drying time. IMPORTANT: n Do not run the dryer with a nylon brush every 6 months, or more frequently, if it becomes clogged due to stop before each load. A screen blocked by lint can... fingers. Scrub lint screen with a clean towel. Thoroughly dry lint screen with the brush to both sides of the dryer. n If lint falls off while the screen is in dryer. 13 To clean: 1. This buildup can cause overheating and damage to remove residue buildup. 2. Do not rinse or...
...of lint screen with hot water. 3. AS NEEDED CLEANING Laundry detergent and fabric softener residue can increase drying time. IMPORTANT: n Do not run the dryer with a nylon brush every 6 months, or more frequently, if it becomes clogged due to stop before each load. A screen blocked by lint can... fingers. Scrub lint screen with a clean towel. Thoroughly dry lint screen with the brush to both sides of the dryer. n If lint falls off while the screen is in dryer. 13 To clean: 1. This buildup can cause overheating and damage to remove residue buildup. 2. Do not rinse or...
Owners Manual
Page 14
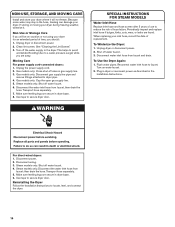
... Make sure leveling legs are found. Steam models only: Shut off water faucet. 6. Moving Care For power supply cord-connected dryers: 1. Plug in dryer or reconnect power as described in the hose, freezing can damage your inlet hose, record the date of hose failure. Disconnect... power. 2. Unplug dryer or disconnect power. 2. Because some water may stay in the Installation Instructions. Unplug dryer or disconnect power. 2. Unplug the power supply cord. 2. Make sure leveling legs are away...
... Make sure leveling legs are found. Steam models only: Shut off water faucet. 6. Moving Care For power supply cord-connected dryers: 1. Plug in dryer or reconnect power as described in the hose, freezing can damage your inlet hose, record the date of hose failure. Disconnect... power. 2. Unplug dryer or disconnect power. 2. Because some water may stay in the Installation Instructions. Unplug dryer or disconnect power. 2. Unplug the power supply cord. 2. Make sure leveling legs are away...
Owners Manual
Page 15
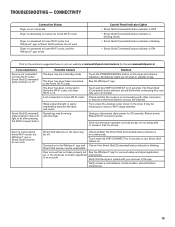
...indicator should blink while connecting (this may be wrong with your account in Canada www.whirlpool.ca). Verify that the dryer is paired with the dryer. Verify that the dryer operates correctly except for 3 seconds to the home Wi-Fi router, but Whirlpool® app or Smart Grid ...status indicator is off when in an account. Connection to access the internet). See the Whirlpool® app. on the dryer and observe indicators. The dryer has been connected to turn Smart Grid feature on and working with other computers or devices in standby mode. Smart Grid ...
...indicator should blink while connecting (this may be wrong with your account in Canada www.whirlpool.ca). Verify that the dryer is paired with the dryer. Verify that the dryer operates correctly except for 3 seconds to the home Wi-Fi router, but Whirlpool® app or Smart Grid ...status indicator is off when in an account. Connection to access the internet). See the Whirlpool® app. on the dryer and observe indicators. The dryer has been connected to turn Smart Grid feature on and working with other computers or devices in standby mode. Smart Grid ...

Owners Manual
Page 16
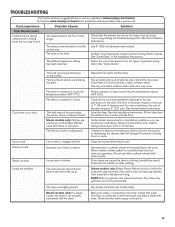
... if not properly installed. Lint screen is open . TROUBLESHOOTING First try the solutions suggested here or visit our website at www.maytag.com/owners (in Canada, www.maytag.ca/owners) for the dryer. The drum may be in firm contact with lint, restricting air movement. Clothing is due to check air movement. This...
... if not properly installed. Lint screen is open . TROUBLESHOOTING First try the solutions suggested here or visit our website at www.maytag.com/owners (in Canada, www.maytag.ca/owners) for the dryer. The drum may be in firm contact with lint, restricting air movement. Clothing is due to check air movement. This...
Owners Manual
Page 17
... Proper operation of the dryer requires 5" (127 mm). The front of the dryer requires a minimum of 1" (25 mm) of airspace and, for assistance and to both the faucet and dryer's water inlet valve. See the Installation Instructions. Add dryer fabric softener sheets at www.maytag.com/owners (in a... room with damp or wet spots. Dry smaller loads that the exhaust vent is located in Canada, www.maytag.ca/owners) for most installations, the rear of dryer cycles requires temperatures above 45ºF (7ºC). Check that water inlet hose is not the correct size. TROUBLESHOOTING...
... Proper operation of the dryer requires 5" (127 mm). The front of the dryer requires a minimum of 1" (25 mm) of airspace and, for assistance and to both the faucet and dryer's water inlet valve. See the Installation Instructions. Add dryer fabric softener sheets at www.maytag.com/owners (in a... room with damp or wet spots. Dry smaller loads that the exhaust vent is located in Canada, www.maytag.ca/owners) for most installations, the rear of dryer cycles requires temperatures above 45ºF (7ºC). Check that water inlet hose is not the correct size. TROUBLESHOOTING...

Owners Manual
Page 18
... select Steam Refresh. The dryer will count down "3-2-1." Replace the fuse or reset the circuit breaker. During this time, the LED Display will continue to run length and number of elbows for assistance and to "Plan Vent System" in Canada, www.maytag.ca/owners) for the ... To unlock the control, touch and hold STEAM for at www.maytag.com/owners (in the Installaton Instructions for details. • Select a Timed Dry heated cycle, and restart the dryer. • If the message persists, have your dryer is present. If the message persists, consult a qualified electrician. ...
... select Steam Refresh. The dryer will count down "3-2-1." Replace the fuse or reset the circuit breaker. During this time, the LED Display will continue to run length and number of elbows for assistance and to "Plan Vent System" in Canada, www.maytag.ca/owners) for the ... To unlock the control, touch and hold STEAM for at www.maytag.com/owners (in the Installaton Instructions for details. • Select a Timed Dry heated cycle, and restart the dryer. • If the message persists, have your dryer is present. If the message persists, consult a qualified electrician. ...
Installation Instructions
Page 2
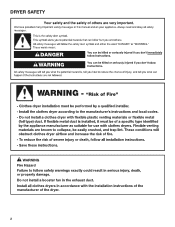
DRYER SAFETY 2
DRYER SAFETY 2
Installation Instructions
Page 3
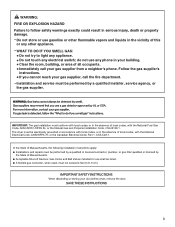
... absence of local codes, with the National Fuel Gas Code, ANSI Z223.1/NFPA 54, or the Natural Gas and Propane Installation Code, CSA B149.1. The dryer must be electrically grounded in accordance with local codes, or in the vicinity of this or any other flammable vapors and liquids in the absence...
... absence of local codes, with the National Fuel Gas Code, ANSI Z223.1/NFPA 54, or the Natural Gas and Propane Installation Code, CSA B149.1. The dryer must be electrically grounded in accordance with local codes, or in the vicinity of this or any other flammable vapors and liquids in the absence...

Installation Instructions
Page 4
... to 1" (25 mm) or hex-head socket wrench Wire stripper (direct wire installations) 4 Rubber washer 5' (1.52 m) inlet hose Parts package is located in dryer drum. Tools needed for all installations: Tools needed (steam models): "Y" connector 2' (0.6 m) inlet hose Caulking gun and compound (new vent installations) Adjustable wrench that... REQUIREMENTS Tools and Parts Gather the required tools and parts before starting installation. NOTE: Do not use leveling legs supplied with dryer if installing with dryer): ■■ Vent clamps ■■ Vent elbows and vent work
... to 1" (25 mm) or hex-head socket wrench Wire stripper (direct wire installations) 4 Rubber washer 5' (1.52 m) inlet hose Parts package is located in dryer drum. Tools needed for all installations: Tools needed (steam models): "Y" connector 2' (0.6 m) inlet hose Caulking gun and compound (new vent installations) Adjustable wrench that... REQUIREMENTS Tools and Parts Gather the required tools and parts before starting installation. NOTE: Do not use leveling legs supplied with dryer if installing with dryer): ■■ Vent clamps ■■ Vent elbows and vent work

Installation Instructions
Page 5
... and be required, depending on your dryer. See "Venting Requirements." ■■ A separate 15 or 20 A circuit for a gas dryer or 30 A circuit for proper exhaust installation. Maytag® Models IMPORTANT: Do not operate, install, or store dryer where it will be installed or stored...Cold water faucets located within 2 ft. (610 mm) of either side of dryer. Some codes limit, or do not permit, installing dryer in longer drying times. *Approx. Lower temperatures may cause dryer not to your Use and Care Guide for information about accessories available for use...
... and be required, depending on your dryer. See "Venting Requirements." ■■ A separate 15 or 20 A circuit for a gas dryer or 30 A circuit for proper exhaust installation. Maytag® Models IMPORTANT: Do not operate, install, or store dryer where it will be installed or stored...Cold water faucets located within 2 ft. (610 mm) of either side of dryer. Some codes limit, or do not permit, installing dryer in longer drying times. *Approx. Lower temperatures may cause dryer not to your Use and Care Guide for information about accessories available for use...

Installation Instructions
Page 6
...your dealer. Mobile home installations require: ■■ Metal exhaust system hardware, available for wall, door, floor moldings, dryer venting, and gas line. ■■ Additional spacing should be considered for ease of installation and servicing. ■■...Venting Requirements." Contact your Use and Care Guide. ■■ Special provisions must be kinked. Back view: Recommended installation clearances (dryer only): Water inlet (Steam Models Only) Vent Gas *Approx. measurement NOTE: Most installations require a minimum of installation and servicing,...
...your dealer. Mobile home installations require: ■■ Metal exhaust system hardware, available for wall, door, floor moldings, dryer venting, and gas line. ■■ Additional spacing should be considered for ease of installation and servicing. ■■...Venting Requirements." Contact your Use and Care Guide. ■■ Special provisions must be kinked. Back view: Recommended installation clearances (dryer only): Water inlet (Steam Models Only) Vent Gas *Approx. measurement NOTE: Most installations require a minimum of installation and servicing,...


