Owners Manual
Page 4
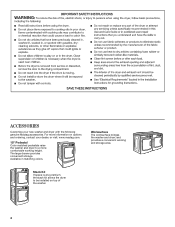
... storage. Stack Kit If space is at a premium, the stack kit allows the dryer to a more information on top of the washer. 4 Worksurface The worksurface bridges the washer and dryer, and provides a convenient working height. ACCESSORIES Customize your dealer, or visit: www.maytag.com. 15" Pedestal Color matched pedestals raise the washer and...
... storage. Stack Kit If space is at a premium, the stack kit allows the dryer to a more information on top of the washer. 4 Worksurface The worksurface bridges the washer and dryer, and provides a convenient working height. ACCESSORIES Customize your dealer, or visit: www.maytag.com. 15" Pedestal Color matched pedestals raise the washer and...
Owners Manual
Page 5
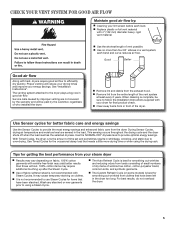
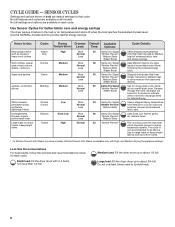
...Cycles for smoothing out wrinkles from your lint screen before each bend and curve reduces air flow. For best results, do not overload the dryer. 5 Use Sensor cycles for getting the best performance from clothes that needs a little more than those without. 100% cotton items may...drying. It may require additional touching up after the Steam Cycle. Use Timed Cycles for smoothing out wrinkles and reducing odors from the dryer. During Sensor Cycles, drying air temperature and moisture level are not covered by improper venting are sensed in front of vent possible. n...
...Cycles for smoothing out wrinkles from your lint screen before each bend and curve reduces air flow. For best results, do not overload the dryer. 5 Use Sensor cycles for getting the best performance from clothes that needs a little more than those without. 100% cotton items may...drying. It may require additional touching up after the Steam Cycle. Use Timed Cycles for smoothing out wrinkles and reducing odors from the dryer. During Sensor Cycles, drying air temperature and moisture level are not covered by improper venting are sensed in front of vent possible. n...
Owners Manual
Page 6
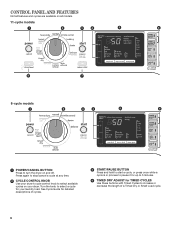
Press again to stop/cancel a cycle at any time. 2 CYCLE CONTROL KNOB Use your dryer's cycle control knob to turn the dryer on your dryer. See Cycle Guide for detailed descriptions of cycles. 3 START/PAUSE BUTTON Press and hold to start a cycle, or press once while a cycle is in process ...
Press again to stop/cancel a cycle at any time. 2 CYCLE CONTROL KNOB Use your dryer's cycle control knob to turn the dryer on your dryer. See Cycle Guide for detailed descriptions of cycles. 3 START/PAUSE BUTTON Press and hold to start a cycle, or press once while a cycle is in process ...
Owners Manual
Page 7
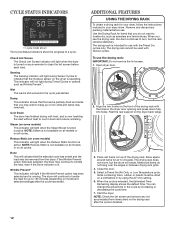
...on Heavy Duty, Normal, Denim, Bedding, Wrinkle Control, and Delicate cycles. 6 OPTION BUTTONS Use these buttons to lock the controls of the dryer and avoid an accidental change in process. NOTE: Dryness Level is in cycle options or preferences during the drying cycle when the load is available... on each stage, see "Cycle Status Indicators". The dryer will be displayed. The light will let you know what stage of the display to a Sensor cycle. NOTE: You may select a dry ...
...on Heavy Duty, Normal, Denim, Bedding, Wrinkle Control, and Delicate cycles. 6 OPTION BUTTONS Use these buttons to lock the controls of the dryer and avoid an accidental change in process. NOTE: Dryness Level is in cycle options or preferences during the drying cycle when the load is available... on each stage, see "Cycle Status Indicators". The dryer will be displayed. The light will let you know what stage of the display to a Sensor cycle. NOTE: You may select a dry ...
Owners Manual
Page 8
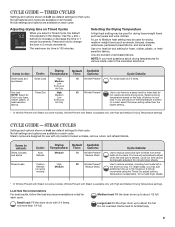
...Less Damp Dry Signal Wrinkle Prevent† Reduce Static Steam Boost Uses Medium heat to provide optimal energy savings. Small load: Fill the dryer drum with high heat, which has been proven to about 3/4 full. CYCLE GUIDE - Not all fabrics. This cycle is available only ...with High heat followed by Medium heat to drive moisture from Medium to tumble freely. 8 Large load: Fill the dryer drum up to reduce household bacteria. Jeans and denims Denim Medium More 50 Normal Less Damp Dry Signal Wrinkle Prevent† Reduce Static...
...Less Damp Dry Signal Wrinkle Prevent† Reduce Static Steam Boost Uses Medium heat to provide optimal energy savings. Small load: Fill the dryer drum with high heat, which has been proven to about 3/4 full. CYCLE GUIDE - Not all fabrics. This cycle is available only ...with High heat followed by Medium heat to drive moisture from Medium to tumble freely. 8 Large load: Fill the dryer drum up to reduce household bacteria. Jeans and denims Denim Medium More 50 Normal Less Damp Dry Signal Wrinkle Prevent† Reduce Static...
Owners Manual
Page 9
... about 3/4 full. Wrinkle Prevent with Steam is available only with High and Medium Drying Temperature settings CYCLE GUIDE - Medium load: Fill the dryer drum up to about 1/2 full. Do not overload. TIMED CYCLES Settings and options shown in the display. Selecting the Drying Temperature A High... Dry time will automatically adjust when the load size is available only with High and Medium Drying Temperature settings. Small load: Fill the dryer drum with Steam (on Timed Cycles + - Line dry bonded or laminated fabrics. temp level dryness leve When you are default settings for...
... about 3/4 full. Wrinkle Prevent with Steam is available only with High and Medium Drying Temperature settings CYCLE GUIDE - Medium load: Fill the dryer drum up to about 1/2 full. Do not overload. TIMED CYCLES Settings and options shown in the display. Selecting the Drying Temperature A High... Dry time will automatically adjust when the load size is available only with High and Medium Drying Temperature settings. Small load: Fill the dryer drum with Steam (on Timed Cycles + - Line dry bonded or laminated fabrics. temp level dryness leve When you are default settings for...
Owners Manual
Page 10
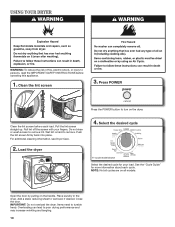
... firmly back into place. Add a static reducing sheet to remove lint. Close the door. For additional cleaning information, see Dryer Care. 2. Place laundry in the dryer. Clean the lint screen 3. Roll lint off the screen with your load. See the "Cycle Guide" for your fingers.... Overloading can lead to persons, read the IMPORTANT SAFETY INSTRUCTIONS before each cycle. Load the dryer 4. USING YOUR DRYER WARNING: To reduce the risk of fire, electric shock, or injury to poor drying performance and may increase wrinkling and tangling. ...
... firmly back into place. Add a static reducing sheet to remove lint. Close the door. For additional cleaning information, see Dryer Care. 2. Place laundry in the dryer. Clean the lint screen 3. Roll lint off the screen with your load. See the "Cycle Guide" for your fingers.... Overloading can lead to persons, read the IMPORTANT SAFETY INSTRUCTIONS before each cycle. Load the dryer 4. USING YOUR DRYER WARNING: To reduce the risk of fire, electric shock, or injury to poor drying performance and may increase wrinkling and tangling. ...
Owners Manual
Page 11
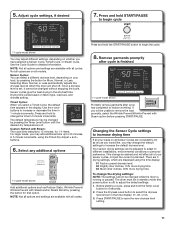
... Reduce Static, Wrinkle Prevent/ Wrinkle Prevent with Steam option before pressing START/PAUSE. Once a dryness level is set, it cannot be changed while the dryer is lit. + - 5. See the Cycle Guide for 6 seconds. 2. Press and hold the START/PAUSE button to select the dryness level shown in...-cycle model shown Add additional options such as you would like, you have selected a Sensor Cycle, Timed Cycle, or Steam Cycle. The dryer must be changed without steam has completed to 50 minutes, in 5 minute increments. temp level dryness leve Custom Refresh with all cycles. Press...
... Reduce Static, Wrinkle Prevent/ Wrinkle Prevent with Steam option before pressing START/PAUSE. Once a dryness level is set, it cannot be changed while the dryer is lit. + - 5. See the Cycle Guide for 6 seconds. 2. Press and hold the START/PAUSE button to select the dryness level shown in...-cycle model shown Add additional options such as you would like, you have selected a Sensor Cycle, Timed Cycle, or Steam Cycle. The dryer must be changed without steam has completed to 50 minutes, in 5 minute increments. temp level dryness leve Custom Refresh with all cycles. Press...
Owners Manual
Page 12
... cycle. Check Lint Screen The Check Lint Screen indicator will light if the Wrinkle Prevent option has been selected and is intended for your dryer, follow the instructions included in the cycle by using the Air Only setting. 6. Steam (on all cycles. NOTE: Reduce Static is selected... or by increasing or decreasing the cycle time. 7. Place wet items on model and selected settings) after the cycle is lit. The dryer will light during Timed Cycles or options such as sweaters and tennis shoes. Sensing The Sensing indicator will continue to tumble the load for ...
... cycle. Check Lint Screen The Check Lint Screen indicator will light if the Wrinkle Prevent option has been selected and is intended for your dryer, follow the instructions included in the cycle by using the Air Only setting. 6. Steam (on all cycles. NOTE: Reduce Static is selected... or by increasing or decreasing the cycle time. 7. Place wet items on model and selected settings) after the cycle is lit. The dryer will light during Timed Cycles or options such as sweaters and tennis shoes. Sensing The Sensing indicator will continue to tumble the load for ...
Owners Manual
Page 13
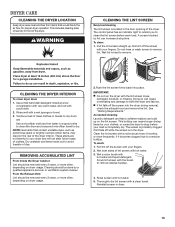
... with the lint screen loose, damaged, blocked, or missing. NOTE: Garments that would block the air flow for your clothes, or cause the dryer to stop before each load. Cleaning should be removed every 2 years, or more frequently, if it becomes clogged due to a residue buildup. IMPORTANT... SCREEN Every load cleaning The lint screen is completely dry. Rinse well with hot water. 5. Wet both the dryer and fabrics. DRYER CARE CLEANING THE DRYER LOCATION Keep dryer area clear and free from items that contain unstable dyes, such as denim blue jeans or brightly colored cotton items...
... with the lint screen loose, damaged, blocked, or missing. NOTE: Garments that would block the air flow for your clothes, or cause the dryer to stop before each load. Cleaning should be removed every 2 years, or more frequently, if it becomes clogged due to a residue buildup. IMPORTANT... SCREEN Every load cleaning The lint screen is completely dry. Rinse well with hot water. 5. Wet both the dryer and fabrics. DRYER CARE CLEANING THE DRYER LOCATION Keep dryer area clear and free from items that contain unstable dyes, such as denim blue jeans or brightly colored cotton items...
Owners Manual
Page 14
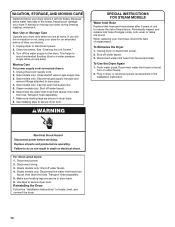
...Clean lint screen. Unplug the power supply cord. 2. Gas models only: Close shutoff valve in the hoses, freezing can damage your dryer. Disconnect the water inlet hose from faucet, then drain the hose. SPECIAL INSTRUCTIONS FOR STEAM MODELS Water Inlet Hose Replace inlet hose ...and replace inlet hose if bulges, kinks, cuts, wear, or leaks are at home. To Use the Dryer Again 1. For direct-wired dryers: 1. Disconnect wiring. 3. Use tape to secure dryer door. Unplug dryer or disconnect power. 2. Reconnect water inlet hose to a water pressure surge) while you are found. Disconnect...
...Clean lint screen. Unplug the power supply cord. 2. Gas models only: Close shutoff valve in the hoses, freezing can damage your dryer. Disconnect the water inlet hose from faucet, then drain the hose. SPECIAL INSTRUCTIONS FOR STEAM MODELS Water Inlet Hose Replace inlet hose ...and replace inlet hose if bulges, kinks, cuts, wear, or leaks are at home. To Use the Dryer Again 1. For direct-wired dryers: 1. Disconnect wiring. 3. Use tape to secure dryer door. Unplug dryer or disconnect power. 2. Reconnect water inlet hose to a water pressure surge) while you are found. Disconnect...
Owners Manual
Page 15
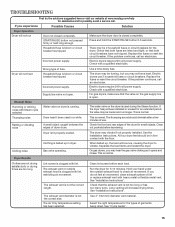
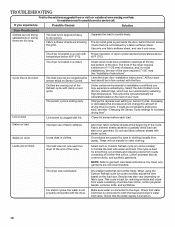
... length. See "Installation Instructions". See "Installation Instructions". This is running. Incorrect power supply. Gas valve operating. If the dryer has just been installed or unused for the types of lint or replace exhaust vent with a qualified electrician. TROUBLESHOOTING First try... the solutions suggested here or visit our website at www.maytag.com/help for 5-10 minutes. There may not have not tripped. Dryer will bounce, causing the dryer to check air movement. Supply line valve not open . This is normal....
... length. See "Installation Instructions". See "Installation Instructions". This is running. Incorrect power supply. Gas valve operating. If the dryer has just been installed or unused for the types of lint or replace exhaust vent with a qualified electrician. TROUBLESHOOTING First try... the solutions suggested here or visit our website at www.maytag.com/help for 5-10 minutes. There may not have not tripped. Dryer will bounce, causing the dryer to check air movement. Supply line valve not open . This is normal....
Owners Manual
Page 16
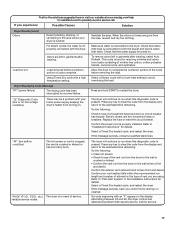
...TROUBLESHOOTING First try the solutions suggested here or visit our website at www.maytag.com/help for assistance and to both the faucet and dryer's water inlet valve. Cycle time is too short Lint on load The dryer is turned on fabric type. Under certain environmental or installation conditions you ...Cycles. For steam cycles, the water is ending early. This cycle is not blocked by dyes in firm contact with the dryer. The dryer was not removed from dryer at the beginning of the door. Dry smaller loads that water inlet hose is best for most installations, the rear of...
...TROUBLESHOOTING First try the solutions suggested here or visit our website at www.maytag.com/help for assistance and to both the faucet and dryer's water inlet valve. Cycle time is too short Lint on load The dryer is turned on fabric type. Under certain environmental or installation conditions you ...Cycles. For steam cycles, the water is ending early. This cycle is not blocked by dyes in firm contact with the dryer. The dryer was not removed from dryer at the beginning of the door. Dry smaller loads that water inlet hose is best for most installations, the rear of...
Owners Manual
Page 17
...try the solutions suggested here or visit our website at www.maytag.com/help for assistance and to avoid overdrying the load. ...Replace the fuse or reset the circuit breaker. Select a Timed Dry heated cycle, and restart the dryer. The dryer will continue to complete the cooldown portion of wrinkle-free cotton, cotton polyester blends, common knits, ... in garments after wearing. Press and hold START to "Installation Instructions" for details. Confirm your dryer is not properly connected with your entire home venting run length and number of elbows for details....
...try the solutions suggested here or visit our website at www.maytag.com/help for assistance and to avoid overdrying the load. ...Replace the fuse or reset the circuit breaker. Select a Timed Dry heated cycle, and restart the dryer. The dryer will continue to complete the cooldown portion of wrinkle-free cotton, cotton polyester blends, common knits, ... in garments after wearing. Press and hold START to "Installation Instructions" for details. Confirm your dryer is not properly connected with your entire home venting run length and number of elbows for details....

Installation Instructions
Page 2
DRYER SAFETY 2
DRYER SAFETY 2
Installation Instructions
Page 3
IMPORTANT: When discarding or storing your old clothes dryer, remove the door. 3
IMPORTANT: When discarding or storing your old clothes dryer, remove the door. 3

Installation Instructions
Page 4
...;■Vent clamps ■■Vent elbows and ductwork Additional parts may be required, depending in dryer drum. Check existing electrical supply and venting. Leveling legs (4) "Y" connector Short inlet hose Long inlet hose Caulking gun and compound Adjustable wrench that all installations: ...
...;■Vent clamps ■■Vent elbows and ductwork Additional parts may be required, depending in dryer drum. Check existing electrical supply and venting. Leveling legs (4) "Y" connector Short inlet hose Long inlet hose Caulking gun and compound Adjustable wrench that all installations: ...
Installation Instructions
Page 5
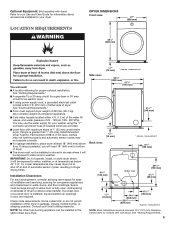
... with elbow. measurement NOTE: Most installations require a minimum of 200 lbs. (90.7 kg). IMPORTANT: Do not operate, install, or store dryer where it will be installed or stored in garages, closets, mobile homes, or sleeping quarters. Installation Clearances For each arrangement, consider allowing more... to allow door to bottom of 20 - 120 psi (138 - 827 kPa). Some codes limit, or do not permit, installation of dryer. LOCATION REQUIREMENTS DRYER DIMENSIONS Front view: 27" (686 mm) 381/8" (968 mm) You will need : ■■A location allowing for your local building...
... with elbow. measurement NOTE: Most installations require a minimum of 200 lbs. (90.7 kg). IMPORTANT: Do not operate, install, or store dryer where it will be installed or stored in garages, closets, mobile homes, or sleeping quarters. Installation Clearances For each arrangement, consider allowing more... to allow door to bottom of 20 - 120 psi (138 - 827 kPa). Some codes limit, or do not permit, installation of dryer. LOCATION REQUIREMENTS DRYER DIMENSIONS Front view: 27" (686 mm) 381/8" (968 mm) You will need : ■■A location allowing for your local building...

Installation Instructions
Page 6
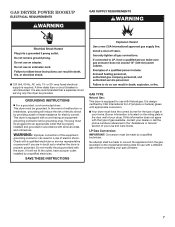
...information, please reference service numbers located in conformance with Canadian Electrical Code, C22.1-latest edition and all local codes and ordinances. This dryer is 5 ft. (1.52 m) long. Louvered doors with equivalent ventilitation openings are required. The installation must be made in your ...;Companion appliance spacing should be considered on both sides of the line. GROUNDING INSTRUCTIONS � For a grounded, cord-connected dryer: This dryer must be plugged into an appropriate outlet that you are in your Use and Care Guide. ■■Special provisions must ...
...information, please reference service numbers located in conformance with Canadian Electrical Code, C22.1-latest edition and all local codes and ordinances. This dryer is 5 ft. (1.52 m) long. Louvered doors with equivalent ventilitation openings are required. The installation must be made in your ...;Companion appliance spacing should be considered on both sides of the line. GROUNDING INSTRUCTIONS � For a grounded, cord-connected dryer: This dryer must be plugged into an appropriate outlet that you are in your Use and Care Guide. ■■Special provisions must ...
Installation Instructions
Page 7
... to convert the appliance from the gas specified on the rating plate in the door well of least resistance for electric current. This dryer is properly installed and grounded in your gas company. 7 Check with a cord having an equipmentgrounding conductor and a grounding plug. Do... can result in the "Assistance or Service" section of electric shock. WARNING: Improper connection of electric shock by a qualified technician. GAS DRYER POWER HOOKUP ELECTRICAL REQUIREMENTS GAS SUPPLY REQUIREMENTS ■■120 Volt, 60 Hz, AC only, 15- A time-delay fuse or circuit breaker...
... to convert the appliance from the gas specified on the rating plate in the door well of least resistance for electric current. This dryer is properly installed and grounded in your gas company. 7 Check with a cord having an equipmentgrounding conductor and a grounding plug. Do... can result in the "Assistance or Service" section of electric shock. WARNING: Improper connection of electric shock by a qualified technician. GAS DRYER POWER HOOKUP ELECTRICAL REQUIREMENTS GAS SUPPLY REQUIREMENTS ■■120 Volt, 60 Hz, AC only, 15- A time-delay fuse or circuit breaker...


