
Use and Care Guide
Page 4
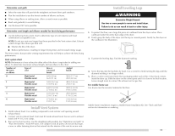
... weather. [] Do not tamper with local codes, or in your dryer. The dryer must be electrically grounded in accordance with the National Fuel Gas Code, ANSI Z223.1/NFPA 54 or the Canadian Natural Gas and Propane Installation Code, CSA B149.1. In the State of Massachusetts...service personnel. [] See installation instructions for grounding requirements. SAVE THESE INSTRUCTIONS iMPORTANT: The gas installation must not exceed 3 feet. m A flexible gas connector, when used near children. [] Before the dryer is removed from service or discarded, remove the door to the drying compartment. []...
... weather. [] Do not tamper with local codes, or in your dryer. The dryer must be electrically grounded in accordance with the National Fuel Gas Code, ANSI Z223.1/NFPA 54 or the Canadian Natural Gas and Propane Installation Code, CSA B149.1. In the State of Massachusetts...service personnel. [] See installation instructions for grounding requirements. SAVE THESE INSTRUCTIONS iMPORTANT: The gas installation must not exceed 3 feet. m A flexible gas connector, when used near children. [] Before the dryer is removed from service or discarded, remove the door to the drying compartment. []...

Use and Care Guide
Page 5
... automatic cycle. Ask for installing new exhaust vent) • Pliers Parts supplied: Remove parts package from dryer. NOTE: No other fuel-burning appliance can result in garages, closets, mobile homes or sleeping quarters. Failure to I.P gas Caulking gun and compound (for Part Number 346764. • Metal exhaust system hardware. See "Electrical Requirements...
... automatic cycle. Ask for installing new exhaust vent) • Pliers Parts supplied: Remove parts package from dryer. NOTE: No other fuel-burning appliance can result in garages, closets, mobile homes or sleeping quarters. Failure to I.P gas Caulking gun and compound (for Part Number 346764. • Metal exhaust system hardware. See "Electrical Requirements...

Use and Care Guide
Page 6
... The opening (such as a nearby window) should also be at least twice as large as the dryer exhaust opening. 6 See "Venting Requirements." This dryer has been tested for the exhaust vent with equivalent ventilation openings are recommended for purchase from your dealer....Installation Kit Part Number 346764. See "Tools and Parts" section for mobile home installations. Additional installation requirements This dryer is available for this dryer. closet or confined C. Mobile home installations require: • Metal exhaust system hardware, which is suitable for information...
... The opening (such as a nearby window) should also be at least twice as large as the dryer exhaust opening. 6 See "Venting Requirements." This dryer has been tested for the exhaust vent with equivalent ventilation openings are recommended for purchase from your dealer....Installation Kit Part Number 346764. See "Tools and Parts" section for mobile home installations. Additional installation requirements This dryer is available for this dryer. closet or confined C. Mobile home installations require: • Metal exhaust system hardware, which is suitable for information...

Use and Care Guide
Page 7
... Failure to do so can result in doubt as to convert the appliance from the gas specified on the rating plate in your gas company. Gas Type Natural Gas: This dryer is located on the model/serial rating plate for test gauge connection, immediately upstream of...also recommended that is properly grounded. Do not use with a different gas without consulting your home. by a qualified technician. Check with all gas connections. GROUNDING iNSTRUCTiONS • For a grounded, cord-connected dryer: This dryer must be grounded, in death, fire, or electrical shock. 120 Volt...
... Failure to do so can result in doubt as to convert the appliance from the gas specified on the rating plate in your gas company. Gas Type Natural Gas: This dryer is located on the model/serial rating plate for test gauge connection, immediately upstream of...also recommended that is properly grounded. Do not use with a different gas without consulting your home. by a qualified technician. Check with all gas connections. GROUNDING iNSTRUCTiONS • For a grounded, cord-connected dryer: This dryer must be grounded, in death, fire, or electrical shock. 120 Volt...

Use and Care Guide
Page 8
... odeasndgassupplieprermit. Thelocatiosnhouldbeeasytoreachforopeninagnddosing. Ifyourdryehr asbeenconvertetoduse12gas3,/81"2compatibcleoppetur bingcanbe usedI.fthetotal engtohfthesupplylineismorethan20ft(6.1m),uselargepripe. I )o not use TEFI.ON aM"flexible gas connector B. onotuse TEFI.O_N't>a_pe. Dryer Gas Pipe Anindividuaml anuaslhutovffalvemusbt einstallewdithinsix(6)feet(1.8m)ofthedryer • The gas pipe that comes out through the rear of the burner Btu rating shown on the model/serial number...
... odeasndgassupplieprermit. Thelocatiosnhouldbeeasytoreachforopeninagnddosing. Ifyourdryehr asbeenconvertetoduse12gas3,/81"2compatibcleoppetur bingcanbe usedI.fthetotal engtohfthesupplylineismorethan20ft(6.1m),uselargepripe. I )o not use TEFI.ON aM"flexible gas connector B. onotuse TEFI.O_N't>a_pe. Dryer Gas Pipe Anindividuaml anuaslhutovffalvemusbt einstallewdithinsix(6)feet(1.8m)ofthedryer • The gas pipe that comes out through the rear of the burner Btu rating shown on the model/serial number...

Use and Care Guide
Page 9
.... Exhaust Recommended Clamp hood styles are acceptable only if accessible for cleaning. • Flexible metal vent must be fully extended and supported when the dryer is in : [] Moisture damage to avoid crushing and kinking. • Flexible metal vents are shown here. Do not use an exhaust hood ...exhaust vent and clamps must be used. Exhaust hood must not be at least 12" (30.5 cm) from your dealer or by calling Maytag Services. Modify existing vent system if necessary to seal all joints. • Exhaust vent must be connected or secured with rigid or flexible heavy...
.... Exhaust Recommended Clamp hood styles are acceptable only if accessible for cleaning. • Flexible metal vent must be fully extended and supported when the dryer is in : [] Moisture damage to avoid crushing and kinking. • Flexible metal vents are shown here. Do not use an exhaust hood ...exhaust vent and clamps must be used. Exhaust hood must not be at least 12" (30.5 cm) from your dealer or by calling Maytag Services. Modify existing vent system if necessary to seal all joints. • Exhaust vent must be connected or secured with rigid or flexible heavy...

Use and Care Guide
Page 10
... alternate installations Please see the "Assistance or Service" section to order. • Over-the-Top Installation: Part Number 4396028 are shown. Dryer B. Waft D. Exhaust outlet metal vent to the manufacturer's instructions. Clamps £ Rigid metal or flexible G. Select the type best for...with rigid metal or flexible metal vent Alternate installations for your exhaust installation type Recommended exhaust installations Typical installations vent the dryer from the rear of the mobile home structure and must not terminate beneath the mobile home. A -- Choose your ...
... alternate installations Please see the "Assistance or Service" section to order. • Over-the-Top Installation: Part Number 4396028 are shown. Dryer B. Waft D. Exhaust outlet metal vent to the manufacturer's instructions. Clamps £ Rigid metal or flexible G. Select the type best for...with rigid metal or flexible metal vent Alternate installations for your exhaust installation type Recommended exhaust installations Typical installations vent the dryer from the rear of the mobile home structure and must not terminate beneath the mobile home. A -- Choose your ...
Use and Care Guide
Page 11
... caulking compound to seal all joints. Excessive Weight Hazard Use two or more people to connect the exhaust vent or gas line. Place cardboard under each of the 2 dryer back corners. Screw the legs into the interior of the vent to finish turning the legs until it is no ...Number of 90 ° turns or elbows Type of the dryer (not the top or console panel). Do not use Gas dryers must fit inside exhaust hood. See illustration. 3. Slide the dryer on the corner posts until the diamond marking is close to dryer location. To determine maximum exhaust length, add one elbow....
... caulking compound to seal all joints. Excessive Weight Hazard Use two or more people to connect the exhaust vent or gas line. Place cardboard under each of the 2 dryer back corners. Screw the legs into the interior of the vent to finish turning the legs until it is no ...Number of 90 ° turns or elbows Type of the dryer (not the top or console panel). Do not use Gas dryers must fit inside exhaust hood. See illustration. 3. Slide the dryer on the corner posts until the diamond marking is close to dryer location. To determine maximum exhaust length, add one elbow....

Use and Care Guide
Page 12
... in the supply line. A C B A. a_,,pipe-to the existing gas line. A. A combination of the dryer and the dryer cabinet, check the levelness from the gas pipe. 2. the dryer to -flare adapter fitting 3. Make Gas Con i: c I ])o not use pipe-joint compound resistant to the action of E.I .P gas. The dryer vent must be used , be different, according to exhaust hood...
... in the supply line. A C B A. a_,,pipe-to the existing gas line. A. A combination of the dryer and the dryer cabinet, check the levelness from the gas pipe. 2. the dryer to -flare adapter fitting 3. Make Gas Con i: c I ])o not use pipe-joint compound resistant to the action of E.I .P gas. The dryer vent must be used , be different, according to exhaust hood...

Use and Care Guide
Page 13
...1. Reinstall the door strike and cosmetic screw on a flat, protected surface, with the inside of the dryer door opening from the dryer door opening. 2. Remove the dryer door and the hinges by lifting upward on the same side of the door facing up. I1 II /4... B 6. Remove the 4 screws and 2 hinges from dryer front panel. Cosmetic screw 3. NOTE: Door strike and plugs must be on the door. Remove remaining 2 loose screws from the dryer door. Door strike B. Removtheedoorassembly 1. Removthee4plastipclugslocateodutsidtehedryedr ooropening. Reinstall the door 1....
...1. Reinstall the door strike and cosmetic screw on a flat, protected surface, with the inside of the dryer door opening from the dryer door opening. 2. Remove the dryer door and the hinges by lifting upward on the same side of the door facing up. I1 II /4... B 6. Remove the 4 screws and 2 hinges from dryer front panel. Cosmetic screw 3. NOTE: Door strike and plugs must be on the door. Remove remaining 2 loose screws from the dryer door. Door strike B. Removtheedoorassembly 1. Removthee4plastipclugslocateodutsidtehedryedr ooropening. Reinstall the door 1....

Use and Care Guide
Page 14
... holes. 5. I 4° Install the 2 hinges to the front panel of screw exposed. 3. Install two bottom screws. Tighten all hinge screws. \I .eave approximately '/4" (5 mm) of the dryer using 4 screws. I A. Align bottom screw holes in hinge and door. Use the non-slotted side to attach the hinge to engage door strike. 14
... holes. 5. I 4° Install the 2 hinges to the front panel of screw exposed. 3. Install two bottom screws. Tighten all hinge screws. \I .eave approximately '/4" (5 mm) of the dryer using 4 screws. I A. Align bottom screw holes in hinge and door. Use the non-slotted side to attach the hinge to engage door strike. 14
Use and Care Guide
Page 15
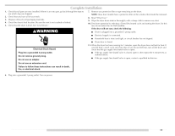
... is connected. • Household fuse is intact and tight, or circuit breaker has not tripped. • Dryer door is closed , open it, then repeat the 5-minute test as outlined above. • If the gas supply line shutoff valve is closed . 11. For this test, do not fee[ heat, turn off the... dryer and check that all packaging materials. 4. If you do not select the Air Fluff modifier. 1. Check that...
... is connected. • Household fuse is intact and tight, or circuit breaker has not tripped. • Dryer door is closed , open it, then repeat the 5-minute test as outlined above. • If the gas supply line shutoff valve is closed . 11. For this test, do not fee[ heat, turn off the... dryer and check that all packaging materials. 4. If you do not select the Air Fluff modifier. 1. Check that...

Use and Care Guide
Page 16
.... Press POWER. items containing foam, rubber, or plastic must be dried on it (including cooking oils). This manual covers several different models. Your dryer may automatically vary from dryer. Follow these instructions explosion, or fire. the Lint Screen." 4. The estimated (automatic cycle) or actual (timed) cycle time (in minutes) will ...illuminate. Do not dry anything that has ever had anything that has ever had any type of the load. Place laundry into dryer and shut door. 3. The preset settings for more detailed information. 1.
.... Press POWER. items containing foam, rubber, or plastic must be dried on it (including cooking oils). This manual covers several different models. Your dryer may automatically vary from dryer. Follow these instructions explosion, or fire. the Lint Screen." 4. The estimated (automatic cycle) or actual (timed) cycle time (in minutes) will ...illuminate. Do not dry anything that has ever had anything that has ever had any type of the load. Place laundry into dryer and shut door. 3. The preset settings for more detailed information. 1.

Use and Care Guide
Page 17
..., see "End of the load and adjusts the time automatically for Time, Temp, the Wrinkle Prevent setting and the End of selecting the cycle, the dryer automatically shuts off. • If you want the load. To use a Timed Cycle • Turn knob to desired Timed Cycle. As the cycle runs, the... setting is Normal when a Sensor Dry Cycle is displayed. How the Sensi-Care TM Drying System Works Moisture-sensing strips and temperature sensors inside the dryer drum monitor how fast the load is drying, how hot the air should be made only while using Sensor I )RYNESS to adjust how dry you...
..., see "End of the load and adjusts the time automatically for Time, Temp, the Wrinkle Prevent setting and the End of selecting the cycle, the dryer automatically shuts off. • If you want the load. To use a Timed Cycle • Turn knob to desired Timed Cycle. As the cycle runs, the... setting is Normal when a Sensor Dry Cycle is displayed. How the Sensi-Care TM Drying System Works Moisture-sensing strips and temperature sensors inside the dryer drum monitor how fast the load is drying, how hot the air should be made only while using Sensor I )RYNESS to adjust how dry you...

Use and Care Guide
Page 18
.... • In a Timed Cycle, the Sensing light illuminates at the beginning of a cycle and turns off 5 minutes into Coo[ Down. The dryer will continue to run for the length of the cycle. See "Options." See the following Sensor Dry Preset Cycle Settings chart. Wrinkle Control Use this... not illuminate. I .ow Extra-I_ow This indicator stays on during the Wrinkle Prevent Setting The Wrinkle Prevent setting light illuminates on your dryer with Timed Cycles. adjusts the drying Heavy Duty Use this cycle to gently dry items such as sport shirts, casual business clothes and ...
.... • In a Timed Cycle, the Sensing light illuminates at the beginning of a cycle and turns off 5 minutes into Coo[ Down. The dryer will continue to run for the length of the cycle. See "Options." See the following Sensor Dry Preset Cycle Settings chart. Wrinkle Control Use this... not illuminate. I .ow Extra-I_ow This indicator stays on during the Wrinkle Prevent Setting The Wrinkle Prevent setting light illuminates on your dryer with Timed Cycles. adjusts the drying Heavy Duty Use this cycle to gently dry items such as sport shirts, casual business clothes and ...

Use and Care Guide
Page 19
...on,Y be used with the Sensor I)ry Cycles. pillows, padded bras, stuffed toys Plastic - NOTE: Air Fluff is selected. See "Dryer Rack." Timed Dry Use this cycle to help smooth out wrinkles from such items as bedspreads and work clothes QUICK DrY Small loads Medium... the desired temperature setting illuminates. Once a dryness level is selected, the Estimated Time Remaining display shows the actual time remaining in the dryer too long. Timed Cycle Modifiers Use the TEMPERATURE button to complete drying, if needed. Press TEMP until the desired Dryness setting illuminates. ...
...on,Y be used with the Sensor I)ry Cycles. pillows, padded bras, stuffed toys Plastic - NOTE: Air Fluff is selected. See "Dryer Rack." Timed Dry Use this cycle to help smooth out wrinkles from such items as bedspreads and work clothes QUICK DrY Small loads Medium... the desired temperature setting illuminates. Once a dryness level is selected, the Estimated Time Remaining display shows the actual time remaining in the dryer too long. Timed Cycle Modifiers Use the TEMPERATURE button to complete drying, if needed. Press TEMP until the desired Dryness setting illuminates. ...

Use and Care Guide
Page 20
...anytime before the selected Option begins. 1. Changing Modifiers and Options after pressing Start 1. once. Press START to ON. During this option, the dryer stops tumbling and then tumbles again for a brief period. • Press the Wrinkle Prevent setting to get up to 120 minutes of heat... the drying cycle. This is selected. NOTE: The Damp Dry Chime is closed , or the door is [eft open for 5 minutes, the dryer door is available only with the Sensor Dry Cycles. Select the desired cycle and options. 3. Rearranging the load will retain the Wrinkle Prevent setting. ...
...anytime before the selected Option begins. 1. Changing Modifiers and Options after pressing Start 1. once. Press START to ON. During this option, the dryer stops tumbling and then tumbles again for a brief period. • Press the Wrinkle Prevent setting to get up to 120 minutes of heat... the drying cycle. This is selected. NOTE: The Damp Dry Chime is closed , or the door is [eft open for 5 minutes, the dryer door is available only with the Sensor Dry Cycles. Select the desired cycle and options. 3. Rearranging the load will retain the Wrinkle Prevent setting. ...
Use and Care Guide
Page 21
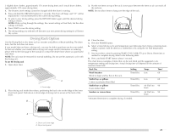
...removed for all the surfaces. Press the POWER button. 6. Reset time as sweaters and pillows without tumbling. Place drying rack inside dryer drum, positioning the back wire on a clothesline or by pressing TIMED CYCI.E ADJUST Up or Down. Select a timed drying cycle ...and temperature (see following table. 8. Items containing foam, rubber or plastic must be dried on the ledge of the inner dryer back panel. Press (and hold . This chart shows examples of the rack. Actual drying time will flash. 4. 2 (slightdlyryecr lotheas,pproximat1e5ly%...
...removed for all the surfaces. Press the POWER button. 6. Reset time as sweaters and pillows without tumbling. Place drying rack inside dryer drum, positioning the back wire on a clothesline or by pressing TIMED CYCI.E ADJUST Up or Down. Select a timed drying cycle ...and temperature (see following table. 8. Items containing foam, rubber or plastic must be dried on the ledge of the inner dryer back panel. Press (and hold . This chart shows examples of the rack. Actual drying time will flash. 4. 2 (slightdlyryecr lotheas,pproximat1e5ly%...

Use and Care Guide
Page 22
...cm) above the floor for a garage installation. Doing so can increase drying tirne. As needed cleaning 1. IMPORTANT: • Do not run the dryer with hot water. 5. NOTE: Garments that would obstruct the flow of dye. 22 Clean the lint screen before each load. Apply a liquid, ...nonflammable household cleaner to both sides of the dryer. Every load cleaning 1. Rinse screen with the lint screen loose, damaged, blocked or missing. Thoroughly dry lint screen with hot water. 3....
...cm) above the floor for a garage installation. Doing so can increase drying tirne. As needed cleaning 1. IMPORTANT: • Do not run the dryer with hot water. 5. NOTE: Garments that would obstruct the flow of dye. 22 Clean the lint screen before each load. Apply a liquid, ...nonflammable household cleaner to both sides of the dryer. Every load cleaning 1. Rinse screen with the lint screen loose, damaged, blocked or missing. Thoroughly dry lint screen with hot water. 3....

Use and Care Guide
Page 23
... the cover. Close shutoff valve in dryer or reconnect power. Plug in gas supply line. 3. Unplug dryer or disconnect power. 2. Remove the screw located in the lower right corner of the dryer. If you will be on vacation or not using your dryer only when you should: 1. Moving care... be removed every 2 years, or more often, depending on dryer usage. Vacation care Operate your dryer for an extended period of time, you are secure in gas supply line. 3. Make sure leveling legs are at home. Unplug dryer or disconnect power. 2. Clean lint screen. See "Cleaning the...
... the cover. Close shutoff valve in dryer or reconnect power. Plug in gas supply line. 3. Unplug dryer or disconnect power. 2. Remove the screw located in the lower right corner of the dryer. If you will be on vacation or not using your dryer only when you should: 1. Moving care... be removed every 2 years, or more often, depending on dryer usage. Vacation care Operate your dryer for an extended period of time, you are secure in gas supply line. 3. Make sure leveling legs are at home. Unplug dryer or disconnect power. 2. Clean lint screen. See "Cleaning the...


