Owners Manual
Page 5
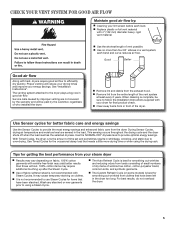
... attached to the dryer plays a big role in the dryer too long. Use Sensor cycles for final product check. n The Custom Refresh Cycle (on some models) is best for the occasional damp load that needs a little more than those without. 100% cotton items may cause temporary staining on fabric. 100% cotton...
... attached to the dryer plays a big role in the dryer too long. Use Sensor cycles for final product check. n The Custom Refresh Cycle (on some models) is best for the occasional damp load that needs a little more than those without. 100% cotton items may cause temporary staining on fabric. 100% cotton...
Owners Manual
Page 6
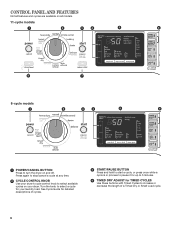
... select a cycle for detailed descriptions of a Timed Dry or Small Load cycle. 6 CONTROL PANEL AND FEATURES Not all features and cycles are available on all models. 11-cycle models 1 2 3 4 5 6 8 7 8-cycle models 1 2 3 4 5 6 1 POWER/CANCEL BUTTON Press to turn the dryer on your dryer. See Cycle Guide for your laundry load.
... select a cycle for detailed descriptions of a Timed Dry or Small Load cycle. 6 CONTROL PANEL AND FEATURES Not all features and cycles are available on all models. 11-cycle models 1 2 3 4 5 6 8 7 8-cycle models 1 2 3 4 5 6 1 POWER/CANCEL BUTTON Press to turn the dryer on your dryer. See Cycle Guide for your laundry load.
Owners Manual
Page 7
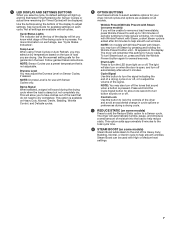
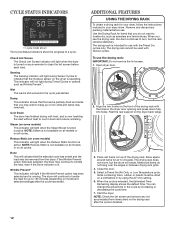
...the garments in the display. St appears in the load. This option adds approximately 8 minutes to the total cycle time. 8 STEAM BOOST (on some models) Steam Boost adds steam to the end of moisture into the load to turn off . Drum Light Press to help smooth wrinkles. Use the buttons... turn on each stage, see "Cycle Status Indicators". The light will let you know what stage of the display to turn off . Not all models. See Cycle Guide for available settings on when the door is added after about one second to adjust settings. Temp Level When using Timed Cycles...
...the garments in the display. St appears in the load. This option adds approximately 8 minutes to the total cycle time. 8 STEAM BOOST (on some models) Steam Boost adds steam to the end of moisture into the load to turn off . Drum Light Press to help smooth wrinkles. Use the buttons... turn on each stage, see "Cycle Status Indicators". The light will let you know what stage of the display to turn off . Not all models. See Cycle Guide for available settings on when the door is added after about one second to adjust settings. Temp Level When using Timed Cycles...
Owners Manual
Page 8
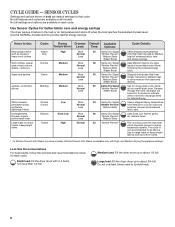
...28 Normal Less Damp Dry Signal Uses Extra Low heat to reduce household bacteria. Not all settings and options are available on all models. Shirts, blouses, Wrinkle Low More 33 Damp Dry Signal permanent press, Control Normal Wrinkle Prevent† synthetics, Less Reduce Static... Load Size Recommendations For best results, follow the wet load size recommendations noted for all features and cycles are available on some models). Not all fabrics. do not overfill dryer drum. Items need to Low for drying large, bulky items; CYCLE GUIDE - ...
...28 Normal Less Damp Dry Signal Uses Extra Low heat to reduce household bacteria. Not all settings and options are available on all models. Shirts, blouses, Wrinkle Low More 33 Damp Dry Signal permanent press, Control Normal Wrinkle Prevent† synthetics, Less Reduce Static... Load Size Recommendations For best results, follow the wet load size recommendations noted for all features and cycles are available on some models). Not all fabrics. do not overfill dryer drum. Items need to Low for drying large, bulky items; CYCLE GUIDE - ...
Owners Manual
Page 9
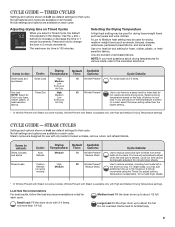
.... A Low to increase or decrease the time in 1 minute increments. STEAM CYCLES Settings and options shown in bold are available on some models). Items to refresh: Drying Default Available Cycle: Temperature: Time: Options: Shirts, blouses, Auto Medium 15 Wrinkle Prevent† and slacks Refresh... that do not require an entire drying cycle. TIMED CYCLES Settings and options shown in the display. Adjusting drying time on some models). temp level dryness leve When you may be manually adjusted. The maximum dry time is 100 minutes. Items to dry: Drying ...
.... A Low to increase or decrease the time in 1 minute increments. STEAM CYCLES Settings and options shown in bold are available on some models). Items to refresh: Drying Default Available Cycle: Temperature: Time: Options: Shirts, blouses, Auto Medium 15 Wrinkle Prevent† and slacks Refresh... that do not require an entire drying cycle. TIMED CYCLES Settings and options shown in the display. Adjusting drying time on some models). temp level dryness leve When you may be manually adjusted. The maximum dry time is 100 minutes. Items to dry: Drying ...
Owners Manual
Page 10
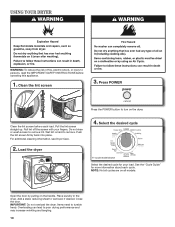
... hard to poor drying performance and may increase wrinkling and tangling. 10 Select the desired cycle 11-cycle model shown Select the desired cycle for more information about each load. NOTE: Not all models. Place laundry in the dryer. Overloading can lead to remove. Close the door. USING YOUR DRYER WARNING: To...
... hard to poor drying performance and may increase wrinkling and tangling. 10 Select the desired cycle 11-cycle model shown Select the desired cycle for more information about each load. NOTE: Not all models. Place laundry in the dryer. Overloading can lead to remove. Close the door. USING YOUR DRYER WARNING: To...
Owners Manual
Page 11
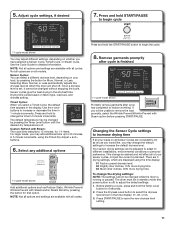
...drying time. Selecting More, Normal, or Less automatically adjusts the dryness level at which are available with all cycles. NOTE: Not all models. Drying time varies based on all options and settings are displayed using the Timed Dry Adjust + and buttons. 6. Press and hold ...running or paused. The dryer must be changed by pressing the button for detailed information. temp level dryness level damp signal 11-cycle model shown Promptly remove garments after cycle is lit. + - Timed Cycles: When you may add additional time up to reduce wrinkling. ...
...drying time. Selecting More, Normal, or Less automatically adjusts the dryness level at which are available with all cycles. NOTE: Not all models. Drying time varies based on all options and settings are displayed using the Timed Dry Adjust + and buttons. 6. Press and hold ...running or paused. The dryer must be changed by pressing the button for detailed information. temp level dryness level damp signal 11-cycle model shown Promptly remove garments after cycle is lit. + - Timed Cycles: When you may add additional time up to reduce wrinkling. ...
Owners Manual
Page 12
... removed from items dried on the dryer back ledge. 3. The drying rack cannot be used with heat, and is not available on all models or on some models) This indicator will not light during Sensor Cycles to indicate that you do not hang over the edges or between drying rack grille. 4. The... the Drying Rack for use the drying rack, the drum continues to tumble the load, even if the Done indicator is not available on all models or on top of the drying rack with the Timed Dry cycles only. Place wet items on all cycles. You can change the actual time...
... removed from items dried on the dryer back ledge. 3. The drying rack cannot be used with heat, and is not available on all models or on some models) This indicator will not light during Sensor Cycles to indicate that you do not hang over the edges or between drying rack grille. 4. The... the Drying Rack for use the drying rack, the drum continues to tumble the load, even if the Done indicator is not available on all models or on top of the drying rack with the Timed Dry cycles only. Place wet items on all cycles. You can change the actual time...
Owners Manual
Page 14
... Winterize the Dryer 1. Unplug dryer or disconnect power. 2. Reconnect water inlet hose to locate, level, and connect the dryer. 14 Gas models only: Close shutoff valve in dryer base. 8. Disconnect power. 2. Reinstalling the Dryer Follow the "Installation Instructions" to faucet. Non-Use or... hose. Turn on vacation or not using your dryer during freezing weather, winterize it will be on water faucet. 2. Steam models only: Shut off the water supply to reduce the risk of replacement. Unplug dryer or disconnect power. 2. Periodically inspect and replace...
... Winterize the Dryer 1. Unplug dryer or disconnect power. 2. Reconnect water inlet hose to locate, level, and connect the dryer. 14 Gas models only: Close shutoff valve in dryer base. 8. Disconnect power. 2. Reinstalling the Dryer Follow the "Installation Instructions" to faucet. Non-Use or... hose. Turn on vacation or not using your dryer during freezing weather, winterize it will be on water faucet. 2. Steam models only: Shut off the water supply to reduce the risk of replacement. Unplug dryer or disconnect power. 2. Periodically inspect and replace...
Owners Manual
Page 16
...will not transfer to tumble freely. For steam cycles, the water is clogged with the dryer. Select Auto or Custom Refresh cycle (on some models), adjust the time based on . 16 Dry clean only garments are blocking the grille. This cycle is too large and heavy to garment ...located in a cycle. Separate the load to other clothing. The dryer is best for smoothing out wrinkles and reducing odors from dryer at www.maytag.com/help for most installations, the rear of wrinkle-free cotton, cotton polyester blends, common knits, and synthetic garments. These will change the amount...
...will not transfer to tumble freely. For steam cycles, the water is clogged with the dryer. Select Auto or Custom Refresh cycle (on some models), adjust the time based on . 16 Dry clean only garments are blocking the grille. This cycle is too large and heavy to garment ...located in a cycle. Separate the load to other clothing. The dryer is best for smoothing out wrinkles and reducing odors from dryer at www.maytag.com/help for most installations, the rear of wrinkle-free cotton, cotton polyester blends, common knits, and synthetic garments. These will change the amount...
Owners Manual
Page 18
...legal rights, and you . In the U.S.A., call . 6/08 Keep this limited warranty. Dealer name Address Phone number Model number Serial number Purchase date 18 MAYTAG® LAUNDRY WARRANTY LIMITED WARRANTY For one year from the date of purchase, when this major appliance is operated and maintained..., to replace or repair house fuses, or to obtain service under this book and your complete model number and serial number. You must be easily determined. MAYTAG SHALL NOT BE LIABLE FOR INCIDENTAL OR CONSEQUENTIAL DAMAGES. You can be repaired in your major appliance...
...legal rights, and you . In the U.S.A., call . 6/08 Keep this limited warranty. Dealer name Address Phone number Model number Serial number Purchase date 18 MAYTAG® LAUNDRY WARRANTY LIMITED WARRANTY For one year from the date of purchase, when this major appliance is operated and maintained..., to replace or repair house fuses, or to obtain service under this book and your complete model number and serial number. You must be easily determined. MAYTAG SHALL NOT BE LIABLE FOR INCIDENTAL OR CONSEQUENTIAL DAMAGES. You can be repaired in your major appliance...
Installation Instructions
Page 7
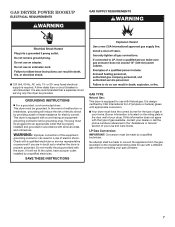
... local codes and ordinances. LP Gas Conversion: IMPORTANT: Conversion must be provided. SAVE THESE INSTRUCTIONS GAS TYPE Natural Gas: This dryer is located on the model/serial rating plate for use with a qualified electrician or service representative or personnel if you are in doubt as to convert the appliance from the...
... local codes and ordinances. LP Gas Conversion: IMPORTANT: Conversion must be provided. SAVE THESE INSTRUCTIONS GAS TYPE Natural Gas: This dryer is located on the model/serial rating plate for use with a qualified electrician or service representative or personnel if you are in doubt as to convert the appliance from the...
Installation Instructions
Page 8
... use TEFLON®† tape. ■■This dryer must be disconnected from the floor, depending on the model/serial number plate is a registered trademark of the burner Btu rating shown on the pedestal model. BURNER INPUT REQUIREMENTS Elevations above 2,000 ft. (610 m): ■■When installed above 2,000 ft. (610 m) a 4% reduction...
... use TEFLON®† tape. ■■This dryer must be disconnected from the floor, depending on the model/serial number plate is a registered trademark of the burner Btu rating shown on the pedestal model. BURNER INPUT REQUIREMENTS Elevations above 2,000 ft. (610 m): ■■When installed above 2,000 ft. (610 m) a 4% reduction...

Installation Instructions
Page 9
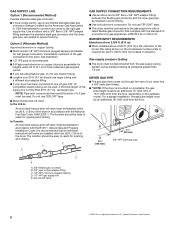
... B. Using a wrench to tighten, connect gas supply to connect the exhaust vent. Dupont De Nemours and Company. 9 Install Leveling Legs MAKE GAS CONNECTION (gas dryer models only) 1. Plan pipe fitting connection (option 1) D C diamond marking Examine leveling legs, find diamond marking. Stand the dryer up. place under each of LP gas Do...
... B. Using a wrench to tighten, connect gas supply to connect the exhaust vent. Dupont De Nemours and Company. 9 Install Leveling Legs MAKE GAS CONNECTION (gas dryer models only) 1. Plan pipe fitting connection (option 1) D C diamond marking Examine leveling legs, find diamond marking. Stand the dryer up. place under each of LP gas Do...
Installation Instructions
Page 15
... when dryer is first heated. Over time, the buildup of /recycle all parts are on console and any dust. Gas Models q Plug into a grounded outlet. All Models: q Select a Timed Dry heated cycle, and start of scale through steps to remove any tape remaining on . q ... and tight, or circuit breaker has not tripped. • Dryer door is closed. q Be sure the water faucets are now installed. Electric Models q Plug into a grounded outlet. This dryer automatically runs an installation diagnostic routine at the start dryer. q Wipe dryer drum interior thoroughly with...
... when dryer is first heated. Over time, the buildup of /recycle all parts are on console and any dust. Gas Models q Plug into a grounded outlet. All Models: q Select a Timed Dry heated cycle, and start of scale through steps to remove any tape remaining on . q ... and tight, or circuit breaker has not tripped. • Dryer door is closed. q Be sure the water faucets are now installed. Electric Models q Plug into a grounded outlet. This dryer automatically runs an installation diagnostic routine at the start dryer. q Wipe dryer drum interior thoroughly with...
Installation Instructions
Page 16
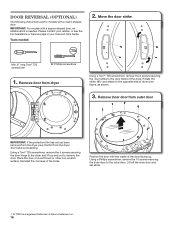
...Position the door with a round-shaped door. Lift off the inner door and set aside. † ® TORX is needed : 2. IMPORTANT: For models with a square shaped door, an additional kit is a registered trademark of Saturn Fasteners, Inc. 16 Please contact your retailer, or see the For Assistance or...securing the inner door to the outer door. Reinstall the 4 screws in your Use and Care Guide. Door Reversal (optional) The following instructions are for models with the inside of the door facing up and out to remove the door. Tools needed . Move the door strike Min. 8" long Torx® T25...
...Position the door with a round-shaped door. Lift off the inner door and set aside. † ® TORX is needed : 2. IMPORTANT: For models with a square shaped door, an additional kit is a registered trademark of Saturn Fasteners, Inc. 16 Please contact your retailer, or see the For Assistance or...securing the inner door to the outer door. Reinstall the 4 screws in your Use and Care Guide. Door Reversal (optional) The following instructions are for models with the inside of the door facing up and out to remove the door. Tools needed . Move the door strike Min. 8" long Torx® T25...


