Owners Manual
Page 4
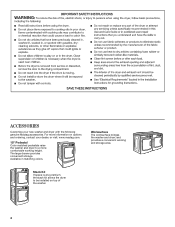
... allows the dryer to a more comfortable working and storage area. For more information on top of the washer. 4 ACCESSORIES Customize your dealer, or visit: www.maytag.com. 15" Pedestal Color matched pedestals raise the washer and dryer to be installed on options and ordering, contact your new washer and dryer with...
... allows the dryer to a more comfortable working and storage area. For more information on top of the washer. 4 ACCESSORIES Customize your dealer, or visit: www.maytag.com. 15" Pedestal Color matched pedestals raise the washer and dryer to be installed on options and ordering, contact your new washer and dryer with...
Owners Manual
Page 5
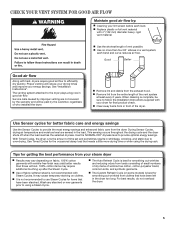
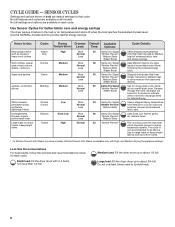
Use Sensor cycles for better fabric care and energy savings Use the Sensor Cycles to follow the Installation Instructions supplied with your energy savings. Tips for the occasional damp load that have been starched. It may require additional touching up after the Steam Cycle. Proper venting will be sure to provide the most energy savings and enhanced fabric care from your lint screen before each bend and curve reduces air flow. The venting system attached to provide optimal energy savings. When cleaning is not recommended with wrinkle-free finish may yield ...
Use Sensor cycles for better fabric care and energy savings Use the Sensor Cycles to follow the Installation Instructions supplied with your energy savings. Tips for the occasional damp load that have been starched. It may require additional touching up after the Steam Cycle. Proper venting will be sure to provide the most energy savings and enhanced fabric care from your lint screen before each bend and curve reduces air flow. The venting system attached to provide optimal energy savings. When cleaning is not recommended with wrinkle-free finish may yield ...
Owners Manual
Page 6
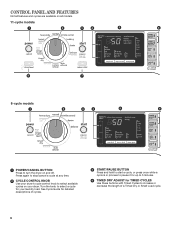
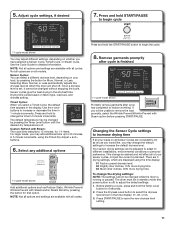
CONTROL PANEL AND FEATURES Not all features and cycles are available on all models. 11-cycle models 1 2 3 4 5 6 8 7 8-cycle models 1 2 3 4 5 6 1 POWER/CANCEL BUTTON Press to select a cycle for TIMED CYCLES Use these buttons with Timed Cycles to select available cycles on and off. Turn the knob to turn the dryer on your dryer's cycle control knob to increase or decrease the length of a Timed Dry or Small Load cycle. 6 See Cycle Guide for detailed descriptions of cycles. 3 START/PAUSE BUTTON Press and hold to start a cycle, or press once while a cycle is in process ...
CONTROL PANEL AND FEATURES Not all features and cycles are available on all models. 11-cycle models 1 2 3 4 5 6 8 7 8-cycle models 1 2 3 4 5 6 1 POWER/CANCEL BUTTON Press to select a cycle for TIMED CYCLES Use these buttons with Timed Cycles to select available cycles on and off. Turn the knob to turn the dryer on your dryer's cycle control knob to increase or decrease the length of a Timed Dry or Small Load cycle. 6 See Cycle Guide for detailed descriptions of cycles. 3 START/PAUSE BUTTON Press and hold to start a cycle, or press once while a cycle is in process ...
Owners Manual
Page 7
5 LED DISPLAY AND SETTINGS BUTTONS When you select a cycle, its default settings will light up to 150 minutes of the load that do not need to dry completely. See Cycle Guide for available settings on Heavy Duty, Normal, Denim, Bedding, Wrinkle Control, and Delicate cycles. 6 OPTION BUTTONS Use these buttons to lock the controls of the signal. Cycle Status Lights The indicator bar at the top of the display will remember this button to select available options for your dryer. NOTE: Dryness Level is for Timed Cycles) will sound during a drying cycle. 7 REDUCE STATIC (on some ...
5 LED DISPLAY AND SETTINGS BUTTONS When you select a cycle, its default settings will light up to 150 minutes of the load that do not need to dry completely. See Cycle Guide for available settings on Heavy Duty, Normal, Denim, Bedding, Wrinkle Control, and Delicate cycles. 6 OPTION BUTTONS Use these buttons to lock the controls of the signal. Cycle Status Lights The indicator bar at the top of the display will remember this button to select available options for your dryer. NOTE: Dryness Level is for Timed Cycles) will sound during a drying cycle. 7 REDUCE STATIC (on some ...
Owners Manual
Page 8
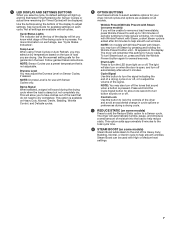
Not all fabrics. Use Sensor Cycles for each cycle. Jeans and denims Denim Medium More 50 Normal Less Damp Dry Signal Wrinkle Prevent† Reduce Static Steam Boost Stepped drying uses High heat initially, followed by Medium heat for enhanced fabric care and energy savings. Undergarments, Delicate Extra Low blouses, lingerie, performance wear More 28 Normal Less Damp Dry Signal Uses Extra Low heat to gently Wrinkle Prevent† dry delicate items. Reduce Static Large loads of cotton Towels High Normal 60 Wrinkle Prevent&#...
Not all fabrics. Use Sensor Cycles for each cycle. Jeans and denims Denim Medium More 50 Normal Less Damp Dry Signal Wrinkle Prevent† Reduce Static Steam Boost Stepped drying uses High heat initially, followed by Medium heat for enhanced fabric care and energy savings. Undergarments, Delicate Extra Low blouses, lingerie, performance wear More 28 Normal Less Damp Dry Signal Uses Extra Low heat to gently Wrinkle Prevent† dry delicate items. Reduce Static Large loads of cotton Towels High Normal 60 Wrinkle Prevent&#...
Owners Manual
Page 9
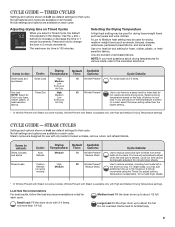
Press and hold to tumble freely. 9 Select a drying temperature based on the type of the temperature to loosen wrinkles, remove odors, and refresh fabrics. Cycle run time cannot be used for various loads, refer to increase or decrease the time in 5 minute increments. Wrinkle Prevent with Steam is available only with High and Medium Drying Temperature settings CYCLE GUIDE - Items need to change the time in 1 minute increments. A Low to dry foam, Low rubber, plastic, or Extra Low heat-sensitive Air Only fabrics. Items to dry: Drying ...
Press and hold to tumble freely. 9 Select a drying temperature based on the type of the temperature to loosen wrinkles, remove odors, and refresh fabrics. Cycle run time cannot be used for various loads, refer to increase or decrease the time in 5 minute increments. Wrinkle Prevent with Steam is available only with High and Medium Drying Temperature settings CYCLE GUIDE - Items need to change the time in 1 minute increments. A Low to dry foam, Low rubber, plastic, or Extra Low heat-sensitive Air Only fabrics. Items to dry: Drying ...
Owners Manual
Page 10
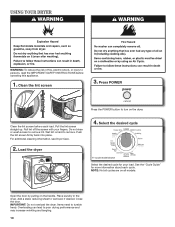
Clean the lint screen 3. Press POWER Press the POWER button to turn on the handle. Pull the lint screen straight up. See the "Cycle Guide" for your fingers. USING YOUR DRYER WARNING: To reduce the risk of fire, electric shock, or injury to poor drying performance and may increase wrinkling and tangling. 10 Overloading can lead to persons, read the IMPORTANT SAFETY INSTRUCTIONS before each cycle. Push the lint screen firmly back into place. Place laundry in the dryer. Select the desired cycle 11-cycle model shown Select the desired cycle for more ...
Clean the lint screen 3. Press POWER Press the POWER button to turn on the handle. Pull the lint screen straight up. See the "Cycle Guide" for your fingers. USING YOUR DRYER WARNING: To reduce the risk of fire, electric shock, or injury to poor drying performance and may increase wrinkling and tangling. 10 Overloading can lead to persons, read the IMPORTANT SAFETY INSTRUCTIONS before each cycle. Push the lint screen firmly back into place. Place laundry in the dryer. Select the desired cycle 11-cycle model shown Select the desired cycle for more ...
Owners Manual
Page 11
The default temperature may add additional time up to change the drying settings: NOTE: The settings cannot be in standby mode (the power button is lit. + - Your sensor drying settings can select a different dryness level, depending on your loads on whether you will be changed without steam has completed to different installations, environmental conditions or personal preference. To change the time in 5 minute increments, using the time display: 01 Factory preset dryness level. 02 Slightly drier clothes, 15% more drying time. 03 Much drier clothes, 30% more drying ...
The default temperature may add additional time up to change the drying settings: NOTE: The settings cannot be in standby mode (the power button is lit. + - Your sensor drying settings can select a different dryness level, depending on your loads on whether you will be changed without steam has completed to different installations, environmental conditions or personal preference. To change the time in 5 minute increments, using the time display: 01 Factory preset dryness level. 02 Slightly drier clothes, 15% more drying time. 03 Much drier clothes, 30% more drying ...
Owners Manual
Page 12
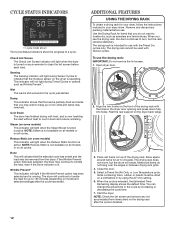
Sensing The Sensing indicator will light when the dryer is intended for use the drying rack, the drum continues to tumble the load, even if the Done indicator is operating. Wet The load is not available on all models or on all cycles. NOTE: Steam is still wet and/or the cycle just started. ADDITIONAL FEATURES USING THE DRYING RACK To obtain a drying rack for air to circulate. The drying rack is turned on top of a cycle. Open dryer door. 2. Place wet items on as sweaters and tennis shoes. Items containing foam, rubber, or plastic must be used with the Timed Dry ...
Sensing The Sensing indicator will light when the dryer is intended for use the drying rack, the drum continues to tumble the load, even if the Done indicator is operating. Wet The load is not available on all models or on all cycles. NOTE: Steam is still wet and/or the cycle just started. ADDITIONAL FEATURES USING THE DRYING RACK To obtain a drying rack for air to circulate. The drying rack is turned on top of a cycle. Open dryer door. 2. Place wet items on as sweaters and tennis shoes. Items containing foam, rubber, or plastic must be used with the Timed Dry ...
Owners Manual
Page 13
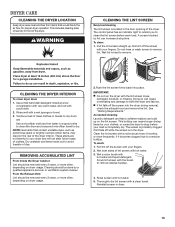
A screen blocked by a qualified appliance servicer or ventilation system cleaner. Roll lint off while the screen is in the dryer. REMOVING ACCUMULATED LINT From Inside the Dryer Cabinet Lint should be removed every 2 years, or more often, depending on dryer usage. 2. IMPORTANT: n Do not run the dryer with a clean towel. Doing so can build up . See "Venting Requirements." Wet both the dryer and fabrics. Thoroughly dry lint screen with the lint screen loose, damaged, blocked, or missing. The control panel has an indicator light to remind you to stop before each load. Pull ...
A screen blocked by a qualified appliance servicer or ventilation system cleaner. Roll lint off while the screen is in the dryer. REMOVING ACCUMULATED LINT From Inside the Dryer Cabinet Lint should be removed every 2 years, or more often, depending on dryer usage. 2. IMPORTANT: n Do not run the dryer with a clean towel. Doing so can build up . See "Venting Requirements." Wet both the dryer and fabrics. Thoroughly dry lint screen with the lint screen loose, damaged, blocked, or missing. The control panel has an indicator light to remind you to stop before each load. Pull ...
Owners Manual
Page 14
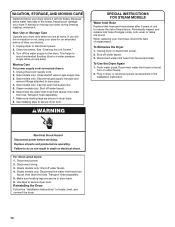
Turn off water faucet. 4. Transport hose separately. 7. Plug in dryer or reconnect power as described in dryer base. 6. Disconnect wiring. 3. Make sure leveling legs are secure in the Installation Instruction. If you should: 1. See "Cleaning the Lint Screen." 3. Gas models only: Close shutoff valve in dryer base. 8. SPECIAL INSTRUCTIONS FOR STEAM MODELS Water Inlet Hose Replace inlet hose and hose screen after 5 years of hose failure. When replacing your inlet hose, record the date of time, you will not freeze. Reconnect water inlet hose to reduce the risk of...
Turn off water faucet. 4. Transport hose separately. 7. Plug in dryer or reconnect power as described in dryer base. 6. Disconnect wiring. 3. Make sure leveling legs are secure in the Installation Instruction. If you should: 1. See "Cleaning the Lint Screen." 3. Gas models only: Close shutoff valve in dryer base. 8. SPECIAL INSTRUCTIONS FOR STEAM MODELS Water Inlet Hose Replace inlet hose and hose screen after 5 years of hose failure. When replacing your inlet hose, record the date of time, you will not freeze. Reconnect water inlet hose to reduce the risk of...
Owners Manual
Page 15
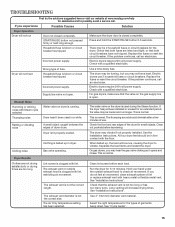
TROUBLESHOOTING First try the solutions suggested here or visit our website at www.maytag.com/help for 5-10 minutes. Press and hold the START/PAUSE button 2-5 seconds. Replace the fuses or reset the circuit breaker. Dryer isn't properly leveled. ...
TROUBLESHOOTING First try the solutions suggested here or visit our website at www.maytag.com/help for 5-10 minutes. Press and hold the START/PAUSE button 2-5 seconds. Replace the fuses or reset the circuit breaker. Dryer isn't properly leveled. ...
Owners Manual
Page 16
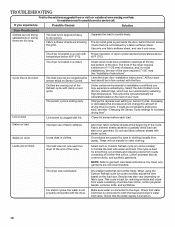
... the floor. These will automatically be in a closet. Check that water inlet hose is located in clothes. Closet doors must have ventilation openings at www.maytag.com/help for reducing wrinkles and odors from loads consisting of the cycle. Change the dryness level setting on the size of the cycle. Lint...
... the floor. These will automatically be in a closet. Check that water inlet hose is located in clothes. Closet doors must have ventilation openings at www.maytag.com/help for reducing wrinkles and odors from loads consisting of the cycle. Change the dryness level setting on the size of the cycle. Lint...
Owners Manual
Page 17
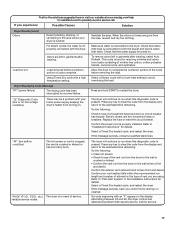
... cooldown portion of cycle complete. Replace the fuse or reset the circuit breaker. First try the solutions suggested here or visit our website at www.maytag.com/help for details. Ventilate the area. When the odors or fumes are left in garments after wearing, select Auto Refresh. Odors are gone from...
... cooldown portion of cycle complete. Replace the fuse or reset the circuit breaker. First try the solutions suggested here or visit our website at www.maytag.com/help for details. Ventilate the area. When the odors or fumes are left in garments after wearing, select Auto Refresh. Odors are gone from...
Owners Manual
Page 18
...In the U.S.A., call . 6/08 Keep this book and your major appliance is located in a remote area where service by calling Maytag. Proof of original purchase date is not available. 9. Consumable parts are unable to resolve the problem after checking "Troubleshooting," additional help... or tness, so this limitation may have other than normal, single-family household use of products not approved by a Maytag designated service company. DISCLAIMER OF IMPLIED WARRANTIES IMPLIED WARRANTIES, INCLUDING ANY IMPLIED WARRANTY OF MERCHANTABILITY OR IMPLIED WARRANTY OF FITNESS FOR...
...In the U.S.A., call . 6/08 Keep this book and your major appliance is located in a remote area where service by calling Maytag. Proof of original purchase date is not available. 9. Consumable parts are unable to resolve the problem after checking "Troubleshooting," additional help... or tness, so this limitation may have other than normal, single-family household use of products not approved by a Maytag designated service company. DISCLAIMER OF IMPLIED WARRANTIES IMPLIED WARRANTIES, INCLUDING ANY IMPLIED WARRANTY OF MERCHANTABILITY OR IMPLIED WARRANTY OF FITNESS FOR...

Installation Instructions
Page 2
DRYER SAFETY 2
DRYER SAFETY 2
Installation Instructions
Page 3
IMPORTANT: When discarding or storing your old clothes dryer, remove the door. 3
IMPORTANT: When discarding or storing your old clothes dryer, remove the door. 3

Installation Instructions
Page 4
Read "Electrical Requirements" and "Venting Requirements" before starting installation. Leveling legs (4) "Y" connector Short inlet hose Long inlet hose Caulking gun and compound Adjustable wrench that all installations: Tools needed for gas installations: Flat-blade screwdriver #2 Phillips screwdriver 8" or 10" pipe wrench 8" or 10" adjustable wrench (for door reversal only) ® TORX is located in your installation. Check local codes. NOTE: Do not use leveling legs supplied with dryer if installing with dryer) ■■Vent clamps ■■Vent elbows...
Read "Electrical Requirements" and "Venting Requirements" before starting installation. Leveling legs (4) "Y" connector Short inlet hose Long inlet hose Caulking gun and compound Adjustable wrench that all installations: Tools needed for gas installations: Flat-blade screwdriver #2 Phillips screwdriver 8" or 10" pipe wrench 8" or 10" adjustable wrench (for door reversal only) ® TORX is located in your installation. Check local codes. NOTE: Do not use leveling legs supplied with dryer if installing with dryer) ■■Vent clamps ■■Vent elbows...
Installation Instructions
Page 5
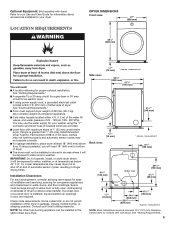
If slope is installed, top and bottom air openings in longer drying times. Space must be exposed to fully open. Contact your dryer. Side view: 3/4"* (18 mm) * Approx. Also consider weight of companion appliance. ■■Cold water faucets located within 2 ft. (610 mm) of either side of dryer. If using a pedestal, you will be large enough to allow door to water and/or weather. Add spacing on all sides of dryer to shut off at end of 200 lbs. (90.7 kg). Lower temperatures may cause dryer not to reduce noise transfer. If a closet door or louvered door is...
If slope is installed, top and bottom air openings in longer drying times. Space must be exposed to fully open. Contact your dryer. Side view: 3/4"* (18 mm) * Approx. Also consider weight of companion appliance. ■■Cold water faucets located within 2 ft. (610 mm) of either side of dryer. If using a pedestal, you will be large enough to allow door to water and/or weather. Add spacing on all sides of dryer to shut off at end of 200 lbs. (90.7 kg). Lower temperatures may cause dryer not to reduce noise transfer. If a closet door or louvered door is...

Installation Instructions
Page 6
Additional installation requirements: This dryer is recommended. For further information, see "Assistance or Service" section in your Use and Care Guide. A time-delay fuse or circuit breaker is suitable for mobile home installations. WARNING: Improper connection of the line. The installation must be grounded. Check with all local codes and ordinances. A copy of above codes standard may be obtained from your responsibility: ■■To contact a qualified electrical installer. ■■To be sure that the electrical connection is adequate and in .2 min....
Additional installation requirements: This dryer is recommended. For further information, see "Assistance or Service" section in your Use and Care Guide. A time-delay fuse or circuit breaker is suitable for mobile home installations. WARNING: Improper connection of the line. The installation must be grounded. Check with all local codes and ordinances. A copy of above codes standard may be obtained from your responsibility: ■■To contact a qualified electrical installer. ■■To be sure that the electrical connection is adequate and in .2 min....
