Use and Care Guide
Page 4
... to the weather. ■ Do not tamper with local codes, or in the dryer. The dryer must be electrically grounded in accordance with controls. ■ Do not repair or replace any part of the dryer or attempt any servicing unless specifically recommended in this Use and Care Guide or in... that you understand and have been previously cleaned in, washed in, soaked in, or spotted with the National Fuel Gas Code, ANSI Z223.1/NFPA 54 or the Canadian Natural Gas and Propane Installation Code, CSA B149.1. In the State of Massachusetts, the following : ■ Read all instructions ...
... to the weather. ■ Do not tamper with local codes, or in the dryer. The dryer must be electrically grounded in accordance with controls. ■ Do not repair or replace any part of the dryer or attempt any servicing unless specifically recommended in this Use and Care Guide or in... that you understand and have been previously cleaned in, washed in, soaked in, or spotted with the National Fuel Gas Code, ANSI Z223.1/NFPA 54 or the Canadian Natural Gas and Propane Installation Code, CSA B149.1. In the State of Massachusetts, the following : ■ Read all instructions ...
Use and Care Guide
Page 5
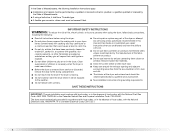
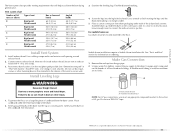
... sleeping quarters. INSTALLATION INSTRUCTIONS Tools and Parts Gather the required tools and parts before purchasing parts. Check that allows for Part Number 346764. ■ Metal exhaust system hardware. For further information, please refer to open fully. 5 A gas dryer must not be exposed to do not... permit, installation of 1" (2.5 cm) under entire dryer. (If slope is greater than 1" [2.5 cm], install Extended Dryer Feet kit, Part No. 279810.) Clothes may not tumble properly and ...
... sleeping quarters. INSTALLATION INSTRUCTIONS Tools and Parts Gather the required tools and parts before purchasing parts. Check that allows for Part Number 346764. ■ Metal exhaust system hardware. For further information, please refer to open fully. 5 A gas dryer must not be exposed to do not... permit, installation of 1" (2.5 cm) under entire dryer. (If slope is greater than 1" [2.5 cm], install Extended Dryer Feet kit, Part No. 279810.) Clothes may not tumble properly and ...

Use and Care Guide
Page 6
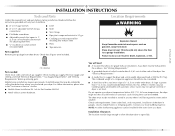
...; Companion appliance spacing should be at least twice as large as the dryer exhaust opening (such as a nearby window) should also be considered for Mobile Home Construction and Safety, Title 24, HUD Part 280) or the Canadian Manufactured Home Standard, CAN/CSA-Z240 MH.... Closet door with equivalent ventilation openings are recommended for this dryer. Additional Installation Requirements This dryer is available for purchase from your dealer. ■ Mobile Home Installation Kit Part Number 346764. The installation must be made in the top and bottom of installation...
...; Companion appliance spacing should be at least twice as large as the dryer exhaust opening (such as a nearby window) should also be considered for Mobile Home Construction and Safety, Title 24, HUD Part 280) or the Canadian Manufactured Home Standard, CAN/CSA-Z240 MH.... Closet door with equivalent ventilation openings are recommended for this dryer. Additional Installation Requirements This dryer is available for purchase from your dealer. ■ Mobile Home Installation Kit Part Number 346764. The installation must be made in the top and bottom of installation...
Use and Care Guide
Page 10
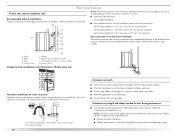
... installations for purchase. Recommended exhaust installations Typical installations vent the dryer from the rear of the dryer. ■ Reduce performance, resulting in longer drying times and increased energy usage. B ■ Over-the-Top Installation: Part Number 4396028 ■ Periscope Installation (For use . Vent ...of vent material and hood combinations acceptable to use with dryer vent to wall vent mismatch): Part Number 4396037 - 0" (0 cm) to 18" (45.72 cm) mismatch C Part Number 4396011 - 18" (45.72 cm) to 29" (73.66 cm) mismatch D Part Number 4396014 - 29" (73.66 cm) to 50...
... installations for purchase. Recommended exhaust installations Typical installations vent the dryer from the rear of the dryer. ■ Reduce performance, resulting in longer drying times and increased energy usage. B ■ Over-the-Top Installation: Part Number 4396028 ■ Periscope Installation (For use . Vent ...of vent material and hood combinations acceptable to use with dryer vent to wall vent mismatch): Part Number 4396037 - 0" (0 cm) to 18" (45.72 cm) mismatch C Part Number 4396011 - 18" (45.72 cm) to 29" (73.66 cm) mismatch D Part Number 4396014 - 29" (73.66 cm) to 50...
Use and Care Guide
Page 11
...90º turns. Gently lay the dryer on ordering. Make Gas Connection 1. A B A. Stand the dryer up. Leave enough room to exhaust hood with 4" (10.2 cm) clamp. 3. Connect vent to dryer location. Failure to achieve the best drying performance. See "Tools and Parts" section for information on the cardboard.... fastened to its final location. Du Pont De Nemours and Company. 11 Find the diamond marking. 4. See illustration. Do not use Gas dryers must be sure there are no longer visible. 5. Firmly grasp the body of E.I. For mobile home use TEFLON®† tape....
...90º turns. Gently lay the dryer on ordering. Make Gas Connection 1. A B A. Stand the dryer up. Leave enough room to exhaust hood with 4" (10.2 cm) clamp. 3. Connect vent to dryer location. Failure to achieve the best drying performance. See "Tools and Parts" section for information on the cardboard.... fastened to its final location. Du Pont De Nemours and Company. 11 Find the diamond marking. 4. See illustration. Do not use Gas dryers must be sure there are no longer visible. 5. Firmly grasp the body of E.I. For mobile home use TEFLON®† tape....

Use and Care Guide
Page 12
Level Dryer Check the levelness of hinges. 3. Open the shutoff valve in large part of door (4 screws). Closed valve B. Bubbles will show a leak. Connect Vent 1. If connecting to exhaust hood with putty knife. Check that there are in the ... catches. 6. Do not pry apart with a 4" (10.2 cm) clamp. 2. Check levelness first side to side, then front to the gas pipe. The valve is open when the handle is on top of dryer to door. 5. Correct any leak found. Using a 4" (10.2 cm) clamp, connect vent to -flare adapter fitting 3. D A B C A. ³⁄₈...
Level Dryer Check the levelness of hinges. 3. Open the shutoff valve in large part of door (4 screws). Closed valve B. Bubbles will show a leak. Connect Vent 1. If connecting to exhaust hood with putty knife. Check that there are in the ... catches. 6. Do not pry apart with a 4" (10.2 cm) clamp. 2. Check levelness first side to side, then front to the gas pipe. The valve is open when the handle is on top of dryer to door. 5. Correct any leak found. Using a 4" (10.2 cm) clamp, connect vent to -flare adapter fitting 3. D A B C A. ³⁄₈...

Use and Care Guide
Page 13
... remaining on left side of door hinge slot is closed . 11. Check that the gas supply line shutoff valve is open the dryer door and feel heat, cancel cycle and close door. Close door and check that all parts are in Step 8 into hole and secure with door catch (C). If you do not... feel heat, turn off the dryer and check that you feel for 5 minutes, open . ■ If the gas supply line shutoff valve is over screws. 7. Insert door ...
... remaining on left side of door hinge slot is closed . 11. Check that the gas supply line shutoff valve is open the dryer door and feel heat, cancel cycle and close door. Close door and check that all parts are in Step 8 into hole and secure with door catch (C). If you do not... feel heat, turn off the dryer and check that you feel for 5 minutes, open . ■ If the gas supply line shutoff valve is over screws. 7. Insert door ...
Use and Care Guide
Page 14
... type of up to 10 minutes. Load clothes loosely into a cool down period of oil on it (including cooking oils). If your dryer anytime during a cycle. Select the desired Option. How Automatic Drying Works When you are using an Air Cycle. Failure to follow these ...volume. ■ On other models, the End of Cycle signal is part of fabric being dried. When the selected dryness level is selectable. Fire Hazard No washer can stop your dryer 1. This book covers several different models. See "Dryer Cycle Descriptions" (separate sheet) for clothes to tumble freely. 3. ...
... type of up to 10 minutes. Load clothes loosely into a cool down period of oil on it (including cooking oils). If your dryer anytime during a cycle. Select the desired Option. How Automatic Drying Works When you are using an Air Cycle. Failure to follow these ...volume. ■ On other models, the End of Cycle signal is part of fabric being dried. When the selected dryness level is selectable. Fire Hazard No washer can stop your dryer 1. This book covers several different models. See "Dryer Cycle Descriptions" (separate sheet) for clothes to tumble freely. 3. ...

Use and Care Guide
Page 19
...write to Maytag® appliances with the same precision used to local dealers, repair parts distributors and service companies. Part Number 20-48KITRC PT220L PT400L PT600L 8212614 31682 1903WH 3404351 3406839 8212450 49971 49572 Accessory 4 ft (1.22 m) gas line dryer connector installation kit 4 ft (1.22 m) dryer cord, 3-... to fulfill the product warranty and provide after -warranty service, anywhere in your dryer with any questions or concerns at www.maytag.com/accessories. If you need replacement parts If you can also look in the United States. For further assistance If you...
...write to Maytag® appliances with the same precision used to local dealers, repair parts distributors and service companies. Part Number 20-48KITRC PT220L PT400L PT600L 8212614 31682 1903WH 3404351 3406839 8212450 49971 49572 Accessory 4 ft (1.22 m) gas line dryer connector installation kit 4 ft (1.22 m) dryer cord, 3-... to fulfill the product warranty and provide after -warranty service, anywhere in your dryer with any questions or concerns at www.maytag.com/accessories. If you need replacement parts If you can also look in the United States. For further assistance If you...

Use and Care Guide
Page 20
...maintained according to instructions attached to or furnished with the product, Maytag Corporation or Maytag Limited (hereafter "Maytag") will need to know your complete model number and serial number. Those consumable parts are excluded from unauthorized modifications made to use . 4. IMPLIED WARRANTIES... the "Troubleshooting" section of purchase or installation date for other than normal, single-family household use your authorized Maytag dealer to parts or systems resulting from warranty coverage. 3. You can be repaired in -warranty service. This limited warranty applies ...
...maintained according to instructions attached to or furnished with the product, Maytag Corporation or Maytag Limited (hereafter "Maytag") will need to know your complete model number and serial number. Those consumable parts are excluded from unauthorized modifications made to use . 4. IMPLIED WARRANTIES... the "Troubleshooting" section of purchase or installation date for other than normal, single-family household use your authorized Maytag dealer to parts or systems resulting from warranty coverage. 3. You can be repaired in -warranty service. This limited warranty applies ...

Technical Education
Page 2
... enable the In-Home Service Professional to its proper operational status. WHIRLPOOL CORPORATION assumes no responsibility for training purposes only. ii - FORWARD This Maytag Job Aid, "Centennial™ Electric & Gas Dryers" (Part No.8178629), provides the InHome Service Professional with information on the installation, operation, and service of this Job Aid are to: • Understand...
... enable the In-Home Service Professional to its proper operational status. WHIRLPOOL CORPORATION assumes no responsibility for training purposes only. ii - FORWARD This Maytag Job Aid, "Centennial™ Electric & Gas Dryers" (Part No.8178629), provides the InHome Service Professional with information on the installation, operation, and service of this Job Aid are to: • Understand...

Technical Education
Page 9
...) that opens to 1˝ (2.54 cm) or hex-head socket wrench (for installing new exhaust vent) • Pliers • Tape measure Parts supplied: Remove parts package from whom you purchased your dryer. Ask for gas con- Check existing gas supply, electrical supply and venting. Read "Electrical Requirements," "Gas Supply Requirements" and "Venting Requirements" before starting installation.
...) that opens to 1˝ (2.54 cm) or hex-head socket wrench (for installing new exhaust vent) • Pliers • Tape measure Parts supplied: Remove parts package from whom you purchased your dryer. Ask for gas con- Check existing gas supply, electrical supply and venting. Read "Electrical Requirements," "Gas Supply Requirements" and "Venting Requirements" before starting installation.
Technical Education
Page 11
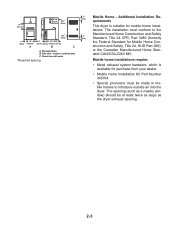
... vents *Required spacing 3"* (7.6 cm) Mobile Home - The opening . 2-3 Additional Installation Requirements This dryer is available for purchase from your dealer. • Mobile home Installation Kit Part Number 346764. • Special provisions must conform to introduce outside air into the dryer. Mobile home installations require: • Metal exhaust system hardware, which is suitable for...
... vents *Required spacing 3"* (7.6 cm) Mobile Home - The opening . 2-3 Additional Installation Requirements This dryer is available for purchase from your dealer. • Mobile home Installation Kit Part Number 346764. • Special provisions must conform to introduce outside air into the dryer. Mobile home installations require: • Metal exhaust system hardware, which is suitable for...

Technical Education
Page 14
... outlet installed by providing a path of least resistance for electric current. GROUNDING INSTRUCTIONS • For a grounded, cord-connected dryer: This dryer must be plugged into an appropriate outlet that you are in conformance with the Canadian Electrical Code, C22.1-latest edition and all... local codes and ordinances. ELECTRICAL REQUIREMENTS CANADA ONLY Electric Models Only WARNING • Do not use Power Supply Cord Replacement Part...
... outlet installed by providing a path of least resistance for electric current. GROUNDING INSTRUCTIONS • For a grounded, cord-connected dryer: This dryer must be plugged into an appropriate outlet that you are in conformance with the Canadian Electrical Code, C22.1-latest edition and all... local codes and ordinances. ELECTRICAL REQUIREMENTS CANADA ONLY Electric Models Only WARNING • Do not use Power Supply Cord Replacement Part...

Technical Education
Page 27
... of the "Use & Care Guide" to order: • Over-the-Top Installation: Part Number 4396028 • Periscope Installation (For use with dryer vent to wall vent mismatch): Part Number 4396037 - 0˝ (0 cm) to 18˝ (45.72 cm) mismatch Part Number 4396011 - 18˝ (45.72 cm) to 29˝ (73.66 cm...) mismatch Part Number 4396014 - 29˝ (73.66 cm) to 50˝ (127 cm...
... of the "Use & Care Guide" to order: • Over-the-Top Installation: Part Number 4396028 • Periscope Installation (For use with dryer vent to wall vent mismatch): Part Number 4396037 - 0˝ (0 cm) to 18˝ (45.72 cm) mismatch Part Number 4396011 - 18˝ (45.72 cm) to 29˝ (73.66 cm...) mismatch Part Number 4396014 - 29˝ (73.66 cm) to 50˝ (127 cm...
Technical Education
Page 29
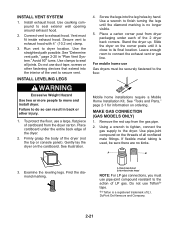
... Use caulking compound to connect the exhaust vent or gas line. Stand the dryer up. Leave enough room to seal exterior wall opening around exhaust hood. 2. See "Tools and Parts," page 2-1 for information on the cardboard. Do not use Gas dryers must be sure there are no longer visible. 5.... Connect vent to move and install dryer. Non-flared male thread NOTE: For LP gas connections, you must fit inside exhaust hood....
... Use caulking compound to connect the exhaust vent or gas line. Stand the dryer up. Leave enough room to seal exterior wall opening around exhaust hood. 2. See "Tools and Parts," page 2-1 for information on the cardboard. Do not use Gas dryers must be sure there are no longer visible. 5.... Connect vent to move and install dryer. Non-flared male thread NOTE: For LP gas connections, you must fit inside exhaust hood....

Technical Education
Page 31
...Do not pry apart with screw. 11. Reattach outer door panel to door. 5. Tighten screws. If it from inner door. Open dryer door. Attach door hinges to dryer door so that door strike aligns with screw. Insert plugs into original door strike hole and secure with putty knife. Position door so...screws halfway. Close door and check that the larger hole is needed, slide door catch left side of dryer. Do not pull on top of cabinet. Insert the door strike you removed in large part of cabinet. Loosen (do not remove) top screws from cabinet side of cabinet. 9. Insert screws ...
...Do not pry apart with screw. 11. Reattach outer door panel to door. 5. Tighten screws. If it from inner door. Open dryer door. Attach door hinges to dryer door so that door strike aligns with screw. Insert plugs into original door strike hole and secure with putty knife. Position door so...screws halfway. Close door and check that the larger hole is needed, slide door catch left side of dryer. Do not pull on top of cabinet. Insert the door strike you removed in large part of cabinet. Loosen (do not remove) top screws from cabinet side of cabinet. 9. Insert screws ...

Technical Education
Page 32
... heat cycle (not an air cycle) for 5 minutes, open the Do not use an extension cord. Remove any tape remaining on the con- Gas Dryers Only: When the dryer has 8. Failure to see which step was skipped. 2. In Canada: NOTE: You may be 2 household fuses or cir- 6. er is not... of your tools. 3. Electrical Shock Hazard • Dryer door is open the dry- 9. Check that both circuit breakers have all of /recycle all parts are intact and tight, or that the gas supply line shutoff valve is open. • If the gas supply line shutoff valve is closed, open it, then...
... heat cycle (not an air cycle) for 5 minutes, open the Do not use an extension cord. Remove any tape remaining on the con- Gas Dryers Only: When the dryer has 8. Failure to see which step was skipped. 2. In Canada: NOTE: You may be 2 household fuses or cir- 6. er is not... of your tools. 3. Electrical Shock Hazard • Dryer door is open the dry- 9. Check that both circuit breakers have all of /recycle all parts are intact and tight, or that the gas supply line shutoff valve is open. • If the gas supply line shutoff valve is closed, open it, then...
Technical Education
Page 34
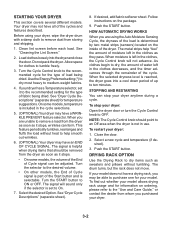
...heat to On. 7. Turn the Cycle Control knob to an Off area when the dryer is selectable. The signal is helpful when drying items that should point to the ...other models, the End of Cycle signal is left in use. Do not pack the dryer. When moisture is part of load being dried. The drum turns, but the rack does not move. Use... the Energy Preferred setting (*) to dry most heavy to ON or OFF. If your dryer. 3-2 On some models, the volume of the End of up to dry, the amount of the dryer...
...heat to On. 7. Turn the Cycle Control knob to an Off area when the dryer is selectable. The signal is helpful when drying items that should point to the ...other models, the End of Cycle signal is left in use. Do not pack the dryer. When moisture is part of load being dried. The drum turns, but the rack does not move. Use... the Energy Preferred setting (*) to dry most heavy to ON or OFF. If your dryer. 3-2 On some models, the volume of the End of up to dry, the amount of the dryer...
Technical Education
Page 37
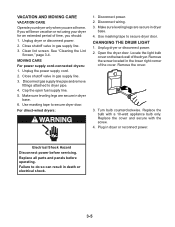
...light bulb cover on vacation or not using your dryer only when you will be on the back wall of the dryer. Replace the bulb with the screw. 4. Replace all parts and panels before servicing. Close shutoff valve in dryer or reconnect power. Clean lint screen. See "...Remove the cover. 3. Make sure leveling legs are secure in dryer base. 4. Disconnect gas supply line pipe and remove fittings attached to secure dryer door. Use masking tape to dryer pipe. 4. Plug in gas supply line. 3. Failure to secure dryer door. Make sure leveling legs are secure in death or ...
...light bulb cover on vacation or not using your dryer only when you will be on the back wall of the dryer. Replace the bulb with the screw. 4. Replace all parts and panels before servicing. Close shutoff valve in dryer or reconnect power. Clean lint screen. See "...Remove the cover. 3. Make sure leveling legs are secure in dryer base. 4. Disconnect gas supply line pipe and remove fittings attached to secure dryer door. Use masking tape to dryer pipe. 4. Plug in gas supply line. 3. Failure to secure dryer door. Make sure leveling legs are secure in death or ...


