

Use and Care Guide
Page 4
... it shall be exposed to the weather. [] Do not tamper with controls. [] Do not repair or replace any part of the dryer or attempt any servicing unless specifically recommended in this Use and Care Guide or in published user-repair instructions that could cause a load...of Massachusetts. [] If using a ball valve, it will be a T-handle type. [] A flexible gas connector, when used near children. [] Before the dryer is removed from the accumulation of lint, dust, and dirt. [] The interior of the dryer and exhaust vent should be electrically grounded in accordance with local codes, or in the...
... it shall be exposed to the weather. [] Do not tamper with controls. [] Do not repair or replace any part of the dryer or attempt any servicing unless specifically recommended in this Use and Care Guide or in published user-repair instructions that could cause a load...of Massachusetts. [] If using a ball valve, it will be a T-handle type. [] A flexible gas connector, when used near children. [] Before the dryer is removed from the accumulation of lint, dust, and dirt. [] The interior of the dryer and exhaust vent should be electrically grounded in accordance with local codes, or in the...
Use and Care Guide
Page 5
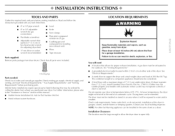
... least 18 inches (46 cm) above the floor for installing new exhaust vent) • Pliers • Tape measure Parts supplied: Remove parts package from dryer. LOCATION REQUIREMENTS I Explosion Hazard Keep flammable materials and vapors, such as a dryer. A gas dryer must be considered. • A level floor with a maximum slope of a companion appliance should also be large enough...
... least 18 inches (46 cm) above the floor for installing new exhaust vent) • Pliers • Tape measure Parts supplied: Remove parts package from dryer. LOCATION REQUIREMENTS I Explosion Hazard Keep flammable materials and vapors, such as a dryer. A gas dryer must be considered. • A level floor with a maximum slope of a companion appliance should also be large enough...
Use and Care Guide
Page 6
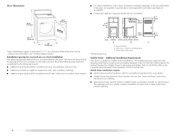
...your dealer. • Mobile Home Installation Kit Part Number 346764. closet or confined area C. Side view - Closet door with vents Mobile Home - Additional Installation Requirements This dryer is aw_ilable for information on all sides of the dryer to reduce noise transfer. *Required spacing B. ...top and bottom of the door are required. [ ouvered doors with equivalent ventilation openings are recommended for this dryer, This dryer has been tested for Mobile Home Construction and Safety, Title 24, HUD Part 280) or the Canadian Manufactured Home Standard, CAN/CSA-Z240 MH.
...your dealer. • Mobile Home Installation Kit Part Number 346764. closet or confined area C. Side view - Closet door with vents Mobile Home - Additional Installation Requirements This dryer is aw_ilable for information on all sides of the dryer to reduce noise transfer. *Required spacing B. ...top and bottom of the door are required. [ ouvered doors with equivalent ventilation openings are recommended for this dryer, This dryer has been tested for Mobile Home Construction and Safety, Title 24, HUD Part 280) or the Canadian Manufactured Home Standard, CAN/CSA-Z240 MH.
Use and Care Guide
Page 10
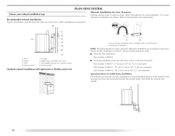
... use with one offset elbow) B. Over-the-top installation (aho available with dryer vent to wall vent mismatch): Part Number 4396037 - 0" (0 cm) to 18" (45.72 cm) mismatch Part Number 4396011 - 18" (45.72 cm) to 29" (73.66 cm) mismatch Part Number 4396014- 29" (73.66 cm) to 50" (127 cm) mismatch Special provisions for...
... use with one offset elbow) B. Over-the-top installation (aho available with dryer vent to wall vent mismatch): Part Number 4396037 - 0" (0 cm) to 18" (45.72 cm) mismatch Part Number 4396011 - 18" (45.72 cm) to 29" (73.66 cm) mismatch Part Number 4396014- 29" (73.66 cm) to 50" (127 cm) mismatch Special provisions for...

Use and Care Guide
Page 11
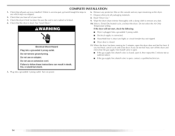
... dryer ...dryer. 2. Secure vent to connect the exhaust vent or gas line. Use clamps to move and install dryer...38 ft (11.6 m/ 19 ft 15.8 m/ 29 ft (8.8 m) 17 ft (5.2 m) 21 ft (6.4 m) 15...Stand the dryer up. ...dryer on the corner posts ...dryer...Gas dryers must fit inside exhaust hood. Screw the legs into the interior of cardboard from dryer packaging under the entire back edge of the dryer.... • Reduce performance, resulting in "Plan Vent System." Connect vent to dryer...dryer back corners. Slide the dryer...
... dryer ...dryer. 2. Secure vent to connect the exhaust vent or gas line. Use clamps to move and install dryer...38 ft (11.6 m/ 19 ft 15.8 m/ 29 ft (8.8 m) 17 ft (5.2 m) 21 ft (6.4 m) 15...Stand the dryer up. ...dryer on the corner posts ...dryer...Gas dryers must fit inside exhaust hood. Screw the legs into the interior of cardboard from dryer packaging under the entire back edge of the dryer.... • Reduce performance, resulting in "Plan Vent System." Connect vent to dryer...dryer back corners. Slide the dryer...

Use and Care Guide
Page 13
...Do not pull on the side where hinges were just removed. 10. Position door so large end of door hinge slot is over towel on dryer, grasp skies of outer door anti gently lift to separate it is needed, slide door catch left side of cabinet, lighten screws halfway. Tighten ...screws, insert and tighten top screws in large part of hinge slot. Open dryer door. Remove door strike plug (B). Attach door hinges to adjust alignment. insert screws into hinge holes on left or right within slot ...
...Do not pull on the side where hinges were just removed. 10. Position door so large end of door hinge slot is over towel on dryer, grasp skies of outer door anti gently lift to separate it is needed, slide door catch left side of cabinet, lighten screws halfway. Tighten ...screws, insert and tighten top screws in large part of hinge slot. Open dryer door. Remove door strike plug (B). Attach door hinges to adjust alignment. insert screws into hinge holes on left or right within slot ...
Use and Care Guide
Page 14
...If the gas supply line shutoff valve is closed . 11. See "level Dryer." 6. If the dryer will not start the dryer. If you do not feel heat, turn off the dryer and check that all packaging materials. 8. If there is not crushed or kinked. 4. Be sure the vent is an extra part, go back...• If the gas supply line shutoff valve is intact and tight, or circuit breaker has not tripped. Check the dryer's final location. Dispose of your tools. 3. Do not use an adapter. When the dryer has been running for heat. [f you have all of /recycle all parts are now installed. ...
...If the gas supply line shutoff valve is closed . 11. See "level Dryer." 6. If the dryer will not start the dryer. If you do not feel heat, turn off the dryer and check that all packaging materials. 8. If there is not crushed or kinked. 4. Be sure the vent is an extra part, go back...• If the gas supply line shutoff valve is intact and tight, or circuit breaker has not tripped. Check the dryer's final location. Dispose of your tools. 3. Do not use an adapter. When the dryer has been running for heat. [f you have all of /recycle all parts are now installed. ...
Use and Care Guide
Page 15
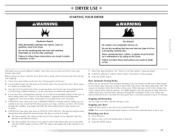
...4. The signal is selectable. Follow instructions on it (including cooking oils). The metal strips help smooth out wrinkles. 6. (OPTIONAL) Your dryer may have an END OF CYCLE SIGNAL. can result in the clothes decreases, and the timer advances through the remainder of fabric being dried...This book covers several different models. The signal will not advance. Select the desired Option. Push the START button. When moisture is part of up to follow these instructions explosion, or fire. If desired, add fabric softener sheet. Failure to 10 minutes. I Fire ...
...4. The signal is selectable. Follow instructions on it (including cooking oils). The metal strips help smooth out wrinkles. 6. (OPTIONAL) Your dryer may have an END OF CYCLE SIGNAL. can result in the clothes decreases, and the timer advances through the remainder of fabric being dried...This book covers several different models. The signal will not advance. Select the desired Option. Push the START button. When moisture is part of up to follow these instructions explosion, or fire. If desired, add fabric softener sheet. Failure to 10 minutes. I Fire ...
Use and Care Guide
Page 20
...service, please check "Troubleshooting." It may save you can write to build every new MAYTAG _ appliance. [b locate factory specified parts in your correspondence. 20 If you need replacement parts If you need further assistance, you the cost of appliances. • Use and ...maintenance procedures. • Accessory and repair parts sales. • Referrals to local dealers, repair parts distributors and service companies. Call the Maytag Services, LI.C Customer Assistance toll free: 1-800-688-9900. Whirlpool Canada LP designated...
...service, please check "Troubleshooting." It may save you can write to build every new MAYTAG _ appliance. [b locate factory specified parts in your correspondence. 20 If you need replacement parts If you need further assistance, you the cost of appliances. • Use and ...maintenance procedures. • Accessory and repair parts sales. • Referrals to local dealers, repair parts distributors and service companies. Call the Maytag Services, LI.C Customer Assistance toll free: 1-800-688-9900. Whirlpool Canada LP designated...
Use and Care Guide
Page 21
... in -warranty service. You must be found by checking the "Assistance or Service" section or by calling Maytag. You will pay for in remote locations. 10. Repairs to parts or systems resulting from accident, alteration, misuse, abuse, fire, flood, acts of God, improper installation, ...REPAIR AS PROVIDED HEREIN. In Canada, call f-800-688-9900. Service must provide proof of products not approved by a Maytag designated service company. Replacement parts or repair labor costs when the major appliance is used in a country other than the country in materials or workmanship. ...
... in -warranty service. You must be found by checking the "Assistance or Service" section or by calling Maytag. You will pay for in remote locations. 10. Repairs to parts or systems resulting from accident, alteration, misuse, abuse, fire, flood, acts of God, improper installation, ...REPAIR AS PROVIDED HEREIN. In Canada, call f-800-688-9900. Service must provide proof of products not approved by a Maytag designated service company. Replacement parts or repair labor costs when the major appliance is used in a country other than the country in materials or workmanship. ...


