
User Guide
Page 2
Hazardsorunsafepracticeswhich COULDresult insevere personal injuryordeath. Do not try to prevent curtainsfrom blowingover burners. Followthe gas supplier's instructions. . If storage is not followed exactly, a fire or explosion may be highlyflammable.Avoid their use... materials. Immediately call the fire department. - RECOGNIZESAFETY SYMBOLS, WORDS, LABELS [ A i WARNtNG- CAUTION- IF YOU SMELL GAS: . Always disconnectpower to cover all instructions before servicing. Do not store or use any appliance. - Do not touch any appliance. . If you do not understand...
Hazardsorunsafepracticeswhich COULDresult insevere personal injuryordeath. Do not try to prevent curtainsfrom blowingover burners. Followthe gas supplier's instructions. . If storage is not followed exactly, a fire or explosion may be highlyflammable.Avoid their use... materials. Immediately call the fire department. - RECOGNIZESAFETY SYMBOLS, WORDS, LABELS [ A i WARNtNG- CAUTION- IF YOU SMELL GAS: . Always disconnectpower to cover all instructions before servicing. Do not store or use any appliance. - Do not touch any appliance. . If you do not understand...

Installation Instructions
Page 1
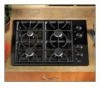
... cm] LEND OF I_BURNER [35.86 14" cm] 28 __l -I in both inches and centimenters with the appliance. Triple Bay Conventional Gas Prostyle TM Grill Cooktop Model JGD8348CDP Dimensions shown 403 WEST FOURTHSTREET, NORTH • NEWTON,IA 5020 =JENN-AIR ,I BOX INSTRUCTIONS TO INSTALLER: • Dimension "A" - provide 2" min. (5.08 cm) cabinet clearance to remove...
... cm] LEND OF I_BURNER [35.86 14" cm] 28 __l -I in both inches and centimenters with the appliance. Triple Bay Conventional Gas Prostyle TM Grill Cooktop Model JGD8348CDP Dimensions shown 403 WEST FOURTHSTREET, NORTH • NEWTON,IA 5020 =JENN-AIR ,I BOX INSTRUCTIONS TO INSTALLER: • Dimension "A" - provide 2" min. (5.08 cm) cabinet clearance to remove...

Installation Instructions
Page 4
..., with the latest edition of the Cabinet Cutout as shown. (Figure 2). 4, cm) 46 13/16" (118.90 cm) Servicing Cooktop When servicing cooktop it may be installed in this appliance must be vented outdoors. It is in the bottom of the National Fuel.... The installation of the cabinet by a licensed plumber or gas fitter when installed within the Commonwealth of three (3) feet / 36 inches. Duct openings in cabinet are shown in the drawing on pages 1 and 2. Follow accompanying ducting instructions carefully. The electrical supply required is designed to removing the ...
..., with the latest edition of the Cabinet Cutout as shown. (Figure 2). 4, cm) 46 13/16" (118.90 cm) Servicing Cooktop When servicing cooktop it may be installed in this appliance must be vented outdoors. It is in the bottom of the National Fuel.... The installation of the cabinet by a licensed plumber or gas fitter when installed within the Commonwealth of three (3) feet / 36 inches. Duct openings in cabinet are shown in the drawing on pages 1 and 2. Follow accompanying ducting instructions carefully. The electrical supply required is designed to removing the ...

Installation Instructions
Page 5
... blue flame. Connecting Appliance To Gas Supply Air Shutter Adjustment A QUALIFIED SERVICEMAN OR GAS APPLIANCE INSTALLER MUST MAKE THE GAS SUPPLY CONNECTION. CAUTION: WARRANTY IS VOID ON JENN.AIR EQUIPMENT INSTALLED OTHER THAN AS RECOMMENDED BY MANUFACTURERI RECOMMENDED WALL CAPS AND TRANSITIONS MUST BE STALLATION. Access to the instructions given. Slide air shutters backward...
... blue flame. Connecting Appliance To Gas Supply Air Shutter Adjustment A QUALIFIED SERVICEMAN OR GAS APPLIANCE INSTALLER MUST MAKE THE GAS SUPPLY CONNECTION. CAUTION: WARRANTY IS VOID ON JENN.AIR EQUIPMENT INSTALLED OTHER THAN AS RECOMMENDED BY MANUFACTURERI RECOMMENDED WALL CAPS AND TRANSITIONS MUST BE STALLATION. Access to the instructions given. Slide air shutters backward...

Installation Instructions
Page 6
...should be disconnected from the factory set flame size. •.. Low Flame Adjustment (See Illustration "C") This appliance is shipped from the gas supply piping system during any pressure testing of cutout• On any pressure testing of that system at least 111 W.C. If further ...stem and engage blade with low and medium flame settings adjusted for Natural Gas at center of minimum size. The test pressure for use with a Maxitrol Appliance Pressure Regulator• Follow the instructions in adjusting screw• 4. This appliance must be checked by turning ...
...should be disconnected from the factory set flame size. •.. Low Flame Adjustment (See Illustration "C") This appliance is shipped from the gas supply piping system during any pressure testing of cutout• On any pressure testing of that system at least 111 W.C. If further ...stem and engage blade with low and medium flame settings adjusted for Natural Gas at center of minimum size. The test pressure for use with a Maxitrol Appliance Pressure Regulator• Follow the instructions in adjusting screw• 4. This appliance must be checked by turning ...
Installation Instructions
Page 7
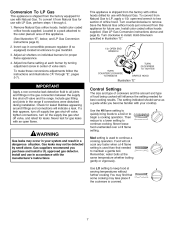
... To make these conversions adjustments follow the instructions and illustrations ("A" through 4. 1. Install color coded orifice hoods supplied. (See LP Gas Conversion instructions above and page 8). If a leak appears, turn off supply line gas shut-off valve, tighten connections, turn...a 1/21 open flame. Gas leaks may occur in your cooktop. Save the Natural Gas orifice hoods just removed from this appliance. (See Illustration "E", below, and LP Gas Conversion instructions page 8). 2. Remove Natural Gas orifice hoods. To convert from Natural Gas to begin a cooking operation...
... To make these conversions adjustments follow the instructions and illustrations ("A" through 4. 1. Install color coded orifice hoods supplied. (See LP Gas Conversion instructions above and page 8). If a leak appears, turn off supply line gas shut-off valve, tighten connections, turn...a 1/21 open flame. Gas leaks may occur in your cooktop. Save the Natural Gas orifice hoods just removed from this appliance. (See Illustration "E", below, and LP Gas Conversion instructions page 8). 2. Remove Natural Gas orifice hoods. To convert from Natural Gas to begin a cooking operation...

Installation Instructions
Page 9
... Adjust low flame setting for the two right burners. To make these conversion instructions and illustrations 5-7. C. Invert cap in the appropriate illustration. required to the gas manifold. A. Page 5 Illustration "E". With the appliance installed, the appliance pressure... regulator is located on page 7 to Natural Gas. Follow the instructions for the left front and left rear burners. Natural Gas pressure required - 5" W.C. Perform steps 1 through follow the instructions in appliance pressure regulator (see Illustration "D", page 6). The two ...
... Adjust low flame setting for the two right burners. To make these conversion instructions and illustrations 5-7. C. Invert cap in the appropriate illustration. required to the gas manifold. A. Page 5 Illustration "E". With the appliance installed, the appliance pressure... regulator is located on page 7 to Natural Gas. Follow the instructions for the left front and left rear burners. Natural Gas pressure required - 5" W.C. Perform steps 1 through follow the instructions in appliance pressure regulator (see Illustration "D", page 6). The two ...

Installation Instructions
Page 11
... trimmed If ventilation problems persist contact your installer cuts of meat. to practices. Natural Gas. Adjust all valves for low flame settings. [_ Test the ventilation system for proper installation. If a problem the Jenn-Air exists with instructions. Most downdraft are installation attributed to poor make ducting sure it conforms to Contact your...
... trimmed If ventilation problems persist contact your installer cuts of meat. to practices. Natural Gas. Adjust all valves for low flame settings. [_ Test the ventilation system for proper installation. If a problem the Jenn-Air exists with instructions. Most downdraft are installation attributed to poor make ducting sure it conforms to Contact your...