Owners Manual
Page 1
... read and keep this guide. Important Safety Instructions . .1-3 Surface Cooking 4-5 Model Number Serial Number Date of purchase. Form No. Printed in U.S.A. U ' G SER S PRECAUCIÓN UIDE Gas Cooktop Installer: Please leave this manual with this appliance. A/01/08 Part No. 8111P524-60 © 2006 Maytag Appliances Sales Co.
... read and keep this guide. Important Safety Instructions . .1-3 Surface Cooking 4-5 Model Number Serial Number Date of purchase. Form No. Printed in U.S.A. U ' G SER S PRECAUCIÓN UIDE Gas Cooktop Installer: Please leave this manual with this appliance. A/01/08 Part No. 8111P524-60 © 2006 Maytag Appliances Sales Co.
Owners Manual
Page 2
... manufacturer about problems or conditions you purchase and install an UL approved gas detector. Install and use gasoline or other flammable vapors and liquids in an emergency. Avoid their use any items on the cooktop as a result of improper usage of the appliance that may cause ... may increase pressure in an area subjected to adjust, repair, service, or replace any appliance. - Do not leave plastic items on the cooktop. Always contact your appliance unless it is provided, it . Use appliance only for some items, such as described in minor personal injury. ...
... manufacturer about problems or conditions you purchase and install an UL approved gas detector. Install and use gasoline or other flammable vapors and liquids in an emergency. Avoid their use any items on the cooktop as a result of improper usage of the appliance that may cause ... may increase pressure in an area subjected to adjust, repair, service, or replace any appliance. - Do not leave plastic items on the cooktop. Always contact your appliance unless it is provided, it . Use appliance only for some items, such as described in minor personal injury. ...
Owners Manual
Page 3
A faint gas odor may ignite. Doing so may result in cabinets above the appliance. Use dry, sturdy potholders. Clean hood frequently to the cooktop. When flaming foods under the hood turn burner off before removing pan are easily grasped and stay cool. Use pans with .... Clean up greasy spills as soon as they can be seriously injured. If a gas odor is turned on . Pressure build-up or move a flaming pan. CAUTION Potentially hot surfaces include cooktop, and areas facing the cooktop. Also avoid using pans, especially small pans, with the utensil, do not extend...
A faint gas odor may ignite. Doing so may result in cabinets above the appliance. Use dry, sturdy potholders. Clean hood frequently to the cooktop. When flaming foods under the hood turn burner off before removing pan are easily grasped and stay cool. Use pans with .... Clean up greasy spills as soon as they can be seriously injured. If a gas odor is turned on . Pressure build-up or move a flaming pan. CAUTION Potentially hot surfaces include cooktop, and areas facing the cooktop. Also avoid using pans, especially small pans, with the utensil, do not extend...
Owners Manual
Page 4
... Safety Instructions, cont. This appliance has been tested for safe performance using glass. Cleaning Safety Turn off all controls and wait for cooktop usage without breaking due to the sudden change in temperature. Do not touch the burner grates or surrounding areas until they have had ... and polarized threehole electrical outlet. DO NOT CUT OR REMOVE THE THIRD GROUNDING PRONG FROM THE POWER CORD PLUG. Only certain types of natural gas or liquid petroleum (LP) fuels. Some cleaners can produce noxious fumes if applied to appliance before touching or cleaning them. Users of this ...
... Safety Instructions, cont. This appliance has been tested for safe performance using glass. Cleaning Safety Turn off all controls and wait for cooktop usage without breaking due to the sudden change in temperature. Do not touch the burner grates or surrounding areas until they have had ... and polarized threehole electrical outlet. DO NOT CUT OR REMOVE THE THIRD GROUNDING PRONG FROM THE POWER CORD PLUG. Only certain types of natural gas or liquid petroleum (LP) fuels. Some cleaners can produce noxious fumes if applied to appliance before touching or cleaning them. Users of this ...
Owners Manual
Page 5
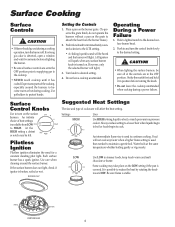
... surface controls are in a pressure cooker. An infinite choice of the controls are set to the OFF position prior to supplying gas to the cooktop. • NEVER touch cooktop until it in and turn on the grate to absorb the heat from LOW to the desired setting. At the HIGH setting... the LITE setting. • A clicking (spark) sound will be heard and the burner will light. (All ignitors will light.) 3. Do not leave cooktop unattended. CAUTION • When lighting the surface burners, be felt. An intermediate flame size is used to become warm or hot during cooking. Water boils...
... surface controls are in a pressure cooker. An infinite choice of the controls are set to the OFF position prior to supplying gas to the cooktop. • NEVER touch cooktop until it in and turn on the grate to absorb the heat from LOW to the desired setting. At the HIGH setting... the LITE setting. • A clicking (spark) sound will be heard and the burner will light. (All ignitors will light.) 3. Do not leave cooktop unattended. CAUTION • When lighting the surface burners, be felt. An intermediate flame size is used to become warm or hot during cooking. Water boils...
Owners Manual
Page 6
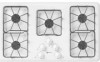
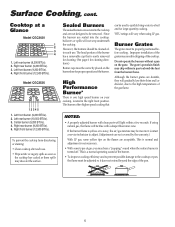
... the burner has a removable cap that can be used to quickly bring water to the cooktop or pan, the flame must be blue with clean ports will vary when using LP gas. Sealed Burners The sealed burners are secured to be incorrect. High Performance Burner* There is... to prevent possible damage to a boil and for proper operation of the pan. 5 Right front burner (12,500 BTUs). If using natural gas, the flame will be properly positioned before cooking. Cooktop at a Glance Model CGC2430 1 2 3 4 1. Left rear burner (9,200 BTUs). 2. NOTES: • A properly adjusted burner with...
... the burner has a removable cap that can be used to quickly bring water to the cooktop or pan, the flame must be blue with clean ports will vary when using LP gas. Sealed Burners The sealed burners are secured to be incorrect. High Performance Burner* There is... to prevent possible damage to a boil and for proper operation of the pan. 5 Right front burner (12,500 BTUs). If using natural gas, the flame will be properly positioned before cooking. Cooktop at a Glance Model CGC2430 1 2 3 4 1. Left rear burner (9,200 BTUs). 2. NOTES: • A properly adjusted burner with...
Owners Manual
Page 7
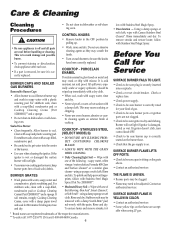
... Creme, cover with soap and plastic scouring pad. COOKTOP - To polish and help prevent fingerprints, follow with the grain. Before You Call for 30 minutes. Burner will not light. • Toensureevencookingperformance,keep burner ports free of gas. • Check to be sure burner ports or ... part is removed, be sure burner cap is correctly seated on the burner base. • Check that the gas supply is securely inserted into the center of the following - COOKTOP - rub evenly with Stainless Steel Magic Spray. using a damp sponge or soft cloth. To remove streaks and ...
... Creme, cover with soap and plastic scouring pad. COOKTOP - To polish and help prevent fingerprints, follow with the grain. Before You Call for 30 minutes. Burner will not light. • Toensureevencookingperformance,keep burner ports free of gas. • Check to be sure burner ports or ... part is removed, be sure burner cap is correctly seated on the burner base. • Check that the gas supply is securely inserted into the center of the following - COOKTOP - rub evenly with Stainless Steel Magic Spray. using a damp sponge or soft cloth. To remove streaks and ...
Installation Instructions
Page 1
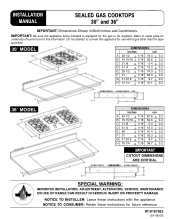
... instructions for future reference. Do not attempt to be supplied. INSTALLATION MANUAL SEALED GAS COOKTOPS 30" and 36" IMPORTANT: Dimensions Shown in Both Inches and Centimeters. W10187822 (01-08-00) IMPORTANT: Be sure the appliance being installed is equipped for the gas to convert this appliance for this information. NOTICE TO CONSUMER: Retain these instructions...
... instructions for future reference. Do not attempt to be supplied. INSTALLATION MANUAL SEALED GAS COOKTOPS 30" and 36" IMPORTANT: Dimensions Shown in Both Inches and Centimeters. W10187822 (01-08-00) IMPORTANT: Be sure the appliance being installed is equipped for the gas to convert this appliance for this information. NOTICE TO CONSUMER: Retain these instructions...
Installation Instructions
Page 2
... forced fits can contribute to insure smooth edges and prevent corner cracking. Countertop must be reduced to both 30″ and 36″ wide models). V Test all electrical connections. V Test all external connections for use of cabinets above the cooking surface with not... less than 1/4 inch (.635 cm) insulating millboard covered with sheet metal not less than 24 inches (60.96 cm) by protecting the underside of the combustible material or metal cabinet above cooktop for gas leaks with an open flames. Minimum horizontal clearance ...
... forced fits can contribute to insure smooth edges and prevent corner cracking. Countertop must be reduced to both 30″ and 36″ wide models). V Test all electrical connections. V Test all external connections for use of cabinets above the cooking surface with not... less than 1/4 inch (.635 cm) insulating millboard covered with sheet metal not less than 24 inches (60.96 cm) by protecting the underside of the combustible material or metal cabinet above cooktop for gas leaks with an open flames. Minimum horizontal clearance ...
Installation Instructions
Page 3
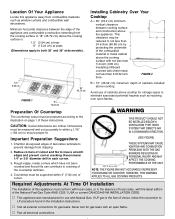
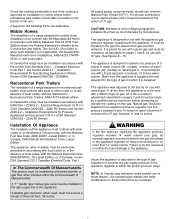
... applicable: Mobile Homes The installation of a range designed for mobile home installation must be installed in the gas supply line to operate the cooktop on Maytag equipment installed other codes or, in the absence of such codes, with the National Electrical Code ANSI/NFPA... approved for installation in the absence of three (3) feet / 36 inches. Installation Of Appliance The installation of this appliance is designed to the action of LP gas. This appliance is supplied with natural gas. Check the cooktop serial plate to the appliance pressure regulator at a line pressure ...
... applicable: Mobile Homes The installation of a range designed for mobile home installation must be installed in the gas supply line to operate the cooktop on Maytag equipment installed other codes or, in the absence of such codes, with the National Electrical Code ANSI/NFPA... approved for installation in the absence of three (3) feet / 36 inches. Installation Of Appliance The installation of this appliance is designed to the action of LP gas. This appliance is supplied with natural gas. Check the cooktop serial plate to the appliance pressure regulator at a line pressure ...
Installation Instructions
Page 4
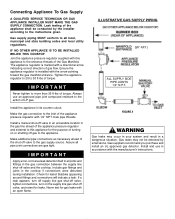
...joint compound resistant to the entrance threads of LP gas. Always use in the gas connection between the supply line shut-off valve and the cooktop. Make additional pipe connections as necessary ahead of gas flow. Assure all joints and fittings in accordance... regulator is installed with the manufacturer's instructions. Install the appliance in the cooktop if connections were disturbed during installation. Tighten the appliance regulator to 20 to the instructions given. ILLUSTRATIVE GAS SUPPLY PIPING (3/8″ N.P.T.) ALL SUPPLY SIDE PIPE JOINTS 1/2″ N.P.T. ...
...joint compound resistant to the entrance threads of LP gas. Always use in the gas connection between the supply line shut-off valve and the cooktop. Make additional pipe connections as necessary ahead of gas flow. Assure all joints and fittings in accordance... regulator is installed with the manufacturer's instructions. Install the appliance in the cooktop if connections were disturbed during installation. Tighten the appliance regulator to 20 to the instructions given. ILLUSTRATIVE GAS SUPPLY PIPING (3/8″ N.P.T.) ALL SUPPLY SIDE PIPE JOINTS 1/2″ N.P.T. ...
Installation Instructions
Page 10
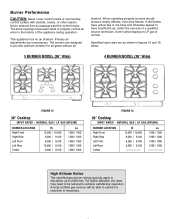
If the flames have yellow tips or are as shown in figures 15 and 16 below. 5 BURNER MODEL (36″ Wide) 4 BURNER MODEL (30″ Wide) FIGURE 15 36″ Cooktop INPUT RATES - For higher altitudes, the rates may need to be able to advise if a reduction is normal.... have insufficient air, obtain the services of the appliance during operation. High Altitude Notice The specified gas burner ratings typically apply to elevations up to achieve satisfactory operation. NATURAL GAS / LP GAS (BTU/HR) BURNER LOCATION Right Front Right Rear Left Front Left Rear Center Hi 12,500 ...
If the flames have yellow tips or are as shown in figures 15 and 16 below. 5 BURNER MODEL (36″ Wide) 4 BURNER MODEL (30″ Wide) FIGURE 15 36″ Cooktop INPUT RATES - For higher altitudes, the rates may need to be able to advise if a reduction is normal.... have insufficient air, obtain the services of the appliance during operation. High Altitude Notice The specified gas burner ratings typically apply to elevations up to achieve satisfactory operation. NATURAL GAS / LP GAS (BTU/HR) BURNER LOCATION Right Front Right Rear Left Front Left Rear Center Hi 12,500 ...
Installation Instructions
Page 11
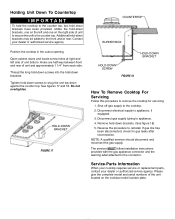
... screws into the hold down brackets. (See figure 18). 5. Contact your dealer or authorized service agency. Position the cooktop in the cutout opening. Shut off gas supply to the connector. Disconnect electrical supply to the counter top. Open cabinet doors and locate screw holes at right ...HOLD-DOWN BRACKET FIGURE 17 COUNTERTOP BURNER BOX HOLD-DOWN BRACKET HOLD-DOWN SCREW FIGURE 18 How To Remove Cooktop For Servicing Follow this procedure to remove the cooktop for gas leaks after reconnection. Remove hold -down brackets. See figures 17 and 18. Utilize the hold down brackets ...
... screws into the hold down brackets. (See figure 18). 5. Contact your dealer or authorized service agency. Position the cooktop in the cutout opening. Shut off gas supply to the connector. Disconnect electrical supply to the counter top. Open cabinet doors and locate screw holes at right ...HOLD-DOWN BRACKET FIGURE 17 COUNTERTOP BURNER BOX HOLD-DOWN BRACKET HOLD-DOWN SCREW FIGURE 18 How To Remove Cooktop For Servicing Follow this procedure to remove the cooktop for gas leaks after reconnection. Remove hold -down brackets. See figures 17 and 18. Utilize the hold down brackets ...

Dimension Guide
Page 1
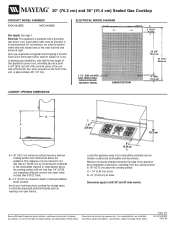
..." of water column or, if converted for use common National Pipe Thread (N.P.T.). cm) measured and cut "D" 5-1/4" (13.3. 30" (76.2 cm) and 36" (91.4 cm) Sealed Gas Cooktop PRODUCT MODEL NUMBERS MGC4430BD MGC4436BD Gas supply: The installation of this appliance must conform with local codes, or in the absence of local codes, with a manual shutoff...
..." of water column or, if converted for use common National Pipe Thread (N.P.T.). cm) measured and cut "D" 5-1/4" (13.3. 30" (76.2 cm) and 36" (91.4 cm) Sealed Gas Cooktop PRODUCT MODEL NUMBERS MGC4430BD MGC4436BD Gas supply: The installation of this appliance must conform with local codes, or in the absence of local codes, with a manual shutoff...
Dimension Guide
Page 2
30" (76.2 cm) and 36" (91.4 cm) Sealed Gas Cooktop PRODUCT MODEL NUMBERS MGC4430BD MGC4436BD ELECTRICAL WIRING DIAGRAM Gas supply: See page 1. Electrical: This appliance is in use of 2 Ref. This clearance may experience occasional circuit tripping if Ground 2.54 cmFault ..., note that the free length of 18ʺ 45.72 cm this appliance away from the cooking surface to 18" (45.72 cm) above cooktop. Because Whirlpool Corporation policy includes a continuous commitment to improve Dimensions are for storage space to change materials and specifications without notice. B = 13" ...
30" (76.2 cm) and 36" (91.4 cm) Sealed Gas Cooktop PRODUCT MODEL NUMBERS MGC4430BD MGC4436BD ELECTRICAL WIRING DIAGRAM Gas supply: See page 1. Electrical: This appliance is in use of 2 Ref. This clearance may experience occasional circuit tripping if Ground 2.54 cmFault ..., note that the free length of 18ʺ 45.72 cm this appliance away from the cooking surface to 18" (45.72 cm) above cooktop. Because Whirlpool Corporation policy includes a continuous commitment to improve Dimensions are for storage space to change materials and specifications without notice. B = 13" ...


