
Owners Manual
Page 3
...installations must meet local plumbing code requirements. ■ Do not use an adapter. Failure to follow the instructions provided with water filters, the disposable water filter should be replaced at least every 6 months. 3 Do not use an extension cord. When you are finished, reconnect..., such as gasoline, away from the electrical source. Allow for leaks. When installing your refrigerator be turned off by a switch. Recommended Grounding Method A 115 Volt, 60 Hz., AC only 15- Water Supply Requirements Gather the required tools and parts before starting installation. ...
...installations must meet local plumbing code requirements. ■ Do not use an adapter. Failure to follow the instructions provided with water filters, the disposable water filter should be replaced at least every 6 months. 3 Do not use an extension cord. When you are finished, reconnect..., such as gasoline, away from the electrical source. Allow for leaks. When installing your refrigerator be turned off by a switch. Recommended Grounding Method A 115 Volt, 60 Hz., AC only 15- Water Supply Requirements Gather the required tools and parts before starting installation. ...
Owners Manual
Page 5
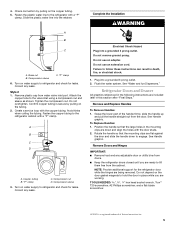
... the copper tubing. NOTE: Provide additional support for leaks. Fasten the plastic water line to the valve inlet using a compression nut and sleeve as shown. Slide the plastic water line into a grounded 3 prong outlet. Correct any leaks. Tighten the compression nut. Create a service loop with... the door studs. 2. Correct any leaks. Do not use an adapter. Flush the water system. Remove Doors and Hinges IMPORTANT: &#...
... the copper tubing. NOTE: Provide additional support for leaks. Fasten the plastic water line to the valve inlet using a compression nut and sleeve as shown. Slide the plastic water line into a grounded 3 prong outlet. Correct any leaks. Tighten the compression nut. Create a service loop with... the door studs. 2. Correct any leaks. Do not use an adapter. Flush the water system. Remove Doors and Hinges IMPORTANT: &#...
Owners Manual
Page 6
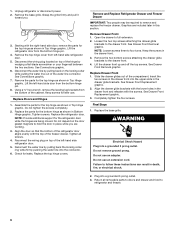
Lift the refrigerator door from the bottom of the compartment. NOTE: Provide additional support for leaks. Align the door so that the bottom of the refrigerator door aligns evenly with the lower holes in this section. Check for the ...to refrigerator and freezer. 6 See Connections graphic. 6. Reconnect the wiring plug on the door gasket magnets to full extension. 2. See Connections graphic. 7. Reconnect the water line by wedging a flat-blade screwdriver or your fingernail between the two sections. Graphics are working. 3. Grasp the grille firmly and pull it toward you...
Lift the refrigerator door from the bottom of the compartment. NOTE: Provide additional support for leaks. Align the door so that the bottom of the refrigerator door aligns evenly with the lower holes in this section. Check for the ...to refrigerator and freezer. 6 See Connections graphic. 6. Reconnect the wiring plug on the door gasket magnets to full extension. 2. See Connections graphic. 7. Reconnect the water line by wedging a flat-blade screwdriver or your fingernail between the two sections. Graphics are working. 3. Grasp the grille firmly and pull it toward you...
Owners Manual
Page 17
... after dispensing is only chilled to 50°F (10°C). ■ New installation? See "Water and Ice Dispensers." See "Water Supply Requirements." See "Water Supply Requirements." ■ Water filter installed on ? If it correctly. ■ Refrigerator door closed completely? Water is leaking from the dispenser is normal. ■ Glass not being held under the dispenser long...
... after dispensing is only chilled to 50°F (10°C). ■ New installation? See "Water and Ice Dispensers." See "Water Supply Requirements." See "Water Supply Requirements." ■ Water filter installed on ? If it correctly. ■ Refrigerator door closed completely? Water is leaking from the dispenser is normal. ■ Glass not being held under the dispenser long...


