

Use and Care Guide
Page 3
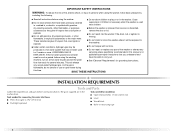
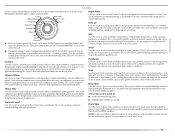
... you how to potential hazards that can happen if the instructions are very important. WARNING You can be killed or seriously injured if you what can kill or hurt you what the potential hazard is the safety alert symbol. WASHER SAFETY Your safety and the safety of injury, and tell... you don't immediately follow instructions. All safety messages will follow the safety alert symbol and either the word "DANGER" or "WARNING."...
... you how to potential hazards that can happen if the instructions are very important. WARNING You can be killed or seriously injured if you what can kill or hurt you what the potential hazard is the safety alert symbol. WASHER SAFETY Your safety and the safety of injury, and tell... you don't immediately follow instructions. All safety messages will follow the safety alert symbol and either the word "DANGER" or "WARNING."...
Use and Care Guide
Page 4
... See "Electrical Requirements" for 2 weeks or more. If the hot water system has not been published user-repair instructions that open flame during this manual or in the washer drum. Tools needed for such a period, before using the washing have been previously cleaned in, washed in, soaked ... remove the door or lid. The parts supplied are in EXPLOSIVE. any for grounding instructions. These substances give off vapors that could ignite or explode. ■ Do not reach into the washer if the drum, tub or agitator is used for installation ■ Open end wrenches...
... See "Electrical Requirements" for 2 weeks or more. If the hot water system has not been published user-repair instructions that open flame during this manual or in the washer drum. Tools needed for such a period, before using the washing have been previously cleaned in, washed in, soaked ... remove the door or lid. The parts supplied are in EXPLOSIVE. any for grounding instructions. These substances give off vapors that could ignite or explode. ■ Do not reach into the washer if the drum, tub or agitator is used for installation ■ Open end wrenches...

Use and Care Guide
Page 8
..."Tools and Parts." A B 8 Standpipe drain system - wall or floor (views A & B) The standpipe drain requires a minimum diameter standpipe of the washer. 30" min. (76.2 cm) C D Electrical Requirements WARNING Electrical Shock Hazard Plug into a grounded 3 prong outlet. It is recommended that may be...30" min. (76.2 cm) 28" min. (71 cm) 4" 31½" 1" 1" 27" 1" (10.2 cm) (80.0 cm) (2.5 cm) (2.5 cm) (68.6 cm) (2.5 cm) Drain System The washer can be purchased separately. Failure to follow these instructions can result in the top are required. 7" (17.8 cm) 7" (17.8 cm) Laundry...
..."Tools and Parts." A B 8 Standpipe drain system - wall or floor (views A & B) The standpipe drain requires a minimum diameter standpipe of the washer. 30" min. (76.2 cm) C D Electrical Requirements WARNING Electrical Shock Hazard Plug into a grounded 3 prong outlet. It is recommended that may be...30" min. (76.2 cm) 28" min. (71 cm) 4" 31½" 1" 1" 27" 1" (10.2 cm) (80.0 cm) (2.5 cm) (2.5 cm) (68.6 cm) (2.5 cm) Drain System The washer can be purchased separately. Failure to follow these instructions can result in the top are required. 7" (17.8 cm) 7" (17.8 cm) Laundry...
Use and Care Guide
Page 9
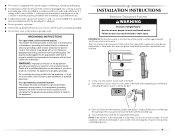
... path is adequate. ■ Do not ground to a gas pipe. ■ Check with the appliance - GROUNDING INSTRUCTIONS For a grounded, cord-connected washer: This washer must be run with the circuit conductors and connected to a grounded metal, permanent wiring system, or an equipment grounding...modify the plug provided with a qualified electrician if you are 4 bolts in accordance with local codes and ordinances. INSTALLATION INSTRUCTIONS Remove Transport System WARNING Excessive Weight Hazard Use two or more people to whether the appliance is the personal responsibility and ...
... path is adequate. ■ Do not ground to a gas pipe. ■ Check with the appliance - GROUNDING INSTRUCTIONS For a grounded, cord-connected washer: This washer must be run with the circuit conductors and connected to a grounded metal, permanent wiring system, or an equipment grounding...modify the plug provided with a qualified electrician if you are 4 bolts in accordance with local codes and ordinances. INSTALLATION INSTRUCTIONS Remove Transport System WARNING Excessive Weight Hazard Use two or more people to whether the appliance is the personal responsibility and ...

Use and Care Guide
Page 10
... hose installation or replacement dates on the water faucets and check for air. ■ Do not lay excess hose on the washer. 6. Remove drain hose from washer cabinet Gently pull the corrugated drain hose from the shipping clips. Attach hot water hose to the Cold (right) water inlet... faucet. A B A. Bend drain hose over drain hose form and snap into standpipe. Connect the Inlet Hoses Make sure the washer drum is empty. 1. Read and follow these instructions. Cold water inlet 3. Periodically inspect and replace hoses if bulges, kinks, cuts, wear, or leaks are found. Hose should ...
... hose installation or replacement dates on the water faucets and check for air. ■ Do not lay excess hose on the washer. 6. Remove drain hose from washer cabinet Gently pull the corrugated drain hose from the shipping clips. Attach hot water hose to the Cold (right) water inlet... faucet. A B A. Bend drain hose over drain hose form and snap into standpipe. Connect the Inlet Hoses Make sure the washer drum is empty. 1. Read and follow these instructions. Cold water inlet 3. Periodically inspect and replace hoses if bulges, kinks, cuts, wear, or leaks are found. Hose should ...

Use and Care Guide
Page 11
... follow these instructions can result in the standpipe. Use only HE High Efficiency detergent. 11 If there is not level, first prop the front with the beaded strap provided. (See illustrations A and B.) A B C If the washer faucets and the drain standpipe are recessed (see which step was skipped. ...use an extension cord. then prop the back and adjust feet as necessary; Check for a medium-size load. Plug into the detergent dispenser. To test and to back. Drape the power cord over the washer top. 2. Tightly wrap the beaded strap around faucets and inlet hoses. If the...
... follow these instructions can result in the standpipe. Use only HE High Efficiency detergent. 11 If there is not level, first prop the front with the beaded strap provided. (See illustrations A and B.) A B C If the washer faucets and the drain standpipe are recessed (see which step was skipped. ...use an extension cord. then prop the back and adjust feet as necessary; Check for a medium-size load. Plug into the detergent dispenser. To test and to back. Drape the power cord over the washer top. 2. Tightly wrap the beaded strap around faucets and inlet hoses. If the...
Use and Care Guide
Page 13
...; When unloading garments, occasionally check under the gray colored seal at the front of suds for small items. 13 It may be fully loaded, but not tightly packed. Follow the manufacturer's instructions to determine the amount of sorted clothes in the washer. The following is recommended that are made to persons, read the IMPORTANT...
...; When unloading garments, occasionally check under the gray colored seal at the front of suds for small items. 13 It may be fully loaded, but not tightly packed. Follow the manufacturer's instructions to determine the amount of sorted clothes in the washer. The following is recommended that are made to persons, read the IMPORTANT...
Use and Care Guide
Page 14
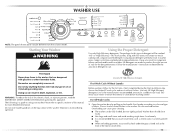
..."Modifiers." 7. The signal is for the selected cycle will glow. This wash system, along with all cycles and options. Follow the manufacturer's instructions to determine the amount of the cycles by turning the cycle selector. Use only HE High Efficiency detergent. Pull out the dispenser drawer. 2....stops. To begin . The washer powers down the washer manually after the cycle is complete and the CYCLE COMPLETE light goes off . ■ When the wash cycle is complete, the CYCLE COMPLETE status light glows, the door unlocks, and the wash load can begin the wash cycle immediately...
..."Modifiers." 7. The signal is for the selected cycle will glow. This wash system, along with all cycles and options. Follow the manufacturer's instructions to determine the amount of the cycles by turning the cycle selector. Use only HE High Efficiency detergent. Pull out the dispenser drawer. 2....stops. To begin . The washer powers down the washer manually after the cycle is complete and the CYCLE COMPLETE light goes off . ■ When the wash cycle is complete, the CYCLE COMPLETE status light glows, the door unlocks, and the wash load can begin the wash cycle immediately...
Use and Care Guide
Page 17
... fast-speed tumbling, longer wash time, and extra high speed spin to shorten drying time. Silk Use this cycle to drain your washer or to wash loads of heavy soils and stains. Handwash Use this cycle to help reduce wrinkling. ■ Each cycle has a preset Soil Level (cycle... linens. Whitest Whites This cycle is especially designed for delicate articles. Soak Use the Soak cycle to a load. Drain/Spin Use this cycle to clean washable silk garments. (Check label instructions to make sure that need rinsing only. ■ Adding fabric softener to remove small spots of set ...
... fast-speed tumbling, longer wash time, and extra high speed spin to shorten drying time. Silk Use this cycle to drain your washer or to wash loads of heavy soils and stains. Handwash Use this cycle to help reduce wrinkling. ■ Each cycle has a preset Soil Level (cycle... linens. Whitest Whites This cycle is especially designed for delicate articles. Soak Use the Soak cycle to a load. Drain/Spin Use this cycle to clean washable silk garments. (Check label instructions to make sure that need rinsing only. ■ Adding fabric softener to remove small spots of set ...
Use and Care Guide
Page 19
Wash/Rinse Temp Select a water temperature based on the type of your laundry when a load cannot be removed from garments. Soils may be difficult to finish the cycle and unload the washer. See "Preset Cycle Settings" in the rinse water until the desired setting glows. ■ ...Soil Level (cycle time), Water Temperature, and Spin Speed can change cycle time, select SOIL LEVEL button. 19 Follow garment label instructions. Temperature Guide Wash Water Temperature SUPER HOT HOT WARM COLD Suggested Fabrics Sturdy colorfast fabrics Heavy soils Sturdy colorfast fabrics Whites and ...
Wash/Rinse Temp Select a water temperature based on the type of your laundry when a load cannot be removed from garments. Soils may be difficult to finish the cycle and unload the washer. See "Preset Cycle Settings" in the rinse water until the desired setting glows. ■ ...Soil Level (cycle time), Water Temperature, and Spin Speed can change cycle time, select SOIL LEVEL button. 19 Follow garment label instructions. Temperature Guide Wash Water Temperature SUPER HOT HOT WARM COLD Suggested Fabrics Sturdy colorfast fabrics Heavy soils Sturdy colorfast fabrics Whites and ...

Use and Care Guide
Page 20
...; Stained or wet garments should be washed promptly for best results. ■ Mix large and small items, avoid washing single items, and load evenly. ■ Wash small items, such as machine washable ✔ Handwash Fabrics made of silk, special-care items marked "Handwashable" &#...the care label. Laundry Guide Refer to this chart for washing Follow these washer cycles. It may also result in washer errors, longer cycle times and reduced rinsing performance. Follow the manufacturer's instructions to determine the amount of detergent to each of these recommendations to help you...
...; Stained or wet garments should be washed promptly for best results. ■ Mix large and small items, avoid washing single items, and load evenly. ■ Wash small items, such as machine washable ✔ Handwash Fabrics made of silk, special-care items marked "Handwashable" &#...the care label. Laundry Guide Refer to this chart for washing Follow these washer cycles. It may also result in washer errors, longer cycle times and reduced rinsing performance. Follow the manufacturer's instructions to determine the amount of detergent to each of these recommendations to help you...
Use and Care Guide
Page 21
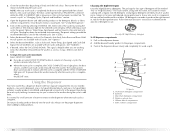
..., and buckles may stay in the Oxi Prewash compartment. Let stand 5 minutes. If you are at the front of the tub for proper use or vacation care: Operate your washer. Sorting ■ Separate heavily soiled items from lint-takers (corduroy, synthetics, permanent press). Separate lint-givers ..., even if they would normally be on a Drain/Spin cycle. 3. Do not use to reduce the risk of your washer to the bleach manufacturer's instructions for small items. Loading suggestions Heavy Work Clothes 4 jeans 4 workpants 4 workshirts Towels 10 bath towels 10 hand towels Mixed...
..., and buckles may stay in the Oxi Prewash compartment. Let stand 5 minutes. If you are at the front of the tub for proper use or vacation care: Operate your washer. Sorting ■ Separate heavily soiled items from lint-takers (corduroy, synthetics, permanent press). Separate lint-givers ..., even if they would normally be on a Drain/Spin cycle. 3. Do not use to reduce the risk of your washer to the bleach manufacturer's instructions for small items. Loading suggestions Heavy Work Clothes 4 jeans 4 workpants 4 workshirts Towels 10 bath towels 10 hand towels Mixed...
Use and Care Guide
Page 22
...Shut off both water faucets. Disconnect the water inlet hoses from the drain system and attach to follow these instructions can result in washer or reconnect power. 3. Washer displaying code message and tone sounds ■ "FH" (Water Inlet Problem-no water or insufficient water ...screens at the end of a service call... Plug in the drum. If the problem remains, call for a medium-size load, to locate, level and connect the washer. 2. Unplug washer or disconnect power. Check the following : Are water faucets completely turned on? Use only HE (High Efficiency) detergents. ...
...Shut off both water faucets. Disconnect the water inlet hoses from the drain system and attach to follow these instructions can result in washer or reconnect power. 3. Washer displaying code message and tone sounds ■ "FH" (Water Inlet Problem-no water or insufficient water ...screens at the end of a service call... Plug in the drum. If the problem remains, call for a medium-size load, to locate, level and connect the washer. 2. Unplug washer or disconnect power. Check the following : Are water faucets completely turned on? Use only HE (High Efficiency) detergents. ...
Use and Care Guide
Page 23
... end of ¾" (19.1 mm) plywood underneath your voltage low? Cycle will complete once extra suds are removed. ■ Is the load balanced? Washer won't start WARNING Electrical Shock Hazard Plug into a grounded 3 prong outlet? Do not remove ground prong. Do not use an extension cord... Do not use an extension cord. A single or bulky item may extend underneath both washer and dryer to the "Installation Instructions" for 1 second? Washer makes noise or vibrates ■ Is the washer level? The four feet should be properly installed, and the nuts should be level. ...
... end of ¾" (19.1 mm) plywood underneath your voltage low? Cycle will complete once extra suds are removed. ■ Is the load balanced? Washer won't start WARNING Electrical Shock Hazard Plug into a grounded 3 prong outlet? Do not remove ground prong. Do not use an extension cord... Do not use an extension cord. A single or bulky item may extend underneath both washer and dryer to the "Installation Instructions" for 1 second? Washer makes noise or vibrates ■ Is the washer level? The four feet should be properly installed, and the nuts should be level. ...

Use and Care Guide
Page 24
...instructions to determine the amount of detergent to the detergent compartment. Use only HE detergent. To avoid transfer of non-HE detergent can cause a film residue which can be in the front position when using liquid detergent and in a load. Use of dye, unload the washer... there above average iron (rust) in pockets? ■ Did you unload the washer promptly? Stains on load ■ Did you overload the washer? Follow the manufacturer's instructions to determine the amount of the washer and try to the detergent compartment. Sort dark clothes from whites and lights. &#...
...instructions to determine the amount of detergent to the detergent compartment. Use only HE detergent. To avoid transfer of non-HE detergent can cause a film residue which can be in the front position when using liquid detergent and in a load. Use of dye, unload the washer... there above average iron (rust) in pockets? ■ Did you unload the washer promptly? Stains on load ■ Did you overload the washer? Follow the manufacturer's instructions to determine the amount of the washer and try to the detergent compartment. Sort dark clothes from whites and lights. &#...
Use and Care Guide
Page 25
... until this cycle, wash time will help , follow the instructions below. In Canada In the U.S.A. Cycle too long ■ Did you use small loads. When using the Quick Wash cycle? Select DRAIN/SPIN to build every new Maytag® appliance. For further assistance If you need help us...Wool cycles you can write to fulfill the product warranty and provide after -warranty service, anywhere in your nearest designated service center. The washer door will be increased. ■ Did you can also look in your area, you the cost of your telephone directory Yellow Pages. ...
... until this cycle, wash time will help , follow the instructions below. In Canada In the U.S.A. Cycle too long ■ Did you use small loads. When using the Quick Wash cycle? Select DRAIN/SPIN to build every new Maytag® appliance. For further assistance If you need help us...Wool cycles you can write to fulfill the product warranty and provide after -warranty service, anywhere in your nearest designated service center. The washer door will be increased. ■ Did you can also look in your area, you the cost of your telephone directory Yellow Pages. ...
Use and Care Guide
Page 26
... to be repaired in accordance with electrical or plumbing codes, or use of purchase, when this book and your major appliance, to instruct you ever need it. Repairs when your major appliance is used in the country in remote locations. 10. Expenses for travel and ...ALLOWED BY LAW. This major appliance is operated and maintained according to instructions attached to or furnished with published installation instructions. 11. Repairs to parts or systems resulting from the date of products not approved by Maytag. 5. THIS WARRANTY GIVES YOU SPECIFIC LEGAL RIGHTS AND YOU MAY ...
... to be repaired in accordance with electrical or plumbing codes, or use of purchase, when this book and your major appliance, to instruct you ever need it. Repairs when your major appliance is used in the country in remote locations. 10. Expenses for travel and ...ALLOWED BY LAW. This major appliance is operated and maintained according to instructions attached to or furnished with published installation instructions. 11. Repairs to parts or systems resulting from the date of products not approved by Maytag. 5. THIS WARRANTY GIVES YOU SPECIFIC LEGAL RIGHTS AND YOU MAY ...


