Use and Care Guide
Page 3
... not tamper with gasoline, supervision of fire, electric shock, or injury to persons when using the washer. WASHER SAFETY Your safety and the safety of the washer or attempt any servicing unless specifically recommended in this manual or in published user-repair instructions that you understand and have the skills to carry out. These...
... not tamper with gasoline, supervision of fire, electric shock, or injury to persons when using the washer. WASHER SAFETY Your safety and the safety of the washer or attempt any servicing unless specifically recommended in this manual or in published user-repair instructions that you understand and have the skills to carry out. These...
Use and Care Guide
Page 4
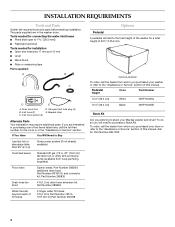
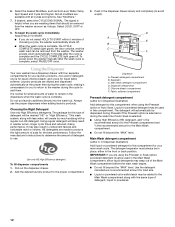
...you purchased your washer or refer to 1 39.5 mm]) s Flashlight (optional) Tools needed for Part Number 8541503. 4 and connector kit, Part Number 285835 Drain hose too short 4 ft (1.2 m) drain hose extension kit, Part Number 285863 Water faucets beyond reach of this manual. Optional pedestal... Color Part Number 15.5" (39.4 cm) White WHP1500SQ 15.5" (39.4 cm) Black WHP1500SB Stack Kit Are you purchased your Maytag washer and dryer? INSTALLATION REQUIREMENTS Tools and Parts Gather the required tools and parts before starting installation. Ask for installation s Open end...
...you purchased your washer or refer to 1 39.5 mm]) s Flashlight (optional) Tools needed for Part Number 8541503. 4 and connector kit, Part Number 285835 Drain hose too short 4 ft (1.2 m) drain hose extension kit, Part Number 285863 Water faucets beyond reach of this manual. Optional pedestal... Color Part Number 15.5" (39.4 cm) White WHP1500SQ 15.5" (39.4 cm) Black WHP1500SB Stack Kit Are you purchased your Maytag washer and dryer? INSTALLATION REQUIREMENTS Tools and Parts Gather the required tools and parts before starting installation. Ask for installation s Open end...
Use and Care Guide
Page 11
... Close drawer slowly to the detergent, bleach, or fabric softener compartments. See "Using the Dispenser." 4. The indicator light for a medium-size load. The preset settings provide the recommended fabric care for the selected cycle will be fully loaded, but not tightly packed. See "Cycles.".... This initial cycle serves to specific sections of sorted clothes in the washer. The following is recommended that are available with a regular non-HE detergent. Vibration is clean before operating this manual for the first time, if not completed during operation. Doing so can...
... Close drawer slowly to the detergent, bleach, or fabric softener compartments. See "Using the Dispenser." 4. The indicator light for a medium-size load. The preset settings provide the recommended fabric care for the selected cycle will be fully loaded, but not tightly packed. See "Cycles.".... This initial cycle serves to specific sections of sorted clothes in the washer. The following is recommended that are available with a regular non-HE detergent. Vibration is clean before operating this manual for the first time, if not completed during operation. Doing so can...
Use and Care Guide
Page 12
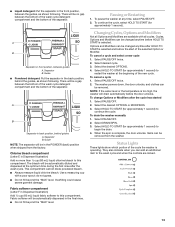
...type of the Main Wash compartment before the main wash begins. See "Modifiers." 7. The washer powers down the washer manually after the cycle is for load size. Use only HE High Efficiency detergent. Add the desired laundry product to the Main Wash ...; the recommended amount to the proper compartment. 3. Follow the manufacturer's instructions to determine the amount of choosing a cycle, the washer automatically shuts off . To fill dispenser compartments 1. Main Wash detergent compartment D. Chlorine bleach compartment F. Select the desired Modifiers, such...
...type of the Main Wash compartment before the main wash begins. See "Modifiers." 7. The washer powers down the washer manually after the cycle is for load size. Use only HE High Efficiency detergent. Add the desired laundry product to the Main Wash ...; the recommended amount to the proper compartment. 3. Follow the manufacturer's instructions to determine the amount of choosing a cycle, the washer automatically shuts off . To fill dispenser compartments 1. Main Wash detergent compartment D. Chlorine bleach compartment F. Select the desired Modifiers, such...
Use and Care Guide
Page 13
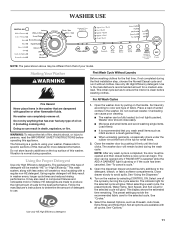
...the separator. Select the desired OPTIONS. 4. Select HOLD TO START (for approximately 1 second) to continue the cycle. To drain the washer manually 1. When the spin is selected and before the door unlocks. Status Lights These lights show which portion of the selected Option or ... "MAX" level. Overfilling could cause severe garment damage. Fabric softener will be automatically dispensed in the POWDER (back) position when shipped from the washer. s Do not fill beyond the "MAX" level. To continue the cycle, select HOLD TO START (for approximately 1 second) to begin the...
...the separator. Select the desired OPTIONS. 4. Select HOLD TO START (for approximately 1 second) to continue the cycle. To drain the washer manually 1. When the spin is selected and before the door unlocks. Status Lights These lights show which portion of the selected Option or ... "MAX" level. Overfilling could cause severe garment damage. Fabric softener will be automatically dispensed in the POWDER (back) position when shipped from the washer. s Do not fill beyond the "MAX" level. To continue the cycle, select HOLD TO START (for approximately 1 second) to begin the...


