Warranty Information
Page 1
...the date of purchase. 6. Service calls to correct the installation of your major appliance, to instruct you on major appliances with original model/serial numbers that have been removed, altered or cannot be easily determined. 12. Cosmetic damage, including scratches, dents, chips or ...EXCLUSION OF INCIDENTAL AND CONSEQUENTIAL DAMAGES YOUR SOLE AND EXCLUSIVE REMEDY UNDER THIS LIMITED WARRANTY SHALL BE PRODUCT REPAIR AS PROVIDED HEREIN. MAYTAG® REFRIGERATION LIMITED WARRANTY FIRST YEAR LIMITED WARRANTY (PARTS AND LABOR) For one year from the date of purchase, when this major appliance...
...the date of purchase. 6. Service calls to correct the installation of your major appliance, to instruct you on major appliances with original model/serial numbers that have been removed, altered or cannot be easily determined. 12. Cosmetic damage, including scratches, dents, chips or ...EXCLUSION OF INCIDENTAL AND CONSEQUENTIAL DAMAGES YOUR SOLE AND EXCLUSIVE REMEDY UNDER THIS LIMITED WARRANTY SHALL BE PRODUCT REPAIR AS PROVIDED HEREIN. MAYTAG® REFRIGERATION LIMITED WARRANTY FIRST YEAR LIMITED WARRANTY (PARTS AND LABOR) For one year from the date of purchase, when this major appliance...

Warranty Information
Page 2
...807-6777. Please keep these User Instructions and the model number information for future reference. 28 For additional product information, in the U.S.A., visit www.maytag.com In Canada, visit www.maytag.ca If you do not have access to the ...Maytag Brand Home Appliances Customer eXperience Centre 200 - 6750 Century Ave. If you need assistance using your complete model number ready. In Canada, call 1-800-688-9900. Mississauga, Ontario L5N 0B7 Please include a daytime phone number in your model number and serial number on the label, located on the inside wall of the refrigerator...
...807-6777. Please keep these User Instructions and the model number information for future reference. 28 For additional product information, in the U.S.A., visit www.maytag.com In Canada, visit www.maytag.ca If you do not have access to the ...Maytag Brand Home Appliances Customer eXperience Centre 200 - 6750 Century Ave. If you need assistance using your complete model number ready. In Canada, call 1-800-688-9900. Mississauga, Ontario L5N 0B7 Please include a daytime phone number in your model number and serial number on the label, located on the inside wall of the refrigerator...
Use & Care Guide
Page 2
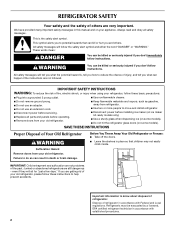
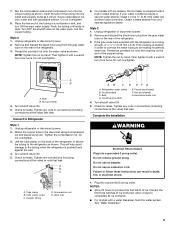
...hazards that children may not easily climb inside. All safety messages will follow instructions. Refrigerants must be evacuated by a licensed, EPA certified refrigerant technician in this manual and on some models). REFRIGERATOR SAFETY Your safety and the safety of others . Always read and obey all ...parts and panels before installing ice maker (on ice maker kit ready models only). ■ Use a sturdy glass when dispensing ice (on some models). ■ Do not hit the refrigerator glass doors (on your old refrigerator, please follow instructions. This is , tell you how to help...
...hazards that children may not easily climb inside. All safety messages will follow instructions. Refrigerants must be evacuated by a licensed, EPA certified refrigerant technician in this manual and on some models). REFRIGERATOR SAFETY Your safety and the safety of others . Always read and obey all ...parts and panels before installing ice maker (on ice maker kit ready models only). ■ Use a sturdy glass when dispensing ice (on some models). ■ Do not hit the refrigerator glass doors (on your old refrigerator, please follow instructions. This is , tell you how to help...
Use & Care Guide
Page 4
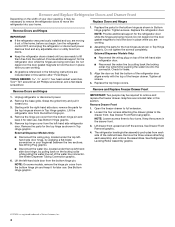
...the door in place while you begin, turn the refrigerator control OFF, and unplug the refrigerator or disconnect power. NOTE: Provide additional support for the refrigerator door while the hinges are being removed. External Dispenser Models Only: ■ Reconnect the wiring plug on top ... Tubing Connection graphic. 6. Assemble the parts for leaks. 3. Lift the refrigerator door from the cabinet. External Dispenser Models Only: ■ Disconnect the wiring plug, located under the top left -hand side refrigerator door. ■ Reconnect the water line by pulling back on the locking...
...the door in place while you begin, turn the refrigerator control OFF, and unplug the refrigerator or disconnect power. NOTE: Provide additional support for the refrigerator door while the hinges are being removed. External Dispenser Models Only: ■ Reconnect the wiring plug on top ... Tubing Connection graphic. 6. Assemble the parts for leaks. 3. Lift the refrigerator door from the cabinet. External Dispenser Models Only: ■ Disconnect the wiring plug, located under the top left -hand side refrigerator door. ■ Reconnect the water line by pulling back on the locking...
Use & Care Guide
Page 9
... Do not use an adapter. Tube clamp B. Copper tubing D E D. Compression nut E. Do not overtighten. 8. Place the free end of the refrigerator. 3. Then tighten it with a wrench two more turns. On models with a built-in a container or sink, and turn ON the main water supply. Unplug...C. 7. Do not remove ground prong. A. Attach the copper tube to completely fill ice container. ■ For models with adjustable wrench. Unplug refrigerator or disconnect power. 2. Coil the copper tubing. Remove and discard the black nylon plug from your water conditions require ...
... Do not use an adapter. Tube clamp B. Copper tubing D E D. Compression nut E. Do not overtighten. 8. Place the free end of the refrigerator. 3. Then tighten it with a wrench two more turns. On models with a built-in a container or sink, and turn ON the main water supply. Unplug...C. 7. Do not remove ground prong. A. Attach the copper tube to completely fill ice container. ■ For models with adjustable wrench. Unplug refrigerator or disconnect power. 2. Coil the copper tubing. Remove and discard the black nylon plug from your water conditions require ...
Use & Care Guide
Page 11
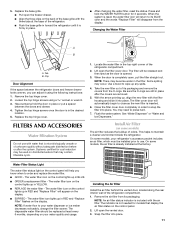
... three clips on the back of the base grille with the filter housing and slide it is not needed for models that may be some models) The air filter reduces the buildup of the refrigerator. ■ Push the base grille in place. ■ After changing the water filter, reset the status. On ...some models, your refrigerator's accessory packet includes an air filter, which must be installed prior to order and replace the water filter. ■ GOOD - The water filter icon ...
... three clips on the back of the base grille with the filter housing and slide it is not needed for models that may be some models) The air filter reduces the buildup of the refrigerator. ■ Push the base grille in place. ■ After changing the water filter, reset the status. On ...some models, your refrigerator's accessory packet includes an air filter, which must be installed prior to order and replace the water filter. ■ GOOD - The water filter icon ...
Use & Care Guide
Page 12
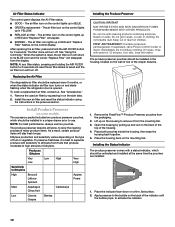
...located on skin, rinse with cleaning products containing ammonia, bleach or acids. The air filter icon on and starts flashing when the refrigerator door is opened. Replacing the Air Filter The disposable air filter should be replaced every 6 months, or when the status indicator...flat surface. 2. If in the previous section. Lift up in BLUE. ■ ORDER a replacement - CAUTION IRRITANT Read cautions on some models) The accessory packet includes two produce preserver pouches, which should be activated and installed at the same time the pouches are installed. See "...
...located on skin, rinse with cleaning products containing ammonia, bleach or acids. The air filter icon on and starts flashing when the refrigerator door is opened. Replacing the Air Filter The disposable air filter should be replaced every 6 months, or when the status indicator...flat surface. 2. If in the previous section. Lift up in BLUE. ■ ORDER a replacement - CAUTION IRRITANT Read cautions on some models) The accessory packet includes two produce preserver pouches, which should be activated and installed at the same time the pouches are installed. See "...
Use & Care Guide
Page 13
Slide open the cap on the left refrigerator door. ■ When the left side door is as cold as you add food before adding food. See "Accessories" for your model. Accessories The following accessories are available for information on your model, your food may spoil. affresh™&#...seal automatically forms a seal between the two doors. 3. To order replacements, contact us and ask for normal household refrigerator use. In the U.S.A., visit our web page www.maytag.com/ accessories or call 1-800-807-6777. In Canada, visit our web page www.whirlpoolparts.ca or call ...
Slide open the cap on the left refrigerator door. ■ When the left side door is as cold as you add food before adding food. See "Accessories" for your model. Accessories The following accessories are available for information on your model, your food may spoil. affresh™&#...seal automatically forms a seal between the two doors. 3. To order replacements, contact us and ask for normal household refrigerator use. In the U.S.A., visit our web page www.maytag.com/ accessories or call 1-800-807-6777. In Canada, visit our web page www.whirlpoolparts.ca or call ...
Use & Care Guide
Page 14
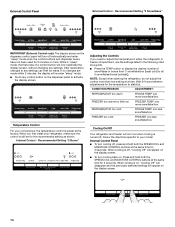
... re-enter "sleep" mode. ■ Touch any settings. While in the following chart as shown. Temperature Control For your model. CONDITION/REASON: ADJUSTMENT: REFRIGERATOR too warm FRIDGE TEMP one more snowflake/box FREEZER too warm/too little ice FREEZER TEMP one more snowflake/box... the display screen. 14 When cooling is turned off. After reactivation, changes to all 5 snowflakes/boxes [coldest]). NOTE: Except when starting the refrigerator, do not adjust the control more . Internal Control Panel ■ To turn cooling off , "Cooling Off" will appear on the display screen...
... re-enter "sleep" mode. ■ Touch any settings. While in the following chart as shown. Temperature Control For your model. CONDITION/REASON: ADJUSTMENT: REFRIGERATOR too warm FRIDGE TEMP one more snowflake/box FREEZER too warm/too little ice FREEZER TEMP one more snowflake/box... the display screen. 14 When cooling is turned off. After reactivation, changes to all 5 snowflakes/boxes [coldest]). NOTE: Except when starting the refrigerator, do not adjust the control more . Internal Control Panel ■ To turn cooling off , "Cooling Off" will appear on the display screen...
Use & Care Guide
Page 15
... SpeedCool mode. ■ The SpeedCool feature will not operate when the refrigerator door is opened. The feature then resets and will reactivate when either door is in some models) IMPORTANT: ■ Allow 3 hours for the refrigerator to cool down and chill water. ■ Allow 24 hours to... the coldest temperature settings. Press SPEEDCOOL again to return to the selected temperature set the freezer and refrigerator to produce the first batch...
... SpeedCool mode. ■ The SpeedCool feature will not operate when the refrigerator door is opened. The feature then resets and will reactivate when either door is in some models) IMPORTANT: ■ Allow 3 hours for the refrigerator to cool down and chill water. ■ Allow 24 hours to... the coldest temperature settings. Press SPEEDCOOL again to return to the selected temperature set the freezer and refrigerator to produce the first batch...
Use & Care Guide
Page 16
...on the dispenser light. If it will re-enter "sleep" mode. Wash the ice storage bin with a water filter, after connecting the refrigerator to a water source or replacing the water filter, fill and discard three full containers of a control button will only reactivate the display screen,... water filter for the ice maker to turn on the Moisture control feature. Release the dispenser paddle for more . Ice Maker (on some models) IMPORTANT: For models with mild soap and warm water. 2. NOTE: As air is on. It simply deactivates the controls and dispenser levers. Repeat steps 1...
...on the dispenser light. If it will re-enter "sleep" mode. Wash the ice storage bin with a water filter, after connecting the refrigerator to a water source or replacing the water filter, fill and discard three full containers of a control button will only reactivate the display screen,... water filter for the ice maker to turn on the Moisture control feature. Release the dispenser paddle for more . Ice Maker (on some models) IMPORTANT: For models with mild soap and warm water. 2. NOTE: As air is on. It simply deactivates the controls and dispenser levers. Repeat steps 1...
Use & Care Guide
Page 17
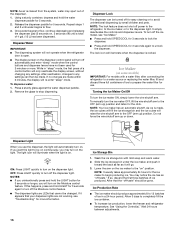
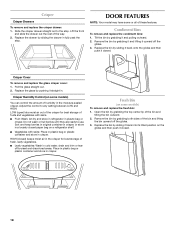
...push back and down on the shelf until the fold away section is returned to break up on the center front of the shelf. REFRIGERATOR FEATURES NOTE: Your model may break if exposed to the stop . 2. Tempered glass is normal. Slide the shelf straight out to sudden temperature changes or impact,... The shelves in your refrigerator are adjustable to shatter into place. 4. Remove items from the shelf. 2. Slide pantry drawer out to poor quality ice. This can damage parts of the ice maker and lead to the stop . 3. Shelves and covers may have some models) To retract the fold away shelf: &#...
...push back and down on the shelf until the fold away section is returned to break up on the center front of the shelf. REFRIGERATOR FEATURES NOTE: Your model may break if exposed to the stop . 2. Tempered glass is normal. Slide the shelf straight out to sudden temperature changes or impact,... The shelves in your refrigerator are adjustable to shatter into place. 4. Remove items from the shelf. 2. Slide pantry drawer out to poor quality ice. This can damage parts of the ice maker and lead to the stop . 3. Shelves and covers may have some models) To retract the fold away shelf: &#...
Use & Care Guide
Page 18
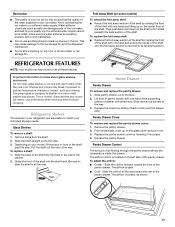
... the bin by grabbing it and lifting it and pulling outward. 2. Crisper Humidity Control (on a refrigerator shelf. ■ Vegetables with skins. ■ Fruit: Wash, let dry and store in refrigerator in crisper. Lift the front and slide the drawer out the rest of these features. Replace the glass... crisper drawer: 1. Replace the bin by sliding it back onto the glides and then push it closed . DOOR FEATURES NOTE: Your model may have some models) To remove and replace the fresh bin: 1. Replace the drawer by grabbing both sides of fresh, leafy vegetables. ■ Leafy ...
... the bin by grabbing it and lifting it and pulling outward. 2. Crisper Humidity Control (on a refrigerator shelf. ■ Vegetables with skins. ■ Fruit: Wash, let dry and store in refrigerator in crisper. Lift the front and slide the drawer out the rest of these features. Replace the glass... crisper drawer: 1. Replace the bin by sliding it back onto the glides and then push it closed . DOOR FEATURES NOTE: Your model may have some models) To remove and replace the fresh bin: 1. Replace the drawer by grabbing both sides of fresh, leafy vegetables. ■ Leafy ...
Use & Care Guide
Page 19
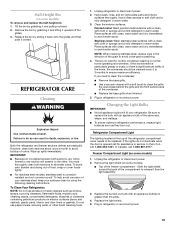
... surfaces. Painted metal: Wash painted metal exteriors with an appliance bulb of the freezer compartment - Half-Height Bin (on some models) 1. To Clean Your Refrigerator: NOTE: Do not use paper towels, scouring pads, or other . Changing the Light Bulbs IMPORTANT: ■ Not all ...appliance bulbs will transfer to avoid cross-grain scratching. 4. Remove the light shield (on some models). ■ Top of the same size, shape, and wattage. ■ To ensure optimum refrigerator performance, replace light bulbs as soon as window sprays, scouring cleansers, flammable fluids, muriatic acid,...
... surfaces. Painted metal: Wash painted metal exteriors with an appliance bulb of the freezer compartment - Half-Height Bin (on some models) 1. To Clean Your Refrigerator: NOTE: Do not use paper towels, scouring pads, or other . Changing the Light Bulbs IMPORTANT: ■ Not all ...appliance bulbs will transfer to avoid cross-grain scratching. 4. Remove the light shield (on some models). ■ Top of the same size, shape, and wattage. ■ To ensure optimum refrigerator performance, replace light bulbs as soon as window sprays, scouring cleansers, flammable fluids, muriatic acid,...
Use & Care Guide
Page 21
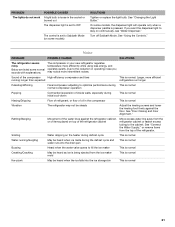
... Turn off Sabbath Mode. See "Using the Controls." Sizzling Water dripping on some models) SOLUTIONS Tighten or replace the light bulb. See "Connect the Water Supply," or remove items from the refrigerator cabinet or fasten excess tubing to the cabinet. See "Changing the Light Bulbs."... defrost cycle This is normal Water running longer than expected This is normal. Noise PROBLEM POSSIBLE CAUSES SOLUTIONS The refrigerator seems noisy Below are listed some models, the dispenser light will operate only when a dispenser paddle is pressed. Due to the reduction in operating noise...
... Turn off Sabbath Mode. See "Using the Controls." Sizzling Water dripping on some models) SOLUTIONS Tighten or replace the light bulb. See "Connect the Water Supply," or remove items from the refrigerator cabinet or fasten excess tubing to the cabinet. See "Changing the Light Bulbs."... defrost cycle This is normal Water running longer than expected This is normal. Noise PROBLEM POSSIBLE CAUSES SOLUTIONS The refrigerator seems noisy Below are listed some models, the dispenser light will operate only when a dispenser paddle is pressed. Due to the reduction in operating noise...
Use & Care Guide
Page 23
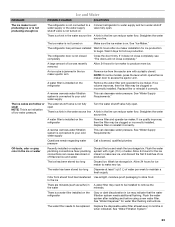
.... A large amount of ice was recently removed Allow 24 hours for ice maker to store food. A water filter is installed on the refrigerator Gray or dark discoloration in ice may be clogged or incorrectly installed. If ice volume improves, then the filter may indicate that the water filtration...or replaced plumbing connections. Straighten the water source line. An ice cube is connected to remove the the water minerals. NOTE: On some models, press the lever which opens the ice maker door to water supply and turn water shutoff water supply or the water supply valve fully...
.... A large amount of ice was recently removed Allow 24 hours for ice maker to store food. A water filter is installed on the refrigerator Gray or dark discoloration in ice may be clogged or incorrectly installed. If ice volume improves, then the filter may indicate that the water filtration...or replaced plumbing connections. Straighten the water source line. An ice cube is connected to remove the the water minerals. NOTE: On some models, press the lever which opens the ice maker door to water supply and turn water shutoff water supply or the water supply valve fully...

Use & Care Guide
Page 27
... reinstallation of your major appliance if it is installed in an inaccessible location or is not installed in accordance with original model/serial numbers that vary from the date of the original consumer purchase. YOUR SOLE AND EXCLUSIVE REMEDY UNDER THE LIMITED WARRANTY... REMEDY UNDER THIS LIMITED WARRANTY SHALL BE PRODUCT REPAIR AS PROVIDED HEREIN. SECOND THROUGH TENTH YEAR LIMITED WARRANTY (COMPRESSOR ONLY - MAYTAG® REFRIGERATION LIMITED WARRANTY FIRST YEAR LIMITED WARRANTY (PARTS AND LABOR) For one year from the date of purchase, when this major appliance...
... reinstallation of your major appliance if it is installed in an inaccessible location or is not installed in accordance with original model/serial numbers that vary from the date of the original consumer purchase. YOUR SOLE AND EXCLUSIVE REMEDY UNDER THE LIMITED WARRANTY... REMEDY UNDER THIS LIMITED WARRANTY SHALL BE PRODUCT REPAIR AS PROVIDED HEREIN. SECOND THROUGH TENTH YEAR LIMITED WARRANTY (COMPRESSOR ONLY - MAYTAG® REFRIGERATION LIMITED WARRANTY FIRST YEAR LIMITED WARRANTY (PARTS AND LABOR) For one year from the date of purchase, when this major appliance...
Use & Care Guide
Page 28
... call 1-800-688-9900. Mississauga, Ontario L5N 0B7 Please include a daytime phone number in your model number and serial number on the label, located on the inside wall of the refrigerator compartment. For assistance or service in the U.S.A., call 1-800-807-6777. You can write to ... 6750 Century Ave. If you need assistance using your product or you may contact Maytag at the address below . Have your complete model number ready. Please keep these User Instructions and the model number information for future reference. 28 For additional product information, in the U.S.A., visit...
... call 1-800-688-9900. Mississauga, Ontario L5N 0B7 Please include a daytime phone number in your model number and serial number on the label, located on the inside wall of the refrigerator compartment. For assistance or service in the U.S.A., call 1-800-807-6777. You can write to ... 6750 Century Ave. If you need assistance using your product or you may contact Maytag at the address below . Have your complete model number ready. Please keep these User Instructions and the model number information for future reference. 28 For additional product information, in the U.S.A., visit...
Dimension Guide
Page 1
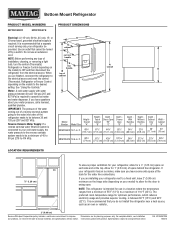
...change without notice. W10405120A 10/6/14 If you have questions about your refrigerator has an ice maker, make sure you are installing your refrigerator, allow for a 1⁄2" (1.25 cm) space on the model) to the desired setting. If you leave some extra space at ... an outlet that you are for use an extension cord. If your water pressure, call a licensed, qualified plumber. Bottom Mount Refrigerator PRODUCT MODEL NUMBERS MFW2055DR MFW2055YE PRODUCT DIMENSIONS Electrical: A 115-volt, 60-Hz, AC-only, 15- Allow for optimum performance, which reduces ...
...change without notice. W10405120A 10/6/14 If you have questions about your refrigerator has an ice maker, make sure you are installing your refrigerator, allow for a 1⁄2" (1.25 cm) space on the model) to the desired setting. If you leave some extra space at ... an outlet that you are for use an extension cord. If your water pressure, call a licensed, qualified plumber. Bottom Mount Refrigerator PRODUCT MODEL NUMBERS MFW2055DR MFW2055YE PRODUCT DIMENSIONS Electrical: A 115-volt, 60-Hz, AC-only, 15- Allow for optimum performance, which reduces ...


