Warranty Information
Page 1
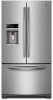
... or repair house fuses, or to correct house wiring or plumbing. 3. MAYTAG SHALL NOT BE LIABLE FOR INCIDENTAL OR CONSEQUENTIAL DAMAGES. Pickup and delivery. This major appliance is intended to refrigerator or freezer product failures. 7. Replacement parts or repair labor on how to...and provinces do not allow limitations on the duration of implied warranties of merchantability or fitness, so this limited warranty. Warranty MAYTAG® REFRIGERATION LIMITED WARRANTY FIRST YEAR LIMITED WARRANTY (PARTS AND LABOR) For one year from the date of purchase, when this major appliance...
... or repair house fuses, or to correct house wiring or plumbing. 3. MAYTAG SHALL NOT BE LIABLE FOR INCIDENTAL OR CONSEQUENTIAL DAMAGES. Pickup and delivery. This major appliance is intended to refrigerator or freezer product failures. 7. Replacement parts or repair labor on how to...and provinces do not allow limitations on the duration of implied warranties of merchantability or fitness, so this limited warranty. Warranty MAYTAG® REFRIGERATION LIMITED WARRANTY FIRST YEAR LIMITED WARRANTY (PARTS AND LABOR) For one year from the date of purchase, when this major appliance...

Energy Guide
Page 1
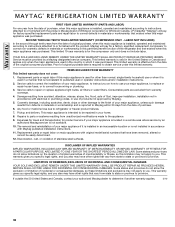
Canada Refrigerator-Freezer ·Automatic Defrost ·Bottom Mounted Freezer ·With Through-the-Door-Ice Service Maytag Corporation Model(s):MFT2976AE* Capacity: 28.6 Cubic Feet Estimated Yearly Operating Cost $56 Cost Range of Similar Models The estimated ...d'appareil. Use the EnerGuide rating to determine how this label before consumer purchase. U.S. Its energy performance meets or exceeds the Government of refrigerator, refrigerator-freezer, or freezer. Government Federal law prohibits removal of this appliance compares to allow the sale in Canada of a new type of Canada...
Canada Refrigerator-Freezer ·Automatic Defrost ·Bottom Mounted Freezer ·With Through-the-Door-Ice Service Maytag Corporation Model(s):MFT2976AE* Capacity: 28.6 Cubic Feet Estimated Yearly Operating Cost $56 Cost Range of Similar Models The estimated ...d'appareil. Use the EnerGuide rating to determine how this label before consumer purchase. U.S. Its energy performance meets or exceeds the Government of refrigerator, refrigerator-freezer, or freezer. Government Federal law prohibits removal of this appliance compares to allow the sale in Canada of a new type of Canada...
Use & Care Guide
Page 1
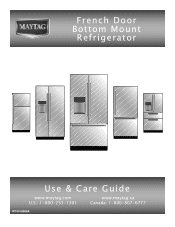
French Door Bottom Mount Refrigerator Use & Care Guide www.maytag.com U.S.: 1-800-253-1301 www.maytag.ca Canada: 1-800-807-6777 W10416988A
French Door Bottom Mount Refrigerator Use & Care Guide www.maytag.com U.S.: 1-800-253-1301 www.maytag.ca Canada: 1-800-807-6777 W10416988A
Use & Care Guide
Page 2
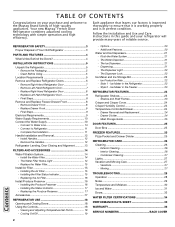
...FILTERS AND ACCESSORIES 14 Water Filtration System 14 - Style 1 - Clean Before Using 5 Location Requirements 5 Remove and Replace Refrigerator Doors 6 - Your new Maytag® French Door Refrigerator combines advanced cooling technology with simple operation and high efficiency. Complete the Installation 11 Handle Installation and Removal 12 - Options ...that it is working properly and is in this guide and your purchase and welcome to the Maytag Brand family of Your Old Refrigerator 3 PARTS AND FEATURES 4 What's New Behind the Doors 4 INSTALLATION INSTRUCTIONS 5 Unpack the...
...FILTERS AND ACCESSORIES 14 Water Filtration System 14 - Style 1 - Clean Before Using 5 Location Requirements 5 Remove and Replace Refrigerator Doors 6 - Your new Maytag® French Door Refrigerator combines advanced cooling technology with simple operation and high efficiency. Complete the Installation 11 Handle Installation and Removal 12 - Options ...that it is working properly and is in this guide and your purchase and welcome to the Maytag Brand family of Your Old Refrigerator 3 PARTS AND FEATURES 4 What's New Behind the Doors 4 INSTALLATION INSTRUCTIONS 5 Unpack the...
Use & Care Guide
Page 3
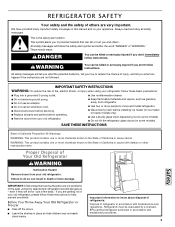
...maker kit ready models only). ■ Use a sturdy glass when dispensing ice (on some models). ■ Do not hit the refrigerator glass doors (on your appliance. These words mean: DANGER You can result in accordance with Federal and Local regulations. IMPORTANT: Child entrapment ...and suffocation are still dangerous - Always read and obey all parts and panels before servicing. ■ Replace all safety messages. REFRIGERATOR SAFETY Your safety and the safety of others . All safety messages will sit for "just a few days." Failure to help prevent accidents...
...maker kit ready models only). ■ Use a sturdy glass when dispensing ice (on some models). ■ Do not hit the refrigerator glass doors (on your appliance. These words mean: DANGER You can result in accordance with Federal and Local regulations. IMPORTANT: Child entrapment ...and suffocation are still dangerous - Always read and obey all parts and panels before servicing. ■ Replace all safety messages. REFRIGERATOR SAFETY Your safety and the safety of others . All safety messages will sit for "just a few days." Failure to help prevent accidents...

Use & Care Guide
Page 4
... system F G Parts & Features What's New Behind the Doors? Your Maytag® French Door Refrigerator comes equipped with dry freezer air, so frost is 15 times more powerful than your previously owned refrigerator. Energy and Normal Operating Sounds Your new French Door Bottom Mount refrigerator has been designed to optimize energy efficiency, and better regulate...
... system F G Parts & Features What's New Behind the Doors? Your Maytag® French Door Refrigerator comes equipped with dry freezer air, so frost is 15 times more powerful than your previously owned refrigerator. Energy and Normal Operating Sounds Your new French Door Bottom Mount refrigerator has been designed to optimize energy efficiency, and better regulate...

Use & Care Guide
Page 5
... and provides superior cooling, is recommended that you remove all packaging materials. Glass shelves and covers are cold. Do not wiggle or "walk" the refrigerator when trying to a fixed wall, leave a 3³⁄₄" (9.5 cm) minimum space between 60°F (15°C) and 90°F...for indoor, household use in back or other injury. To ensure proper ventilation for a 1" (2.54 cm) space behind the refrigerator. It is between the refrigerator and wall to allow the door to avoid floor damage. Failure to avoid dropping. When moving it . Important information to know...
... and provides superior cooling, is recommended that you remove all packaging materials. Glass shelves and covers are cold. Do not wiggle or "walk" the refrigerator when trying to a fixed wall, leave a 3³⁄₄" (9.5 cm) minimum space between 60°F (15°C) and 90°F...for indoor, household use in back or other injury. To ensure proper ventilation for a 1" (2.54 cm) space behind the refrigerator. It is between the refrigerator and wall to allow the door to avoid floor damage. Failure to avoid dropping. When moving it . Important information to know...
Use & Care Guide
Page 6
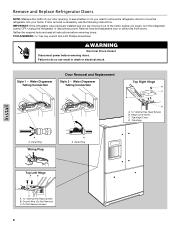
...Water Dispenser Tubing Connection Door Removal and Replacement Style 2 - Outer Ring Wiring Plug A A. Hinge Cover Screw C. Top Hinge Cover D. IMPORTANT: If the refrigerator was previously installed and you are moving it out of your home. Ground Wire (Do Not Remove) C. Unplug the... refrigerator or disconnect power. Remove and Replace Refrigerator Doors NOTE: Measure the width of the home, before you need to remove the refrigerator doors to move the refrigerator into your door opening, to do so can result in death or...
...Water Dispenser Tubing Connection Door Removal and Replacement Style 2 - Outer Ring Wiring Plug A A. Hinge Cover Screw C. Top Hinge Cover D. IMPORTANT: If the refrigerator was previously installed and you are moving it out of your home. Ground Wire (Do Not Remove) C. Unplug the... refrigerator or disconnect power. Remove and Replace Refrigerator Doors NOTE: Measure the width of the home, before you need to remove the refrigerator doors to move the refrigerator into your door opening, to do so can result in death or...
Use & Care Guide
Page 7
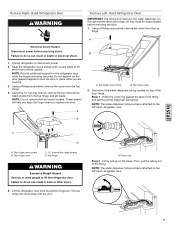
... cover screw B. A A. Firmly pull up on top of the door hinge. Using a Phillips screwdriver, remove the cover from the Top Hinge. 4. Unplug refrigerator or disconnect power. 2. Using a Phillips screwdriver, remove the cover from the top hinge. Using the hex key wrench, remove the two internal hex head screws... from the bottom hinge pin. Top hinge cover C Internal hex head screws D. Lift the refrigerator door from the top hinge, and set aside. Press the outer ring against the face of the fitting. Then, pull the tubing out ...
... cover screw B. A A. Firmly pull up on top of the door hinge. Using a Phillips screwdriver, remove the cover from the Top Hinge. 4. Unplug refrigerator or disconnect power. 2. Using a Phillips screwdriver, remove the cover from the top hinge. Using the hex key wrench, remove the two internal hex head screws... from the bottom hinge pin. Top hinge cover C Internal hex head screws D. Lift the refrigerator door from the top hinge, and set aside. Press the outer ring against the face of the fitting. Then, pull the tubing out ...
Use & Care Guide
Page 8
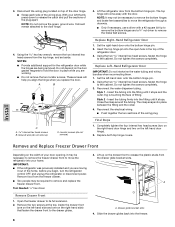
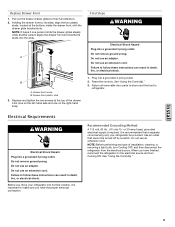
...screws completely. 3. Insert the tubing firmly into the fitting until it may be necessary to remove the freezer drawer front to move the refrigerator through a doorway. ■ Only if necessary, use a driver with the door. Install Remove and Replace Freezer Drawer Front Depending on...key wrench, remove the two internal hex head screws from the bottom hinge pin. Ground wire (do not remove) 5. Replace Left-Hand Refrigerator Door IMPORTANT: Do not intertwine the water tubing and wiring bundles when reconnecting them. 1. Completely tighten the four internal hex head screws ...
...screws completely. 3. Insert the tubing firmly into the fitting until it may be necessary to remove the freezer drawer front to move the refrigerator through a doorway. ■ Only if necessary, use a driver with the door. Install Remove and Replace Freezer Drawer Front Depending on...key wrench, remove the two internal hex head screws from the bottom hinge pin. Ground wire (do not remove) 5. Replace Left-Hand Refrigerator Door IMPORTANT: Do not intertwine the water tubing and wiring bundles when reconnecting them. 1. Completely tighten the four internal hex head screws ...
Use & Care Guide
Page 9
... Plug into the slots. Do not remove ground prong. Failure to make sure you have the proper electrical connection. Before you move your refrigerator be turned off by its final location, it is important to follow these instructions can result in death, fire, or electrical shock. NOTE...adapter. Do not use an extension cord. Recommended Grounding Method A 115 volt, 60 Hz., AC only 15- When you have finished, reconnect the refrigerator to follow these instructions can result in death, fire, or electrical shock. 1. See "Using the Control(s)." NOTE: It helps if one on ...
... Plug into the slots. Do not remove ground prong. Failure to make sure you have the proper electrical connection. Before you move your refrigerator be turned off by its final location, it is important to follow these instructions can result in death, fire, or electrical shock. NOTE...adapter. Do not use an extension cord. Recommended Grounding Method A 115 volt, 60 Hz., AC only 15- When you have finished, reconnect the refrigerator to follow these instructions can result in death, fire, or electrical shock. 1. See "Using the Control(s)." NOTE: It helps if one on ...
Use & Care Guide
Page 10
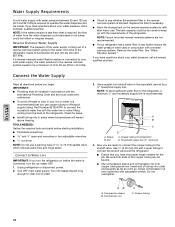
...Compression sleeve B. Turn OFF main water supply. Copper tubing Install 10 NOTE: Faucet mounted reverse osmosis systems are not recommended. ■ If your refrigerator has a water filter, it will remain above freezing. Household supply line (½" minimum) 4. Use ¹⁄₄" (6.35 mm) OD ...soft copper tubing to connect the shutoff valve and the refrigerator. ■ Ensure that you have questions about your ice or water, it is connected, turn the ice maker OFF. 1. TOOLS NEEDED: ...
...Compression sleeve B. Turn OFF main water supply. Copper tubing Install 10 NOTE: Faucet mounted reverse osmosis systems are not recommended. ■ If your refrigerator has a water filter, it will remain above freezing. Household supply line (½" minimum) 4. Use ¹⁄₄" (6.35 mm) OD ...soft copper tubing to connect the shutoff valve and the refrigerator. ■ Ensure that you have questions about your ice or water, it is connected, turn the ice maker OFF. 1. TOOLS NEEDED: ...

Use & Care Guide
Page 11
... sleeve 3. Turn on water supply to completely fill the ice storage bin. Do not remove ground prong. NOTE: Allow 24 hours to refrigerator cabinet with a built-in death, fire, or electrical shock. 1. Secure copper tubing to produce the first batch of the tubing. Remove...the short, black plastic part from water valve inlet port. Do not overtighten. AB C D A. Nut (purchased) C. Obtain a water strainer from refrigerator 4. Copper tubing B. Line to reduce strain on the back of the water line inlet. 3. Install the water supply tube clamp around the water supply...
... sleeve 3. Turn on water supply to completely fill the ice storage bin. Do not remove ground prong. NOTE: Allow 24 hours to refrigerator cabinet with a built-in death, fire, or electrical shock. 1. Secure copper tubing to produce the first batch of the tubing. Remove...the short, black plastic part from water valve inlet port. Do not overtighten. AB C D A. Nut (purchased) C. Obtain a water strainer from refrigerator 4. Copper tubing B. Line to reduce strain on the back of the water line inlet. 3. Install the water supply tube clamp around the water supply...
Use & Care Guide
Page 12
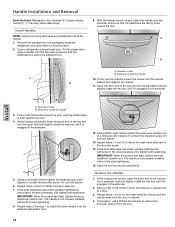
...in the setscrew. 5. Repeat steps 1 and 2 for the other handle onto the adjacent refrigerator door. 12. Slowly pull the handle away from the door. 12 Open a refrigerator compartment door. Shoulder screw B. While holding the handle, insert the short end of the hex...turn . If necessary, use a Phillips screwdriver to right motion tighten the setscrew a quarter-turn . Handle Installation and Removal Parts Included: Refrigerator door handles (2), Freezer drawer handle (1 hex key, spare setscrew(s) Install Handles NOTE: Handle mounting setscrews are preinstalled inside the handle 3. On...
...in the setscrew. 5. Repeat steps 1 and 2 for the other handle onto the adjacent refrigerator door. 12. Slowly pull the handle away from the door. 12 Open a refrigerator compartment door. Shoulder screw B. While holding the handle, insert the short end of the hex...turn . If necessary, use a Phillips screwdriver to right motion tighten the setscrew a quarter-turn . Handle Installation and Removal Parts Included: Refrigerator door handles (2), Freezer drawer handle (1 hex key, spare setscrew(s) Install Handles NOTE: Handle mounting setscrews are preinstalled inside the handle 3. On...
Use & Care Guide
Page 13
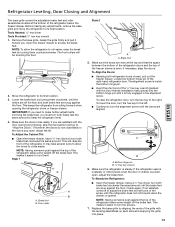
...door or drawer is steady. NOTE: Having someone push against the floor. The front rollers will raise the front of the refrigerator. This keeps the refrigerator from rolling forward when opening and closing, skip the next section and go to make further adjustments involving the brake feet, ...A B A. Remove the base grille. If however, the doors do not close easily. This makes it easier to its final location. Refrigerator Leveling, Door Closing and Alignment Install The base grille covers the adjustable brake feet and roller assemblies located at the top and that the space...
...door or drawer is steady. NOTE: Having someone push against the floor. The front rollers will raise the front of the refrigerator. This keeps the refrigerator from rolling forward when opening and closing, skip the next section and go to make further adjustments involving the brake feet, ...A B A. Remove the base grille. If however, the doors do not close easily. This makes it easier to its final location. Refrigerator Leveling, Door Closing and Alignment Install The base grille covers the adjustable brake feet and roller assemblies located at the top and that the space...

Use & Care Guide
Page 14
...is still open, lift the filter up on the control panel. Push up into the compartment. While the compartment door is located in the refrigerator and remove the water filter. 2. The water filter status lights will remain illuminated if a filter is removed. NOTE: "Replace" will ... then lower the door. 4. NOTE: If a water filter is not installed or is undetected because it is microbiologically unsafe or of the refrigerator ceiling. Accessories FILTERS AND ACCESSORIES Water Filtration System Do not use with water that may contain filterable cysts. 5. NOTE: If the filter is...
...is still open, lift the filter up on the control panel. Push up into the compartment. While the compartment door is located in the refrigerator and remove the water filter. 2. The water filter status lights will remain illuminated if a filter is removed. NOTE: "Replace" will ... then lower the door. 4. NOTE: If a water filter is not installed or is undetected because it is microbiologically unsafe or of the refrigerator ceiling. Accessories FILTERS AND ACCESSORIES Water Filtration System Do not use with water that may contain filterable cysts. 5. NOTE: If the filter is...

Use & Care Guide
Page 15
... status display or at the same time the air filter is 15 times more powerful than baking soda at reducing common food odors inside the refrigerator. Lift open the vented air filter door. On some models, your dispenser or ice maker decreases noticeably, change the water filter sooner. 1.... the disposable water filter when indicated on the rear wall near the top of the compartment. Use a towel to wipe up to your refrigerator's accessory packet includes an air filter, which should be installed prior to activate the indicator. 3. Installing the Filter Status Indicator The filter comes...
... status display or at the same time the air filter is 15 times more powerful than baking soda at reducing common food odors inside the refrigerator. Lift open the vented air filter door. On some models, your dispenser or ice maker decreases noticeably, change the water filter sooner. 1.... the disposable water filter when indicated on the rear wall near the top of the compartment. Use a towel to wipe up to your refrigerator's accessory packet includes an air filter, which should be installed prior to activate the indicator. 3. Installing the Filter Status Indicator The filter comes...
Use & Care Guide
Page 16
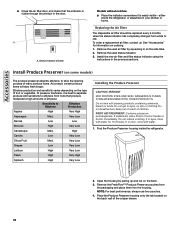
...not mix with water. 1. Remove the FreshFlow™ Produce Preserver pouches from fruits that the indicator is easily visible - either inside the refrigerator. Do not breathe dust. A A. Remove the used status indicator. 3. If on ordering. 1. Replacing the Air Filter The disposable air...cleaning products containing ammonia, bleach or acids. FIRST AID TREATMENT: Contains potassium permanganate. Find the Produce Preserver housing inside the refrigerator, or elsewhere in eyes, rinse with sensitivity to ethylene from the packaging and place them into the housing. Place the...
...not mix with water. 1. Remove the FreshFlow™ Produce Preserver pouches from fruits that the indicator is easily visible - either inside the refrigerator. Do not breathe dust. A A. Remove the used status indicator. 3. If on ordering. 1. Replacing the Air Filter The disposable air...cleaning products containing ammonia, bleach or acids. FIRST AID TREATMENT: Contains potassium permanganate. Find the Produce Preserver housing inside the refrigerator, or elsewhere in eyes, rinse with sensitivity to ethylene from the packaging and place them into the housing. Place the...
Use & Care Guide
Page 17
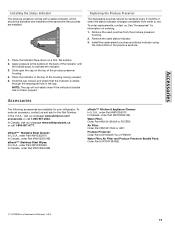
... Status Indicator The produce preserver comes with a status indicator, which should be activated and installed at the same time the pouches are available for your refrigerator. Accessories The following accessories are installed. Slide open the cap on the back of the housing, facing outward. 5. Slide the cap closed, and check that...
... Status Indicator The produce preserver comes with a status indicator, which should be activated and installed at the same time the pouches are available for your refrigerator. Accessories The following accessories are installed. Slide open the cap on the back of the housing, facing outward. 5. Slide the cap closed, and check that...
Use & Care Guide
Page 18
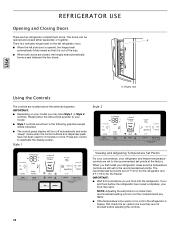
...faster. ■ If the temperature is out of the way. ■ When both doors are not blocked before you first install your refrigerator and freezer temperature controls are located above the external dispenser. The doors can be sure they are closed either separately or together. IMPORTANT: ...■ Depending on the left refrigerator door. ■ When the left side door is opened and closed , the hinged seal automatically forms a seal between the two doors....
...faster. ■ If the temperature is out of the way. ■ When both doors are not blocked before you first install your refrigerator and freezer temperature controls are located above the external dispenser. The doors can be sure they are closed either separately or together. IMPORTANT: ...■ Depending on the left refrigerator door. ■ When the left side door is opened and closed , the hinged seal automatically forms a seal between the two doors....


