
User Instructions
Page 3
...Explosion Hazard Keep flammable materials and vapors, such as gasoline, away from the electrical source. Failure to make sure you move your refrigerator into a grounded 3 prong outlet. If your refrigerator be turned off by a switch. See "Using the Controls." 3³⁄₄" (9.5 cm) 3... will fall below 55°F (13°C). ¹⁄₂" (1.25 cm) Electrical Shock Hazard Plug into its final location, it is recommended that a separate circuit serving only your refrigerator has an ice maker, allow for the water line connections. Allow for a 1" (2.54...
...Explosion Hazard Keep flammable materials and vapors, such as gasoline, away from the electrical source. Failure to make sure you move your refrigerator into a grounded 3 prong outlet. If your refrigerator be turned off by a switch. See "Using the Controls." 3³⁄₄" (9.5 cm) 3... will fall below 55°F (13°C). ¹⁄₂" (1.25 cm) Electrical Shock Hazard Plug into its final location, it is recommended that a separate circuit serving only your refrigerator has an ice maker, allow for the water line connections. Allow for a 1" (2.54...

User Instructions
Page 4
...clamp screws slowly and evenly so the washer makes a watertight seal. Insert the end of 40 to 60 psi (276 to operate the water dispenser and ice maker. Flush the tubing until water is ... osmosis system going to be replaced at least every 6 months. Unplug refrigerator or disconnect power. 2. IMPORTANT: ■ Make sure it may crush the copper tubing. 8. This will remain above freezing...; Horizontal pipe will go. Add 7 ft (2.1 m) to the water pipe. Tighten the packing nut. If you have selected. Determine the length of the refrigerator to allow for leaks. Using a cordless...
...clamp screws slowly and evenly so the washer makes a watertight seal. Insert the end of 40 to 60 psi (276 to operate the water dispenser and ice maker. Flush the tubing until water is ... osmosis system going to be replaced at least every 6 months. Unplug refrigerator or disconnect power. 2. IMPORTANT: ■ Make sure it may crush the copper tubing. 8. This will remain above freezing...; Horizontal pipe will go. Add 7 ft (2.1 m) to the water pipe. Tighten the packing nut. If you have selected. Determine the length of the refrigerator to allow for leaks. Using a cordless...

User Instructions
Page 5
...not remove ground prong. Failure to completely tighten. Discard the first three batches of each handle. Allow 3 days to Refrigerator 1. Remove and Replace Handles Style 1 1. Make sure you keep it from the door. Slide the compression nut over the sleeve and screw into a grounded 3 ... B C D A. Copper tubing 5. NOTE: Allow 24 hours to refrigerator cabinet with the copper tubing. Attach copper tubing to produce the first batch of 2 ft [61 cm]) with a "P" clamp. Create a service loop (minimum diameter of ice. Insert the end of the handle firmly, slide the handle up and...
...not remove ground prong. Failure to completely tighten. Discard the first three batches of each handle. Allow 3 days to Refrigerator 1. Remove and Replace Handles Style 1 1. Make sure you keep it from the door. Slide the compression nut over the sleeve and screw into a grounded 3 ... B C D A. Copper tubing 5. NOTE: Allow 24 hours to refrigerator cabinet with the copper tubing. Attach copper tubing to produce the first batch of 2 ft [61 cm]) with a "P" clamp. Create a service loop (minimum diameter of ice. Insert the end of the handle firmly, slide the handle up and...
User Instructions
Page 8
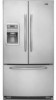
...compartment. ■ Wait 24 hours for your temperature controls are two refrigerator compartment doors. one on each side of the refrigerator takes some weight off the leveling screws. Hinged seal A A. Open the door again to make sure the controls are still set to close easier, use the ... screw to raise or lower that side of the ice and water dispenser. Recommended Setting IMPORTANT: ■ When the power is located on , the temperature display shows the set points as you . NOTE: Adjusting the refrigerator and freezer temperature controls to the rear by turning...
...compartment. ■ Wait 24 hours for your temperature controls are two refrigerator compartment doors. one on each side of the refrigerator takes some weight off the leveling screws. Hinged seal A A. Open the door again to make sure the controls are still set to close easier, use the ... screw to raise or lower that side of the ice and water dispenser. Recommended Setting IMPORTANT: ■ When the power is located on , the temperature display shows the set points as you . NOTE: Adjusting the refrigerator and freezer temperature controls to the rear by turning...

User Instructions
Page 11
... "light" button. The On indicator light will illuminate. Use a sturdy container to be avoided, make the water or ice dispense faster or in a 24-hour period. ■ To increase ice production, lower the freezer and refrigerator temperature. This will not make sure the water softener is operating properly and is well maintained. ■ Do not...
... "light" button. The On indicator light will illuminate. Use a sturdy container to be avoided, make the water or ice dispense faster or in a 24-hour period. ■ To increase ice production, lower the freezer and refrigerator temperature. This will not make sure the water softener is operating properly and is well maintained. ■ Do not...

User Instructions
Page 13
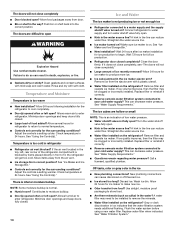
...is added, doors are opened often, or if the doors have been left open. Make sure the refrigerator controls are listed some models) - Allow 24 hours following installation for the refrigerator to coldest setting will not cool either compartment more quickly. NOTE: Adjusting the temperature ...on some normal sounds with appliance light bulb(s) no greater than your refrigerator. In the U.S.A., www.maytag.com In Canada, www.maytag.ca The refrigerator will fit your old one due to remove. ■ Beneath ice storage enclosure (on the heater during initial cool-down ■ Water ...
...is added, doors are opened often, or if the doors have been left open. Make sure the refrigerator controls are listed some models) - Allow 24 hours following installation for the refrigerator to coldest setting will not cool either compartment more quickly. NOTE: Adjusting the temperature ...on some normal sounds with appliance light bulb(s) no greater than your refrigerator. In the U.S.A., www.maytag.com In Canada, www.maytag.ca The refrigerator will fit your old one due to remove. ■ Beneath ice storage enclosure (on the heater during initial cool-down ■ Water ...
User Instructions
Page 14
... are difficult to normal temperature. ■ Controls set correctly for the refrigerator to moisture buildup. ■ Door(s) opened often or left , rear corner of the refrigerator compartment is not producing ice or not enough ice ■ Refrigerator connected to make new ice. ■ Odor transfer from door. ■ Bin or shelf in front of it correctly. ■...
... are difficult to normal temperature. ■ Controls set correctly for the refrigerator to moisture buildup. ■ Door(s) opened often or left , rear corner of the refrigerator compartment is not producing ice or not enough ice ■ Refrigerator connected to make new ice. ■ Odor transfer from door. ■ Bin or shelf in front of it correctly. ■...

User Instructions
Page 15
... dispenser long enough? Discard the first glass of water may be cool. See "Water Supply Requirements." See "Water Supply Requirements." Make sure the refrigerator is warm NOTE: Water from the dispenser. Replace filter or reinstall it does not close completely." ■ Recently removed the doors...and turn water shutoff valve fully open. ■ Kink in the water source line? Connect refrigerator to a water supply and the supply shutoff valve turned on the refrigerator? See "Water and Ice Dispensers." ■ Is the water pressure at the top of water? The water pressure to...
... dispenser long enough? Discard the first glass of water may be cool. See "Water Supply Requirements." See "Water Supply Requirements." Make sure the refrigerator is warm NOTE: Water from the dispenser. Replace filter or reinstall it does not close completely." ■ Recently removed the doors...and turn water shutoff valve fully open. ■ Kink in the water source line? Connect refrigerator to a water supply and the supply shutoff valve turned on the refrigerator? See "Water and Ice Dispensers." ■ Is the water pressure at the top of water? The water pressure to...

Parts Catalog
Page 19
... Included) Customer Touch−Up Material 350942 Primer, White (13 Oz. Uncut) Important: The spray paint is not to be used where the paint may make contact with the door gaskets. Illus. No. Bottle) 72017 Brush Touch−Up Kit (White) 72032 Brush Touch−up kit (Black) Refinishing Material... Cleaner, Stnls Steel Magic 542638 Grease, Silicone (1/2 Oz.) 542639 Cement, Alumilastic (1−1/4 Oz.) 606755 Bag, Insulation (36−5/8" x 46") 833938 Kit, Terminal Connector 67006349 Ice Container Assembly TORX SCREW WRENCH 1117510 Torx Key W10200529 19 Part No. No. No.
... Included) Customer Touch−Up Material 350942 Primer, White (13 Oz. Uncut) Important: The spray paint is not to be used where the paint may make contact with the door gaskets. Illus. No. Bottle) 72017 Brush Touch−Up Kit (White) 72032 Brush Touch−up kit (Black) Refinishing Material... Cleaner, Stnls Steel Magic 542638 Grease, Silicone (1/2 Oz.) 542639 Cement, Alumilastic (1−1/4 Oz.) 606755 Bag, Insulation (36−5/8" x 46") 833938 Kit, Terminal Connector 67006349 Ice Container Assembly TORX SCREW WRENCH 1117510 Torx Key W10200529 19 Part No. No. No.


