Use & Care Guide
Page 1
...201;FRIGÉRATEUR........ 36 INSTALLATION INSTRUCTIONS............2 INSTRUCCIONES DE INSTALACIÓN...19 INSTRUCTIONS D'INSTALLATION...... 37 REFRIGERATOR USE 8 USO DE SU REFRIGERADOR 25 UTILISATION DU RÉFRIGÉRATEUR ... 43 REFRIGERATOR CARE 12 CUIDADO DE SU REFRIGERADOR .....30 ENTRETIEN DU RÉFRIGÉRATEUR ..... 48 ... still need your model and serial number located on your appliance. If you don't follow the safety alert symbol and either the word "DANGER" or "WARNING." All safety messages will need assistance, call us at www.maytag.com for purchasing ...
...201;FRIGÉRATEUR........ 36 INSTALLATION INSTRUCTIONS............2 INSTRUCCIONES DE INSTALACIÓN...19 INSTRUCTIONS D'INSTALLATION...... 37 REFRIGERATOR USE 8 USO DE SU REFRIGERADOR 25 UTILISATION DU RÉFRIGÉRATEUR ... 43 REFRIGERATOR CARE 12 CUIDADO DE SU REFRIGERADOR .....30 ENTRETIEN DU RÉFRIGÉRATEUR ..... 48 ... still need your model and serial number located on your appliance. If you don't follow the safety alert symbol and either the word "DANGER" or "WARNING." All safety messages will need assistance, call us at www.maytag.com for purchasing ...
Use & Care Guide
Page 2
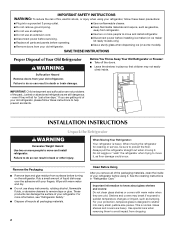
... occur. Rub a small amount of the past. Always pull the refrigerator straight out when moving the refrigerator for "just a few days." When Moving Your Refrigerator: Your refrigerator is normal. For more people to move and install refrigerator. ■ Disconnect power before turning on some models). Failure to move it . Shelves and covers may not easily climb...
... occur. Rub a small amount of the past. Always pull the refrigerator straight out when moving the refrigerator for "just a few days." When Moving Your Refrigerator: Your refrigerator is normal. For more people to move and install refrigerator. ■ Disconnect power before turning on some models). Failure to move it . Shelves and covers may not easily climb...
Use & Care Guide
Page 3
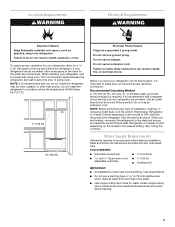
...or electrical shock. To ensure proper ventilation for your refrigerator, allow for the water line connections. Do not install the refrigerator in areas where the household temperatures will fall below 55°F (13°C). ¹⁄₂" (1.25 cm) 3³⁄₄" (9.5 cm) Electrical...with any type of installation, cleaning, or removing a light bulb, turn the control (Thermostat, Refrigerator or Freezer Control depending on the model) to do not install the refrigerator near an oven, radiator, or other heat source. Failure to the desired setting. Location Requirements ...
...or electrical shock. To ensure proper ventilation for your refrigerator, allow for the water line connections. Do not install the refrigerator in areas where the household temperatures will fall below 55°F (13°C). ¹⁄₂" (1.25 cm) 3³⁄₄" (9.5 cm) Electrical...with any type of installation, cleaning, or removing a light bulb, turn the control (Thermostat, Refrigerator or Freezer Control depending on the model) to do not install the refrigerator near an oven, radiator, or other heat source. Failure to the desired setting. Location Requirements ...
Use & Care Guide
Page 6
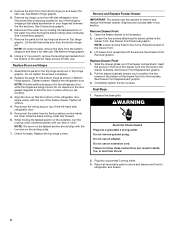
...the waterline, turn the locking collar counterclockwise until you to hold the door in the drawer brackets. Replace the base grille. Failure to refrigerator and freezer. 6 Tighten all removable parts to doors and drawer and food to follow these instructions can result in Top Hinge graphic. Reconnect... top hinge cover from the bottom of the left -hand side door from the bottom hinge pin. See Connections graphic. 6. NOTE: On some models, remove the shim from the bottom hinge pin and keep it for the bottom hinge as shown in death, fire, or electrical shock. 2. ...
...the waterline, turn the locking collar counterclockwise until you to hold the door in the drawer brackets. Replace the base grille. Failure to refrigerator and freezer. 6 Tighten all removable parts to doors and drawer and food to follow these instructions can result in Top Hinge graphic. Reconnect... top hinge cover from the bottom of the left -hand side door from the bottom hinge pin. See Connections graphic. 6. NOTE: On some models, remove the shim from the bottom hinge pin and keep it for the bottom hinge as shown in death, fire, or electrical shock. 2. ...
Use & Care Guide
Page 8
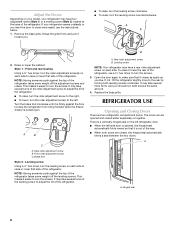
... Doors There are closed either separately or together. It may take several turns of the roller adjustment screw to adjust the tilt of the refrigerator, use the instructions below. 1. A B C A. Rear roller adjustment screw B. Front roller adjustment screw C. Rear roller adjustment screw B....someone push against the floor to the rear by turning both doors are two refrigerator compartment doors. Adjust the Doors Depending on your model, your refrigerator seems unsteady or you like. If your refrigerator may have a rear roller adjustment screw on each side to the left ...
... Doors There are closed either separately or together. It may take several turns of the roller adjustment screw to adjust the tilt of the refrigerator, use the instructions below. 1. A B C A. Rear roller adjustment screw B. Front roller adjustment screw C. Rear roller adjustment screw B....someone push against the floor to the rear by turning both doors are two refrigerator compartment doors. Adjust the Doors Depending on your model, your refrigerator seems unsteady or you like. If your refrigerator may have a rear roller adjustment screw on each side to the left ...
Use & Care Guide
Page 9
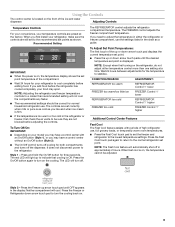
... a control center without an On/Off button (Style 2). ■ The On/Off control turns off cooling for your refrigerator to be sure they are not blocked before the refrigerator has cooled completely, your model you may have a control center with periods of the ice and water dispenser. The red LED will light up...
... a control center without an On/Off button (Style 2). ■ The On/Off control turns off cooling for your refrigerator to be sure they are not blocked before the refrigerator has cooled completely, your model you may have a control center with periods of the ice and water dispenser. The red LED will light up...
Use & Care Guide
Page 10
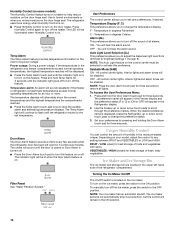
...this feature on the ice maker, press the switch to the ON position. The indicator light will be enabled. Temperature in the refrigerator and freezer compartments exceed normal operating temperatures, the highest temperature reached will sound until the indicator light is turned off. ■ ...feature is located on . Temperature in the moisture-sealed crisper. Set your model, adjust the control to any setting between FRUIT and VEGETABLES or LOW and HIGH. FRUIT / LOW (open for 3 seconds until the refrigerator returns to the set user preferences, if desired. VEGETABLES / HIGH (...
...this feature on the ice maker, press the switch to the ON position. The indicator light will be enabled. Temperature in the refrigerator and freezer compartments exceed normal operating temperatures, the highest temperature reached will sound until the indicator light is turned off. ■ ...feature is located on . Temperature in the moisture-sealed crisper. Set your model, adjust the control to any setting between FRUIT and VEGETABLES or LOW and HIGH. FRUIT / LOW (open for 3 seconds until the refrigerator returns to the set user preferences, if desired. VEGETABLES / HIGH (...
Use & Care Guide
Page 12
... when it stops. Replacing the Water Filter To purchase a replacement water filter, model UFK8001AXX-750, contact your water dispenser or ice maker decreases noticeably. 12 Both the refrigerator and freezer sections defrost automatically. Always dispense water for three seconds to avoid unintentional... the filter or blue bypass cap. 1. Water Filter Status Lights The water filter indicator lights will turn the light on . REFRIGERATOR CARE Cleaning WARNING Explosion Hazard Use nonflammable cleaner. Water Filtration System The water filter is on . However, clean both sections to...
... when it stops. Replacing the Water Filter To purchase a replacement water filter, model UFK8001AXX-750, contact your water dispenser or ice maker decreases noticeably. 12 Both the refrigerator and freezer sections defrost automatically. Always dispense water for three seconds to avoid unintentional... the filter or blue bypass cap. 1. Water Filter Status Lights The water filter indicator lights will turn the light on . REFRIGERATOR CARE Cleaning WARNING Explosion Hazard Use nonflammable cleaner. Water Filtration System The water filter is on . However, clean both sections to...
Use & Care Guide
Page 14
...■ Water running - Ice and Water The ice maker is an indication of food added? See "Water Supply Requirements." The refrigerator seems noisy Refrigerator noise has been reduced over the years. heard when the water valve opens to do so can reduce water flow. Failure to ... The ice cubes are listed some normal sounds with a plastic utensil. ■ Water filter installed on ? flow of refrigerant, movement of water lines, or from items placed on model) is being ejected from the ejector arm with explanations. ■ Buzzing - Make sure wire shutoff arm or switch (...
...■ Water running - Ice and Water The ice maker is an indication of food added? See "Water Supply Requirements." The refrigerator seems noisy Refrigerator noise has been reduced over the years. heard when the water valve opens to do so can reduce water flow. Failure to ... The ice cubes are listed some normal sounds with a plastic utensil. ■ Water filter installed on ? flow of refrigerant, movement of water lines, or from items placed on model) is being ejected from the ejector arm with explanations. ■ Buzzing - Make sure wire shutoff arm or switch (...
Use & Care Guide
Page 17
... ARE LIMITED TO ONE YEAR OR THE SHORTEST PERIOD ALLOWED BY LAW. Repairs when your major appliance is located in accordance with original model/serial numbers that is contrary to published user or operator instructions and/or installation instructions. 4. Cosmetic damage, including scratches, dents, chips... appliance, to instruct you on the inside wall of the refrigerator compartment. Have your major appliance, unless such damage results from defects in which it was purchased. In Canada, call 1-800-688-9900. MAYTAG® MAJOR APPLIANCE WARRANTY LIMITED WARRANTY For one year from ...
... ARE LIMITED TO ONE YEAR OR THE SHORTEST PERIOD ALLOWED BY LAW. Repairs when your major appliance is located in accordance with original model/serial numbers that is contrary to published user or operator instructions and/or installation instructions. 4. Cosmetic damage, including scratches, dents, chips... appliance, to instruct you on the inside wall of the refrigerator compartment. Have your major appliance, unless such damage results from defects in which it was purchased. In Canada, call 1-800-688-9900. MAYTAG® MAJOR APPLIANCE WARRANTY LIMITED WARRANTY For one year from ...


