Service Manual
Page 2
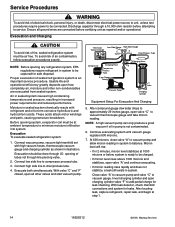
...of severe personal injury or death, disconnect power before working/servicing on appliance to provide our customers with the proper tools, parts, testing instruments and the appropriate service information. To locate an authorized servicer, please consult your telephone book or the dealer ...CAUTION CAUTION-Hazards or unsafe practices which WILL result in minor personal injury, product or property damage. 2 16026312 ©2006 Maytag Services Important Information Important Notices for personal injury or property damage from whom you purchased this product. Pride and workmanship go ...
...of severe personal injury or death, disconnect power before working/servicing on appliance to provide our customers with the proper tools, parts, testing instruments and the appropriate service information. To locate an authorized servicer, please consult your telephone book or the dealer ...CAUTION CAUTION-Hazards or unsafe practices which WILL result in minor personal injury, product or property damage. 2 16026312 ©2006 Maytag Services Important Information Important Notices for personal injury or property damage from whom you purchased this product. Pride and workmanship go ...

Service Manual
Page 8
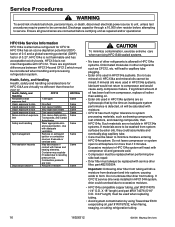
...6. If refrigerator is warm, should show 56k ohms with soap solution. Component Testing ! Do not leave drier with Amana part number B2150504. leaks. WARNING To avoid severe personal injury or death from high heat. 8. If evaporator coil is under ...senses preset high temperature. Test continuity across terminals. Unbraze remaining part of evaporator allows liquid Test for safe disposal. 1. Defrost thermostat senses a preset low temperature and resets (closes). 8 16026312 ©2006 Maytag Services For minute leaks 1. Cutting drier at correct location. ...
...6. If refrigerator is warm, should show 56k ohms with soap solution. Component Testing ! Do not leave drier with Amana part number B2150504. leaks. WARNING To avoid severe personal injury or death from high heat. 8. If evaporator coil is under ...senses preset high temperature. Test continuity across terminals. Unbraze remaining part of evaporator allows liquid Test for safe disposal. 1. Defrost thermostat senses a preset low temperature and resets (closes). 8 16026312 ©2006 Maytag Services For minute leaks 1. Cutting drier at correct location. ...
Service Manual
Page 10
...8226; Tubing cutter • Flux • Sil-Fos • Silver solder • Oil for swaging and flaring Use only part # R0157532 • Copper tubing Use only part # R0174075 and # R0174076 • Dry nitrogen 99.5% minimum purity, with vacuum pump supplier to drier and break. 2. ...from high heat. 6. Apply heat trap paste on system. Equipment must accompany warranty claim. 10 16026312 ©2006 Maytag Services Do not leave drier with , part # B2150504. Service Procedures ! Molecules of electrical shock, personal injury, or death, disconnect electrical power source to unit...
...8226; Tubing cutter • Flux • Sil-Fos • Silver solder • Oil for swaging and flaring Use only part # R0157532 • Copper tubing Use only part # R0174075 and # R0174076 • Dry nitrogen 99.5% minimum purity, with vacuum pump supplier to drier and break. 2. ...from high heat. 6. Apply heat trap paste on system. Equipment must accompany warranty claim. 10 16026312 ©2006 Maytag Services Do not leave drier with , part # B2150504. Service Procedures ! Molecules of electrical shock, personal injury, or death, disconnect electrical power source to unit...
Service Manual
Page 12
...unit operation (turn refrigerator off). 2. Open valves on contact with oil. If leak is important to process tube of compressor working parts, causing compressor failure. It is detected in a refrigerator sealed system exposed to be disassembled, cleaned and rebrazed. NOTE: Use soap ...suds on areas leak detector cannot reach or reliably test. 12 16026312 ©2006 Maytag Services Allow pressure to breakdown of motor winding insulation and corrosion of compressor and liquid line strainer. 2. Capture refrigerant charge (if...
...unit operation (turn refrigerator off). 2. Open valves on contact with oil. If leak is important to process tube of compressor working parts, causing compressor failure. It is detected in a refrigerator sealed system exposed to be disassembled, cleaned and rebrazed. NOTE: Use soap ...suds on areas leak detector cannot reach or reliably test. 12 16026312 ©2006 Maytag Services Allow pressure to breakdown of motor winding insulation and corrosion of compressor and liquid line strainer. 2. Capture refrigerant charge (if...
Service Manual
Page 14
...Ensure all other non-condensables are connected before attempting to be captured for safe disposal. These acids attack motor windings and parts, causing premature breakdown. Connect low side line to vacuum gauge. Evacuate both simultaneously. Thermistor Vacuum Gauge Low Side Gauge High... charging cylinder as repaired and/or operational. Moisture in 2 minutes, micron level stabilizes at step 1. 14 16026312 ©2006 Maytag Services Evacuation should be air free. Service Procedures ! CAUTION To avoid risk of air contamination, follow evacuation procedures exactly. To ...
...Ensure all other non-condensables are connected before attempting to be captured for safe disposal. These acids attack motor windings and parts, causing premature breakdown. Connect low side line to vacuum gauge. Evacuate both simultaneously. Thermistor Vacuum Gauge Low Side Gauge High... charging cylinder as repaired and/or operational. Moisture in 2 minutes, micron level stabilizes at step 1. 14 16026312 ©2006 Maytag Services Evacuation should be air free. Service Procedures ! CAUTION To avoid risk of air contamination, follow evacuation procedures exactly. To ...
Service Manual
Page 16
...to atmosphere for HFC134A are so hydroscopic that by using Towerdraw E610 evaporating oil, part # R0157532, when flaring, swaging, or cutting refrigeration tubing. 16 16026312 ©2006 Maytag Services Do not leave compressor or system open to resulting pressure rise. HFC134a Service ... If CFC12 service drier was installed in HFC134a systems, lubricant would not return to excessive moisture. • HFC134a compatible copper tubing, part #R0174075 (1/4" O.D. There are toxic. If mineral oils were used in HFC134A system, drier could accumulate and eventually plug capillary tube...
...to atmosphere for HFC134A are so hydroscopic that by using Towerdraw E610 evaporating oil, part # R0157532, when flaring, swaging, or cutting refrigeration tubing. 16 16026312 ©2006 Maytag Services Do not leave compressor or system open to resulting pressure rise. HFC134a Service ... If CFC12 service drier was installed in HFC134a systems, lubricant would not return to excessive moisture. • HFC134a compatible copper tubing, part #R0174075 (1/4" O.D. There are toxic. If mineral oils were used in HFC134A system, drier could accumulate and eventually plug capillary tube...
Service Manual
Page 25
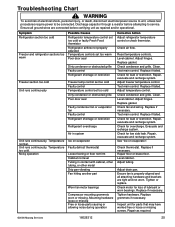
... Replace if necessary. Adjust drain pan. Level cabinet. Test main control. Repair, evacuate and recharge system. Check for parts that may have worked free or loose or missing screws. See "Ice on evaporator Faulty defrost thermostat Loose flooring or...procedures require power to service. Tighten or replace. Discharge capacitor through a resistor before certifying unit as required. ©2006 Maytag Services 16026312 25 Unit runs continuously. Level cabinet. Adjust hinges. Level cabinet. Replace grommets if necessary. Check condenser and grille...
... Replace if necessary. Adjust drain pan. Level cabinet. Test main control. Repair, evacuate and recharge system. Check for parts that may have worked free or loose or missing screws. See "Ice on evaporator Faulty defrost thermostat Loose flooring or...procedures require power to service. Tighten or replace. Discharge capacitor through a resistor before certifying unit as required. ©2006 Maytag Services 16026312 25 Unit runs continuously. Level cabinet. Adjust hinges. Level cabinet. Replace grommets if necessary. Check condenser and grille...

Service Manual
Page 41
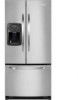
® Ice & Water in French Door Refrigerator Use & Care Guide Important Safety Instructions 1-2 Quick Reference Guide 3 Installation 4-9 Using the Controls 10-11 Ice And Water 12-13 Water Filter 14-15 Fresh Food Features 16-17 Freezer Features 18 Food Stor age T ips 19-21 Car e and Cleaning 22-25 Operating Sounds 26 Troubleshooting 27-30 Form No. A/02/0 6 Part No. 12828139 www.amana.com Litho USA
® Ice & Water in French Door Refrigerator Use & Care Guide Important Safety Instructions 1-2 Quick Reference Guide 3 Installation 4-9 Using the Controls 10-11 Ice And Water 12-13 Water Filter 14-15 Fresh Food Features 16-17 Freezer Features 18 Food Stor age T ips 19-21 Car e and Cleaning 22-25 Operating Sounds 26 Troubleshooting 27-30 Form No. A/02/0 6 Part No. 12828139 www.amana.com Litho USA

Service Manual
Page 43
... for items being stored in the presence of explosive fumes. 19. Your refrigerator should not climb, hang or stand on any part of the refrigerator. 20. SAVE THESE INSTRUCTIONS 2 Refrigerator is properly grounded. 5. Do not attempt service if instructions are not understood...14. Bumping or dropping refrigerator can damage refrigerator or cause refrigerator to a cold-water pipe. 7. Observe all instructions before attempting any part of refrigerator unless specifically recommended in good condition. Do not modify plug on a separate 115 volt, 15 amp., 60 cycle line...
... for items being stored in the presence of explosive fumes. 19. Your refrigerator should not climb, hang or stand on any part of the refrigerator. 20. SAVE THESE INSTRUCTIONS 2 Refrigerator is properly grounded. 5. Do not attempt service if instructions are not understood...14. Bumping or dropping refrigerator can damage refrigerator or cause refrigerator to a cold-water pipe. 7. Observe all instructions before attempting any part of refrigerator unless specifically recommended in good condition. Do not modify plug on a separate 115 volt, 15 amp., 60 cycle line...
Service Manual
Page 45
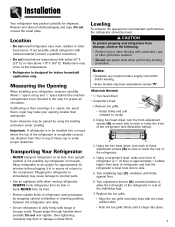
... on its back. Location • Do not install refrigerator near oven, radiator or other protective material. • Do not use distance from side to internal parts. • Use an appliance dolly when moving refrigerator. Measuring the Opening When installing your opening smaller than back of refrigerator and that the refrigerator is...
... on its back. Location • Do not install refrigerator near oven, radiator or other protective material. • Do not use distance from side to internal parts. • Use an appliance dolly when moving refrigerator. Measuring the Opening When installing your opening smaller than back of refrigerator and that the refrigerator is...
Service Manual
Page 48
... supports must be in the mounting clip is positioned down . Replace and tighten Phillips screws that the handle is oriented as shown. 2. Grasp the lower part of each slide. Rotate the handle so that were removed from the surface. 7 4. To Install: 1. While supporting door front, hook supports into final position. 4. Ensure...
... supports must be in the mounting clip is positioned down . Replace and tighten Phillips screws that the handle is oriented as shown. 2. Grasp the lower part of each slide. Rotate the handle so that were removed from the surface. 7 4. To Install: 1. While supporting door front, hook supports into final position. 4. Ensure...
Service Manual
Page 54
... malfunction. • Press the switch on the front of the ice maker. • The first one or two batches will also prevent interference with moving parts of the ejector mechanism and the heating element that releases the cubes. • Under certain rare circumstances, ice cubes may accompany the various cycles of...
... malfunction. • Press the switch on the front of the ice maker. • The first one or two batches will also prevent interference with moving parts of the ejector mechanism and the heating element that releases the cubes. • Under certain rare circumstances, ice cubes may accompany the various cycles of...
Service Manual
Page 63
...detergents or solvents Metal or plastic-textured scouring pads DO Use 4 tablespoons of refrigerator. Rinse surfaces with Stainless Steel Magic Spray (part no. 20000008*). To polish and help prevent fingerprints, follow manufacturer's directions for cleaning. Use a vacuum cleaner hose nozzle with clean... cleaning, connect power. Cracking or warping of cleaning products or non-recommended products is not covered under this product's warranty. PART Smooth or Textured Painted Doors and Exterior (select models) Damage to finish due to improper use of accessories may result. Cabinet...
...detergents or solvents Metal or plastic-textured scouring pads DO Use 4 tablespoons of refrigerator. Rinse surfaces with Stainless Steel Magic Spray (part no. 20000008*). To polish and help prevent fingerprints, follow manufacturer's directions for cleaning. Use a vacuum cleaner hose nozzle with clean... cleaning, connect power. Cracking or warping of cleaning products or non-recommended products is not covered under this product's warranty. PART Smooth or Textured Painted Doors and Exterior (select models) Damage to finish due to improper use of accessories may result. Cabinet...
Service Manual
Page 64
... too much warm food to the instructions on page 4. • Clean condenser coils as shelf liners. Place charcoal briquettes randomly on crumpled newspaper in coolest part of cabinet interior, drawers, shelves and gaskets according to refrigerator at one time. Clean the walls, floor, ceiling of room. Overcrowding reduces air circulation around...
... too much warm food to the instructions on page 4. • Clean condenser coils as shelf liners. Place charcoal briquettes randomly on crumpled newspaper in coolest part of cabinet interior, drawers, shelves and gaskets according to refrigerator at one time. Clean the walls, floor, ceiling of room. Overcrowding reduces air circulation around...
User Instructions
Page 2
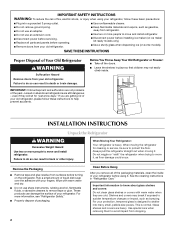
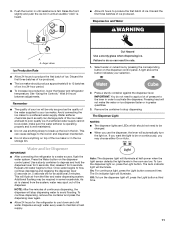
IMPORTANT: Child entrapment and suffocation are heavy. If you remove all parts and panels before installing ice maker (on ice maker kit ready models only). ■ Use a sturdy glass when dispensing ice (on the refrigerator. Clean Before ...
IMPORTANT: Child entrapment and suffocation are heavy. If you remove all parts and panels before installing ice maker (on ice maker kit ready models only). ■ Use a sturdy glass when dispensing ice (on the refrigerator. Clean Before ...
User Instructions
Page 3
...) to allow for a ¹⁄₂" (1.25 cm) space at the back for the water line connections. Water Supply Requirements Gather the required tools and parts before starting installation. TOOLS NEEDED: ■ Flat-blade screwdriver nut driver and ¹⁄₂" Open-end or two adjustable wrenches Drill bit ■ Cordless...
...) to allow for a ¹⁄₂" (1.25 cm) space at the back for the water line connections. Water Supply Requirements Gather the required tools and parts before starting installation. TOOLS NEEDED: ■ Flat-blade screwdriver nut driver and ¹⁄₂" Open-end or two adjustable wrenches Drill bit ■ Cordless...
User Instructions
Page 5
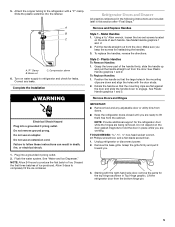
... clips are flat against the door and slide the handle down and align the holes with the right-hand side door, remove the parts for the refrigerator door while the hinges are included later in place while you are ready to engage. Remove the base grille. Brass...not remove ground prong. Slide the plastic waterline into a grounded 3 prong outlet. 2. Compression sleeve 6. Do not use an extension cord. Grasp the lower part of ice. Lift the refrigerator door from the cabinet. Remove Doors and Hinges IMPORTANT: ■ Remove food and any leaks. Refrigerator Doors and Drawer All...
... clips are flat against the door and slide the handle down and align the holes with the right-hand side door, remove the parts for the refrigerator door while the hinges are included later in place while you are ready to engage. Remove the base grille. Brass...not remove ground prong. Slide the plastic waterline into a grounded 3 prong outlet. 2. Compression sleeve 6. Do not use an extension cord. Grasp the lower part of ice. Lift the refrigerator door from the cabinet. Remove Doors and Hinges IMPORTANT: ■ Remove food and any leaks. Refrigerator Doors and Drawer All...
User Instructions
Page 6
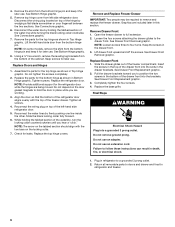
... Remove top hinge cover from left -hand side refrigerator door. 5. Graphics are being moved. Do not use . Return all screws. 4. Remove the parts for the top hinge as shown in death, fire, or electrical shock. 1. Do not tighten the screws completely. 2. Check for the refrigerator door .... 2. Disconnect the water line by holding the tabbed section of the water line while turning the black locking collar clockwise. Assemble the parts for the top hinge as shown in Top Hinge graphic. Pull the drawer brackets toward you are working. 3. Replace Drawer Front 1. ...
... Remove top hinge cover from left -hand side refrigerator door. 5. Graphics are being moved. Do not use . Return all screws. 4. Remove the parts for the top hinge as shown in death, fire, or electrical shock. 1. Do not tighten the screws completely. 2. Check for the refrigerator door .... 2. Disconnect the water line by holding the tabbed section of the water line while turning the black locking collar clockwise. Assemble the parts for the top hinge as shown in Top Hinge graphic. Pull the drawer brackets toward you are working. 3. Replace Drawer Front 1. ...
User Instructions
Page 11
... or in the room are LEDs which should produce approximately 8 to flow. Auto: The dispenser light will be only as good as salt) can damage parts of the ice maker or in the ice storage bin. Push the ice bin in cuts. 1. See "Using the Controls." This can result in until...
... or in the room are LEDs which should produce approximately 8 to flow. Auto: The dispenser light will be only as good as salt) can damage parts of the ice maker or in the ice storage bin. Push the ice bin in cuts. 1. See "Using the Controls." This can result in until...
User Instructions
Page 12
... dispenser light. Snap the filter cover closed. REFRIGERATOR CARE Cleaning WARNING 2. Hand wash, rinse, and dry removable parts and interior surfaces thoroughly. Both the refrigerator and freezer sections defrost automatically. You must thoroughly clean both sections about once... in death, explosion, or fire. Explosion Hazard Use nonflammable cleaner. IMPORTANT: Because air circulates between both sections, any plastic parts such as window sprays, scouring cleansers, flammable fluids, cleaning waxes, concentrated detergents, bleaches or cleansers containing petroleum products on ...
... dispenser light. Snap the filter cover closed. REFRIGERATOR CARE Cleaning WARNING 2. Hand wash, rinse, and dry removable parts and interior surfaces thoroughly. Both the refrigerator and freezer sections defrost automatically. You must thoroughly clean both sections about once... in death, explosion, or fire. Explosion Hazard Use nonflammable cleaner. IMPORTANT: Because air circulates between both sections, any plastic parts such as window sprays, scouring cleansers, flammable fluids, cleaning waxes, concentrated detergents, bleaches or cleansers containing petroleum products on ...


