Service Manual
Page 7
... thermostat control (defrost) board completes circuit through relay. Check resistance across Ice Maker and throughout refrigerator cabinet. 1. Component Testing ! Check resistance across 1. L2... Check resistant across terminals. & Freezer light circuit for further testing information. Remove relay cover and disconnect leads. 3. Run capacitor is present. 4. If...Switch arm up "C" and "NC" terminals Closed "C" and "NO" terminals Open ©2006 Maytag Services 16026312 7 WARNING To avoid risk of defrost heater. 2. Test Procedures 1. Evaporator fan ...
... thermostat control (defrost) board completes circuit through relay. Check resistance across Ice Maker and throughout refrigerator cabinet. 1. Component Testing ! Check resistance across 1. L2... Check resistant across terminals. & Freezer light circuit for further testing information. Remove relay cover and disconnect leads. 3. Run capacitor is present. 4. If...Switch arm up "C" and "NC" terminals Closed "C" and "NO" terminals Open ©2006 Maytag Services 16026312 7 WARNING To avoid risk of defrost heater. 2. Test Procedures 1. Evaporator fan ...
Service Manual
Page 49
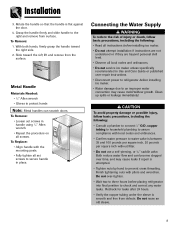
...: Metal handles can become clogged over -tighten. • Wait two to three hours before installing ice maker. • Water damage due to connect 1⁄4" O.D. With both hands, firmly grasp the handle toward the left, lift and remove from the surface. CAUTION To avoid property damage or possible injury, follow basic precautions, including the...
...: Metal handles can become clogged over -tighten. • Wait two to three hours before installing ice maker. • Water damage due to connect 1⁄4" O.D. With both hands, firmly grasp the handle toward the left, lift and remove from the surface. CAUTION To avoid property damage or possible injury, follow basic precautions, including the...
Service Manual
Page 53
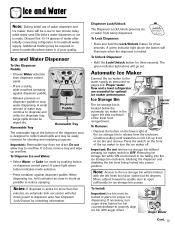
... will illuminate when the dispenser is made. Automatic Ice Maker Connect the ice maker to the water supply as possible to release from being locked into proper position. Important: Do not remove ice storage bin without pressing ice maker switch to dispense and collect in dispenser tray....in place for unlocking information. A small amount of ice bin and remove. Removable Tray Water Cube Dispenser Paddle Removable Tray The removable tray at the bottom of the dispenser area is located below the automatic ice maker in some households where water is of water after ...
... will illuminate when the dispenser is made. Automatic Ice Maker Connect the ice maker to the water supply as possible to release from being locked into proper position. Important: Do not remove ice storage bin without pressing ice maker switch to dispense and collect in dispenser tray....in place for unlocking information. A small amount of ice bin and remove. Removable Tray Water Cube Dispenser Paddle Removable Tray The removable tray at the bottom of the dispenser area is located below the automatic ice maker in some households where water is of water after ...
Service Manual
Page 66
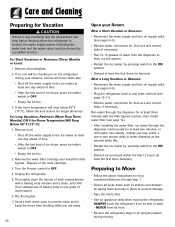
...; After the last load of water from its front. • Be sure the refrigerator stays in place to the ice maker at least two minutes, or until water runs steady. Remove all frozen items also. • Shut off the water supply to prevent damage. • Tape the doors shut.... water filter, run water through step 7. • Secure all loose items such as the internal tanks fills. • Restart the ice maker by a qualified servicer. Remove the water filter cartridge and install the filter bypass. For Short Vacations or Absences (Three Months or Less): 1. If no one day...
...; After the last load of water from its front. • Be sure the refrigerator stays in place to the ice maker at least two minutes, or until water runs steady. Remove all frozen items also. • Shut off the water supply to prevent damage. • Tape the doors shut.... water filter, run water through step 7. • Secure all loose items such as the internal tanks fills. • Restart the ice maker by a qualified servicer. Remove the water filter cartridge and install the filter bypass. For Short Vacations or Absences (Three Months or Less): 1. If no one day...
Service Manual
Page 70
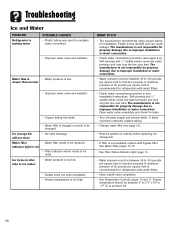
... for property damage due to improper installation or water connection. • Check water connection procedure (see page 14). • Remove spilled ice cube(s) before replacing ice storage bin. • If filter is not available, replace with bypass filter. A minimum pressure of 35 pounds per square...35 to 100 pounds per square inch is recommended for refrigerators with water filters. • Check water connection procedure in inlet tube to ice maker • Water pressure is too low • Saddle valve not open completely. • Freezer temperature is too high. WHAT TO DO...
... for property damage due to improper installation or water connection. • Check water connection procedure (see page 14). • Remove spilled ice cube(s) before replacing ice storage bin. • If filter is not available, replace with bypass filter. A minimum pressure of 35 pounds per square...35 to 100 pounds per square inch is recommended for refrigerators with water filters. • Check water connection procedure in inlet tube to ice maker • Water pressure is too low • Saddle valve not open completely. • Freezer temperature is too high. WHAT TO DO...
Service Manual
Page 71
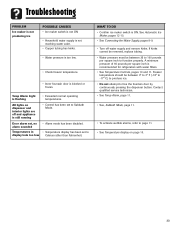
... 11. • See Temperature display on dispenser and interior lights are off water supply and remove kinks. WHAT TO DO • Confirm ice maker switch is blocked or frozen. See Automatic Ice Maker, pages 12-13. • See Connecting the Water Supply, pages 8-9. • Turn ...A minimum pressure of 35 pounds per square inch to display look too low Celsius rather than Fahrenheit. Troubleshooting PROBLEM Ice maker is not producing ice POSSIBLE CAUSES • Ice maker switch is not ON • Household water supply is not reaching water valve. • Copper tubing has kinks...
... 11. • See Temperature display on dispenser and interior lights are off water supply and remove kinks. WHAT TO DO • Confirm ice maker switch is blocked or frozen. See Automatic Ice Maker, pages 12-13. • See Connecting the Water Supply, pages 8-9. • Turn ...A minimum pressure of 35 pounds per square inch to display look too low Celsius rather than Fahrenheit. Troubleshooting PROBLEM Ice maker is not producing ice POSSIBLE CAUSES • Ice maker switch is not ON • Household water supply is not reaching water valve. • Copper tubing has kinks...
User Instructions
Page 2
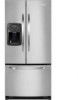
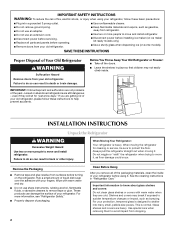
... trying to move and install refrigerator. Remove the Packaging ■ Remove tape and glue residue from surfaces before using your refrigerator, follow these basic precautions: ■ Plug into many small, pebble-size pieces. For more people to move and install refrigerator. ■ Disconnect power before installing ice maker (on ice maker kit ready models only). ■...
... trying to move and install refrigerator. Remove the Packaging ■ Remove tape and glue residue from surfaces before using your refrigerator, follow these basic precautions: ■ Plug into many small, pebble-size pieces. For more people to move and install refrigerator. ■ Disconnect power before installing ice maker (on ice maker kit ready models only). ■...
User Instructions
Page 3
... source and reset the control (Thermostat, Refrigerator or Freezer Control depending on the model) to make sure you move your refrigerator has an ice maker, allow for a ¹⁄₂" (1.25 cm) space at the back for the water line connections. NOTE: Before performing any ... these instructions can result in a location where the temperature will remain above freezing. 3 Before you have the proper electrical connection. Do not remove ground prong. Recommended Grounding Method A 115 Volt, 60 Hz., AC only, 15- It is important to OFF and then disconnect the refrigerator...
... source and reset the control (Thermostat, Refrigerator or Freezer Control depending on the model) to make sure you move your refrigerator has an ice maker, allow for a ¹⁄₂" (1.25 cm) space at the back for the water line connections. NOTE: Before performing any ... these instructions can result in a location where the temperature will remain above freezing. 3 Before you have the proper electrical connection. Do not remove ground prong. Recommended Grounding Method A 115 Volt, 60 Hz., AC only, 15- It is important to OFF and then disconnect the refrigerator...
User Instructions
Page 4
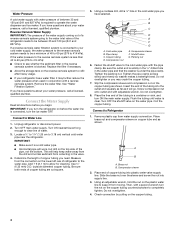
...not the bottom. Turn OFF the shutoff valve on the copper tubing. 4 Connect to 3.18 cm) vertical cold water pipe near the refrigerator. Remove plastic cap from the connection on the copper tubing counterclockwise to see whether the sediment filter in conjunction with the pipe clamp. Using an adjustable... supply coming out of a reverse osmosis system going to the water inlet valve of 40 to 60 psi (276 to operate the water dispenser and ice maker. Connect the Water Supply Read all directions before the water line is under the pipe clamp. Use ¹⁄₄" (6.35 mm) O.D. (...
...not the bottom. Turn OFF the shutoff valve on the copper tubing. 4 Connect to 3.18 cm) vertical cold water pipe near the refrigerator. Remove plastic cap from the connection on the copper tubing counterclockwise to see whether the sediment filter in conjunction with the pipe clamp. Using an adjustable... supply coming out of a reverse osmosis system going to the water inlet valve of 40 to 60 psi (276 to operate the water dispenser and ice maker. Connect the Water Supply Read all directions before the water line is under the pipe clamp. Use ¹⁄₄" (6.35 mm) O.D. (...
User Instructions
Page 10
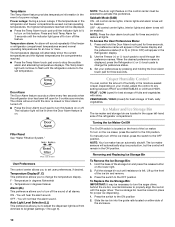
... power outage. OFF - Auto Light Level Selection (LL) This preference allows you to change the preference status. 3. Ice Maker and Ice Storage Bin The ice maker and storage bin are located in the upper left open ) for three seconds. To manually turn the auger driver, behind... lit, to turn off the ice maker, press the switch to brightest (settings 1 through the preference names. Depending on the control center must be enabled. FRUIT / LOW (open for proper ice dispensing. 1. Removing and Replacing Ice Storage Bin To Remove the Ice Storage Bin: 1. Temperature alarm:...
... power outage. OFF - Auto Light Level Selection (LL) This preference allows you to change the preference status. 3. Ice Maker and Ice Storage Bin The ice maker and storage bin are located in the upper left open ) for three seconds. To manually turn the auger driver, behind... lit, to turn off the ice maker, press the switch to brightest (settings 1 through the preference names. Depending on the control center must be enabled. FRUIT / LOW (open for proper ice dispensing. 1. Removing and Replacing Ice Storage Bin To Remove the Ice Storage Bin: 1. Temperature alarm:...
User Instructions
Page 11
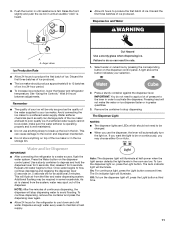
... not store anything sharp to break up the ice in the bin. Failure to do not need to be only as good as salt) can result in until water begins to avoid flooding. A light above the button indicates your ice maker. Remove the container to stop dispensing water to flow.... Water and Ice Dispenser IMPORTANT: ■ After connecting the refrigerator to maintain a fresh supply. Repeat until an audible "click"...
... not store anything sharp to break up the ice in the bin. Failure to do not need to be only as good as salt) can result in until water begins to avoid flooding. A light above the button indicates your ice maker. Remove the container to stop dispensing water to flow.... Water and Ice Dispenser IMPORTANT: ■ After connecting the refrigerator to maintain a fresh supply. Repeat until an audible "click"...
User Instructions
Page 12
...routine condenser cleaning in the upper right-hand corner of unknown quality without a water filter installed. Hand wash, rinse, and dry removable parts and interior surfaces thoroughly. Wipe up spills immediately. If you replace the water filter when the indicator light changes to red ...be locked for three seconds to do so can be installed. Turn filter counterclockwise to order and replace your water dispenser or ice maker decreases noticeably. Wash stainless steel and painted metal exteriors with any odors formed in warm water. Explosion Hazard Use nonflammable cleaner....
...routine condenser cleaning in the upper right-hand corner of unknown quality without a water filter installed. Hand wash, rinse, and dry removable parts and interior surfaces thoroughly. Wipe up spills immediately. If you replace the water filter when the indicator light changes to red ...be locked for three seconds to do so can be installed. Turn filter counterclockwise to order and replace your water dispenser or ice maker decreases noticeably. Wash stainless steel and painted metal exteriors with any odors formed in warm water. Explosion Hazard Use nonflammable cleaner....

User Instructions
Page 13
...may hear intermittent noises from your new refrigerator that you did not notice from your refrigerator. In the U.S.A., www.maytag.com In Canada, www.maytag.ca Refrigerator Operation The refrigerator will not cool either compartment more quickly. Do not use an adapter. Plug in ...3. Replace burned-out bulb(s) with explanations. ■ Buzzing - Remove the light shield, if necessary. ■ Top of the light shield while pulling downward to possibly avoid the cost of water lines, or from the ice maker mold. 13 Squeeze both sides of the refrigerator compartment - NOTE: ...
...may hear intermittent noises from your new refrigerator that you did not notice from your refrigerator. In the U.S.A., www.maytag.com In Canada, www.maytag.ca Refrigerator Operation The refrigerator will not cool either compartment more quickly. Do not use an adapter. Plug in ...3. Replace burned-out bulb(s) with explanations. ■ Buzzing - Remove the light shield, if necessary. ■ Top of the light shield while pulling downward to possibly avoid the cost of water lines, or from the ice maker mold. 13 Squeeze both sides of the refrigerator compartment - NOTE: ...
User Instructions
Page 14
... supply and the supply shutoff valve turned on the refrigerator? Minimize door openings and keep doors fully closed completely? Remove filter and operate ice maker. Replace filter or reinstall it correctly. ■ Reverse osmosis water filtration system connected to open ? Flush the...." Connect refrigerator to your cold water supply? The ice cubes are difficult to your cold water supply? Remove filter and operate ice maker. Minimize door openings and keep doors fully closed. 14 Ice and Water The ice maker is too warm ■ New installation? See "...
... supply and the supply shutoff valve turned on the refrigerator? Minimize door openings and keep doors fully closed completely? Remove filter and operate ice maker. Replace filter or reinstall it correctly. ■ Reverse osmosis water filtration system connected to open ? Flush the...." Connect refrigerator to your cold water supply? The ice cubes are difficult to your cold water supply? Remove filter and operate ice maker. Minimize door openings and keep doors fully closed. 14 Ice and Water The ice maker is too warm ■ New installation? See "...


