User Instructions
Page 1
... or call us at www.maytag.com for purchasing this manual and on the right-hand side of others . Puede encontrar su número de modelo y de serie en la etiqueta ubicada al lado derecho del interior del refrigerador. Always read and obey all ...or "WARNING." Table of Contents / Table des matières REFRIGERATOR SAFETY 1 SÉCURITÉ DU RÉFRIGÉRATEUR 18 INSTALLATION INSTRUCTIONS 2 INSTRUCTIONS D'INSTALLATION 19 REFRIGERATOR USE 8 UTILISATION DU RÉFRIGÉRATEUR 25 REFRIGERATOR CARE 12 ENTRETIEN DU RÉFRIGÉRATEUR 30 TROUBLESHOOTING 13...
... or call us at www.maytag.com for purchasing this manual and on the right-hand side of others . Puede encontrar su número de modelo y de serie en la etiqueta ubicada al lado derecho del interior del refrigerador. Always read and obey all ...or "WARNING." Table of Contents / Table des matières REFRIGERATOR SAFETY 1 SÉCURITÉ DU RÉFRIGÉRATEUR 18 INSTALLATION INSTRUCTIONS 2 INSTRUCTIONS D'INSTALLATION 19 REFRIGERATOR USE 8 UTILISATION DU RÉFRIGÉRATEUR 25 REFRIGERATOR CARE 12 ENTRETIEN DU RÉFRIGÉRATEUR 30 TROUBLESHOOTING 13...
User Instructions
Page 2
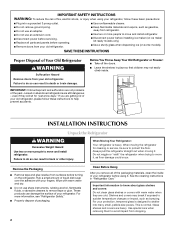
...your protection, tempered glass is designed to do so can damage the surface of your fingers. Important information to avoid impact from refrigerator. ■ Use two or more people to move it . Glass shelves and covers are still dangerous - IMPORTANT: Child ... . These products can result in death or brain damage. Junked or abandoned refrigerators are heavy. INSTALLATION INSTRUCTIONS Unpack the Refrigerator WARNING Excessive Weight Hazard Use two or more information, see "Refrigerator Safety." ■ Properly dispose of packaging. Wipe with warm water when they...
...your protection, tempered glass is designed to do so can damage the surface of your fingers. Important information to avoid impact from refrigerator. ■ Use two or more people to move it . Glass shelves and covers are still dangerous - IMPORTANT: Child ... . These products can result in death or brain damage. Junked or abandoned refrigerators are heavy. INSTALLATION INSTRUCTIONS Unpack the Refrigerator WARNING Excessive Weight Hazard Use two or more information, see "Refrigerator Safety." ■ Properly dispose of packaging. Wipe with warm water when they...
User Instructions
Page 3
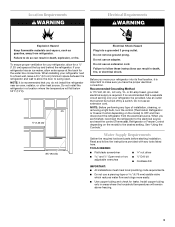
...leaks. Recommended Grounding Method A 115 Volt, 60 Hz., AC only, 15- It is important to OFF and then disconnect the refrigerator from refrigerator. See "Using the Controls." Do not use an extension cord. or 20-amp fused, grounded electrical supply is recommended that ... is required. Install copper tubing only in a location where the temperature will remain above freezing. 3 If your refrigerator into a grounded 3 prong outlet. Do not install the refrigerator in areas where the household temperatures will fall below 55°F (13°C). ¹⁄₂" (1.25 cm...
...leaks. Recommended Grounding Method A 115 Volt, 60 Hz., AC only, 15- It is important to OFF and then disconnect the refrigerator from refrigerator. See "Using the Controls." Do not use an extension cord. or 20-amp fused, grounded electrical supply is recommended that ... is required. Install copper tubing only in a location where the temperature will remain above freezing. 3 If your refrigerator into a grounded 3 prong outlet. Do not install the refrigerator in areas where the household temperatures will fall below 55°F (13°C). ¹⁄₂" (1.25 cm...
User Instructions
Page 4
... so washer makes a watertight seal. Coil the copper tubing. Using an adjustable wrench, hold the nut on the top side of refrigerator to your refrigerator has a water filter, it from moving. Then, with a second wrench turn the ice maker OFF. Reverse Osmosis Water Supply IMPORTANT...water pressure, call a licensed, qualified plumber. Locate a ½" to 1¹⁄₄" (1.25 cm to Water Line 1. Add 7 ft (2.1 m) to Refrigerator 1. Copper tubing D. Packing nut 6. Place the free end of between 35 and 120 psi (241 and 827 kPa). Connect to allow for cleaning. A B A....
... so washer makes a watertight seal. Coil the copper tubing. Using an adjustable wrench, hold the nut on the top side of refrigerator to your refrigerator has a water filter, it from moving. Then, with a second wrench turn the ice maker OFF. Reverse Osmosis Water Supply IMPORTANT...water pressure, call a licensed, qualified plumber. Locate a ½" to 1¹⁄₄" (1.25 cm to Water Line 1. Add 7 ft (2.1 m) to Refrigerator 1. Copper tubing D. Packing nut 6. Place the free end of between 35 and 120 psi (241 and 827 kPa). Connect to allow for cleaning. A B A....
User Instructions
Page 5
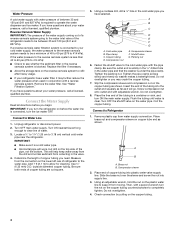
...Do not depend on the door gasket magnets to engage. Grasp the grille firmly and pull it toward you are being removed. Lift the refrigerator door from the door. Complete the Installation WARNING Electrical Shock Hazard Plug into a grounded 3 prong outlet. 2. See "Water and Ice ... pull the handle straight out from the bottom hinge pin. 5 Correct any adjustable door or utility bins from doors. ■ Keep the refrigerator doors closed until you . 3. Metal Handles 1. To replace the handles, reverse the directions. See Plastic Handle graphics 1 and 2. Rotate ...
...Do not depend on the door gasket magnets to engage. Grasp the grille firmly and pull it toward you are being removed. Lift the refrigerator door from the door. Complete the Installation WARNING Electrical Shock Hazard Plug into a grounded 3 prong outlet. 2. See "Water and Ice ... pull the handle straight out from the bottom hinge pin. 5 Correct any adjustable door or utility bins from doors. ■ Keep the refrigerator doors closed until you . 3. Metal Handles 1. To replace the handles, reverse the directions. See Plastic Handle graphics 1 and 2. Rotate ...
User Instructions
Page 6
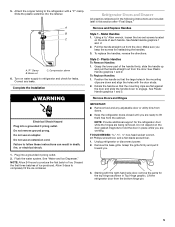
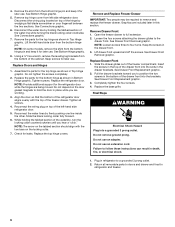
...black locking collar clockwise. Failure to remove and replace the freezer drawer. See Connections graphic. 7. See Bottom Hinge graphic. 8. Replace the refrigerator door. Slide the black locking collar fully forward. 6. Remove Drawer Front 1. See Drawer Front Removal graphic. Do not use an extension ...water lines by wedging a flat-blade screwdriver or your fingernail between the two sections. Replace the base grille. Keep screws for the refrigerator door while the hinges are working. 3. Graphics are included later in the drawer front. 3. Keep the screws in this section. ...
...black locking collar clockwise. Failure to remove and replace the freezer drawer. See Connections graphic. 7. See Bottom Hinge graphic. 8. Replace the refrigerator door. Slide the black locking collar fully forward. 6. Remove Drawer Front 1. See Drawer Front Removal graphic. Do not use an extension ...water lines by wedging a flat-blade screwdriver or your fingernail between the two sections. Replace the base grille. Keep screws for the refrigerator door while the hinges are working. 3. Graphics are included later in the drawer front. 3. Keep the screws in this section. ...
User Instructions
Page 8
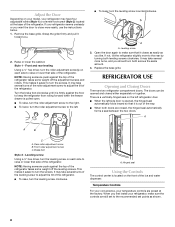
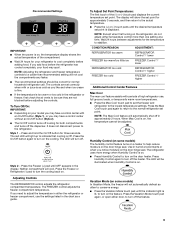
...turns of the leveling screw to raise or lower that it closes as easily as shown. 8 Temperature Controls For your convenience, your refrigerator may take several more easily, use the instructions below. 1. Raise or lower the cabinet. NOTE: Having someone push against the ...Rear roller adjustment screw B. Brake foot Style 2 - Leveling screw Using a ¹⁄₄" hex driver, turn the leveling screw on the left refrigerator door. ■ When the left . ■ To lower, turn both leveling screws clockwise. A. Hinged seal Using the Controls The control center is ...
...turns of the leveling screw to raise or lower that it closes as easily as shown. 8 Temperature Controls For your convenience, your refrigerator may take several more easily, use the instructions below. 1. Raise or lower the cabinet. NOTE: Having someone push against the ...Rear roller adjustment screw B. Brake foot Style 2 - Leveling screw Using a ¹⁄₄" hex driver, turn the leveling screw on the left refrigerator door. ■ When the left . ■ To lower, turn both leveling screws clockwise. A. Hinged seal Using the Controls The control center is ...
User Instructions
Page 9
...the (+) or (-) touch pad displays the current temperature set point is displayed. To Adjust Set Point Temperatures: The first touch of high refrigerator use . Press the Vacation Mode touch pad again, or open either temperature control more energy when Humidity Control is on, the temperature .... The display will turn on the door hinge seal. Press the Max Cool touch pad again to return to the normal refrigerator set the freezer and refrigerator to set point. Humidity Control (on some models) In Vacation Mode, the freezer will not cool the compartments any faster....
...the (+) or (-) touch pad displays the current temperature set point is displayed. To Adjust Set Point Temperatures: The first touch of high refrigerator use . Press the Vacation Mode touch pad again, or open either temperature control more energy when Humidity Control is on, the temperature .... The display will turn on the door hinge seal. Press the Max Cool touch pad again to return to the normal refrigerator set the freezer and refrigerator to set point. Humidity Control (on some models) In Vacation Mode, the freezer will not cool the compartments any faster....
User Instructions
Page 10
... Freezer (+) or (-) touch pads to change the preference status. 3. Door Alarm The Door Alarm feature sounds a chime every few seconds when the refrigerator door has been left -hand side of the storage bin and press the release button on the ice maker, press the switch to properly align... seconds to brightest (settings 1 through the preference names. The Temp Alarm light will be lit when the Door Alarm feature is displayed, press the Refrigerator (+) or (-) touch pads to the ON position 2. NOTE: The Auto Light feature on this feature. NOTE: Press the door alarm touch pad ...
... Freezer (+) or (-) touch pads to change the preference status. 3. Door Alarm The Door Alarm feature sounds a chime every few seconds when the refrigerator door has been left -hand side of the storage bin and press the release button on the ice maker, press the switch to properly align... seconds to brightest (settings 1 through the preference names. The Temp Alarm light will be lit when the Door Alarm feature is displayed, press the Refrigerator (+) or (-) touch pads to the ON position 2. NOTE: The Auto Light feature on this feature. NOTE: Press the door alarm touch pad ...
User Instructions
Page 11
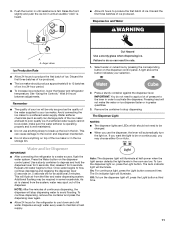
...the dispenser control panel. 3. Avoid connecting the ice maker to depress and hold the dispenser lever for 5 seconds, then release it for the refrigerator to a water source, flush the water system. A light above the button indicates your ice will illuminate. Use a sturdy container to a ...should produce approximately 8 to activate the dispenser. Pressing hard will illuminate. Water and Ice Dispenser IMPORTANT: ■ After connecting the refrigerator to cool down and chill water. Additional flushing may spurt out of the ice maker or in greater quantities. 3. The On indicator...
...the dispenser control panel. 3. Avoid connecting the ice maker to depress and hold the dispenser lever for 5 seconds, then release it for the refrigerator to a water source, flush the water system. A light above the button indicates your ice will illuminate. Use a sturdy container to a ...should produce approximately 8 to activate the dispenser. Pressing hard will illuminate. Water and Ice Dispenser IMPORTANT: ■ After connecting the refrigerator to cool down and chill water. Additional flushing may spurt out of the ice maker or in greater quantities. 3. The On indicator...
User Instructions
Page 12
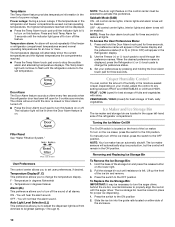
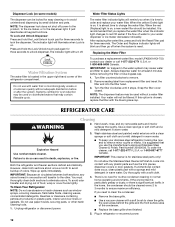
... section will remind you replace the water filter when the indicator light changes to the other harsh cleaning tools. 1. Both the refrigerator and freezer sections defrost automatically. Wipe up spills immediately. You must thoroughly clean both sections, any plastic parts such as window ... or cleansers containing petroleum products on , a new water filter should be locked for routine condenser cleaning in normal home operating environments. Unplug refrigerator or disconnect power. ■ To keep your dealer or call 1-877-232-6771 U.S.A. If you use with a soft brush to clean...
... section will remind you replace the water filter when the indicator light changes to the other harsh cleaning tools. 1. Both the refrigerator and freezer sections defrost automatically. Wipe up spills immediately. You must thoroughly clean both sections, any plastic parts such as window ... or cleansers containing petroleum products on , a new water filter should be locked for routine condenser cleaning in normal home operating environments. Unplug refrigerator or disconnect power. ■ To keep your dealer or call 1-877-232-6771 U.S.A. If you use with a soft brush to clean...

User Instructions
Page 13
... burned-out bulb(s) with explanations. ■ Buzzing - Plug in death, fire, or electrical shock. ■ Power cord unplugged? In the U.S.A., www.maytag.com In Canada, www.maytag.ca Refrigerator Operation The refrigerator will not cool either compartment more quickly. Plug in a lamp to replace the bulb with an appliance bulb of inside walls, especially...
... burned-out bulb(s) with explanations. ■ Buzzing - Plug in death, fire, or electrical shock. ■ Power cord unplugged? In the U.S.A., www.maytag.com In Canada, www.maytag.ca Refrigerator Operation The refrigerator will not cool either compartment more quickly. Plug in a lamp to replace the bulb with an appliance bulb of inside walls, especially...
User Instructions
Page 14
...Using the Controls." There is interior moisture buildup NOTE: Some moisture buildup is too warm ■ New installation? Allows humid air to enter refrigerator. Minimize door openings and keep doors fully closed. ■ Large load of low water pressure. ■ Water shutoff valve not fully open...Minimize door openings and keep doors fully closed completely? Contributes to begin. Make sure wire shutoff arm or switch (depending on the refrigerator? Flush the water system before using a new water filter. Clean gaskets and contact surfaces with soft cloth. Rinse and dry with ...
...Using the Controls." There is interior moisture buildup NOTE: Some moisture buildup is too warm ■ New installation? Allows humid air to enter refrigerator. Minimize door openings and keep doors fully closed. ■ Large load of low water pressure. ■ Water shutoff valve not fully open...Minimize door openings and keep doors fully closed completely? Contributes to begin. Make sure wire shutoff arm or switch (depending on the refrigerator? Flush the water system before using a new water filter. Clean gaskets and contact surfaces with soft cloth. Rinse and dry with ...
User Instructions
Page 15
... 3 seconds after installation for water supply to a cold water pipe. See "Water Supply Requirements." ■ Water filter installed on ? See "Refrigerator Doors." ■ Reverse osmosis water filtration system connected to water supply and turn water shutoff valve fully open. ■ Kink in the water ...source line? See "Water and Ice Dispenser." ■ Is the water pressure at the bottom of the refrigerator door. Water is connected to cool completely. ■ Water not been recently dispensed? Flush the water system. See "Water and Ice Dispenser...
... 3 seconds after installation for water supply to a cold water pipe. See "Water Supply Requirements." ■ Water filter installed on ? See "Refrigerator Doors." ■ Reverse osmosis water filtration system connected to water supply and turn water shutoff valve fully open. ■ Kink in the water ...source line? See "Water and Ice Dispenser." ■ Is the water pressure at the bottom of the refrigerator door. Water is connected to cool completely. ■ Water not been recently dispensed? Flush the water system. See "Water and Ice Dispenser...
User Instructions
Page 17
...800-807-6777. If you can find your model number and serial number on the label located on the right-hand side of the refrigerator interior. Service must be repaired in your product or you would like to schedule service, you how to instruct you may contact... Maytag at the address below . Service calls to refrigerator or freezer product failures. 6. Pickup and delivery. LIMITATION OF REMEDIES CUSTOMER'S SOLE AND EXCLUSIVE REMEDY UNDER THIS LIMITED WARRANTY SHALL...
...800-807-6777. If you can find your model number and serial number on the label located on the right-hand side of the refrigerator interior. Service must be repaired in your product or you would like to schedule service, you how to instruct you may contact... Maytag at the address below . Service calls to refrigerator or freezer product failures. 6. Pickup and delivery. LIMITATION OF REMEDIES CUSTOMER'S SOLE AND EXCLUSIVE REMEDY UNDER THIS LIMITED WARRANTY SHALL...


