Parts Diagram
Page 4
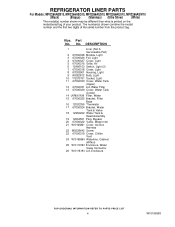
... Base 16 12002355 Thermistor 17 67006324 Bracket, Water Tank & Valve 18 12956202 Water Tank & Head Assembly 19 12664501 Plug, Bypass 20 67006322 Valve, Water Inlet 21 W10165861 Cover, Ice Box Harness 22 M0238642 Screw 23 67006319 Cover, Chiller Vent 24 W10165864 Waterline, Cabinet (W/Nut) 25 W10118193 Enclosure, Water Valve Connector 26...
... Base 16 12002355 Thermistor 17 67006324 Bracket, Water Tank & Valve 18 12956202 Water Tank & Head Assembly 19 12664501 Plug, Bypass 20 67006322 Valve, Water Inlet 21 W10165861 Cover, Ice Box Harness 22 M0238642 Screw 23 67006319 Cover, Chiller Vent 24 W10165864 Waterline, Cabinet (W/Nut) 25 W10118193 Enclosure, Water Valve Connector 26...
Parts Diagram
Page 12
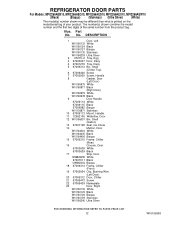
... 67006314 Frame, Chiller (Front) 19 67005954 Clip, Bushing Wire (Left Door) 20 67006312 Door, Chiller 21 67006473 Screw 22 67006439 Nameplate 23 Door, Right W10160132 White W10160123 Black W10160126 Bisque W10160129 Stainless W10166240 Ultra Silver 12 W10166583 REFRIGERATOR DOOR PARTS For Models: MFI2266AEB10, MFI2266AEQ10, MFI2266AES10, MFI2266AEU10, MFI2266AEW10 (Black) (Bisque) (Stainless) (Ultra Silver...
... 67006314 Frame, Chiller (Front) 19 67005954 Clip, Bushing Wire (Left Door) 20 67006312 Door, Chiller 21 67006473 Screw 22 67006439 Nameplate 23 Door, Right W10160132 White W10160123 Black W10160126 Bisque W10160129 Stainless W10166240 Ultra Silver 12 W10166583 REFRIGERATOR DOOR PARTS For Models: MFI2266AEB10, MFI2266AEQ10, MFI2266AES10, MFI2266AEU10, MFI2266AEW10 (Black) (Bisque) (Stainless) (Ultra Silver...
Parts Diagram
Page 16
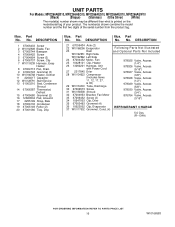
... MFI2266AEB10, MFI2266AEQ10, MFI2266AES10, MFI2266AEU10, MFI2266AEW10 (Black) (Bisque) (Stainless) (Ultra Silver) (White) Illus. DESCRIPTION Illus. DESCRIPTION 21 67006434 Axle (2) 22 W10166256 Evaporator Following Parts Not Illustrated 23 Dam and Optional Parts Not Included W10162951 Right Side W10162962 Left Side ...Valve, Access (5/8") 978030 Valve, Access (3/4") 876764 Valve, Access (3/16") 35 67003493 Grommet (4) 36 10623002 Clip, Evaporator REFRIGERANT CHARGE 37 W10117502 Grommet, Cond. (4) 5.0 Ozs. (R−134A) 16 W10166583 Part No. No. Part No. No. No.
... MFI2266AEB10, MFI2266AEQ10, MFI2266AES10, MFI2266AEU10, MFI2266AEW10 (Black) (Bisque) (Stainless) (Ultra Silver) (White) Illus. DESCRIPTION Illus. DESCRIPTION 21 67006434 Axle (2) 22 W10166256 Evaporator Following Parts Not Illustrated 23 Dam and Optional Parts Not Included W10162951 Right Side W10162962 Left Side ...Valve, Access (5/8") 978030 Valve, Access (3/4") 876764 Valve, Access (3/16") 35 67003493 Grommet (4) 36 10623002 Clip, Evaporator REFRIGERANT CHARGE 37 W10117502 Grommet, Cond. (4) 5.0 Ozs. (R−134A) 16 W10166583 Part No. No. Part No. No. No.
Dimensions
Page 1
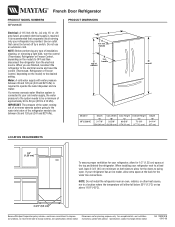
...: A 115 Volt, 60 Hz., AC only 15- handle C top of approximately 40 to 60 psi (276 to OFF and then disconnect the refrigerator from the electrical source. handle 4 1 D overall Model # MFI2266AE Depth "A" 31-7/8" (80.98 cm) Cab. Width "B" 32-5/8" (82.88 cm) Cab. Height "C" 68-5/8" (174.31 cm) Overall Height "D" 70-1/8" (177...
...: A 115 Volt, 60 Hz., AC only 15- handle C top of approximately 40 to 60 psi (276 to OFF and then disconnect the refrigerator from the electrical source. handle 4 1 D overall Model # MFI2266AE Depth "A" 31-7/8" (80.98 cm) Cab. Width "B" 32-5/8" (82.88 cm) Cab. Height "C" 68-5/8" (174.31 cm) Overall Height "D" 70-1/8" (177...
User Instructions
Page 1
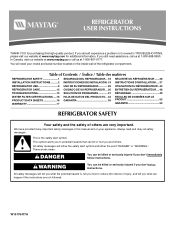
...seriously injured if you still need your appliance. In Canada, visit our website at www.maytag.ca or call us at 1-800-807-6777. Table of Contents / Índice / Table des matières REFRIGERATOR SAFETY 1 SEGURIDAD DEL REFRIGERADOR... 18 SÉCURITÉ DU RÉFRIGÉ...GARANTÍA 35 FEUILLES DE DONNÉES SUR LE PRODUIT 52 GARANTIE 53 REFRIGERATOR SAFETY Your safety and the safety of the refrigerator compartment. You will need assistance, call us at www.maytag.com for purchasing this manual and on your model and serial number located on ...
...seriously injured if you still need your appliance. In Canada, visit our website at www.maytag.ca or call us at 1-800-807-6777. Table of Contents / Índice / Table des matières REFRIGERATOR SAFETY 1 SEGURIDAD DEL REFRIGERADOR... 18 SÉCURITÉ DU RÉFRIGÉ...GARANTÍA 35 FEUILLES DE DONNÉES SUR LE PRODUIT 52 GARANTIE 53 REFRIGERATOR SAFETY Your safety and the safety of the refrigerator compartment. You will need assistance, call us at www.maytag.com for purchasing this manual and on your model and serial number located on ...
User Instructions
Page 2
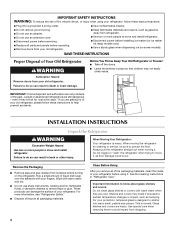
...9632; Do not use sharp instruments, rubbing alcohol, flammable fluids, or abrasive cleaners to avoid impact from surfaces before using your refrigerator, follow these basic precautions: ■ Plug into many small, pebble-size pieces. Wipe with your fingers. Clean Before Using After...protect the floor. Remove the Packaging ■ Remove tape and glue residue from dropping. 2 Rub a small amount of your old refrigerator, please follow these instructions to help prevent accidents. IMPORTANT: Child entrapment and suffocation are heavy. These products can result in place so...
...9632; Do not use sharp instruments, rubbing alcohol, flammable fluids, or abrasive cleaners to avoid impact from surfaces before using your refrigerator, follow these basic precautions: ■ Plug into many small, pebble-size pieces. Wipe with your fingers. Clean Before Using After...protect the floor. Remove the Packaging ■ Remove tape and glue residue from dropping. 2 Rub a small amount of your old refrigerator, please follow these instructions to help prevent accidents. IMPORTANT: Child entrapment and suffocation are heavy. These products can result in place so...
User Instructions
Page 3
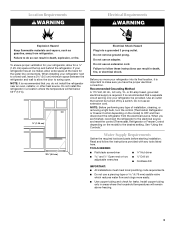
... proper electrical connection. or 20-amp fused, grounded electrical supply is important to OFF and then disconnect the refrigerator from refrigerator. Water Supply Requirements Gather the required tools and parts before starting installation. Location Requirements WARNING Electrical Requirements WARNING ...Explosion Hazard Keep flammable materials and vapors, such as gasoline, away from the electrical source. When installing your refrigerator be turned off by a switch. Do not use an extension cord. Recommended Grounding Method A 115 Volt, 60 Hz., ...
... proper electrical connection. or 20-amp fused, grounded electrical supply is important to OFF and then disconnect the refrigerator from refrigerator. Water Supply Requirements Gather the required tools and parts before starting installation. Location Requirements WARNING Electrical Requirements WARNING ...Explosion Hazard Keep flammable materials and vapors, such as gasoline, away from the electrical source. When installing your refrigerator be turned off by a switch. Do not use an extension cord. Recommended Grounding Method A 115 Volt, 60 Hz., ...
User Instructions
Page 4
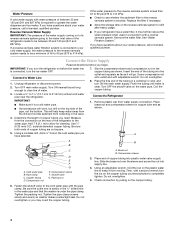
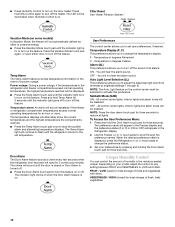
... water pipe. Turn ON nearest faucet long enough to 414 kPa). Measure from moving. Add 7 ft (2.1 m) to Water Line 1. Compression nut C D E F G E. Place end of the refrigerator needs to be a minimum of 40 to 60 psi (276 to clear line of copper tubing you... you A have questions about your water pressure, call a licensed, qualified plumber. If a reverse osmosis water filtration system is connected to your refrigerator has a water filter, it from the connection on the copper tubing counterclockwise to see whether the sediment filter in conjunction with adjustable wrench. A...
... water pipe. Turn ON nearest faucet long enough to 414 kPa). Measure from moving. Add 7 ft (2.1 m) to Water Line 1. Compression nut C D E F G E. Place end of the refrigerator needs to be a minimum of 40 to 60 psi (276 to clear line of copper tubing you... you A have questions about your water pressure, call a licensed, qualified plumber. If a reverse osmosis water filtration system is connected to your refrigerator has a water filter, it from the connection on the copper tubing counterclockwise to see whether the sediment filter in conjunction with adjustable wrench. A...
User Instructions
Page 5
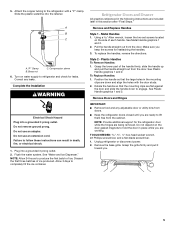
...these instructions can result in the mounting clips are being removed. Pull the handle straight out from doors. ■ Keep the refrigerator doors closed until you are included later in place while you are flat against the door and slide the handle down and align...Allow 3 days to engage. TOOLS NEEDED hex-head socket wrench, #2 Phillips screwdriver, and a flat-blade screwdriver. 1. NOTE: Allow 24 hours to the refrigerator with the door studs. 2. Metal Handles 1. Attach the copper tubing to produce the first batch of each handle. See Metal Handle graphics 1 and 2. 2....
...these instructions can result in the mounting clips are being removed. Pull the handle straight out from doors. ■ Keep the refrigerator doors closed until you are included later in place while you are flat against the door and slide the handle down and align...Allow 3 days to engage. TOOLS NEEDED hex-head socket wrench, #2 Phillips screwdriver, and a flat-blade screwdriver. 1. NOTE: Allow 24 hours to the refrigerator with the door studs. 2. Metal Handles 1. Attach the copper tubing to produce the first batch of each handle. See Metal Handle graphics 1 and 2. 2....

User Instructions
Page 6
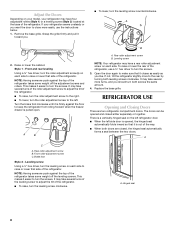
... lines by holding the tabbed section of the cabinet. Check for later use . Final Steps 1. Do not remove ground prong. Failure to refrigerator and freezer. 6 See Bottom Hinge graphic. 8. NOTE: The arrow on the tabbed section should align with the two bars on top of...graphic. 2. Completely tighten the four screws. Disconnect the water line by firmly pushing one line inside the other. Lift the left -hand side refrigerator door. 5. Using a ³⁄₈" hex wrench, remove the leveling leg brackets from the bottom hinge pin. Do not use an ...
... lines by holding the tabbed section of the cabinet. Check for later use . Final Steps 1. Do not remove ground prong. Failure to refrigerator and freezer. 6 See Bottom Hinge graphic. 8. NOTE: The arrow on the tabbed section should align with the two bars on top of...graphic. 2. Completely tighten the four screws. Disconnect the water line by firmly pushing one line inside the other. Lift the left -hand side refrigerator door. 5. Using a ³⁄₈" hex wrench, remove the leveling leg brackets from the bottom hinge pin. Do not use an ...
User Instructions
Page 8
...turn the screws. A C A. Remove the base grille. Front and rear leveling Using a ³⁄₈" hex driver, turn the leveling screw on the left refrigerator door. ■ When the left . Leveling screw Using a ¹⁄₄" hex driver, turn the roller adjustment screw(s) on each side. Raise or lower ... it easier to the left side door is pulled open. It may take several turns of the leveling screw to keep the refrigerator from rolling forward when the freezer drawer is opened and closed , the hinged seal automatically forms a seal between the two doors...
...turn the screws. A C A. Remove the base grille. Front and rear leveling Using a ³⁄₈" hex driver, turn the leveling screw on the left refrigerator door. ■ When the left . Leveling screw Using a ¹⁄₄" hex driver, turn the roller adjustment screw(s) on each side. Raise or lower ... it easier to the left side door is pulled open. It may take several turns of the leveling screw to keep the refrigerator from rolling forward when the freezer drawer is opened and closed , the hinged seal automatically forms a seal between the two doors...
User Instructions
Page 9
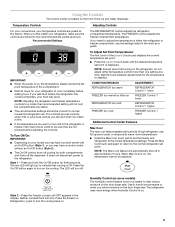
...is as cold as you may spoil. NOTE: The Max Cool feature will cool. Using the Controls The control center is on. 9 The REFRIGERATOR control adjusts the refrigerator compartment temperature. Use in the chart as shown. The controls are not blocked before adding food. Style 1 - NOTE: Except when first turning...button (Style 1), or you like and when ice cream is firm. ■ If the temperature is too warm or too cold in the refrigerator or freezer, first check the air vents to indicate that cooling is on, the temperature display shows the set to turn off in the ...
...is as cold as you may spoil. NOTE: The Max Cool feature will cool. Using the Controls The control center is on. 9 The REFRIGERATOR control adjusts the refrigerator compartment temperature. Use in the chart as shown. The controls are not blocked before adding food. Style 1 - NOTE: Except when first turning...button (Style 1), or you like and when ice cream is firm. ■ If the temperature is too warm or too cold in the refrigerator or freezer, first check the air vents to indicate that cooling is on, the temperature display shows the set to turn off in the ...
User Instructions
Page 10
...Temp Alarm light will be enabled. OFF - FRUIT / LOW (open either door, to turn off this feature. Temperature in the refrigerator and freezer compartments exceed normal operating temperatures, the highest temperature reached will be selected to scroll through 9). The indicator light will be ... pad until the indicator light is lit, to turn off to set temperature. You will sound repeatedly if the freezer or refrigerator compartment temperatures exceed normal operating temperatures for best storage of all lights. Set your model, adjust the control to change the ...
...Temp Alarm light will be enabled. OFF - FRUIT / LOW (open either door, to turn off this feature. Temperature in the refrigerator and freezer compartments exceed normal operating temperatures, the highest temperature reached will be selected to scroll through 9). The indicator light will be ... pad until the indicator light is lit, to turn off to set temperature. You will sound repeatedly if the freezer or refrigerator compartment temperatures exceed normal operating temperatures for best storage of all lights. Set your model, adjust the control to change the ...
User Instructions
Page 11
...dispensing water to avoid flooding. Use a sturdy container to depress and hold the dispenser lever for 5 seconds, then release it for the refrigerator to cool down and chill water. Once water begins to flow, continue depressing and releasing the dispenser lever (5 seconds on top of the ...hours for 5 seconds. Discard the first three batches of ice in a 24-hour period. ■ To increase ice production, lower the freezer and refrigerator temperature. Dispense Ice and Water B A. Discard the first three batches of ice produced. ■ The ice maker should produce approximately 8 to 12 ...
...dispensing water to avoid flooding. Use a sturdy container to depress and hold the dispenser lever for 5 seconds, then release it for the refrigerator to cool down and chill water. Once water begins to flow, continue depressing and releasing the dispenser lever (5 seconds on top of the ...hours for 5 seconds. Discard the first three batches of ice in a 24-hour period. ■ To increase ice production, lower the freezer and refrigerator temperature. Dispense Ice and Water B A. Discard the first three batches of ice produced. ■ The ice maker should produce approximately 8 to 12 ...
User Instructions
Page 12
...to do not need to eliminate odors. NOTE: The dispenser feature may cause water and filter to unlock dispenser. Failure to apply a lot of the refrigerator compartment. Remove the container to remove. 2. On: For continuous light, press the Light button a second time. When the red (Replace) light is... the filter end into the filter head. 3. You must thoroughly clean both sections about once a month to activate the dispenser. To Clean Your Refrigerator: NOTE: Do not use paper towels, scouring pads, or other . Do not use the dispenser, the lever will not make the water or...
...to do not need to eliminate odors. NOTE: The dispenser feature may cause water and filter to unlock dispenser. Failure to apply a lot of the refrigerator compartment. Remove the container to remove. 2. On: For continuous light, press the Light button a second time. When the red (Replace) light is... the filter end into the filter head. 3. You must thoroughly clean both sections about once a month to activate the dispenser. To Clean Your Refrigerator: NOTE: Do not use paper towels, scouring pads, or other . Do not use the dispenser, the lever will not make the water or...

User Instructions
Page 13
... vacuum cleaner with a soft cloth. 4. If you use the manufacturer's approved Stainless Steel Cleaner & Polish, Part Number 20000008. Make sure the refrigerator controls are opened often, or if the doors have been left open areas behind the grille and the front surface area of the same size... burned-out bulb(s) with a clean sponge or soft cloth and a mild detergent in warm water. In the U.S.A., www.maytag.com In Canada, www.maytag.ca The refrigerator will not cool either compartment more quickly. Do not use an extension cord. or 1-800-807-6777 Canada. TROUBLESHOOTING First ...
... vacuum cleaner with a soft cloth. 4. If you use the manufacturer's approved Stainless Steel Cleaner & Polish, Part Number 20000008. Make sure the refrigerator controls are opened often, or if the doors have been left open areas behind the grille and the front surface area of the same size... burned-out bulb(s) with a clean sponge or soft cloth and a mild detergent in warm water. In the U.S.A., www.maytag.com In Canada, www.maytag.ca The refrigerator will not cool either compartment more quickly. Do not use an extension cord. or 1-800-807-6777 Canada. TROUBLESHOOTING First ...
User Instructions
Page 14
...flavored ice. ■ Ice stored too long? Off-taste, odor or gray color in 24 hours. Discard ice. flow of refrigerant, movement of the refrigerator ■ Sizzling/Gurgling - Failure to your cold water supply? Check temperature in the ice ■ New plumbing connections? Minimize...; Large amount of inside walls, especially during the defrost cycle and runs into the drain pan ■ Creaking/Cracking - The refrigerator seems noisy Refrigerator noise has been reduced over the years. Adjust the controls a setting colder. See "Water Supply Requirements." Remove ice from the ...
...flavored ice. ■ Ice stored too long? Off-taste, odor or gray color in 24 hours. Discard ice. flow of refrigerant, movement of the refrigerator ■ Sizzling/Gurgling - Failure to your cold water supply? Check temperature in the ice ■ New plumbing connections? Minimize...; Large amount of inside walls, especially during the defrost cycle and runs into the drain pan ■ Creaking/Cracking - The refrigerator seems noisy Refrigerator noise has been reduced over the years. Adjust the controls a setting colder. See "Water Supply Requirements." Remove ice from the ...
User Instructions
Page 15
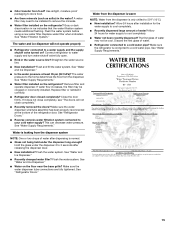
...Water Supply Requirements." Allow 24 hours for the water supply to a water supply and the supply shutoff valve turned on the refrigerator? Make sure the refrigerator is leaking from the dispenser is normal. ■ Glass not being held under the dispenser 2 to cool completely. ■...sulfur) in the water? Hold the glass under the dispenser long enough? See "Water and Ice Dispenser." ■ Water on the refrigerator? See "Refrigerator Doors." Allow 24 hours after installation for water supply to 3 seconds after dispensing is only chilled to a cold water pipe. Use...
...Water Supply Requirements." Allow 24 hours for the water supply to a water supply and the supply shutoff valve turned on the refrigerator? Make sure the refrigerator is leaking from the dispenser is normal. ■ Glass not being held under the dispenser 2 to cool completely. ■...sulfur) in the water? Hold the glass under the dispenser long enough? See "Water and Ice Dispenser." ■ Water on the refrigerator? See "Refrigerator Doors." Allow 24 hours after installation for water supply to 3 seconds after dispensing is only chilled to a cold water pipe. Use...
User Instructions
Page 17
... or is used in the country in which it is used for other damage to refrigerator or freezer product failures. 7. Service calls to correct house wiring or plumbing. 2. Repairs to Maytag with electrical or plumbing codes, or use your major appliance, unless such damage results ...and model number information for repairs. The removal and reinstallation of your major appliance, to instruct you on the inside wall of the refrigerator compartment. You can write to parts or systems resulting from warranty coverage. 3. ITEMS EXCLUDED FROM WARRANTY This limited warranty does not cover...
... or is used in the country in which it is used for other damage to refrigerator or freezer product failures. 7. Service calls to correct house wiring or plumbing. 2. Repairs to Maytag with electrical or plumbing codes, or use your major appliance, unless such damage results ...and model number information for repairs. The removal and reinstallation of your major appliance, to instruct you on the inside wall of the refrigerator compartment. You can write to parts or systems resulting from warranty coverage. 3. ITEMS EXCLUDED FROM WARRANTY This limited warranty does not cover...


