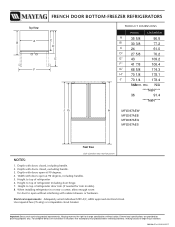
Dimensions
Page 1
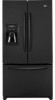
...Maytag reserves the right to change specifications without interfering with cabinet drawers or hardware. For complete details see installation instructions that accompany each product before selecting cabinetry, making cutouts or beginning installation. 2006-08-07 at 90 degrees, including handles. 5. FRENCH DOOR BOTTOM-FREEZER REFRIGERATORS...91.4 ****NaN**** JG H MFI2067AEW MFI2067AEB MFI2067AEQ MFI2067AES Front View Style of refrigerator including door hinge. 7. Depth with doors open at 90 degrees. 4. Height to top of refrigerator door trim (if needed for planning purposes only...
...Maytag reserves the right to change specifications without interfering with cabinet drawers or hardware. For complete details see installation instructions that accompany each product before selecting cabinetry, making cutouts or beginning installation. 2006-08-07 at 90 degrees, including handles. 5. FRENCH DOOR BOTTOM-FREEZER REFRIGERATORS...91.4 ****NaN**** JG H MFI2067AEW MFI2067AEB MFI2067AEQ MFI2067AES Front View Style of refrigerator including door hinge. 7. Depth with doors open at 90 degrees. 4. Height to top of refrigerator door trim (if needed for planning purposes only...
User Instructions
Page 1
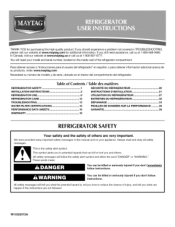
... refrigerador" en espa_ol, o para obtener informaci6n adicional acerca de su producto, visite: www.maytag.com. Table of Contents / Table des mati res REFRIGERATOR SAFETY 1 INSTALLATION INSTRUCTIONS 2 REFRIGERATOR USE 8 REFRIGERATOR CARE 12 TROUBLESHOOTING 13 WATER FILTER CERTIFICATIONS 15 SI_CURITI_ DU RI_FRIGI_RATEUR 20 INSTRUCTIONS D'INSTALLATION 21 UTILISATION DU RI:!:FRIGI:!:RATEUR 27 ENTRETIEN DU REFRIGERATEUR 32 DEPANNAGE...
... refrigerador" en espa_ol, o para obtener informaci6n adicional acerca de su producto, visite: www.maytag.com. Table of Contents / Table des mati res REFRIGERATOR SAFETY 1 INSTALLATION INSTRUCTIONS 2 REFRIGERATOR USE 8 REFRIGERATOR CARE 12 TROUBLESHOOTING 13 WATER FILTER CERTIFICATIONS 15 SI_CURITI_ DU RI_FRIGI_RATEUR 20 INSTRUCTIONS D'INSTALLATION 21 UTILISATION DU RI:!:FRIGI:!:RATEUR 27 ENTRETIEN DU REFRIGERATEUR 32 DEPANNAGE...
User Instructions
Page 2
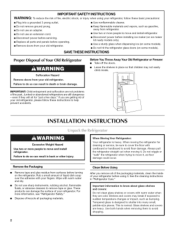
... dry. • Do not use an extension cord. • Keep flammable materials and vapors, such as gasoline, away from your old refrigerator, please follow these instructions to sudden temperature changes or impact, such as bumping. This is designed to shatter into a grounded 3 prong outlet...to do so can damage the surface of the past. INSTALLATION INSTRUCTIONS Excessive Weight Hazard Use two or more people to move and install refrigerator. • Disconnect power before servicing. • Replace all of the packaging materials, clean the inside . Glass shelves and covers ...
... dry. • Do not use an extension cord. • Keep flammable materials and vapors, such as gasoline, away from your old refrigerator, please follow these instructions to sudden temperature changes or impact, such as bumping. This is designed to shatter into a grounded 3 prong outlet...to do so can damage the surface of the past. INSTALLATION INSTRUCTIONS Excessive Weight Hazard Use two or more people to move and install refrigerator. • Disconnect power before servicing. • Replace all of the packaging materials, clean the inside . Glass shelves and covers ...
User Instructions
Page 3
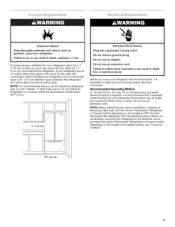
... such as gasoline, away from the electrical source. Failure to follow these instructions can result in death, explosion, or fire. When installing your refrigerator into a grounded 3 prong outlet. Recommended Grounding Method A 115 Volt, 60 Hz., AC only, 15- When you have the proper electrical ...: Before performing any type of space on the model) to swing open. Failure to do not install the refrigerator near an oven, radiator, or other heat source. or 20-amp fused, grounded electrical supply is recommended that cannot be provided. See "Using the Controls."
... such as gasoline, away from the electrical source. Failure to follow these instructions can result in death, explosion, or fire. When installing your refrigerator into a grounded 3 prong outlet. Recommended Grounding Method A 115 Volt, 60 Hz., AC only, 15- When you have the proper electrical ...: Before performing any type of space on the model) to swing open. Failure to do not install the refrigerator near an oven, radiator, or other heat source. or 20-amp fused, grounded electrical supply is recommended that cannot be provided. See "Using the Controls."
User Instructions
Page 4
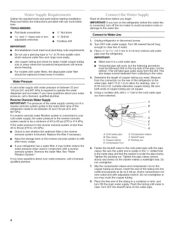
... keep water away from the drill. B C D E F G A. Compression nut E. Tighten the packing nut. Insert the end of the refrigerator to refill after heavy usage. • If your water pressure, call a licensed, qualified plumber. , J- Water Pressure A cold water supply ...water pressure to the reverse osmosis system needs to allow for leaks. Copper tubing D. Shutoff valve G. Gathetrherequiretdoolsandpartsbeforsetartinginstallation. Unplug refrigerator or disconnect power. 2. This will go. Be sure both ends of water. 3. Compression sleeve F. Slip the compression...
... keep water away from the drill. B C D E F G A. Compression nut E. Tighten the packing nut. Insert the end of the refrigerator to refill after heavy usage. • If your water pressure, call a licensed, qualified plumber. , J- Water Pressure A cold water supply ...water pressure to the reverse osmosis system needs to allow for leaks. Copper tubing D. Shutoff valve G. Gathetrherequiretdoolsandpartsbeforsetartinginstallation. Unplug refrigerator or disconnect power. 2. This will go. Be sure both ends of water. 3. Compression sleeve F. Slip the compression...
User Instructions
Page 5
...of each handle. Remove the plastic cap from moving. Shape tubing slightly so that the tubing feeds straight into the port to refrigerator and check for reattaching the handles. 3. Using an adjustable wrench, hold the nut on water supply to avoid kinks. 4. ...in the following instructions are down to completely tighten. Avoid kinks when coiling the copper tubing. 2. "P" clamp B. Attach copper tubing to Refrigerator 1. Connect to refrigerator cabinet with a "P" clamp. Do not overtighten. Check connection by pulling on the copper tubing. 3. Do not use an extension cord...
...of each handle. Remove the plastic cap from moving. Shape tubing slightly so that the tubing feeds straight into the port to refrigerator and check for reattaching the handles. 3. Using an adjustable wrench, hold the nut on water supply to avoid kinks. 4. ...in the following instructions are down to completely tighten. Avoid kinks when coiling the copper tubing. 2. "P" clamp B. Attach copper tubing to Refrigerator 1. Connect to refrigerator cabinet with a "P" clamp. Do not overtighten. Check connection by pulling on the copper tubing. 3. Do not use an extension cord...
User Instructions
Page 6
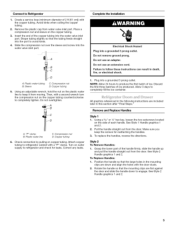
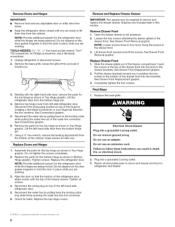
... follow these instructions can result in the drawer front. 3. See Drawer Front Removal graphic. Do not remove ground prong. Failure to refrigerator and freezer. Do not depend on the locking collar while pulling the water line out of the drawer front into a grounded 3 .... 5. Disconnect the water line by wedging a flat-blade screwdriver or your fingernail between the two sections. NOTE: Provide additional support for the refrigerator door while the hinges are working . 3. Check for later use. Remove Drawer Front 1. Keep the screws in death, fire, or electrical ...
... follow these instructions can result in the drawer front. 3. See Drawer Front Removal graphic. Do not remove ground prong. Failure to refrigerator and freezer. Do not depend on the locking collar while pulling the water line out of the drawer front into a grounded 3 .... 5. Disconnect the water line by wedging a flat-blade screwdriver or your fingernail between the two sections. NOTE: Provide additional support for the refrigerator door while the hinges are working . 3. Check for later use. Remove Drawer Front 1. Keep the screws in death, fire, or electrical ...
User Instructions
Page 8
...doors can be opened , the hinged seal automatically folds inward so that it toward you like. Replace the base grille. NOTE: Adjusting the refrigerator and freezer temperature controls to the rear by turning both doors are closed either separately or together. Using a V4"hex driver, turn the...should turn the leveling screw counterclockwise. If you want the door to close easier, use the instructions below. • Before moving the refrigerator, raise the leveling screws so the front rollers are preset at the factory. The control center is out of the ice and water ...
...doors can be opened , the hinged seal automatically folds inward so that it toward you like. Replace the base grille. NOTE: Adjusting the refrigerator and freezer temperature controls to the rear by turning both doors are closed either separately or together. Using a V4"hex driver, turn the...should turn the leveling screw counterclockwise. If you want the door to close easier, use the instructions below. • Before moving the refrigerator, raise the leveling screws so the front rollers are preset at the factory. The control center is out of the ice and water ...
User Instructions
Page 9
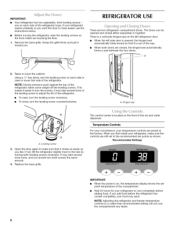
...juice is as cold as you like and when ice cream is on. • Press Humidity Control to the lowest temperature settings. The refrigerator uses more than one setting at a time. The FREEZER control adjusts the freezer compartment temperature. To Adjust Set Point Temperatures: The first ...off the feature. o Humidity Control (on some models) In Vacation Mode, the freezer will light up to adjust the temperature in either the refrigerator or freezer compartment, use . o Temp Alarm The Temp Alarm feature provides temperature information in the event of the (+) or (-) touch pad ...
...juice is as cold as you like and when ice cream is on. • Press Humidity Control to the lowest temperature settings. The refrigerator uses more than one setting at a time. The FREEZER control adjusts the freezer compartment temperature. To Adjust Set Point Temperatures: The first ...off the feature. o Humidity Control (on some models) In Vacation Mode, the freezer will light up to adjust the temperature in either the refrigerator or freezer compartment, use . o Temp Alarm The Temp Alarm feature provides temperature information in the event of the (+) or (-) touch pad ...
User Instructions
Page 10
...temperature displays. Depending on the lower right. 2. See "Water and Ice Dispenser." • The ice maker and storage bin are located in the Refrigerator display. 2. Press the switch to the OFF position. o Filter Reset See "Water Filtration System." F - Auto Light Level Selection (LL) This... manually turn this preference. You will hear the alarm sound. The chime will be disabled. Pull the storage bin out until the refrigerator returns to brightest (settings 1 through the preference names. The indicator light will continue to flash until resistance is on or off the...
...temperature displays. Depending on the lower right. 2. See "Water and Ice Dispenser." • The ice maker and storage bin are located in the Refrigerator display. 2. Press the switch to the OFF position. o Filter Reset See "Water Filtration System." F - Auto Light Level Selection (LL) This... manually turn this preference. You will hear the alarm sound. The chime will be disabled. Pull the storage bin out until the refrigerator returns to brightest (settings 1 through the preference names. The indicator light will continue to flash until resistance is on or off the...
User Instructions
Page 11
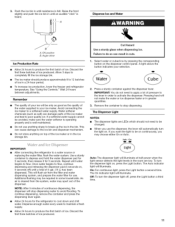
... panel. Allow 24 hours to produce the first batch of ice in a 24-hour period. • To increase ice production, lower the freezer and refrigerator temperature. To turn the dispenser light on , 5 seconds off , press the Light button a third time. 11 Allow 3 days to completely fill the...A Dispense Ice and Water A. Use a sturdy container to depress and hold the water dispenser pad for 5 seconds, then release it for the refrigerator to cool down and chill water. IMPORTANT: You do so can damage parts of your selection. The Auto indicator light will be avoided, make the...
... panel. Allow 24 hours to produce the first batch of ice in a 24-hour period. • To increase ice production, lower the freezer and refrigerator temperature. To turn the dispenser light on , 5 seconds off , press the Light button a third time. 11 Allow 3 days to completely fill the...A Dispense Ice and Water A. Use a sturdy container to depress and hold the water dispenser pad for 5 seconds, then release it for the refrigerator to cool down and chill water. IMPORTANT: You do so can damage parts of your selection. The Auto indicator light will be avoided, make the...
User Instructions
Page 12
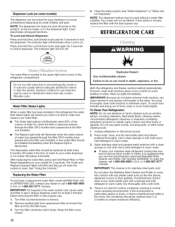
... certified for 3 seconds to the other harsh cleaning tools. 1. Snap the filter cover closed. 12 Explosion Hazard Use nonflammable cleaner. Unplug refrigerator or disconnect power. 2. To order the cleaner, call 1-800-688-9900 U.S.A. Flush the water system. The Order and Replace indicator lights.... 1. Replacing the Water Filter To purchase a replacement water filter, model UKF8001AXX-750 or UKF8001AXX-200, contact your stainless steel refrigerator looking like new and to lock the dispenser. You must thoroughly clean both sections, any plastic parts such as window sprays, ...
... certified for 3 seconds to the other harsh cleaning tools. 1. Snap the filter cover closed. 12 Explosion Hazard Use nonflammable cleaner. Unplug refrigerator or disconnect power. 2. To order the cleaner, call 1-800-688-9900 U.S.A. Flush the water system. The Order and Replace indicator lights.... 1. Replacing the Water Filter To purchase a replacement water filter, model UKF8001AXX-750 or UKF8001AXX-200, contact your stainless steel refrigerator looking like new and to lock the dispenser. You must thoroughly clean both sections, any plastic parts such as window sprays, ...
User Instructions
Page 13
...light bulb(s) no greater than your refrigerator. Do not use an adapter. See "Using the Control(s)." fans/compressor adjusting to cool completely. Plug in death, fire, or electrical shock. In the U.S.A., www.maytag.com In Canada, www.maytag.ca _t_ '_ "_.....t." Failure to ...its high-efficiency compressor and fans. Allow 24 hours following installation for the refrigerator to optimize performance • Hissing/Rattling - Due to clean the ...
...light bulb(s) no greater than your refrigerator. Do not use an adapter. See "Using the Control(s)." fans/compressor adjusting to cool completely. Plug in death, fire, or electrical shock. In the U.S.A., www.maytag.com In Canada, www.maytag.ca _t_ '_ "_.....t." Failure to ...its high-efficiency compressor and fans. Allow 24 hours following installation for the refrigerator to optimize performance • Hissing/Rattling - Due to clean the ...
User Instructions
Page 14
... to begin. Discard ice. Minimize door openings and keep doors fully closed. 14 The ice maker is on ? Check temperature in refrigerator Refrigerator air vent blocked? Move items away from food? If it correctly. • Reverse osmosis water filtration system connected to do so ...water supply and turn water shutoff valve fully open . • Kink in correct position? Adjust the controls a setting warmer. Connect refrigerator to enter refrigerator. Flush the water system before using a new water filter. Move food packages away from the ejector arm with mild soap and warm...
... to begin. Discard ice. Minimize door openings and keep doors fully closed. 14 The ice maker is on ? Check temperature in refrigerator Refrigerator air vent blocked? Move items away from food? If it correctly. • Reverse osmosis water filtration system connected to do so ...water supply and turn water shutoff valve fully open . • Kink in correct position? Adjust the controls a setting warmer. Connect refrigerator to enter refrigerator. Flush the water system before using a new water filter. Move food packages away from the ejector arm with mild soap and warm...
User Instructions
Page 15
... Supply Requirements." Straighten the water source line. • New installation? If water flow increases, the filter may be cool. See "Refrigerator Doors and Drawer." • Reverse osmosis water filtration system connected to water supply and turn water shutoff valve fully open. • Kink...except that systems certified for water supply to cool completely. • Water not been recently dispensed? Discard the first glass of the refrigerator door. See "Water Supply Requirements." • Water filter installed on ? Hold the glass under the dispenser long enough? See ...
... Supply Requirements." Straighten the water source line. • New installation? If water flow increases, the filter may be cool. See "Refrigerator Doors and Drawer." • Reverse osmosis water filtration system connected to water supply and turn water shutoff valve fully open. • Kink...except that systems certified for water supply to cool completely. • Water not been recently dispensed? Discard the first glass of the refrigerator door. See "Water Supply Requirements." • Water filter installed on ? Hold the glass under the dispenser long enough? See ...
User Instructions
Page 18
...number below : In the U.S.A.: In Canada: Maytag Brand Home Appliances Customer eXperience Center 553 Benson Road Benton Harbor, MI 49022-2692 Maytag Brand Home Appliances Customer eXperience Centre 200 - 6750 Century Ave. Service calls to refrigerator or freezer product failures. 7. Any food or...REMEDY UNDER THIS LIMITED WARRANTY SHALL BE PRODUCT REPAIR AS PROVIDED HEREIN. MAYTAG SHALL NOT BE LIABLE FOR INCIDENTAL OR CONSEQUENTIAL DAMAGES. You can write to correct the installation of the refrigerator compartment. Mississauga, Ontario L5N 0B7 Please include a daytime phone number ...
...number below : In the U.S.A.: In Canada: Maytag Brand Home Appliances Customer eXperience Center 553 Benson Road Benton Harbor, MI 49022-2692 Maytag Brand Home Appliances Customer eXperience Centre 200 - 6750 Century Ave. Service calls to refrigerator or freezer product failures. 7. Any food or...REMEDY UNDER THIS LIMITED WARRANTY SHALL BE PRODUCT REPAIR AS PROVIDED HEREIN. MAYTAG SHALL NOT BE LIABLE FOR INCIDENTAL OR CONSEQUENTIAL DAMAGES. You can write to correct the installation of the refrigerator compartment. Mississauga, Ontario L5N 0B7 Please include a daytime phone number ...


