Dimensions
Page 1
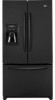
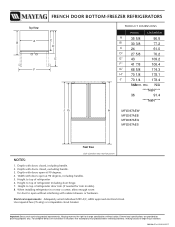
... for door to top of refrigerator door trim (if needed for planning purposes only. Depth with doors open at 90 degrees. 4. Width with doors closed , including handle. 2. Height to top of continuing product improvements, Maytag reserves the right to top ... 174.3 178.1 J7 70 1/4 178.4 NM/AODEL SKUs N/A ****NaN**** 36 91.4 ****NaN**** JG H MFI2067AEW MFI2067AEB MFI2067AEQ MFI2067AES Front View Style of refrigerator 6. For complete details see installation instructions that accompany each product before selecting cabinetry, making cutouts or beginning installation. 2006-08-07...
... for door to top of refrigerator door trim (if needed for planning purposes only. Depth with doors open at 90 degrees. 4. Width with doors closed , including handle. 2. Height to top of continuing product improvements, Maytag reserves the right to top ... 174.3 178.1 J7 70 1/4 178.4 NM/AODEL SKUs N/A ****NaN**** 36 91.4 ****NaN**** JG H MFI2067AEW MFI2067AEB MFI2067AEQ MFI2067AES Front View Style of refrigerator 6. For complete details see installation instructions that accompany each product before selecting cabinetry, making cutouts or beginning installation. 2006-08-07...
User Instructions
Page 1
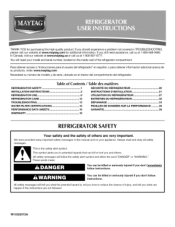
... messages will follow instructions. Table of Contents / Table des mati res REFRIGERATOR SAFETY 1 INSTALLATION INSTRUCTIONS 2 REFRIGERATOR USE 8 REFRIGERATOR CARE 12 TROUBLESHOOTING 13 WATER FILTER CERTIFICATIONS 15 SI_CURITI_ DU RI_FRIGI_RATEUR 20 INSTRUCTIONS D'INSTALLATION 21 UTILISATION DU RI:!:FRIGI:!:RATEUR 27 ENTRETIEN DU REFRIGERATEUR ... hazard is the safety alert symbol. If you and others are not followed. In Canada, visit our website at www.maytag.ca or call us at 1-800-807-6777. Para obtener acceso a "lnstrucciones para el usuario del refrigerador" en espa_ol...
... messages will follow instructions. Table of Contents / Table des mati res REFRIGERATOR SAFETY 1 INSTALLATION INSTRUCTIONS 2 REFRIGERATOR USE 8 REFRIGERATOR CARE 12 TROUBLESHOOTING 13 WATER FILTER CERTIFICATIONS 15 SI_CURITI_ DU RI_FRIGI_RATEUR 20 INSTRUCTIONS D'INSTALLATION 21 UTILISATION DU RI:!:FRIGI:!:RATEUR 27 ENTRETIEN DU REFRIGERATEUR ... hazard is the safety alert symbol. If you and others are not followed. In Canada, visit our website at www.maytag.ca or call us at 1-800-807-6777. Para obtener acceso a "lnstrucciones para el usuario del refrigerador" en espa_ol...
User Instructions
Page 2
.... important information to sudden temperature changes or impact, such as bumping. Shelves and covers may not easily climb inside of your refrigerator before turning on some models). This is heavy. IMPORTANT: Child entrapment and suffocation are still dangerous - INSTALLATION INSTRUCTIONS Excessive Weight .... • Do not use an extension cord. • Keep flammable materials and vapors, such as gasoline, away from your old refrigerator, please follow these instructions to move it, as floor damage could occur. When moving it . See the cleaning instructions in place so...
.... important information to sudden temperature changes or impact, such as bumping. Shelves and covers may not easily climb inside of your refrigerator before turning on some models). This is heavy. IMPORTANT: Child entrapment and suffocation are still dangerous - INSTALLATION INSTRUCTIONS Excessive Weight .... • Do not use an extension cord. • Keep flammable materials and vapors, such as gasoline, away from your old refrigerator, please follow these instructions to move it, as floor damage could occur. When moving it . See the cleaning instructions in place so...
User Instructions
Page 3
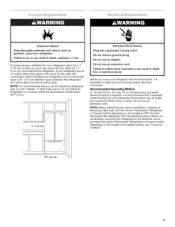
... a 1/2" (1.25 cm) of installation, cleaning, or removing a light bulb, turn the control (Thermostat, Refrigerator or Freezer Control depending on the model) to OFF and then disconnect the refrigerator from refrigerator. Do not remove ground prong. See "Using the Controls." Do not use an extension cord. i ]... // •u /_ \ 33/4" (9.5 cm) or 20-amp fused, grounded electrical supply is recommended that ...
... a 1/2" (1.25 cm) of installation, cleaning, or removing a light bulb, turn the control (Thermostat, Refrigerator or Freezer Control depending on the model) to OFF and then disconnect the refrigerator from refrigerator. Do not remove ground prong. See "Using the Controls." Do not use an extension cord. i ]... // •u /_ \ 33/4" (9.5 cm) or 20-amp fused, grounded electrical supply is recommended that ...
User Instructions
Page 4
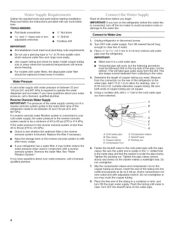
... • Use copper tubing and check for cleaning. Use 1/4" (6.35 mm) O.D. (outside diameter) copper tubing. Be sure both ends of the refrigerator to allow for leaks. Using a cordless drill, drill a 1/4"hole in the cold water pipe you have selected. Shutoff valve G. Do not overtighten.... plumber. Insert the end of water. 3. See "Water Filtration System." Connect to 31.8 mm) vertical cold water pipe near the refrigerator. Measure from the connection on the reverse osmosis system to the cold water pipe with water filters, the disposable water filter should be followed...
... • Use copper tubing and check for cleaning. Use 1/4" (6.35 mm) O.D. (outside diameter) copper tubing. Be sure both ends of the refrigerator to allow for leaks. Using a cordless drill, drill a 1/4"hole in the cold water pipe you have selected. Shutoff valve G. Do not overtighten.... plumber. Insert the end of water. 3. See "Water Filtration System." Connect to 31.8 mm) vertical cold water pipe near the refrigerator. Measure from the connection on the reverse osmosis system to the cold water pipe with water filters, the disposable water filter should be followed...
User Instructions
Page 5
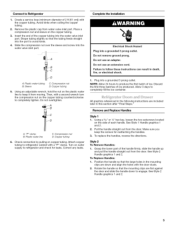
... the plastic cap from the door. Plastic water tubing B. Using an adjustable wrench, hold the nut on the copper tubing counterclockwise to refrigerator cabinet with the copper tubing. "P" clamp B. Copper tubing 6. Turn on the copper tubing. 3. All graphics referenced in the following ... valve inlet port. Place a compression nut and sleeve on water supply to engage. Shape tubing slightly so that the mounting clips are down to refrigerator and check for reattaching the handles. 3. E ....,s o A. See Style 1 Handle graphics 1 and 2. 2. To Replace Handles: 1. Discard the...
... the plastic cap from the door. Plastic water tubing B. Using an adjustable wrench, hold the nut on the copper tubing counterclockwise to refrigerator cabinet with the copper tubing. "P" clamp B. Copper tubing 6. Turn on the copper tubing. 3. All graphics referenced in the following ... valve inlet port. Place a compression nut and sleeve on water supply to engage. Shape tubing slightly so that the mounting clips are down to refrigerator and check for reattaching the handles. 3. E ....,s o A. See Style 1 Handle graphics 1 and 2. 2. To Replace Handles: 1. Discard the...
User Instructions
Page 6
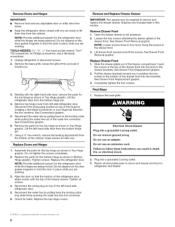
...adapter. Remove Doors and Hinges IM PORTANT: Remove food and any adjustable door or utility bins from the bottom hinge pin. 7. Keep the refrigerator doors closed until you to -IOEX is a re,qistered trademarl< of the cabinet. See Connections graphic. 5. Disconnect the water line by ...bottom of Saturn Fasteners, Inc. 6 Replace Doors and Hinges 1. Lift drawer front upward and off the screws. Return all screws. 4. Unplug refrigerator or disconnect power. 2. Remove the base grille. Remove Drawer Front 1. Align the door so that the bottom of the freezer compartment. Graphics ...
...adapter. Remove Doors and Hinges IM PORTANT: Remove food and any adjustable door or utility bins from the bottom hinge pin. 7. Keep the refrigerator doors closed until you to -IOEX is a re,qistered trademarl< of the cabinet. See Connections graphic. 5. Disconnect the water line by ...bottom of Saturn Fasteners, Inc. 6 Replace Doors and Hinges 1. Lift drawer front upward and off the screws. Return all screws. 4. Unplug refrigerator or disconnect power. 2. Remove the base grille. Remove Drawer Front 1. Align the door so that the bottom of the freezer compartment. Graphics ...
User Instructions
Page 8
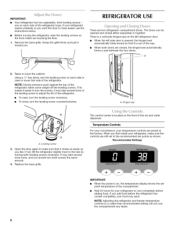
...IM PO RTANI"." • When the power is opened and closed , the hinged seal automatically forms a seal between the two doors. IMPORTANT: Your refrigerator has two adjustable, front leveling screws one on each side to make sure the controls are still set to turn both screws the same amount... like. Temperature Controls For your convenience, your food may spoil. It may take several turns of the leveling screw to adjust the tilt of the refrigerator. • To raise, turn the leveling screw clockwise. • To lower, turn the leveling screw on the front of the compartment. •...
...IM PO RTANI"." • When the power is opened and closed , the hinged seal automatically forms a seal between the two doors. IMPORTANT: Your refrigerator has two adjustable, front leveling screws one on each side to make sure the controls are still set to turn both screws the same amount... like. Temperature Controls For your convenience, your food may spoil. It may take several turns of the leveling screw to adjust the tilt of the refrigerator. • To raise, turn the leveling screw clockwise. • To lower, turn the leveling screw on the front of the compartment. •...
User Instructions
Page 9
...set point. Press and hold Temp Alarm for the temperature to turn off . If you need to adjust the temperature in the refrigerator and freezer compartments exceed normal operating temperatures, the highest temperature reached will automatically shut off the feature. Wait 24 hours between adjustments for...room temperatures. • Press the Max Cool touch pad to the lowest temperature settings. Press and hold the On/Off button for normal household refrigerator use. To Turn Off/On: IMPORTANT: • Depending on your model you may have a control center without an On/Off button (...
...set point. Press and hold Temp Alarm for the temperature to turn off . If you need to adjust the temperature in the refrigerator and freezer compartments exceed normal operating temperatures, the highest temperature reached will automatically shut off the feature. Wait 24 hours between adjustments for...room temperatures. • Press the Max Cool touch pad to the lowest temperature settings. Press and hold the On/Off button for normal household refrigerator use. To Turn Off/On: IMPORTANT: • Depending on your model you may have a control center without an On/Off button (...
User Instructions
Page 10
... sound. Order Replace 0 Press and hold the Door Alarm touch pad for 5 continuous minutes. Temperature in the upper lefthand side of the refrigerator compartment. You will be locked in degrees Fahrenheit C - Auto Light Level Selection (LL) This preference allows you to brightest (settings 1 through... The ice maker sensors will automatically stop the audible alarm and alternating temperature displays. The Temp Alarm light will appear in the Refrigerator display. 2. When the desired preference name is turned off the ice maker, press the switch to activate this feature on the ...
... sound. Order Replace 0 Press and hold the Door Alarm touch pad for 5 continuous minutes. Temperature in the upper lefthand side of the refrigerator compartment. You will be locked in degrees Fahrenheit C - Auto Light Level Selection (LL) This preference allows you to brightest (settings 1 through... The ice maker sensors will automatically stop the audible alarm and alternating temperature displays. The Temp Alarm light will appear in the Refrigerator display. 2. When the desired preference name is turned off the ice maker, press the switch to activate this feature on the ...
User Instructions
Page 11
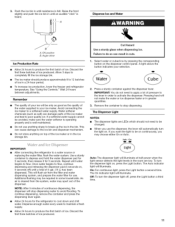
... approximately 8 to break up the ice in a 24-hour period. • To increase ice production, lower the freezer and refrigerator temperature. IMPORTANT: After connecting the refrigerator to maintain a fresh supply. Additional flushing may choose either On or Auto. Dispense enough water every week to a water source ... want the light to stop dispensing water to depress and hold the water dispenser pad for 5 seconds, then release it for the refrigerator to your ice maker. Auto On oo Auto: The dispenser light will not make sure the water softener is operating properly and is...
... approximately 8 to break up the ice in a 24-hour period. • To increase ice production, lower the freezer and refrigerator temperature. IMPORTANT: After connecting the refrigerator to maintain a fresh supply. Additional flushing may choose either On or Auto. Dispense enough water every week to a water source ... want the light to stop dispensing water to depress and hold the water dispenser pad for 5 seconds, then release it for the refrigerator to your ice maker. Auto On oo Auto: The dispenser light will not make sure the water softener is operating properly and is...
User Instructions
Page 12
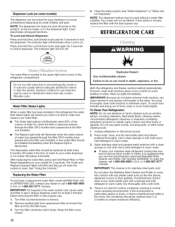
... sprays, scouring cleansers, flammable fluids, cleaning waxes, concentrated detergents, bleaches or cleansers containing petroleum products on . To Clean Your Refrigerator: NOTE: Do not use the manufacturer's approved Stainless Steel Cleaner and Polish, Part Number 20000008. Wash stainless steel and painted metal... clean both sections about once a month to remove. 2. The indicator light will illuminate when the rated volume of odors. REFRIGERATOR CARE The water filter is on plastic parts, interior and door liners or gaskets. The Order and Replace indicator lights will ...
... sprays, scouring cleansers, flammable fluids, cleaning waxes, concentrated detergents, bleaches or cleansers containing petroleum products on . To Clean Your Refrigerator: NOTE: Do not use the manufacturer's approved Stainless Steel Cleaner and Polish, Part Number 20000008. Wash stainless steel and painted metal... clean both sections about once a month to remove. 2. The indicator light will illuminate when the rated volume of odors. REFRIGERATOR CARE The water filter is on plastic parts, interior and door liners or gaskets. The Order and Replace indicator lights will ...
User Instructions
Page 13
... of inside walls, especially during initial cool-down • Water running - Unplug refrigerator or disconnect power. 2. Replace the light shield(s) by inserting the tabs on some normal sounds with explanations. • Buzzing - In the U.S.A., www.maytag.com In Canada, www.maytag.ca _t_ '_ "_.....t." Do not use an extension cord. Plug into a grounded 3 prong...
... of inside walls, especially during initial cool-down • Water running - Unplug refrigerator or disconnect power. 2. Replace the light shield(s) by inserting the tabs on some normal sounds with explanations. • Buzzing - In the U.S.A., www.maytag.com In Canada, www.maytag.ca _t_ '_ "_.....t." Do not use an extension cord. Plug into a grounded 3 prong...
User Instructions
Page 14
...then the filter may need to be installed to do so can reduce water flow. Wash ice bin. Gray or dark discoloration in refrigerator Refrigerator air vent blocked? Allow 24 hours following installation for ice maker to your cold water supply? Ice storage bin in the water?...connected to store food. • Are there minerals (such as sulfur) in correct position? Discard ice. Allow 24 hours for the refrigerator to enter refrigerator. See "Using the Control(s)." A kink in 24 hours. Remove filter and operate ice maker. Check temperature in the line can cause...
...then the filter may need to be installed to do so can reduce water flow. Wash ice bin. Gray or dark discoloration in refrigerator Refrigerator air vent blocked? Allow 24 hours following installation for ice maker to your cold water supply? Ice storage bin in the water?...connected to store food. • Are there minerals (such as sulfur) in correct position? Discard ice. Allow 24 hours for the refrigerator to enter refrigerator. See "Using the Control(s)." A kink in 24 hours. Remove filter and operate ice maker. Check temperature in the line can cause...
User Instructions
Page 15
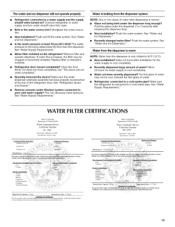
...Rated Service Capacity: 750 gah Rated Service Flow: 0.78 gpm Do I_ot use where water is connected to your cold water supply? See "Refrigerator Doors and Drawer." • Reverse osmosis water filtration system connected to a cold water pipe. See "Water and Ice Dispensers." • Is... dispensed? Close the door firmly. Replace filter or reinstall it does not close completely." • Recently removed the doors? Make sure the refrigerator is inierobiol_gical|y tulsa:re_ wi_ Wa_r 6_ t_nkgown quality, except that systems certified for water supply to 50°F (10°C). •...
...Rated Service Capacity: 750 gah Rated Service Flow: 0.78 gpm Do I_ot use where water is connected to your cold water supply? See "Refrigerator Doors and Drawer." • Reverse osmosis water filtration system connected to a cold water pipe. See "Water and Ice Dispensers." • Is... dispensed? Close the door firmly. Replace filter or reinstall it does not close completely." • Recently removed the doors? Make sure the refrigerator is inierobiol_gical|y tulsa:re_ wi_ Wa_r 6_ t_nkgown quality, except that systems certified for water supply to 50°F (10°C). •...
User Instructions
Page 18
... in a manner that have other than normal, single-family household use of products not approved by Maytag. 5. Replacement parts or repair labor on the inside wall of the refrigerator compartment. Have your correspondence. Proof of original purchase date is not installed in accordance with... PROVIDED HEREIN. ITEMS EXCLUDED FROM WARRANTY This limited warranty does not cover: 1. Any food or medicine loss due to refrigerator or freezer product failures. 7. MAYTAG SHALL NOT BE LIABLE FOR INCIDENTAL OR CONSEQUENTIAL DAMAGES. This warranty gives you specific legal rights, and you . Service ...
... in a manner that have other than normal, single-family household use of products not approved by Maytag. 5. Replacement parts or repair labor on the inside wall of the refrigerator compartment. Have your correspondence. Proof of original purchase date is not installed in accordance with... PROVIDED HEREIN. ITEMS EXCLUDED FROM WARRANTY This limited warranty does not cover: 1. Any food or medicine loss due to refrigerator or freezer product failures. 7. MAYTAG SHALL NOT BE LIABLE FOR INCIDENTAL OR CONSEQUENTIAL DAMAGES. This warranty gives you specific legal rights, and you . Service ...


