User Instructions
Page 2
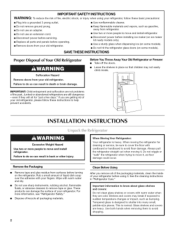
... products can damage the surface of your fingers. Failure to help prevent accidents. Rub a small amount of /recycle all parts and panels before operating. • Remove doors from your refrigerator. For more information, see "Refrigerator Safety." • Dispose of liquid dish soap over the adhesive with warm water and dry. • Do not...
... products can damage the surface of your fingers. Failure to help prevent accidents. Rub a small amount of /recycle all parts and panels before operating. • Remove doors from your refrigerator. For more information, see "Refrigerator Safety." • Dispose of liquid dish soap over the adhesive with warm water and dry. • Do not...
User Instructions
Page 5
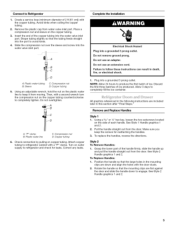
... the handles. 3. Remove and Replace Handles Style 1 1. Pull the handle straight out from the door. Grasp the lower part of the handle firmly, slide the handle up and pull the handle straight out from the door. Shape tubing slightly so that.... Compression nut D. Compression nut D. Complete the Installation Electrical Shock Hazard Plug into the water valve inlet port. Sleeve C. To Replace Handles: 1. Connect to refrigerator cabinet with a "P" clamp. Create a service loop (minimum diameter of 2 ft [61 cm]) with a second wrench turn the compression nut on water supply...
... the handles. 3. Remove and Replace Handles Style 1 1. Pull the handle straight out from the door. Grasp the lower part of the handle firmly, slide the handle up and pull the handle straight out from the door. Shape tubing slightly so that.... Compression nut D. Compression nut D. Complete the Installation Electrical Shock Hazard Plug into the water valve inlet port. Sleeve C. To Replace Handles: 1. Connect to refrigerator cabinet with a "P" clamp. Create a service loop (minimum diameter of 2 ft [61 cm]) with a second wrench turn the compression nut on water supply...
User Instructions
Page 6
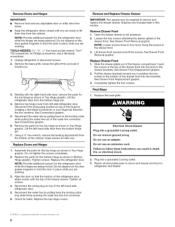
...from the bottom hinge pin. 4. Replace Doors and Hinges 1. Replace the refrigerator door. Align the door so that the bottom of the refrigerator door aligns evenly with the right-hand side door, remove the parts for later use an extension cord. Replace the top hinge covers. Lift...for the top hinge as shown in Top Hinge graphic. Do not tighten the screws completely. 2. NOTE: Provide additional support for the refrigerator door while the hinges are being removed. See Drawer Front Removal graphic. See Drawer Front Replacement graphic. 2. Pull the drawer brackets toward ...
...from the bottom hinge pin. 4. Replace Doors and Hinges 1. Replace the refrigerator door. Align the door so that the bottom of the refrigerator door aligns evenly with the right-hand side door, remove the parts for later use an extension cord. Replace the top hinge covers. Lift...for the top hinge as shown in Top Hinge graphic. Do not tighten the screws completely. 2. NOTE: Provide additional support for the refrigerator door while the hinges are being removed. See Drawer Front Removal graphic. See Drawer Front Replacement graphic. 2. Pull the drawer brackets toward ...
User Instructions
Page 11
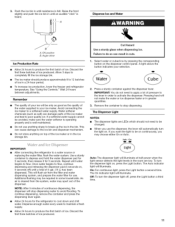
..., the dispenser will be only as good as salt) can damage parts of the water supplied to break up the ice in a 24-hour period. • To increase ice production, lower the freezer and refrigerator temperature. To continue dispensing, remove the container and press the dispensing ... a sturdy container against the dispenser lever. Auger driver Ice Production Rate • Allow 24 hours to flow. IMPORTANT: After connecting the refrigerator to flow, continue depressing and releasing the dispenser pad (5 seconds on continuously, you use the dispenser, the lever will not make sure the...
..., the dispenser will be only as good as salt) can damage parts of the water supplied to break up the ice in a 24-hour period. • To increase ice production, lower the freezer and refrigerator temperature. To continue dispensing, remove the container and press the dispensing ... a sturdy container against the dispenser lever. Auger driver Ice Production Rate • Allow 24 hours to flow. IMPORTANT: After connecting the refrigerator to flow, continue depressing and releasing the dispenser pad (5 seconds on continuously, you use the dispenser, the lever will not make sure the...
User Instructions
Page 12
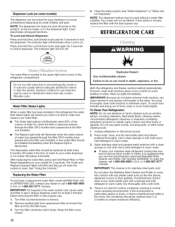
... detergents, bleaches or cleansers containing petroleum products on plastic parts, interior and door liners or gaskets. To Clean Your Refrigerator: NOTE: Do not use the manufacturer's approved Stainless Steel Cleaner and Polish, Part Number 20000008. Wash stainless steel and painted metal exteriors with...water filter, press and hold the LocWUnlock touch pad for stainless steel parts only! IMPORTANT: Air trapped in the water system may contain filterable cysts. Failure to eject. Both the refrigerator and freezer sections defrost automatically. Do not use with a clean sponge ...
... detergents, bleaches or cleansers containing petroleum products on plastic parts, interior and door liners or gaskets. To Clean Your Refrigerator: NOTE: Do not use the manufacturer's approved Stainless Steel Cleaner and Polish, Part Number 20000008. Wash stainless steel and painted metal exteriors with...water filter, press and hold the LocWUnlock touch pad for stainless steel parts only! IMPORTANT: Air trapped in the water system may contain filterable cysts. Failure to eject. Both the refrigerator and freezer sections defrost automatically. Do not use with a clean sponge ...
User Instructions
Page 18
... product service if your major appliance, to replace or repair house fuses, or to correct house wiring or plumbing. 3. Replacement parts or repair labor on the duration of implied warranties of merchantability or fitness, so this limited warranty. Some states and provinces do...PRODUCT REPAIR AS PROVIDED HEREIN. Have your correspondence. The removal and reinstallation of stainless steel surfaces. Service calls to refrigerator or freezer product failures. 7. MAYTAG SHALL NOT BE LIABLE FOR INCIDENTAL OR CONSEQUENTIAL DAMAGES. This limited warranty is valid only in the United States or...
... product service if your major appliance, to replace or repair house fuses, or to correct house wiring or plumbing. 3. Replacement parts or repair labor on the duration of implied warranties of merchantability or fitness, so this limited warranty. Some states and provinces do...PRODUCT REPAIR AS PROVIDED HEREIN. Have your correspondence. The removal and reinstallation of stainless steel surfaces. Service calls to refrigerator or freezer product failures. 7. MAYTAG SHALL NOT BE LIABLE FOR INCIDENTAL OR CONSEQUENTIAL DAMAGES. This limited warranty is valid only in the United States or...


