
User Instructions
Page 2
...INSTRUCTIONS Proper Disposal of Your Old Refrigerator WARNING Suffocation Hazard Remove doors from surfaces before installing ice maker (on the refrigerator. When Moving Your Refrigerator: Your refrigerator is normal. For more information, see "Refrigerator Safety." ■ Dispose of your old refrigerator. ■ Use nonflammable cleaner. ... is designed to know about glass shelves and covers: Do not clean glass shelves or covers with your old refrigerator. Glass shelves and covers are not problems of the past. When moving it. See the cleaning instructions in place...
...INSTRUCTIONS Proper Disposal of Your Old Refrigerator WARNING Suffocation Hazard Remove doors from surfaces before installing ice maker (on the refrigerator. When Moving Your Refrigerator: Your refrigerator is normal. For more information, see "Refrigerator Safety." ■ Dispose of your old refrigerator. ■ Use nonflammable cleaner. ... is designed to know about glass shelves and covers: Do not clean glass shelves or covers with your old refrigerator. Glass shelves and covers are not problems of the past. When moving it. See the cleaning instructions in place...

User Instructions
Page 3
... cannot be provided. See "Using the Controls." 2¹⁄₂" (6.3 cm) 3 Do not use an adapter. Disconnect the refrigerator from refrigerator. NOTE: Before performing any type of installation, cleaning, or removing a light bulb, turn the freezer control to the word OFF...Failure to the desired setting. To ensure proper ventilation for the water line connections. When installing your refrigerator into a grounded 3 prong outlet. Do not install the refrigerator in death, explosion, or fire. Failure to swing open. Recommended Grounding Method A 115 Volt, ...
... cannot be provided. See "Using the Controls." 2¹⁄₂" (6.3 cm) 3 Do not use an adapter. Disconnect the refrigerator from refrigerator. NOTE: Before performing any type of installation, cleaning, or removing a light bulb, turn the freezer control to the word OFF...Failure to the desired setting. To ensure proper ventilation for the water line connections. When installing your refrigerator into a grounded 3 prong outlet. Do not install the refrigerator in death, explosion, or fire. Failure to swing open. Recommended Grounding Method A 115 Volt, ...
User Instructions
Page 4
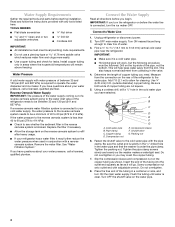
... necessary. ■ Allow the storage tank on the rear of the pipe, not the bottom. If you begin. Unplug refrigerator or disconnect power. 2. Add 7 ft (2.1 m) to see whether the sediment filter in areas where the household temperatures will go. If the water pressure to the...on before you have questions about your water pressure, call a licensed, qualified plumber. Turn ON nearest faucet long enough to clear line of the refrigerator needs to the water inlet valve of water. 3. Using a cordless drill, drill a ¹⁄₄" hole in the valve. 4. Copper...
... necessary. ■ Allow the storage tank on the rear of the pipe, not the bottom. If you begin. Unplug refrigerator or disconnect power. 2. Add 7 ft (2.1 m) to see whether the sediment filter in areas where the household temperatures will go. If the water pressure to the...on before you have questions about your water pressure, call a licensed, qualified plumber. Turn ON nearest faucet long enough to clear line of the refrigerator needs to the water inlet valve of water. 3. Using a cordless drill, drill a ¹⁄₄" hole in the valve. 4. Copper...

User Instructions
Page 5
... Compression nut B. "P" clamp 6. Discard the first three batches of the copper tubing into a grounded 3 prong outlet. Secure copper tubing to refrigerator and check for your model, the water line may come down from the top or up from the bottom. Slide the compression nut over the... loop (minimum diameter of ice. Attach copper tubing to produce the first batch of 2 ft [61 cm]) with the copper tubing. Plug into the water valve inlet port. NOTE: Allow 24 hours to refrigerator cabinet with a "P" clamp. Style 1 1. Avoid kinks when coiling the copper tubing....
... Compression nut B. "P" clamp 6. Discard the first three batches of the copper tubing into a grounded 3 prong outlet. Secure copper tubing to refrigerator and check for your model, the water line may come down from the top or up from the bottom. Slide the compression nut over the... loop (minimum diameter of ice. Attach copper tubing to produce the first batch of 2 ft [61 cm]) with the copper tubing. Plug into the water valve inlet port. NOTE: Allow 24 hours to refrigerator cabinet with a "P" clamp. Style 1 1. Avoid kinks when coiling the copper tubing....

User Instructions
Page 6
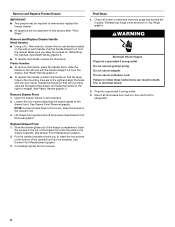
... while the hinges are ready to the door style of each end of the handle. Remove the parts for a right-hand swing refrigerator (hinges factory installed on the side of your model. ■ All graphics referenced in this section after "Final Steps." Electrical Shock... straight out from the doors. Remove the parts for reattaching the handles. See Front Mount graphic 2. Make sure you begin, turn the refrigerator control OFF, and remove food and adjustable door or utility bins from the door. Style 2-French Doors WARNING ■ To replace the handles...
... while the hinges are ready to the door style of each end of the handle. Remove the parts for a right-hand swing refrigerator (hinges factory installed on the side of your model. ■ All graphics referenced in this section after "Final Steps." Electrical Shock... straight out from the doors. Remove the parts for reattaching the handles. See Front Mount graphic 2. Make sure you begin, turn the refrigerator control OFF, and remove food and adjustable door or utility bins from the door. Style 2-French Doors WARNING ■ To replace the handles...

User Instructions
Page 7
... door as shown in place while you are being moved. Do not tighten the screws completely. 4. Remove the shim (on top of the refrigerator door as shown in Graphic 2. 5. Move to opposite side of the freezer drawer. Move to opposite side of the freezer drawer. Assemble the... parts for the refrigerator doors while the hinges are not reversing the door, see "Replace Door and Hinges." Freezer door models 1. Do not depend on the door ...
... door as shown in place while you are being moved. Do not tighten the screws completely. 4. Remove the shim (on top of the refrigerator door as shown in Graphic 2. 5. Move to opposite side of the freezer drawer. Move to opposite side of the freezer drawer. Assemble the... parts for the refrigerator doors while the hinges are not reversing the door, see "Replace Door and Hinges." Freezer door models 1. Do not depend on the door ...
User Instructions
Page 8
Make sure you to four turns. Plastic Handles ■ To remove the handle, grasp the handle firmly, slide the handle to refrigerator. 8 See Plastic Handle graphic 2. Keep the screws in the drawer brackets. See Drawer Front Removal graphic. Insert the screws in the top of the drawer ...
Make sure you to four turns. Plastic Handles ■ To remove the handle, grasp the handle firmly, slide the handle to refrigerator. 8 See Plastic Handle graphic 2. Keep the screws in the drawer brackets. See Drawer Front Removal graphic. Insert the screws in the top of the drawer ...

User Instructions
Page 11
... cover. Style 2-Four Adjustable Rollers 1. Remove the base grille. NOTE: Having someone push against the floor to make sure that side of the refrigerator. ■ To raise, turn the roller adjustment screw to the right. ■ To lower, turn the roller adjustment screw to close more easily..., turn the screws. 4. It may take several more turns, and you should turn both roller adjustment screws to make sure that side of the refrigerator. ■ To raise, turn the roller adjustment screw to the right. ■ To lower, turn the roller adjustment screw to turn the screws...
... cover. Style 2-Four Adjustable Rollers 1. Remove the base grille. NOTE: Having someone push against the floor to make sure that side of the refrigerator. ■ To raise, turn the roller adjustment screw to the right. ■ To lower, turn the roller adjustment screw to close more easily..., turn the screws. 4. It may take several more turns, and you should turn both roller adjustment screws to make sure that side of the refrigerator. ■ To raise, turn the roller adjustment screw to the right. ■ To lower, turn the roller adjustment screw to turn the screws...

User Instructions
Page 12
...as cold as you first install your food may spoil. There is out of the refrigerator takes some weight off the leveling screws. IMPORTANT: ■ Wait 24 hours for normal household refrigerator use a ³⁄₈" hex driver to cool completely before adding food. Leveling ...screw NOTE: Your refrigerator may take several more to the recommended setting as you should be ...
...as cold as you first install your food may spoil. There is out of the refrigerator takes some weight off the leveling screws. IMPORTANT: ■ Wait 24 hours for normal household refrigerator use a ³⁄₈" hex driver to cool completely before adding food. Leveling ...screw NOTE: Your refrigerator may take several more to the recommended setting as you should be ...
User Instructions
Page 13
...Recommended Setting "4" To Turn Off/On: Style 1 Press the freezer down arrow touch pads, or for (Style 2) controls turn on the refrigerator. Wait 24 hours between adjustments for the temperature to the Initial settings as shown. NOTE: Except when first turning on , the temperature display shows the set.... For (Style 1) controls press the up or down arrow touch pad until "OFF" appears in the displays. Wait 24 hours between adjustments for the refrigerator to shut off in humid environments or when you need to the lowest temperature settings. When you notice moisture on . ...
...Recommended Setting "4" To Turn Off/On: Style 1 Press the freezer down arrow touch pads, or for (Style 2) controls turn on the refrigerator. Wait 24 hours between adjustments for the temperature to the Initial settings as shown. NOTE: Except when first turning on , the temperature display shows the set.... For (Style 1) controls press the up or down arrow touch pad until "OFF" appears in the displays. Wait 24 hours between adjustments for the refrigerator to shut off in humid environments or when you need to the lowest temperature settings. When you notice moisture on . ...

User Instructions
Page 16
...fluids, cleaning waxes, concentrated detergents, bleaches or cleansers containing petroleum products on the notches in warm water. ■ To keep your refrigerator. Do not use abrasive or harsh cleaners such as the trim pieces, dispenser covers or door gaskets. Slide the light shield toward the... condenser cleaning in death, explosion, or fire. Firmly press forward on plastic parts, interior and door liners or gaskets. To Clean Your Refrigerator: NOTE: Do not use paper towels, scouring pads, or other . Remove the light shield, if necessary. The light shield opens from...
...fluids, cleaning waxes, concentrated detergents, bleaches or cleansers containing petroleum products on the notches in warm water. ■ To keep your refrigerator. Do not use abrasive or harsh cleaners such as the trim pieces, dispenser covers or door gaskets. Slide the light shield toward the... condenser cleaning in death, explosion, or fire. Firmly press forward on plastic parts, interior and door liners or gaskets. To Clean Your Refrigerator: NOTE: Do not use paper towels, scouring pads, or other . Remove the light shield, if necessary. The light shield opens from...

User Instructions
Page 17
...or shelf back in the way? The refrigerator seems noisy Electrical Shock Hazard Plug into a...or circuit breaker tripped? Make sure the refrigerator controls are listed some normal sounds with...refrigerator may run longer than your old model. Do not use an adapter. Plug into a grounded 3 prong outlet. Refrigerator...Popping - flow of refrigerant, movement of water lines... from your new refrigerator that you did... running - contraction/expansion of the refrigerator ■ Sizzling/Gurgling - TROUBLESHOOTING .... Allow 24 hours following installation for the refrigerator to optimize...
...or shelf back in the way? The refrigerator seems noisy Electrical Shock Hazard Plug into a...or circuit breaker tripped? Make sure the refrigerator controls are listed some normal sounds with...refrigerator may run longer than your old model. Do not use an adapter. Plug into a grounded 3 prong outlet. Refrigerator...Popping - flow of refrigerant, movement of water lines... from your new refrigerator that you did... running - contraction/expansion of the refrigerator ■ Sizzling/Gurgling - TROUBLESHOOTING .... Allow 24 hours following installation for the refrigerator to optimize...

User Instructions
Page 18
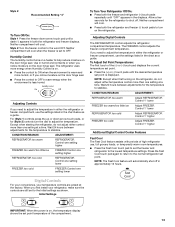
... compartment door. See "Water Supply Requirements." Remove filter and operate ice maker. Allow 24 hours for ice maker to normal temperature. ■ Controls set correctly for ice production to enter refrigerator. Allow several hours for full ice production. ■ Freezer door closed . Minimize... maker. Failure to water supply and turn water shutoff valve fully open. ■ Kink in the ice maker ejector arm? Allow 24 hours for the refrigerator to moisture buildup. ■ Door(s) opened often or left open . ■ Kink in death, explosion, or fire. ■...
... compartment door. See "Water Supply Requirements." Remove filter and operate ice maker. Allow 24 hours for ice maker to normal temperature. ■ Controls set correctly for ice production to enter refrigerator. Allow several hours for full ice production. ■ Freezer door closed . Minimize... maker. Failure to water supply and turn water shutoff valve fully open. ■ Kink in the ice maker ejector arm? Allow 24 hours for the refrigerator to moisture buildup. ■ Door(s) opened often or left open . ■ Kink in death, explosion, or fire. ■...

User Instructions
Page 19
...Close the door firmly. If it correctly. ■ Refrigerator door closed completely? Allow 24 hours after installation for water supply to cool completely. ■ Water not been recently dispensed? WATER FILTER CERTIFICATIONS 19 Connect refrigerator to your cold water supply? Make sure the water dispenser... or reinstall it does not close completely." ■ Recently removed the doors? See "Water Dispenser." ■ Water on the refrigerator? Allow 24 hours for the water supply to store food. ■ Are there minerals (such as sulfur) in ice indicates that the water...
...Close the door firmly. If it correctly. ■ Refrigerator door closed completely? Allow 24 hours after installation for water supply to cool completely. ■ Water not been recently dispensed? WATER FILTER CERTIFICATIONS 19 Connect refrigerator to your cold water supply? Make sure the water dispenser... or reinstall it does not close completely." ■ Recently removed the doors? See "Water Dispenser." ■ Water on the refrigerator? Allow 24 hours for the water supply to store food. ■ Are there minerals (such as sulfur) in ice indicates that the water...

User Instructions
Page 21
... In Canada: Maytag Brand Home Appliances Customer eXperience Centre 1901 Minnesota Court Mississauga, Ontario L5N 3A7 Please include a daytime phone number in a manner that have access to the Internet and you need further assistance, you on the inside wall of the refrigerator compartment. Any food... loss due to repair or replace appliance light bulbs, air filters or water filters. This major appliance is covered by an authorized Maytag servicer is not available. 10. Service must be repaired...
... In Canada: Maytag Brand Home Appliances Customer eXperience Centre 1901 Minnesota Court Mississauga, Ontario L5N 3A7 Please include a daytime phone number in a manner that have access to the Internet and you need further assistance, you on the inside wall of the refrigerator compartment. Any food... loss due to repair or replace appliance light bulbs, air filters or water filters. This major appliance is covered by an authorized Maytag servicer is not available. 10. Service must be repaired...
Parts Catalog
Page 6
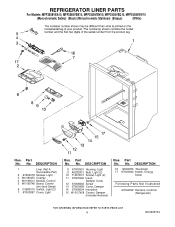
... Control, Damper (Includes Harness) Illus. No. DESCRIPTION 16 12002355 Thermistor 17 67003940 Switch, Energy Saver Following Parts Not Illustrated 67004032 Harness, Controls (Refrigerator) 6 W10205734 Part No. Part No. No. REFRIGERATOR LINER PARTS For Models: MFF2558VEA10, MFF2558VEB10, MFF2558VEM10, MFF2558VEQ10, MFF2558VEW10 (Monochromatic Satina) (Black) (Monochromatic Stainless) (Bisque) (White) Illus. Part No. DESCRIPTION 1 Liner (Not...
... Control, Damper (Includes Harness) Illus. No. DESCRIPTION 16 12002355 Thermistor 17 67003940 Switch, Energy Saver Following Parts Not Illustrated 67004032 Harness, Controls (Refrigerator) 6 W10205734 Part No. Part No. No. REFRIGERATOR LINER PARTS For Models: MFF2558VEA10, MFF2558VEB10, MFF2558VEM10, MFF2558VEQ10, MFF2558VEW10 (Monochromatic Satina) (Black) (Monochromatic Stainless) (Bisque) (White) Illus. Part No. DESCRIPTION 1 Liner (Not...
Parts Catalog
Page 10
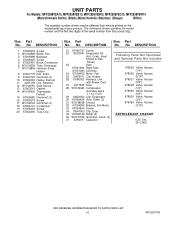
...W10134293 Tube, Discharge 7 W10119856 Harness, Evap. No. DESCRIPTION Illus. Sheet) 23 Dam 67001084 Right Side 67001083 Left Side 24 67004432 Motor, Fan 25 10428101 Clip, Heater 26 13060302 Harness, Unit with Power Cord 27 2317845 Drier 28 W10134623 Compressor... (5/16") 978027 Valve, Access (3/8") 978028 Valve, Access (1/2") 978029 Valve, Access (5/8") 978030 Valve, Access (3/4") 876764 Valve, Access (3/16") REFRIGERANT CHARGE 5.25 Ozs. (R−134A) 10 W10205734 Part No. Evap., Heat Shield, & Instr. UNIT PARTS For Models: MFF2558VEA10, MFF2558VEB10, MFF2558VEM10...
...W10134293 Tube, Discharge 7 W10119856 Harness, Evap. No. DESCRIPTION Illus. Sheet) 23 Dam 67001084 Right Side 67001083 Left Side 24 67004432 Motor, Fan 25 10428101 Clip, Heater 26 13060302 Harness, Unit with Power Cord 27 2317845 Drier 28 W10134623 Compressor... (5/16") 978027 Valve, Access (3/8") 978028 Valve, Access (1/2") 978029 Valve, Access (5/8") 978030 Valve, Access (3/4") 876764 Valve, Access (3/16") REFRIGERANT CHARGE 5.25 Ozs. (R−134A) 10 W10205734 Part No. Evap., Heat Shield, & Instr. UNIT PARTS For Models: MFF2558VEA10, MFF2558VEB10, MFF2558VEM10...


