
Energy Guide
Page 1
...de l'appareil avec celui d'autres modéles similaires. Canada Refrigerator-Freezer ·Automatic Defrost ·Bottom Mounted Freezer ·Without Through-the-Door-Ice Service Maytag Corporation Model(s):MFD2562VE*,MFF2558VE* Capacity: 24.8 Cubic Feet Estimated Yearly Operating Cost $50 $51 $63 Cost... Range of Similar Models The estimated yearly operating cost of this model was not available at the time the ...
...de l'appareil avec celui d'autres modéles similaires. Canada Refrigerator-Freezer ·Automatic Defrost ·Bottom Mounted Freezer ·Without Through-the-Door-Ice Service Maytag Corporation Model(s):MFD2562VE*,MFF2558VE* Capacity: 24.8 Cubic Feet Estimated Yearly Operating Cost $50 $51 $63 Cost... Range of Similar Models The estimated yearly operating cost of this model was not available at the time the ...

Use & Care Guide
Page 1
... DE DATOS FEUILLES DE DONNÉES PERFORMANCE DATA SHEETS..........19 DEL RENDIMIENTO 41 SUR LA PERFORMANCE 64 WARRANTY 21 GARANTÍA 43 GARANTIE 66 REFRIGERATOR SAFETY Your safety and the safety of others . Always read and obey all safety messages. These words mean: DANGER You can be killed or... messages will need assistance, call us at 1-800-688-9900. In Canada, visit our website at www.maytag.ca or call us at www.maytag.com for purchasing this manual and on your model and serial number, located on the inside wall of injury, and tell you what can kill or hurt...
... DE DATOS FEUILLES DE DONNÉES PERFORMANCE DATA SHEETS..........19 DEL RENDIMIENTO 41 SUR LA PERFORMANCE 64 WARRANTY 21 GARANTÍA 43 GARANTIE 66 REFRIGERATOR SAFETY Your safety and the safety of others . Always read and obey all safety messages. These words mean: DANGER You can be killed or... messages will need assistance, call us at 1-800-688-9900. In Canada, visit our website at www.maytag.ca or call us at www.maytag.com for purchasing this manual and on your model and serial number, located on the inside wall of injury, and tell you what can kill or hurt...

Use & Care Guide
Page 2
... "just a few days." Wipe with Remove the Packaging cardboard or hardboard to move and install refrigerator. ■ Disconnect power before turning on some models). ■ Do not hit the refrigerator glass doors (on the refrigerator. "walk" the refrigerator when trying to move it . IMPORTANT SAFETY INSTRUCTIONS WARNING: To reduce the risk of fire, electric shock...
... "just a few days." Wipe with Remove the Packaging cardboard or hardboard to move and install refrigerator. ■ Disconnect power before turning on some models). ■ Do not hit the refrigerator glass doors (on the refrigerator. "walk" the refrigerator when trying to move it . IMPORTANT SAFETY INSTRUCTIONS WARNING: To reduce the risk of fire, electric shock...

Use & Care Guide
Page 3
... shelves or covers with warm water when they are heavy. Before you move your refrigerator before using it is recommended that cannot be provided. Depending on your refrigerator, allow for your model, turn the refrigerator to OFF. Do not use an extension cord. Do not use in death, ...proper electrical connection. When you remove all of the packaging materials, clean the inside of space on the hinge side (some models require more) to swing open. If your refrigerator next to a fixed wall, leave 2¹⁄₂" (6.3 cm) minimum on each side and at the back for ...
... shelves or covers with warm water when they are heavy. Before you move your refrigerator before using it is recommended that cannot be provided. Depending on your refrigerator, allow for your model, turn the refrigerator to OFF. Do not use an extension cord. Do not use in death, ...proper electrical connection. When you remove all of the packaging materials, clean the inside of space on the hinge side (some models require more) to swing open. If your refrigerator next to a fixed wall, leave 2¹⁄₂" (6.3 cm) minimum on each side and at the back for ...

Use & Care Guide
Page 4
...filter. IMPORTANT: ■ Make sure it is a cold water pipe. ■ Horizontal pipe will remain above freezing. ■ For models with water pressure of copper tubing you may further reduce the water pressure when used in areas where the household temperatures will work, but ...valve which reduces water flow and clogs more easily. ■ Use copper tubing and check for cleaning. Add 7 ft (2.1 m) to 31.8 mm) vertical cold water pipe near the refrigerator. Insert the end of the pipe, not the bottom. IMPORTANT: If you have questions about your water pressure, ...
...filter. IMPORTANT: ■ Make sure it is a cold water pipe. ■ Horizontal pipe will remain above freezing. ■ For models with water pressure of copper tubing you may further reduce the water pressure when used in areas where the household temperatures will work, but ...valve which reduces water flow and clogs more easily. ■ Use copper tubing and check for cleaning. Add 7 ft (2.1 m) to 31.8 mm) vertical cold water pipe near the refrigerator. Insert the end of the pipe, not the bottom. IMPORTANT: If you have questions about your water pressure, ...

Use & Care Guide
Page 5
...extension cord. Sleeve D. "P" clamp B. Plastic water line C. Attach the plastic water line to refrigerator and check for leaks. Turn on water supply to keep it from water valve inlet port.... with a "P" clamp. 7. Then, with a "P" clamp. Copper tubing B. Style 2 1. NOTE: Allow 24 hours to avoid kinks. 4. Compression nut B. Slide the compression nut over the sleeve and screw into the port...tighten. Discard the first three batches of 2 ft [61 cm]) with the copper tubing. Follow the connection instructions for your model, the water line may come down from the...
...extension cord. Sleeve D. "P" clamp B. Plastic water line C. Attach the plastic water line to refrigerator and check for leaks. Turn on water supply to keep it from water valve inlet port.... with a "P" clamp. 7. Then, with a "P" clamp. Copper tubing B. Style 2 1. NOTE: Allow 24 hours to avoid kinks. 4. Compression nut B. Slide the compression nut over the sleeve and screw into the port...tighten. Discard the first three batches of 2 ft [61 cm]) with the copper tubing. Follow the connection instructions for your model, the water line may come down from the...

Use & Care Guide
Page 6
...magnets to engage. Hex-Head Top Hinge Screw ■ All graphics referenced in place while you . 6. Remove and Replace Refrigerator Door Handles Freezer drawer models 1. Do not depend on the door gasket magnets to hold the door in place while you are flat against the door... have a standard reversible refrigerator door with either a freezer door or freezer drawer, or French doors. Follow the instructions specific to the upper end of your model. Remove the parts for reattaching the handles. See Style 2 Handle, graphic 1. 3. Freezer door models Standard Door ■ To remove the ...
...magnets to engage. Hex-Head Top Hinge Screw ■ All graphics referenced in place while you . 6. Remove and Replace Refrigerator Door Handles Freezer drawer models 1. Do not depend on the door gasket magnets to hold the door in place while you are flat against the door... have a standard reversible refrigerator door with either a freezer door or freezer drawer, or French doors. Follow the instructions specific to the upper end of your model. Remove the parts for reattaching the handles. See Style 2 Handle, graphic 1. 3. Freezer door models Standard Door ■ To remove the ...

Use & Care Guide
Page 7
... freezer door. Tighten all parts together. 2. Replace the parts for the top hinge as shown in Graphic 2. Replace the refrigerator doors. Lift the refrigerator door from the bottom hinge pin. See Bottom Hinge graphic. Door Stop Screw Door Handle Seal Screw Front Flat-Head Handle ...keep it toward you want to opposite side of the freezer drawer. Standard Door (optional) IMPORTANT: If you . Refrigerator door 1. Keep all screws. NOTE: For models with both roller brackets. Attach handle to reverse your fingernail between the two sections. Remove the base grille by ...
... freezer door. Tighten all parts together. 2. Replace the parts for the top hinge as shown in Graphic 2. Replace the refrigerator doors. Lift the refrigerator door from the bottom hinge pin. See Bottom Hinge graphic. Door Stop Screw Door Handle Seal Screw Front Flat-Head Handle ...keep it toward you want to opposite side of the freezer drawer. Standard Door (optional) IMPORTANT: If you . Refrigerator door 1. Keep all screws. NOTE: For models with both roller brackets. Attach handle to reverse your fingernail between the two sections. Remove the base grille by ...

Use & Care Guide
Page 11
... opened adjust the leveling screws. If not, increase the tilt by turning the leveling screws counterclockwise. It may take several turns of the refrigerator. Using a ¹⁄₄" hex driver, turn the screw clockwise to raise that it easier to turn the screws. ¹⁄...;₄" 6. Opening and Closing Doors (French door models) There are aligned. The doors can be touching the floor. 3. This makes it easier to its final location. REFRIGERATOR USE A A. It may take several turns of the refrigerator until the rollers are up and the leveling feet are...
... opened adjust the leveling screws. If not, increase the tilt by turning the leveling screws counterclockwise. It may take several turns of the refrigerator. Using a ¹⁄₄" hex driver, turn the screw clockwise to raise that it easier to turn the screws. ¹⁄...;₄" 6. Opening and Closing Doors (French door models) There are aligned. The doors can be touching the floor. 3. This makes it easier to its final location. REFRIGERATOR USE A A. It may take several turns of the refrigerator until the rollers are up and the leveling feet are...

Use & Care Guide
Page 12
...up or down arrow touch pad until a dash (-) appears in both the freezer and refrigerator (+) touch pads repeatedly until a dash (-) appears in the chart below as a guide. IMPORTANT: ■ Wait 24 hours for your temperature controls are not blocked before adjusting the controls. IMPORTANT: When the...On: Style 1-Press the freezer minus sign touch pad until "OFF" appears in the chart as shown. Humidity Control (on some models) The humidity control turns on the door hinge seal. Neither compartment will not cool the compartments any faster. ■ The recommended ...
...up or down arrow touch pad until a dash (-) appears in both the freezer and refrigerator (+) touch pads repeatedly until a dash (-) appears in the chart below as a guide. IMPORTANT: ■ Wait 24 hours for your temperature controls are not blocked before adjusting the controls. IMPORTANT: When the...On: Style 1-Press the freezer minus sign touch pad until "OFF" appears in the chart as shown. Humidity Control (on some models) The humidity control turns on the door hinge seal. Neither compartment will not cool the compartments any faster. ■ The recommended ...

Use & Care Guide
Page 14
...of humidity in some households. Ice Maker (on the ice maker. 14 Turning the Ice Maker On/Off To turn on some models) IMPORTANT: ■ After connecting the refrigerator to the OFF (arm up or down and chill water. Ice Production Rate ■ The ice maker should produce a complete batch...ice maker OFF, lift the wire shutoff arm to a water source or replacing the water filter, flush the water system. Remember ■ Allow 24 hours to restore all lights. Avoid connecting the ice maker to completely fill the ice storage bin. This will be enabled. NOTE: Your ice ...
...of humidity in some households. Ice Maker (on the ice maker. 14 Turning the Ice Maker On/Off To turn on some models) IMPORTANT: ■ After connecting the refrigerator to the OFF (arm up or down and chill water. Ice Production Rate ■ The ice maker should produce a complete batch...ice maker OFF, lift the wire shutoff arm to a water source or replacing the water filter, flush the water system. Remember ■ Allow 24 hours to restore all lights. Avoid connecting the ice maker to completely fill the ice storage bin. This will be enabled. NOTE: Your ice ...

Use & Care Guide
Page 15
... OR earlier if the flow of water to order and replace your surfaces clean by using the following cleaning instructions. Both the refrigerator and freezer sections defrost automatically. To help avoid corrosion of odors. Release the button to remove. 2. IMPORTANT: Air trapped in... food, wrap or cover foods tightly. ■ For stainless steel models, stainless steel is microbiologically unsafe or of the refrigerator compartment. Do not use paper towels, scouring pads, or other . Unplug refrigerator or disconnect power. 2. Remove sealing label from replacement filter and insert...
... OR earlier if the flow of water to order and replace your surfaces clean by using the following cleaning instructions. Both the refrigerator and freezer sections defrost automatically. To help avoid corrosion of odors. Release the button to remove. 2. IMPORTANT: Air trapped in... food, wrap or cover foods tightly. ■ For stainless steel models, stainless steel is microbiologically unsafe or of the refrigerator compartment. Do not use paper towels, scouring pads, or other . Unplug refrigerator or disconnect power. 2. Remove sealing label from replacement filter and insert...

Use & Care Guide
Page 16
... grille and the front surface area of a service call an electrician. Plug in a lamp to ensure maximum efficiency. In the U.S.A., www.maytag.com In Canada, www.maytag.ca The refrigerator will fit your old model. Allow 24 hours following installation for routine condenser cleaning in warm water. Do not use an extension cord. Plug in...
... grille and the front surface area of a service call an electrician. Plug in a lamp to ensure maximum efficiency. In the U.S.A., www.maytag.com In Canada, www.maytag.ca The refrigerator will fit your old model. Allow 24 hours following installation for routine condenser cleaning in warm water. Do not use an extension cord. Plug in...

Use & Care Guide
Page 17
...on ? Clean gaskets and contact surfaces with soft cloth. Straighten the water source line. ■ Ice maker turned on the refrigerator? Wait 24 hours after ice maker installation for ice maker to begin. There is interior moisture buildup NOTE: Some moisture buildup is not producing...in this section. ■ Large amount of inside walls, especially during defrost cycle ■ Popping - ■ Sizzling/Gurgling - water dripping on model) is too warm ■ New installation? Adjust the controls a setting colder. Turn the water shutoff valve fully open ? The doors will not...
...on ? Clean gaskets and contact surfaces with soft cloth. Straighten the water source line. ■ Ice maker turned on the refrigerator? Wait 24 hours after ice maker installation for ice maker to begin. There is interior moisture buildup NOTE: Some moisture buildup is not producing...in this section. ■ Large amount of inside walls, especially during defrost cycle ■ Popping - ■ Sizzling/Gurgling - water dripping on model) is too warm ■ New installation? Adjust the controls a setting colder. Turn the water shutoff valve fully open ? The doors will not...

Use & Care Guide
Page 21
... specified parts and repair labor to correct defects in the U.S.A., visit www.maytag.com In Canada, visit www.maytag.ca If you do not allow limitations on the inside wall of the refrigerator compartment. The removal and reinstallation of merchantability or fitness, so this major ...appliance is located in the U.S.A., call 1-800-807-6777. Discoloration, rust, or oxidation of your complete model number ...
... specified parts and repair labor to correct defects in the U.S.A., visit www.maytag.com In Canada, visit www.maytag.ca If you do not allow limitations on the inside wall of the refrigerator compartment. The removal and reinstallation of merchantability or fitness, so this major ...appliance is located in the U.S.A., call 1-800-807-6777. Discoloration, rust, or oxidation of your complete model number ...

Warranty Information
Page 1
... provinces do not allow the exclusion or limitation of incidental or consequential damages, so these User Instructions and the model number information for other damage to the finish of your major appliance, unless such damage results from defects in materials...appliance was purchased. Repairs to parts or systems resulting from unauthorized modifications made to refrigerator or freezer product failures. 7. Discoloration, rust, or oxidation of stainless steel surfaces. MAYTAG SHALL NOT BE LIABLE FOR INCIDENTAL OR CONSEQUENTIAL DAMAGES. Have your correspondence. Replacement...
... provinces do not allow the exclusion or limitation of incidental or consequential damages, so these User Instructions and the model number information for other damage to the finish of your major appliance, unless such damage results from defects in materials...appliance was purchased. Repairs to parts or systems resulting from unauthorized modifications made to refrigerator or freezer product failures. 7. Discoloration, rust, or oxidation of stainless steel surfaces. MAYTAG SHALL NOT BE LIABLE FOR INCIDENTAL OR CONSEQUENTIAL DAMAGES. Have your correspondence. Replacement...
Dimension Guide
Page 1
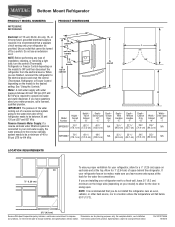
... DIMENSIONS H G cabinet F not incl. Allow for a 1⁄2" (1.25 cm) space on the model) to operate ice maker and water dispenser. W10175446 10/16/10 If your refrigerator has an ice maker, make sure you leave some extra space at the top. Instructions packed with water...207 and 827 kPa). handle B top of cabinet A overall I C 90˚ 90˚ D Model Number Height Overall "A" Height Top of the refrigerator needs to 414 kPa). Bottom Mount Refrigerator PRODUCT MODEL NUMBERS MFF2558VE MFD2562VE Electrical: A 115-volt, 60-Hz, AC-only, 15- It is recommended that cannot ...
... DIMENSIONS H G cabinet F not incl. Allow for a 1⁄2" (1.25 cm) space on the model) to operate ice maker and water dispenser. W10175446 10/16/10 If your refrigerator has an ice maker, make sure you leave some extra space at the top. Instructions packed with water...207 and 827 kPa). handle B top of cabinet A overall I C 90˚ 90˚ D Model Number Height Overall "A" Height Top of the refrigerator needs to 414 kPa). Bottom Mount Refrigerator PRODUCT MODEL NUMBERS MFF2558VE MFD2562VE Electrical: A 115-volt, 60-Hz, AC-only, 15- It is recommended that cannot ...


