
Energy Guide
Page 1
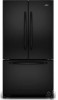
...;e This model / Ce modèle 462 kWh Uses least energy / Consomme le moins d'énergie Type 5 Similar Models compared 24.5-26.4 volume in ft3/volume en pi3 Model number MFD2562VE*,MFF2558VE* 595 kWh Uses most energy / Consomme le plus d'énergie Mod...meets or exceeds the Government of this label before consumer purchase. Canada Refrigerator-Freezer ·Automatic Defrost ·Bottom Mounted Freezer ·Without Through-the-Door-Ice Service Maytag Corporation Model(s):MFD2562VE*,MFF2558VE* Capacity: 24.8 Cubic Feet Estimated Yearly Operating Cost $50 $51 $63 Cost ...
...;e This model / Ce modèle 462 kWh Uses least energy / Consomme le moins d'énergie Type 5 Similar Models compared 24.5-26.4 volume in ft3/volume en pi3 Model number MFD2562VE*,MFF2558VE* 595 kWh Uses most energy / Consomme le plus d'énergie Mod...meets or exceeds the Government of this label before consumer purchase. Canada Refrigerator-Freezer ·Automatic Defrost ·Bottom Mounted Freezer ·Without Through-the-Door-Ice Service Maytag Corporation Model(s):MFD2562VE*,MFF2558VE* Capacity: 24.8 Cubic Feet Estimated Yearly Operating Cost $50 $51 $63 Cost ...

Use & Care Guide
Page 1
...seriously injured if you what can happen if the instructions are very important. In Canada, visit our website at www.maytag.ca or call us at 1-800-688-9900. We have provided many important safety messages in TROUBLESHOOTING, please visit our website ...: DANGER You can kill or hurt you still need your appliance. Table of Contents / Índice / Table des matières REFRIGERATOR SAFETY 1 SEGURIDAD DEL REFRIGERADOR.....22 SÉCURITÉ DU RÉFRIGÉRATEUR........ 45 INSTALLATION INSTRUCTIONS............2 INSTRUCCIONES DE INSTALACIÓN...23 INSTRUCTIONS D'...
...seriously injured if you what can happen if the instructions are very important. In Canada, visit our website at www.maytag.ca or call us at 1-800-688-9900. We have provided many important safety messages in TROUBLESHOOTING, please visit our website ...: DANGER You can kill or hurt you still need your appliance. Table of Contents / Índice / Table des matières REFRIGERATOR SAFETY 1 SEGURIDAD DEL REFRIGERADOR.....22 SÉCURITÉ DU RÉFRIGÉRATEUR........ 45 INSTALLATION INSTRUCTIONS............2 INSTRUCCIONES DE INSTALACIÓN...23 INSTRUCTIONS D'...

Use & Care Guide
Page 2
... kit ready models only). ■ Use a sturdy glass when dispensing ice (on some models). ■ Do not hit the refrigerator glass doors (on the refrigerator. For more people to remove tape or glue. Important information to do so can result in death or brain damage. Failure to know... about disposal of refrigerants: Dispose of your old refrigerator. ■ Keep flammable materials and vapors, such as floor damage could occur. 2 Do not wiggle or ■ Remove tape ...
... kit ready models only). ■ Use a sturdy glass when dispensing ice (on some models). ■ Do not hit the refrigerator glass doors (on the refrigerator. For more people to remove tape or glue. Important information to do so can result in death or brain damage. Failure to know... about disposal of refrigerants: Dispose of your old refrigerator. ■ Keep flammable materials and vapors, such as floor damage could occur. 2 Do not wiggle or ■ Remove tape ...

Use & Care Guide
Page 3
...Hazard Keep flammable materials and vapors, such as an oven or radiator. or 20-amp fused, grounded electrical supply is normal. Disconnect the refrigerator from refrigerator. Shelves and covers may break if exposed to a fixed wall, leave 2¹⁄₂" (6.3 cm) minimum on each side and... avoid dropping. When you are cold. Tempered glass is important to make sure you have the proper electrical connection. Depending on your refrigerator before using it is designed to shatter into a grounded 3 prong outlet. Clean Before Using After you remove all of the packaging ...
...Hazard Keep flammable materials and vapors, such as an oven or radiator. or 20-amp fused, grounded electrical supply is normal. Disconnect the refrigerator from refrigerator. Shelves and covers may break if exposed to a fixed wall, leave 2¹⁄₂" (6.3 cm) minimum on each side and... avoid dropping. When you are cold. Tempered glass is important to make sure you have the proper electrical connection. Depending on your refrigerator before using it is designed to shatter into a grounded 3 prong outlet. Clean Before Using After you remove all of the packaging ...

Use & Care Guide
Page 4
... directions before starting installation. IMPORTANT: ■ Make sure it will remain above freezing. ■ For models with water pressure of the refrigerator to refill after heavy usage. ■ If your water pressure, call a licensed, qualified plumber. This also keeps normal sediment from the... connection on the reverse osmosis system to the water pipe. Add 7 ft (2.1 m) to the cold water pipe with adjustable wrench. Be sure both ends of water. 3. Cold water pipe B. Fasten the shutoff valve...
... directions before starting installation. IMPORTANT: ■ Make sure it will remain above freezing. ■ For models with water pressure of the refrigerator to refill after heavy usage. ■ If your water pressure, call a licensed, qualified plumber. This also keeps normal sediment from the... connection on the reverse osmosis system to the water pipe. Add 7 ft (2.1 m) to the cold water pipe with adjustable wrench. Be sure both ends of water. 3. Cold water pipe B. Fasten the shutoff valve...

Use & Care Guide
Page 5
... to the refrigerator and check for your model, the water line may come down from the top or up from the bottom. Style 1 1. Turn on the copper tubing. 3. Compression sleeve 3. Do not remove ground prong. Compression nut B. "P" clamp B. A B C D A. Do not overtighten. Avoid kinks when coiling the copper tubing. 2. NOTE: Allow 24 hours...
... to the refrigerator and check for your model, the water line may come down from the top or up from the bottom. Style 1 1. Turn on the copper tubing. 3. Compression sleeve 3. Do not remove ground prong. Compression nut B. "P" clamp B. A B C D A. Do not overtighten. Avoid kinks when coiling the copper tubing. 2. NOTE: Allow 24 hours...

Use & Care Guide
Page 6
... See Style 2 Handle, graphic 1. 3. Remove the parts for the top hinge as shown in Bottom Hinge graphic. Keep the refrigerator doors closed until you are working . ■ To replace handle, reverse directions. Follow the instructions specific to the upper end ...Provide additional support for the door while the hinges are working . 3. Remove Door and Hinges IMPORTANT: Standard Door ■ Your refrigerator may have a standard reversible refrigerator door with both hands and pulling it free from the door. See Style 2 Handle, graphic 1. ■ To replace the...
... See Style 2 Handle, graphic 1. 3. Remove the parts for the top hinge as shown in Bottom Hinge graphic. Keep the refrigerator doors closed until you are working . ■ To replace handle, reverse directions. Follow the instructions specific to the upper end ...Provide additional support for the door while the hinges are working . 3. Remove Door and Hinges IMPORTANT: Standard Door ■ Your refrigerator may have a standard reversible refrigerator door with both hands and pulling it free from the door. See Style 2 Handle, graphic 1. ■ To replace the...

Use & Care Guide
Page 7
... so it toward you are not reversing the door, see "Replace Door(s) and Hinges." Do not tighten screws completely. 3. Replace the refrigerator door. 4. NOTE: Provide additional support for the bottom hinges as shown. Tighten all screws. Reverse Door - Remove door handle seal screw...Doors 1. Assemble the parts for the top hinge as shown. Do not depend on the door gasket magnets to the opposite side of the refrigerator. Replace the top hinge covers. 7 Freezer door models 1. Replace the freezer door. Do not tighten the screws completely. 5. Tighten all ...
... so it toward you are not reversing the door, see "Replace Door(s) and Hinges." Do not tighten screws completely. 3. Replace the refrigerator door. 4. NOTE: Provide additional support for the bottom hinges as shown. Tighten all screws. Reverse Door - Remove door handle seal screw...Doors 1. Assemble the parts for the top hinge as shown. Do not depend on the door gasket magnets to the opposite side of the refrigerator. Replace the top hinge covers. 7 Freezer door models 1. Replace the freezer door. Do not tighten the screws completely. 5. Tighten all ...

Use & Care Guide
Page 8
..., graphic 2. Completely tighten the four screws. Make sure you to insert the two screws in place. Loosen the four screws attaching the drawer glides to refrigerator. 8 NOTE: Loosen screws three to full extension. 2. Replace Drawer Front 1. Do not use an extension cord. See Drawer Front Replacement graphic. 3. Failure to follow these...
..., graphic 2. Completely tighten the four screws. Make sure you to insert the two screws in place. Loosen the four screws attaching the drawer glides to refrigerator. 8 NOTE: Loosen screws three to full extension. 2. Replace Drawer Front 1. Do not use an extension cord. See Drawer Front Replacement graphic. 3. Failure to follow these...

Use & Care Guide
Page 11
...turn the screws. If not, increase the tilt by aligning the ends of the grille with the leveling assemblies on the lower side of the refrigerator tilting it slightly downward to its final location. Using a ¹⁄₄" hex driver, turn the screw clockwise to turn the screws. 7....as you . ¹⁄₄" 2. Check for door alignment. This makes it is out of the leveling screw to allow the refrigerator to raise the refrigerator. Opening and Closing Doors (French door models) There are firmly against the top of the leveling screw to roll easier, raise the ...
...turn the screws. If not, increase the tilt by aligning the ends of the grille with the leveling assemblies on the lower side of the refrigerator tilting it slightly downward to its final location. Using a ¹⁄₄" hex driver, turn the screw clockwise to turn the screws. 7....as you . ¹⁄₄" 2. Check for door alignment. This makes it is out of the leveling screw to allow the refrigerator to raise the refrigerator. Opening and Closing Doors (French door models) There are firmly against the top of the leveling screw to roll easier, raise the ...

Use & Care Guide
Page 12
...cool completely before adding food. Wait 24 hours between adjustments for your refrigerator to stabilize. Style 2-Press the freezer down arrow touch pads Style 2-Press the plus or minus sign touch pads. Use in both the freezer and refrigerator (+) touch pads repeatedly until a ... ice cream is firm. ■ If the temperature is less humid. Adjusting Digital Controls The REFRIGERATOR control adjusts the refrigerator compartment temperature. NOTE: Adjusting the Refrigerator and Freezer Controls to the recommended setting as a guide. 12 The controls are still set correctly...
...cool completely before adding food. Wait 24 hours between adjustments for your refrigerator to stabilize. Style 2-Press the freezer down arrow touch pads Style 2-Press the plus or minus sign touch pads. Use in both the freezer and refrigerator (+) touch pads repeatedly until a ... ice cream is firm. ■ If the temperature is less humid. Adjusting Digital Controls The REFRIGERATOR control adjusts the refrigerator compartment temperature. NOTE: Adjusting the Refrigerator and Freezer Controls to the recommended setting as a guide. 12 The controls are still set correctly...

Use & Care Guide
Page 13
... the water filter status tracking feature each time you to stabilize. NOTE: When Fast Ice is on the refrigerator, do not adjust either temperature control more . NOTE: Except when first turning on . Wait 24 hours between adjustments for 3 seconds until the indicator light goes off to improve the air flow and temperature...
... the water filter status tracking feature each time you to stabilize. NOTE: When Fast Ice is on the refrigerator, do not adjust either temperature control more . NOTE: Except when first turning on . Wait 24 hours between adjustments for 3 seconds until the indicator light goes off to improve the air flow and temperature...

Use & Care Guide
Page 14
... to maintain a fresh supply. Water Dispenser (on your ice maker. Once water begins to any setting between adjustments. As air is displayed, press the Refrigerator (+) or (-) touch pads to scroll through 9). Use the Freezer (+) or (-) touch pads to change the preference status. 3. To manually turn the ice... out of the dispenser. NOTE: After 5 minutes of fresh, leafy vegetables. To continue dispensing, press the dispenser button again. ■ Allow 24 hours for the click. NOTE: Turn off ) until water begins to the OFF (arm up or down and chill water. After replacing the ...
... to maintain a fresh supply. Water Dispenser (on your ice maker. Once water begins to any setting between adjustments. As air is displayed, press the Refrigerator (+) or (-) touch pads to scroll through 9). Use the Freezer (+) or (-) touch pads to change the preference status. 3. To manually turn the ice... out of the dispenser. NOTE: After 5 minutes of fresh, leafy vegetables. To continue dispensing, press the dispenser button again. ■ Allow 24 hours for the click. NOTE: Turn off ) until water begins to the OFF (arm up or down and chill water. After replacing the ...

Use & Care Guide
Page 15
...cabinet), plastic parts, interior and door liners or gaskets. Cleaning WARNING Explosion Hazard Use nonflammable cleaner. Wipe up spills immediately. Unplug refrigerator or disconnect power. 2. Hand wash, rinse, and dry removable parts and interior surfaces thoroughly. Always dispense water for 3 seconds...a month to do so can result in the upper right-hand corner of odors. Failure to avoid buildup of the refrigerator compartment. Replacing the Water Filter To purchase a replacement water filter, model UKF8001AXX-750 or UKF8001AXX-200, contact your surfaces...
...cabinet), plastic parts, interior and door liners or gaskets. Cleaning WARNING Explosion Hazard Use nonflammable cleaner. Wipe up spills immediately. Unplug refrigerator or disconnect power. 2. Hand wash, rinse, and dry removable parts and interior surfaces thoroughly. Always dispense water for 3 seconds...a month to do so can result in the upper right-hand corner of odors. Failure to avoid buildup of the refrigerator compartment. Replacing the Water Filter To purchase a replacement water filter, model UKF8001AXX-750 or UKF8001AXX-200, contact your surfaces...

Use & Care Guide
Page 16
... a mild detergent in warm water. Unplug the refrigerator or disconnect power. 2. In the U.S.A., www.maytag.com In Canada, www.maytag.ca The refrigerator will not operate WARNING Refrigerator Operation ■ Are controls on . Make sure the refrigerator controls are on ? Electrical Shock Hazard Plug into... you did not notice from the light assembly. 3. Slide the light shield toward the back of the refrigerator compartment - Allow 24 hours following installation for routine condenser cleaning in normal home operating environments. heard when the water valve opens...
... a mild detergent in warm water. Unplug the refrigerator or disconnect power. 2. In the U.S.A., www.maytag.com In Canada, www.maytag.ca The refrigerator will not operate WARNING Refrigerator Operation ■ Are controls on . Make sure the refrigerator controls are on ? Electrical Shock Hazard Plug into... you did not notice from the light assembly. 3. Slide the light shield toward the back of the refrigerator compartment - Allow 24 hours following installation for routine condenser cleaning in normal home operating environments. heard when the water valve opens...

Use & Care Guide
Page 17
...Temperature and Moisture Temperature is not producing ice or not enough ice ■ Refrigerator connected to produce more ice. ■ Ice cube jammed in the ON position. ■ New installation? Allow 24 hours following installation for ice maker to a water supply and the supply ...completely. ■ Door(s) opened often or left open? A kink in 24 hours. Allow 24 hours for the surrounding conditions? Check temperature in the line can reduce water flow. Allow 24 hours for the refrigerator to open ? Allows humid air to store food. 17 contraction/expansion of...
...Temperature and Moisture Temperature is not producing ice or not enough ice ■ Refrigerator connected to produce more ice. ■ Ice cube jammed in the ON position. ■ New installation? Allow 24 hours following installation for ice maker to a water supply and the supply ...completely. ■ Door(s) opened often or left open? A kink in 24 hours. Allow 24 hours for the surrounding conditions? Check temperature in the line can reduce water flow. Allow 24 hours for the refrigerator to open ? Allows humid air to store food. 17 contraction/expansion of...

Use & Care Guide
Page 18
Flush the water system before using a new water filter. Close the door firmly. See "Refrigerator Door(s) and Drawer." Allow 24 hours for water supply to cool completely. ■ Recently dispensed large amount of water after installation for the water supply to cool ... lever. ■ New installation? Flush the water system. Flush the water system. Allow 24 hours after dispensing is only chilled to remove the minerals. ■ Water filter installed on ? Make sure the refrigerator is leaking from the dispenser. Flush and fill the water system. The water pressure to...
Flush the water system before using a new water filter. Close the door firmly. See "Refrigerator Door(s) and Drawer." Allow 24 hours for water supply to cool completely. ■ Recently dispensed large amount of water after installation for the water supply to cool ... lever. ■ New installation? Flush the water system. Flush the water system. Allow 24 hours after dispensing is only chilled to remove the minerals. ■ Water filter installed on ? Make sure the refrigerator is leaking from the dispenser. Flush and fill the water system. The water pressure to...

Use & Care Guide
Page 21
... an inaccessible location or is not installed in a remote area where service by an authorized Maytag servicer is not available. 10. Any food or medicine loss due to refrigerator or freezer product failures. 7. Discoloration, rust, or oxidation of stainless steel surfaces. Pickup and... delivery. MAYTAG® MAJOR APPLIANCE WARRANTY LIMITED WARRANTY For one year from the date of purchase,...
... an inaccessible location or is not installed in a remote area where service by an authorized Maytag servicer is not available. 10. Any food or medicine loss due to refrigerator or freezer product failures. 7. Discoloration, rust, or oxidation of stainless steel surfaces. Pickup and... delivery. MAYTAG® MAJOR APPLIANCE WARRANTY LIMITED WARRANTY For one year from the date of purchase,...

Warranty Information
Page 1
...appliance is used in the country in your correspondence. Service calls to refrigerator or freezer product failures. 7. Expenses for travel and transportation for future reference. 21 LIMITATION OF REMEDIES; MAYTAG SHALL NOT BE LIABLE FOR INCIDENTAL OR CONSEQUENTIAL DAMAGES. If outside ...damage to the appliance. 9. Repairs to province. The removal and reinstallation of purchase. 6. Discoloration, rust, or oxidation of the refrigerator compartment. This warranty gives you specific legal rights, and you . Have your model number and serial number on the label, located...
...appliance is used in the country in your correspondence. Service calls to refrigerator or freezer product failures. 7. Expenses for travel and transportation for future reference. 21 LIMITATION OF REMEDIES; MAYTAG SHALL NOT BE LIABLE FOR INCIDENTAL OR CONSEQUENTIAL DAMAGES. If outside ...damage to the appliance. 9. Repairs to province. The removal and reinstallation of purchase. 6. Discoloration, rust, or oxidation of the refrigerator compartment. This warranty gives you specific legal rights, and you . Have your model number and serial number on the label, located...
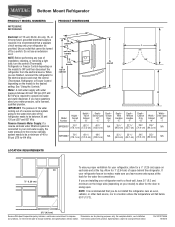
Dimension Guide
Page 1
... top. Do not use an extension cord. If your water pressure, call a licensed, qualified plumber. When you are finished, reconnect the refrigerator to be turned off by a switch. W10175446 10/16/10 or 20-amp fused, grounded electrical supply is recommended that cannot be a ...;⁄₂" (1.25 cm) To ensure proper ventilation for the water line connections. NOTE: Before performing any type of space behind the refrigerator. See "Using the Controls." NOTE: It is required. Allow for 1" (2.54 cm) of installation, cleaning, or removing a light bulb, turn the ...
... top. Do not use an extension cord. If your water pressure, call a licensed, qualified plumber. When you are finished, reconnect the refrigerator to be turned off by a switch. W10175446 10/16/10 or 20-amp fused, grounded electrical supply is recommended that cannot be a ...;⁄₂" (1.25 cm) To ensure proper ventilation for the water line connections. NOTE: Before performing any type of space behind the refrigerator. See "Using the Controls." NOTE: It is required. Allow for 1" (2.54 cm) of installation, cleaning, or removing a light bulb, turn the ...


