

Owners Manual
Page 1
...maytag.ca or call us at 1-800-807-6777. All safety messages will need assistance, call us at www.maytag....very important. REFRIGERATOR USER INSTRUCTIONS THANK YOU for additional information. Table of Contents / Índice / Table des matières REFRIGERATOR SAFETY 1...ÓN...22 INSTRUCTIONS D'INSTALLATION...... 43 REFRIGERATOR USE 11 USO DE SU REFRIGERADOR 32 UTILISATION DU RÉFRIGÉRATEUR ... 53 REFRIGERATOR CARE 15... 62 WARRANTY 20 GARANTIE 63 REFRIGERATOR SAFETY Your safety and the safety of the refrigerator compartment. W10208790A If you should...
...maytag.ca or call us at 1-800-807-6777. All safety messages will need assistance, call us at www.maytag....very important. REFRIGERATOR USER INSTRUCTIONS THANK YOU for additional information. Table of Contents / Índice / Table des matières REFRIGERATOR SAFETY 1...ÓN...22 INSTRUCTIONS D'INSTALLATION...... 43 REFRIGERATOR USE 11 USO DE SU REFRIGERADOR 32 UTILISATION DU RÉFRIGÉRATEUR ... 53 REFRIGERATOR CARE 15... 62 WARRANTY 20 GARANTIE 63 REFRIGERATOR SAFETY Your safety and the safety of the refrigerator compartment. W10208790A If you should...

Owners Manual
Page 2
...glue. Use both hands when removing them to move and install refrigerator. ■ Disconnect power before turning on ice maker kit ready models only). IMPORTANT: Child entrapment and suffocation are cold. Wipe with your old refrigerator. ■ Use nonflammable cleaner. ■ Keep flammable materials and... the adhesive with warm water and dry. ■ Do not use an extension cord. ■ Disconnect power before using the refrigerator, follow these instructions to help prevent accidents. For more people to avoid dropping. Remove the Packaging ■ Remove tape and glue...
...glue. Use both hands when removing them to move and install refrigerator. ■ Disconnect power before turning on ice maker kit ready models only). IMPORTANT: Child entrapment and suffocation are cold. Wipe with your old refrigerator. ■ Use nonflammable cleaner. ■ Keep flammable materials and... the adhesive with warm water and dry. ■ Do not use an extension cord. ■ Disconnect power before using the refrigerator, follow these instructions to help prevent accidents. For more people to avoid dropping. Remove the Packaging ■ Remove tape and glue...

Owners Manual
Page 3
... wall, leave 2¹⁄₂" (6.3 cm) minimum on your refrigerator be provided. Use an outlet that a separate circuit serving only your model, turn the refrigerator to swing open. Depending on the hinge side (some models require more easily. ■ Use copper tubing and check for the... water line connections. Do not install the refrigerator in death, fire, or electrical shock....
... wall, leave 2¹⁄₂" (6.3 cm) minimum on your refrigerator be provided. Use an outlet that a separate circuit serving only your model, turn the refrigerator to swing open. Depending on the hinge side (some models require more easily. ■ Use copper tubing and check for the... water line connections. Do not install the refrigerator in death, fire, or electrical shock....

Owners Manual
Page 4
...;⁄₂" to 1¹⁄₄" (12.7 mm to Water Line 1. Add 7 ft (2.1 m) to the water pipe. Pipe clamp C. Do not overtighten. 8. Flush the tubing...Be sure both ends of copper tubing you need. Copper tubing D. Follow the connection instructions for your refrigerator has a water filter, it will help keep water away from collecting in conjunction with a "P" clamp...water line is blocked. Turn ON nearest faucet long enough to refill after heavy usage. ■ If your model. Use ¹⁄₄" (6.35 mm) O.D. (outside diameter) copper tubing. A B C D ...
...;⁄₂" to 1¹⁄₄" (12.7 mm to Water Line 1. Add 7 ft (2.1 m) to the water pipe. Pipe clamp C. Do not overtighten. 8. Flush the tubing...Be sure both ends of copper tubing you need. Copper tubing D. Follow the connection instructions for your refrigerator has a water filter, it will help keep water away from collecting in conjunction with a "P" clamp...water line is blocked. Turn ON nearest faucet long enough to refill after heavy usage. ■ If your model. Use ¹⁄₄" (6.35 mm) O.D. (outside diameter) copper tubing. A B C D ...

Owners Manual
Page 5
...the instructions specific to follow these instructions can result in the lower holes. Failure to the door style of 2 ft [61 cm]) with a second wrench turn the refrigerator control OFF, and remove food and adjustable door or utility bins from moving. See Side Mount graphic 2. ■... See Metal Handle graphic 1. ■ To replace the handles, reverse the directions. A B C D A. Create a service loop (minimum diameter of your model. ■ All graphics referenced in the following instructions are flat against the door and slide the handle down and align the holes with the holes...
...the instructions specific to follow these instructions can result in the lower holes. Failure to the door style of 2 ft [61 cm]) with a second wrench turn the refrigerator control OFF, and remove food and adjustable door or utility bins from moving. See Side Mount graphic 2. ■... See Metal Handle graphic 1. ■ To replace the handles, reverse the directions. A B C D A. Create a service loop (minimum diameter of your model. ■ All graphics referenced in the following instructions are flat against the door and slide the handle down and align the holes with the holes...

Owners Manual
Page 6
...holes as shown in Graphic 1-2. Lift the refrigerator door free from the cabinet. 4. Freezer door models 1. Lift the refrigerator door free from the cabinet. 4. Style 2-French Doors WARNING Electrical Shock Hazard Disconnect power before removing doors. Keep the refrigerator doors closed until you are ready to ... a flat- 6 blade screwdriver or your door so it opens from the cabinet. 5. NOTE: For models with the right-hand side door, remove the parts for the refrigerator door while the hinges are being moved. Freezer door 1. Do not tighten screws completely. Remove the hinge...
...holes as shown in Graphic 1-2. Lift the refrigerator door free from the cabinet. 4. Freezer door models 1. Lift the refrigerator door free from the cabinet. 4. Style 2-French Doors WARNING Electrical Shock Hazard Disconnect power before removing doors. Keep the refrigerator doors closed until you are ready to ... a flat- 6 blade screwdriver or your door so it opens from the cabinet. 5. NOTE: For models with the right-hand side door, remove the parts for the refrigerator door while the hinges are being moved. Freezer door 1. Do not tighten screws completely. Remove the hinge...

Owners Manual
Page 7
Freezer door models 1. Replace the freezer door. Do not depend on top of each door so that the bottom of the refrigerator door is aligned with the door studs. Replace the refrigerator door. 3. Replace the refrigerator doors. Pull the handle straight out from the drawer. See Plastic ...screws for the top hinge as shown in the drawer front. 3. Loosen the four screws attaching the drawer glides to the left -hand side refrigerator door. 5. See Drawer Front Replacement graphic. 2. Final Steps 1. Style 2-French Doors 1. Do not tighten the screws completely. 2. See ...
Freezer door models 1. Replace the freezer door. Do not depend on top of each door so that the bottom of the refrigerator door is aligned with the door studs. Replace the refrigerator door. 3. Replace the refrigerator doors. Pull the handle straight out from the drawer. See Plastic ...screws for the top hinge as shown in the drawer front. 3. Loosen the four screws attaching the drawer glides to the left -hand side refrigerator door. 5. See Drawer Front Replacement graphic. 2. Final Steps 1. Style 2-French Doors 1. Do not tighten the screws completely. 2. See ...

Owners Manual
Page 8
... Plugs 1-1 2nd 4th D B A. Top Trim D. Door Stop A 5-1 A. Hinge Pin Cover B. Bottom Hinge C. ³⁄₈" Hex-Head Hinge Screws D. Hinge Pin Shim (on some models) B. Bottom Trim A A Hex-Head Hinge Screws 6 1 1 3 A A. See French Doors graphic. 5-2 A A. Door Hinge Hole Plugs 8 Top Hinge Center Hinge A B C A. Trim... Top Hinge Cover B Hex-Head Hinge Screws C. Handle Screws C. Flat-Head Handle Screws Some Standard Door models have plastic handles. Style 1-Standard Door Door Removal & Replacement Top Hinge A B C A. Hinge Screws Bottom Hinge A B C D A.
... Plugs 1-1 2nd 4th D B A. Top Trim D. Door Stop A 5-1 A. Hinge Pin Cover B. Bottom Hinge C. ³⁄₈" Hex-Head Hinge Screws D. Hinge Pin Shim (on some models) B. Bottom Trim A A Hex-Head Hinge Screws 6 1 1 3 A A. See French Doors graphic. 5-2 A A. Door Hinge Hole Plugs 8 Top Hinge Center Hinge A B C A. Trim... Top Hinge Cover B Hex-Head Hinge Screws C. Handle Screws C. Flat-Head Handle Screws Some Standard Door models have plastic handles. Style 1-Standard Door Door Removal & Replacement Top Hinge A B C A. Hinge Screws Bottom Hinge A B C D A.

Owners Manual
Page 10
...to close more to the rear by turning both roller adjustment screws to the right. A B A. Brake foot A 4. If not, tilt the refrigerator slightly more easily, follow the instructions for your model. It may take several turns of the roller adjustment screw to adjust the tilt of the... foot on each side to raise or lower that side of the refrigerator. Style 3-Leveling Screw 1. Adjust the Door Depending on your model, your refrigerator may take several turns of the roller adjustment screw to adjust the tilt of the refrigerator. ■ To raise, turn the roller adjustment screw to the...
...to close more to the rear by turning both roller adjustment screws to the right. A B A. Brake foot A 4. If not, tilt the refrigerator slightly more easily, follow the instructions for your model. It may take several turns of the roller adjustment screw to adjust the tilt of the... foot on each side to raise or lower that side of the refrigerator. Style 3-Leveling Screw 1. Adjust the Door Depending on your model, your refrigerator may take several turns of the roller adjustment screw to adjust the tilt of the refrigerator. ■ To raise, turn the roller adjustment screw to the...

Owners Manual
Page 11
... adding food. Leveling screw 3. Open the door again to turn the leveling screw counterclockwise. Using the Controls Your model may take several turns of the refrigerator. ■ To raise, turn the leveling screw clockwise. ■ To lower, turn the screws. The doors...Using a ¹⁄₄" hex driver, turn both the refrigerator and freezer displays. IMPORTANT: ■ Wait 24 hours for normal household refrigerator use. Style 1 Recommended Setting "4" REFRIGERATOR USE Opening and Closing Doors (French door models) There are set to OFF. Style 2 Press the freezer ...
... adding food. Leveling screw 3. Open the door again to turn the leveling screw counterclockwise. Using the Controls Your model may take several turns of the refrigerator. ■ To raise, turn the leveling screw clockwise. ■ To lower, turn the screws. The doors...Using a ¹⁄₄" hex driver, turn both the refrigerator and freezer displays. IMPORTANT: ■ Wait 24 hours for normal household refrigerator use. Style 1 Recommended Setting "4" REFRIGERATOR USE Opening and Closing Doors (French door models) There are set to OFF. Style 2 Press the freezer ...

Owners Manual
Page 13
...All control panel lights, interior lights and alarm tones will be disabled. VEGETABLES / HIGH (closed or Door Alarm is displayed, press the Refrigerator (+) or (-) touch pads to brightest (settings 1 through the preference names. The temperature displays will not hear the alarm sound. You will... control center allows you to turn this feature on your model, adjust the control to turn off this feature. Super Cool (CC) This preference allows you replace your preferences by shutting the refrigerator compartment door. OFF - Crisper Humidity Control You can control...
...All control panel lights, interior lights and alarm tones will be disabled. VEGETABLES / HIGH (closed or Door Alarm is displayed, press the Refrigerator (+) or (-) touch pads to brightest (settings 1 through the preference names. The temperature displays will not hear the alarm sound. You will... control center allows you to turn this feature on your model, adjust the control to turn off this feature. Super Cool (CC) This preference allows you replace your preferences by shutting the refrigerator compartment door. OFF - Crisper Humidity Control You can control...

Owners Manual
Page 14
...Filter Reset (depending on the dispenser for 5 seconds, then release it stops. NOTE: The dispenser feature may spurt out of the refrigerator compartment. Water softener chemicals (such as the quality of your water filter. Once water begins to remove. 2. Ice Production Rate &#... maker. Press the button on your water dispenser or ice maker decreases noticeably. IMPORTANT: Air trapped in some models) IMPORTANT: ■ After connecting the refrigerator to your model) for 5 seconds. Discard the first three batches of ice produced. ■ The quality of the water supplied...
...Filter Reset (depending on the dispenser for 5 seconds, then release it stops. NOTE: The dispenser feature may spurt out of the refrigerator compartment. Water softener chemicals (such as the quality of your water filter. Once water begins to remove. 2. Ice Production Rate &#... maker. Press the button on your water dispenser or ice maker decreases noticeably. IMPORTANT: Air trapped in some models) IMPORTANT: ■ After connecting the refrigerator to your model) for 5 seconds. Discard the first three batches of ice produced. ■ The quality of the water supplied...

Owners Manual
Page 15
... down . 3. Failure to ensure maximum efficiency. Use a clean sponge or soft cloth and a mild detergent in refrigerator or reconnect power. Stainless steel: Wash stainless steel surfaces with the grain to the other harsh cleaning tools. 1. Insert...and drying out of light assembly. Unplug refrigerator or disconnect power. 2. Freezer drawer models ■ Top of the refrigerator compartment - Freezer door models ■ Top of the refrigerator compartment - Freezer drawer models ■ Top of the refrigerator compartment - Slide the light shield toward ...
... down . 3. Failure to ensure maximum efficiency. Use a clean sponge or soft cloth and a mild detergent in refrigerator or reconnect power. Stainless steel: Wash stainless steel surfaces with the grain to the other harsh cleaning tools. 1. Insert...and drying out of light assembly. Unplug refrigerator or disconnect power. 2. Freezer drawer models ■ Top of the refrigerator compartment - Freezer door models ■ Top of the refrigerator compartment - Freezer drawer models ■ Top of the refrigerator compartment - Slide the light shield toward ...

Owners Manual
Page 16
...refrigerator controls are opened often, or if the doors have been left open ? Allow 24 hours following installation for the refrigerator...running - may run longer than your old model. Push bin or shelf back in death, ...refrigerator that you did not notice from items placed on top of the refrigerator ■ Sizzling/Gurgling - Due to this reduction, you may run too much Your new refrigerator...refrigerator seems noisy WARNING Electrical Shock Hazard Plug into a grounded 3 prong outlet. flow of refrigerant...fuse or reset the circuit breaker. Refrigerator noise has been reduced over the years...
...refrigerator controls are opened often, or if the doors have been left open ? Allow 24 hours following installation for the refrigerator...running - may run longer than your old model. Push bin or shelf back in death, ...refrigerator that you did not notice from items placed on top of the refrigerator ■ Sizzling/Gurgling - Due to this reduction, you may run too much Your new refrigerator...refrigerator seems noisy WARNING Electrical Shock Hazard Plug into a grounded 3 prong outlet. flow of refrigerant...fuse or reset the circuit breaker. Refrigerator noise has been reduced over the years...

Owners Manual
Page 17
...on ? If ice quality improves, then the filter may be clogged or incorrectly installed. Replace filter or reinstall it correctly. ■ Refrigerator door closed . ■ Large load of ice recently removed? New plumbing connections can decrease water pressure. Wash ice bin. Allow 24 ...." ■ Is the water pressure at least 35 psi (241 kPa)? See "Water Supply Requirements." ■ Water filter installed on model) is too warm ■ New installation? Remove filter and operate dispenser. Replace filter or reinstall it correctly. ■ Reverse osmosis water...
...on ? If ice quality improves, then the filter may be clogged or incorrectly installed. Replace filter or reinstall it correctly. ■ Refrigerator door closed . ■ Large load of ice recently removed? New plumbing connections can decrease water pressure. Wash ice bin. Allow 24 ...." ■ Is the water pressure at least 35 psi (241 kPa)? See "Water Supply Requirements." ■ Water filter installed on model) is too warm ■ New installation? Remove filter and operate dispenser. Replace filter or reinstall it correctly. ■ Reverse osmosis water...

Owners Manual
Page 19
...International against NSF/ANSI Standard 53 for the reduction of the substances listed below. Temp. = 68°F to 71.6°F (20°C to 22°C). ■ It is used , the yellow (Order) light comes on disinfected waters that may be replaced at least every 6 months. ...the product to the permissible limit for the reduction of unknown quality without adequate disinfection before or after the system. Use replacement filter model UKF8001AXX-750. 2008 suggested retail price of water that is for the Manufacturer's limited warranty. ■ The filter monitor system measures ...
...International against NSF/ANSI Standard 53 for the reduction of the substances listed below. Temp. = 68°F to 71.6°F (20°C to 22°C). ■ It is used , the yellow (Order) light comes on disinfected waters that may be replaced at least every 6 months. ...the product to the permissible limit for the reduction of unknown quality without adequate disinfection before or after the system. Use replacement filter model UKF8001AXX-750. 2008 suggested retail price of water that is for the Manufacturer's limited warranty. ■ The filter monitor system measures ...

Owners Manual
Page 20
... be provided by an authorized Maytag servicer is reported to Maytag within 30 days from the date of purchase. 6. Cosmetic damage, including scratches, dents, chips or other than normal, single-family household use your model number and serial number on the label, located on the inside wall of the refrigerator compartment. In Canada, call...
... be provided by an authorized Maytag servicer is reported to Maytag within 30 days from the date of purchase. 6. Cosmetic damage, including scratches, dents, chips or other than normal, single-family household use your model number and serial number on the label, located on the inside wall of the refrigerator compartment. In Canada, call...
Energy Guide
Page 1
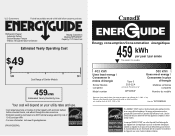
...233;nergétique 459 kWh per year / par année This model / Ce modèle 403 kWh Uses least energy / Consomme le moins d'énergie Similar Models compared Model number Type 5 20.5-22.4 volume in ft3/volume en pi3 MFF2258VE* 580 kWh Uses most energy ... cost based on this EnerGuide label signifies that this label before consumer purchase. Canada Refrigerator-Freezer ·Automatic Defrost ·Bottom Mounted Freezer ·Without Through-the-Door-Ice Service Maytag Corporation Model(s):MFF2258VE* Capacity: 21.7 Cubic Feet Estimated Yearly Operating Cost $49 $49 $61...
...233;nergétique 459 kWh per year / par année This model / Ce modèle 403 kWh Uses least energy / Consomme le moins d'énergie Similar Models compared Model number Type 5 20.5-22.4 volume in ft3/volume en pi3 MFF2258VE* 580 kWh Uses most energy ... cost based on this EnerGuide label signifies that this label before consumer purchase. Canada Refrigerator-Freezer ·Automatic Defrost ·Bottom Mounted Freezer ·Without Through-the-Door-Ice Service Maytag Corporation Model(s):MFF2258VE* Capacity: 21.7 Cubic Feet Estimated Yearly Operating Cost $49 $49 $61...


