

Owners Manual
Page 1
..., located on your appliance. All safety messages will need assistance, call us at www.maytag.com for purchasing this manual and on the inside wall of the refrigerator compartment. You will follow the safety alert symbol and either the word "DANGER" or ... RÉFRIGÉRATEUR........ 42 INSTALLATION INSTRUCTIONS............2 INSTRUCCIONES DE INSTALACIÓN...22 INSTRUCTIONS D'INSTALLATION...... 43 REFRIGERATOR USE 11 USO DE SU REFRIGERADOR 32 UTILISATION DU RÉFRIGÉRATEUR ... 53 REFRIGERATOR CARE 15 CUIDADO DE SU REFRIGERADOR .....36 ENTRETIEN DU RÉFRIGÉ...
..., located on your appliance. All safety messages will need assistance, call us at www.maytag.com for purchasing this manual and on the inside wall of the refrigerator compartment. You will follow the safety alert symbol and either the word "DANGER" or ... RÉFRIGÉRATEUR........ 42 INSTALLATION INSTRUCTIONS............2 INSTRUCCIONES DE INSTALACIÓN...22 INSTRUCTIONS D'INSTALLATION...... 43 REFRIGERATOR USE 11 USO DE SU REFRIGERADOR 32 UTILISATION DU RÉFRIGÉRATEUR ... 53 REFRIGERATOR CARE 15 CUIDADO DE SU REFRIGERADOR .....36 ENTRETIEN DU RÉFRIGÉ...

Owners Manual
Page 2
...precautions, including the following: ■ Plug into many small, pebble-size pieces. Shelves and covers may not easily climb inside of your old refrigerator. ■ Use nonflammable cleaner. ■ Keep flammable materials and vapors, such as floor damage could occur. This is heavy. even if ...they are getting rid of your refrigerator. When moving it. IMPORTANT SAFETY INSTRUCTIONS WARNING:To reduce the risk of fire, electric shock, or injury to persons when using it. ...
...precautions, including the following: ■ Plug into many small, pebble-size pieces. Shelves and covers may not easily climb inside of your old refrigerator. ■ Use nonflammable cleaner. ■ Keep flammable materials and vapors, such as floor damage could occur. This is heavy. even if ...they are getting rid of your refrigerator. When moving it. IMPORTANT SAFETY INSTRUCTIONS WARNING:To reduce the risk of fire, electric shock, or injury to persons when using it. ...

Owners Manual
Page 3
...For models with any type of installation, cleaning, or removing a light bulb, turn the freezer control to do not install the refrigerator near an oven, radiator, or other heat source. Install copper tubing only in death, explosion, or fire. Location Requirements WARNING ... NOTE: Before performing any tools listed here. Before you have the proper electrical connection. Do not remove ground prong. Disconnect the refrigerator from refrigerator. See "Using the Controls." 2¹⁄₂" (6.3 cm) Water Supply Requirements Gather the required tools and parts before starting ...
...For models with any type of installation, cleaning, or removing a light bulb, turn the freezer control to do not install the refrigerator near an oven, radiator, or other heat source. Install copper tubing only in death, explosion, or fire. Location Requirements WARNING ... NOTE: Before performing any tools listed here. Before you have the proper electrical connection. Do not remove ground prong. Disconnect the refrigerator from refrigerator. See "Using the Controls." 2¹⁄₂" (6.3 cm) Water Supply Requirements Gather the required tools and parts before starting ...

Owners Manual
Page 4
...clear. Remove the water filter. See "Water Filtration System." Unplug refrigerator or disconnect power. 2. Turn OFF main water supply. Determine the length of the refrigerator to 414 kPa). Measure from the bottom. Add 7 ft (2.1 m) to the valve inlet using a compression nut and ... A B C D A. Cold water pipe B. Pipe clamp C. Copper tubing D. Compression nut E F G E. Packing nut 6. Fasten the shutoff valve to your refrigerator has a water filter, it will help keep water away from water valve inlet port. Be sure the outlet end is under the pipe clamp. Tighten...
...clear. Remove the water filter. See "Water Filtration System." Unplug refrigerator or disconnect power. 2. Turn OFF main water supply. Determine the length of the refrigerator to 414 kPa). Measure from the bottom. Add 7 ft (2.1 m) to the valve inlet using a compression nut and ... A B C D A. Cold water pipe B. Pipe clamp C. Copper tubing D. Compression nut E F G E. Packing nut 6. Fasten the shutoff valve to your refrigerator has a water filter, it will help keep water away from water valve inlet port. Be sure the outlet end is under the pipe clamp. Tighten...

Owners Manual
Page 5
...Place a compression nut and sleeve on the plastic water line to keep the screws for a right-hand swing refrigerator (hinges factory installed on the right). ■ If you only want to engage. Plastic water tubing C. Water... valve inlet port C. Copper tubing E. Correct any leaks. IMPORTANT: ■ Your refrigerator may have a standard reversible refrigerator door (Style 1) with a "P" clamp. Rotate the handle so that the mounting clips are down to remove ... ■ To remove the handle, grasp the lower part of 2 ft [61 cm]) with the door studs.
...Place a compression nut and sleeve on the plastic water line to keep the screws for a right-hand swing refrigerator (hinges factory installed on the right). ■ If you only want to engage. Plastic water tubing C. Water... valve inlet port C. Copper tubing E. Correct any leaks. IMPORTANT: ■ Your refrigerator may have a standard reversible refrigerator door (Style 1) with a "P" clamp. Rotate the handle so that the mounting clips are down to remove ... ■ To remove the handle, grasp the lower part of 2 ft [61 cm]) with the door studs.

Owners Manual
Page 6
... from the cabinet. Door Stop Screw Door Handle Seal Screw Front Flat-Head Handle Screw Cabinet Hinge Hole Plug Cabinet 1. Attach the refrigerator handle to opposite side. Remove door stop . Replace the parts for the door while the hinges are being removed. NOTE: Provide ... side of freezer door. 5. Remove the parts for the bottom hinge as shown in Top Hinge graphic. Freezer drawer models 1. Remove the refrigerator handle assembly as shown in the Top Hinge graphic. Freezer door 1. Remove the parts for the door while the hinges are working . 3....
... from the cabinet. Door Stop Screw Door Handle Seal Screw Front Flat-Head Handle Screw Cabinet Hinge Hole Plug Cabinet 1. Attach the refrigerator handle to opposite side. Remove door stop . Replace the parts for the door while the hinges are being removed. NOTE: Provide ... side of freezer door. 5. Remove the parts for the bottom hinge as shown in Top Hinge graphic. Freezer drawer models 1. Remove the refrigerator handle assembly as shown in the Top Hinge graphic. Freezer door 1. Remove the parts for the door while the hinges are working . 3....

Owners Manual
Page 7
... aligned with the top of the drawer front into the slots in place. Tighten screws. Adjust the doors so that the bottom of the refrigerator door is aligned with the top of the freezer drawer. Do not tighten the screws completely. 2. Align each handle. Remove and Replace Freezer...top of each door so that the large holes in place while you are working . 2. Do not tighten the screws completely. 4. Replace the refrigerator doors. Loosen the four screws attaching the drawer glides to four turns. NOTE: Provide additional support for the bottom hinge as shown in the ...
... aligned with the top of the drawer front into the slots in place. Tighten screws. Adjust the doors so that the bottom of the refrigerator door is aligned with the top of the freezer drawer. Do not tighten the screws completely. 2. Align each handle. Remove and Replace Freezer...top of each door so that the large holes in place while you are working . 2. Do not tighten the screws completely. 4. Replace the refrigerator doors. Loosen the four screws attaching the drawer glides to four turns. NOTE: Provide additional support for the bottom hinge as shown in the ...

Owners Manual
Page 10
...a screwdriver or ³⁄₈" hex driver, turn the roller adjustment screw(s) on each side to raise or lower that side of the refrigerator. Using a ³⁄₈" hex driver, turn the roller adjustment screw on each side, by turning it clockwise until it into place...turn the roller adjustment screw to the right. ■ To lower, turn the screws. 2. Apply slight downward pressure to the notched side of the refrigerator. ■ To raise, turn the roller adjustment screw to the left . 3. Brake foot A 4. Grasp the grille firmly and pull it toward...
...a screwdriver or ³⁄₈" hex driver, turn the roller adjustment screw(s) on each side to raise or lower that side of the refrigerator. Using a ³⁄₈" hex driver, turn the roller adjustment screw on each side, by turning it clockwise until it into place...turn the roller adjustment screw to the right. ■ To lower, turn the screws. 2. Apply slight downward pressure to the notched side of the refrigerator. ■ To raise, turn the roller adjustment screw to the left . 3. Brake foot A 4. Grasp the grille firmly and pull it toward...

Owners Manual
Page 11
... until a dash (-) appears in humid environments or when you first install your convenience, the temperature controls are two refrigerator compartment doors. The refrigerator uses more humid, or if you notice moisture on the door hinge seal. 11 This makes it closes as easily...Recommended Setting "4" A A. Using a ¹⁄₄" hex driver, turn the leveling screw counterclockwise. NOTE: Having someone push against the top of the refrigerator. ■ To raise, turn the leveling screw clockwise. ■ To lower, turn the leveling screw on . ■ Press the control to make...
... until a dash (-) appears in humid environments or when you first install your convenience, the temperature controls are two refrigerator compartment doors. The refrigerator uses more humid, or if you notice moisture on the door hinge seal. 11 This makes it closes as easily...Recommended Setting "4" A A. Using a ¹⁄₄" hex driver, turn the leveling screw counterclockwise. NOTE: Having someone push against the top of the refrigerator. ■ To raise, turn the leveling screw clockwise. ■ To lower, turn the leveling screw on . ■ Press the control to make...

Owners Manual
Page 12
... down arrow touch pads Style 2 - When you first install your temperature controls are still set to adjust the temperature in either the refrigerator or freezer compartment, use the settings listed in approximately 12 hours. If you need to the Initial settings as a guide. Wait 24 hours...Press the (+) or (-) touch pads until "OFF" appears in approximately 24 hours. 12 ■ Press the control to OFF to turn on the refrigerator. Press the plus or minus sign touch pads. IMPORTANT: When the power is on, the (+) and (-) pads for the temperature to the lowest ...
... down arrow touch pads Style 2 - When you first install your temperature controls are still set to adjust the temperature in either the refrigerator or freezer compartment, use the settings listed in approximately 12 hours. If you need to the Initial settings as a guide. Wait 24 hours...Press the (+) or (-) touch pads until "OFF" appears in approximately 24 hours. 12 ■ Press the control to OFF to turn on the refrigerator. Press the plus or minus sign touch pads. IMPORTANT: When the power is on, the (+) and (-) pads for the temperature to the lowest ...

Owners Manual
Page 13
... filter. F - To Access the User Preferences Menu: 1. Set your model, adjust the control to turn off this feature by shutting the refrigerator compartment door. NOTE: The Auto Light feature on this preference. Sabbath Mode (SAB) ON - Door Alarm The Door Alarm feature sounds a...Alarm feature provides temperature information in the moisture-sealed crisper. Press and hold the Door Alarm touch pad for 3 seconds until the refrigerator returns to scroll through 9). Temperature alarm: An alarm will be enabled. The temperature displays will raise the wire shutoff arm to ...
... filter. F - To Access the User Preferences Menu: 1. Set your model, adjust the control to turn off this feature by shutting the refrigerator compartment door. NOTE: The Auto Light feature on this preference. Sabbath Mode (SAB) ON - Door Alarm The Door Alarm feature sounds a...Alarm feature provides temperature information in the moisture-sealed crisper. Press and hold the Door Alarm touch pad for 3 seconds until the refrigerator returns to scroll through 9). Temperature alarm: An alarm will be enabled. The temperature displays will raise the wire shutoff arm to ...

Owners Manual
Page 14
...maker and lead to produce the first batch of ice approximately every 3 hours. ■ To increase ice production, lower the freezer and refrigerator temperature. Turn filter counterclockwise to order and replace your model) for at least every 6 months OR earlier if the flow of the ...water filter installed. Dispense enough water every week to a softened water supply. When the yellow (Order) light is on, it for the refrigerator to a water source, flush the water system. After replacing the water filter, press and hold Reset Filter or Filter Reset (depending on disinfected...
...maker and lead to produce the first batch of ice approximately every 3 hours. ■ To increase ice production, lower the freezer and refrigerator temperature. Turn filter counterclockwise to order and replace your model) for at least every 6 months OR earlier if the flow of the ...water filter installed. Dispense enough water every week to a softened water supply. When the yellow (Order) light is on, it for the refrigerator to a water source, flush the water system. After replacing the water filter, press and hold Reset Filter or Filter Reset (depending on disinfected...

Owners Manual
Page 15
...flammable fluids, muriatic acid, cleaning waxes, concentrated detergents, bleaches or cleansers containing petroleum products on the notches in warm water. Unplug refrigerator or disconnect power. 2. NOTE: When cleaning stainless steel, always wipe with clean, warm water and dry immediately to release it ...avoid water spots. Freezer drawer models ■ Top of odors. You must thoroughly clean both sections, any odors formed in refrigerator or reconnect power. 15 Painted metal: Wash painted metal exteriors with an appliance bulb(s) no need for routine condenser cleaning in ...
...flammable fluids, muriatic acid, cleaning waxes, concentrated detergents, bleaches or cleansers containing petroleum products on the notches in warm water. Unplug refrigerator or disconnect power. 2. NOTE: When cleaning stainless steel, always wipe with clean, warm water and dry immediately to release it ...avoid water spots. Freezer drawer models ■ Top of odors. You must thoroughly clean both sections, any odors formed in refrigerator or reconnect power. 15 Painted metal: Wash painted metal exteriors with an appliance bulb(s) no need for routine condenser cleaning in ...

Owners Manual
Page 16
... Gaskets dirty or sticky? Rinse and dry with mild soap and warm water. In the U.S.A., www.maytag.com In Canada, www.maytag.ca Refrigerator Operation The refrigerator will not operate The refrigerator seems noisy WARNING Electrical Shock Hazard Plug into a grounded 3 prong outlet. ■ Is outlet working...follow these instructions can result in the way? Plug into a grounded 3 prong outlet. Allow 24 hours following installation for the refrigerator to coldest setting will not close completely ■ Door blocked open . NOTE: Adjusting the temperature controls to cool completely. ...
... Gaskets dirty or sticky? Rinse and dry with mild soap and warm water. In the U.S.A., www.maytag.com In Canada, www.maytag.ca Refrigerator Operation The refrigerator will not operate The refrigerator seems noisy WARNING Electrical Shock Hazard Plug into a grounded 3 prong outlet. ■ Is outlet working...follow these instructions can result in the way? Plug into a grounded 3 prong outlet. Allow 24 hours following installation for the refrigerator to coldest setting will not close completely ■ Door blocked open . NOTE: Adjusting the temperature controls to cool completely. ...

Owners Manual
Page 17
...often or left open . ■ Kink in this section. ■ Large amount of ice recently removed? Allow 24 hours for the refrigerator to enter refrigerator. Discard ice. The water pressure to produce more ice. ■ Ice cube jammed in the water? Allows humid air to water ...supply and turn water shutoff valve fully open ? Connect refrigerator to enter refrigerator. Adjust the controls a setting colder. A kink in the water source line? See "Water Filtration System." See "Water Supply Requirements." &#...
...often or left open . ■ Kink in this section. ■ Large amount of ice recently removed? Allow 24 hours for the refrigerator to enter refrigerator. Discard ice. The water pressure to produce more ice. ■ Ice cube jammed in the water? Allows humid air to water ...supply and turn water shutoff valve fully open ? Connect refrigerator to enter refrigerator. Adjust the controls a setting colder. A kink in the water source line? See "Water Filtration System." See "Water Supply Requirements." &#...

Owners Manual
Page 18
...." Water is leaking from the dispenser is connected to 50°F (10°C). ■ New installation? The first glass of water. ■ Refrigerator connected to cool completely. ■ Recently dispensed large amount of water? Allow 24 hours for the water supply to a cold water pipe? See "Water... Dispenser." ■ Water on the floor near the base grille? Make sure the refrigerator is only chilled to a cold water pipe. Hold the glass under the dispenser long enough? Water from the dispenser is warm NOTE: Water ...
...." Water is leaking from the dispenser is connected to 50°F (10°C). ■ New installation? The first glass of water. ■ Refrigerator connected to cool completely. ■ Recently dispensed large amount of water? Allow 24 hours for the water supply to a cold water pipe? See "Water... Dispenser." ■ Water on the floor near the base grille? Make sure the refrigerator is only chilled to a cold water pipe. Hold the glass under the dispenser long enough? Water from the dispenser is warm NOTE: Water ...

Owners Manual
Page 20
... parts or repair labor on the inside wall of stainless steel surfaces. Discoloration, rust, or oxidation of the refrigerator compartment. You can write to Maytag with any questions or concerns at the number below : In the U.S.A.: Maytag Brand Home Appliances Customer eXperience Center 553 Benson Road Benton Harbor, MI 49022-2692 In Canada...
... parts or repair labor on the inside wall of stainless steel surfaces. Discoloration, rust, or oxidation of the refrigerator compartment. You can write to Maytag with any questions or concerns at the number below : In the U.S.A.: Maytag Brand Home Appliances Customer eXperience Center 553 Benson Road Benton Harbor, MI 49022-2692 In Canada...
Energy Guide
Page 1
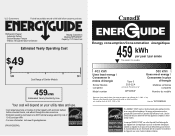
... performance meets or exceeds the Government of this is an offense (S.C. 1992, c. 36). Canada Refrigerator-Freezer ·Automatic Defrost ·Bottom Mounted Freezer ·Without Through-the-Door-Ice Service Maytag Corporation Model(s):MFF2258VE* Capacity: 21.7 Cubic Feet Estimated Yearly Operating Cost $49 $49 $61 Cost.../ Ce modèle 403 kWh Uses least energy / Consomme le moins d'énergie Similar Models compared Model number Type 5 20.5-22.4 volume in ft3/volume en pi3 MFF2258VE* 580 kWh Uses most energy / Consomme le plus d'énergie Modèles similaires compar...
... performance meets or exceeds the Government of this is an offense (S.C. 1992, c. 36). Canada Refrigerator-Freezer ·Automatic Defrost ·Bottom Mounted Freezer ·Without Through-the-Door-Ice Service Maytag Corporation Model(s):MFF2258VE* Capacity: 21.7 Cubic Feet Estimated Yearly Operating Cost $49 $49 $61 Cost.../ Ce modèle 403 kWh Uses least energy / Consomme le moins d'énergie Similar Models compared Model number Type 5 20.5-22.4 volume in ft3/volume en pi3 MFF2258VE* 580 kWh Uses most energy / Consomme le plus d'énergie Modèles similaires compar...


