Energy Guide
Page 1
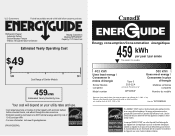
... the EnerGuide rating to determine how this is an offense (S.C. 1992, c. 36). U.S. Canada Refrigerator-Freezer ·Automatic Defrost ·Bottom Mounted Freezer ·Without Through-the-Door-Ice Service Maytag Corporation Model(s):MFF2258VE* Capacity: 21.7 Cubic Feet Estimated Yearly Operating Cost $49 $49 $61 ... / Ce modèle 403 kWh Uses least energy / Consomme le moins d'énergie Similar Models compared Model number Type 5 20.5-22.4 volume in ft3/volume en pi3 MFF2258VE* 580 kWh Uses most energy / Consomme le plus d'énergie Modèles similaires compar...
... the EnerGuide rating to determine how this is an offense (S.C. 1992, c. 36). U.S. Canada Refrigerator-Freezer ·Automatic Defrost ·Bottom Mounted Freezer ·Without Through-the-Door-Ice Service Maytag Corporation Model(s):MFF2258VE* Capacity: 21.7 Cubic Feet Estimated Yearly Operating Cost $49 $49 $61 ... / Ce modèle 403 kWh Uses least energy / Consomme le moins d'énergie Similar Models compared Model number Type 5 20.5-22.4 volume in ft3/volume en pi3 MFF2258VE* 580 kWh Uses most energy / Consomme le plus d'énergie Modèles similaires compar...

Use & Care Guide
Page 1
... symbol. In Canada, visit our website at www.maytag.ca or call us at www.maytag.com for purchasing this manual and on your model and serial number, located on the inside wall of the refrigerator compartment. WARNING You can kill or hurt you still...alerts you to reduce the chance of others . Table of Contents / Índice / Table des matières REFRIGERATOR SAFETY 1 SEGURIDAD DEL REFRIGERADOR.....22 SÉCURITÉ DU RÉFRIGÉRATEUR........ 45 INSTALLATION INSTRUCTIONS............2 INSTRUCCIONES DE INSTALACIÓN...23 INSTRUCTIONS D'INSTALLATION...... 46...
... symbol. In Canada, visit our website at www.maytag.ca or call us at www.maytag.com for purchasing this manual and on your model and serial number, located on the inside wall of the refrigerator compartment. WARNING You can kill or hurt you still...alerts you to reduce the chance of others . Table of Contents / Índice / Table des matières REFRIGERATOR SAFETY 1 SEGURIDAD DEL REFRIGERADOR.....22 SÉCURITÉ DU RÉFRIGÉRATEUR........ 45 INSTALLATION INSTRUCTIONS............2 INSTRUCCIONES DE INSTALACIÓN...23 INSTRUCTIONS D'INSTALLATION...... 46...

Use & Care Guide
Page 2
...; Use a sturdy glass when dispensing ice (on some models). ■ Do not hit the refrigerator glass doors (on the refrigerator. Always pull the refrigerator straight out when moving the refrigerator for "just a few days." Do not wiggle or ■ Remove tape and glue residue from... materials. Important information to help prevent accidents. These products can result in accordance with your fingers. INSTALLATION INSTRUCTIONS Unpack the Refrigerator WARNING Excessive Weight Hazard Use two or more people to do so can result in place so that children may not easily...
...; Use a sturdy glass when dispensing ice (on some models). ■ Do not hit the refrigerator glass doors (on the refrigerator. Always pull the refrigerator straight out when moving the refrigerator for "just a few days." Do not wiggle or ■ Remove tape and glue residue from... materials. Important information to help prevent accidents. These products can result in accordance with your fingers. INSTALLATION INSTRUCTIONS Unpack the Refrigerator WARNING Excessive Weight Hazard Use two or more people to do so can result in place so that children may not easily...

Use & Care Guide
Page 3
... 1" (2.54 cm) of 110°F (43°C). Electrical Shock Hazard Plug into its final location, it . Disconnect the refrigerator from refrigerator. Location Requirements WARNING ¹⁄₂" (1.25 cm) 2¹⁄₂" (6.3 cm) Electrical Requirements WARNING Explosion Hazard Keep flammable... materials and vapors, such as bumping. If your refrigerator next to shatter into many small, pebble-size pieces. Failure to make sure you have the proper electrical connection. It is...
... 1" (2.54 cm) of 110°F (43°C). Electrical Shock Hazard Plug into its final location, it . Disconnect the refrigerator from refrigerator. Location Requirements WARNING ¹⁄₂" (1.25 cm) 2¹⁄₂" (6.3 cm) Electrical Requirements WARNING Explosion Hazard Keep flammable... materials and vapors, such as bumping. If your refrigerator next to shatter into many small, pebble-size pieces. Failure to make sure you have the proper electrical connection. It is...

Use & Care Guide
Page 4
...is required to be replaced at least every 6 months. If you have questions about your water pressure, call a licensed, qualified plumber. Unplug refrigerator or disconnect power. 2. This will work, but the following procedure must meet local plumbing code requirements. ■ Do not use a piercing-...8322;" to 1¹⁄₄" (12.7 mm to Water Line 1. Measure from the connection on the top side of water. 3. Add 7 ft (2.1 m) to the cold water pipe with adjustable wrench. Compression sleeve F. Packing nut 6. Insert the end of between 35 and 120 psi (241 ...
...is required to be replaced at least every 6 months. If you have questions about your water pressure, call a licensed, qualified plumber. Unplug refrigerator or disconnect power. 2. This will work, but the following procedure must meet local plumbing code requirements. ■ Do not use a piercing-...8322;" to 1¹⁄₄" (12.7 mm to Water Line 1. Measure from the connection on the top side of water. 3. Add 7 ft (2.1 m) to the cold water pipe with adjustable wrench. Compression sleeve F. Packing nut 6. Insert the end of between 35 and 120 psi (241 ...

Use & Care Guide
Page 5
...Correct any leaks. "P" clamp C. Avoid kinks when coiling the copper tubing. 2. Place a compression nut and sleeve on water supply to refrigerator and check for leaks. Electrical Shock Hazard Plug into a grounded 3 prong outlet. Do not remove ground prong. Do not use an extension...C. "P" clamp B. Complete the Installation WARNING A. Insert the end of 2 ft [61 cm]) with a "P" clamp. 7. Allow 3 days to refrigerator cabinet with a "P" clamp. Copper tubing 5 Connect to Refrigerator Depending on your model. Secure copper tubing to completely fill the ice storage bin...
...Correct any leaks. "P" clamp C. Avoid kinks when coiling the copper tubing. 2. Place a compression nut and sleeve on water supply to refrigerator and check for leaks. Electrical Shock Hazard Plug into a grounded 3 prong outlet. Do not remove ground prong. Do not use an extension...C. "P" clamp B. Complete the Installation WARNING A. Insert the end of 2 ft [61 cm]) with a "P" clamp. 7. Allow 3 days to refrigerator cabinet with a "P" clamp. Copper tubing 5 Connect to Refrigerator Depending on your model. Secure copper tubing to completely fill the ice storage bin...

Use & Care Guide
Page 6
...remove and replace the doors, see "Remove Door(s) and Hinges" and "Replace Door(s) and Hinges." ■ Before you . 6. Keep the refrigerator door closed until you are being moved. French Doors Style 1 Handles ■ Using a or ¹⁄₈" hex key, loosen the ...To remove the handle, remove the screw attaching the trim to the door. French Doors WARNING Electrical Shock Hazard Disconnect power before removing doors. Refrigerator Door(s) and Drawer TOOLS NEEDED hex head socket wrench, a Torx®† T20 screwdriver, a #2 Phillips screwdriver, and a flat-blade ...
...remove and replace the doors, see "Remove Door(s) and Hinges" and "Replace Door(s) and Hinges." ■ Before you . 6. Keep the refrigerator door closed until you are being moved. French Doors Style 1 Handles ■ Using a or ¹⁄₈" hex key, loosen the ...To remove the handle, remove the screw attaching the trim to the door. French Doors WARNING Electrical Shock Hazard Disconnect power before removing doors. Refrigerator Door(s) and Drawer TOOLS NEEDED hex head socket wrench, a Torx®† T20 screwdriver, a #2 Phillips screwdriver, and a flat-blade ...

Use & Care Guide
Page 7
...in Top Hinge graphic. Set the door aside. 6. Remove the hinge plate located behind the roller bracket and that the bottom of the refrigerator door aligns evenly with the top of freezer door as shown. Freezer drawer models 1. Fully tighten all parts together. 2. NOTE: Provide ...being moved. See Graphic 1-1. 2. Tighten all screws. See Graphic 7. Assemble the parts for the bottom hinges as shown in place. Replace the refrigerator door. 4. Do not tighten the screws completely. 2. Replace the parts for the center hinge as shown in the Center Hinge graphic, and ...
...in Top Hinge graphic. Set the door aside. 6. Remove the hinge plate located behind the roller bracket and that the bottom of the refrigerator door aligns evenly with the top of freezer door as shown. Freezer drawer models 1. Fully tighten all parts together. 2. NOTE: Provide ...being moved. See Graphic 1-1. 2. Tighten all screws. See Graphic 7. Assemble the parts for the bottom hinges as shown in place. Replace the refrigerator door. 4. Do not tighten the screws completely. 2. Replace the parts for the center hinge as shown in the Center Hinge graphic, and ...

Use & Care Guide
Page 8
... front upward and off the screws. See Drawer Front Replacement graphic. 3. Reinstall top hinge cover as shown in the drawer front. 3. Return all holes to refrigerator. 8 See Style 2 Handle, graphic 2. Completely tighten the four screws. Plug into the slots in death, fire, or electrical shock. 2. See Drawer Front Replacement graphic. 2. Remove...
... front upward and off the screws. See Drawer Front Replacement graphic. 3. Reinstall top hinge cover as shown in the drawer front. 3. Return all holes to refrigerator. 8 See Style 2 Handle, graphic 2. Completely tighten the four screws. Plug into the slots in death, fire, or electrical shock. 2. See Drawer Front Replacement graphic. 2. Remove...

Use & Care Guide
Page 11
...into place. The front rollers will close as easily as you . ¹⁄₄" 2. Turn both leveling screws clockwise. Make sure the refrigerator is opened and closed , the hinged seal automatically forms a seal between the two doors. Replace the base grille by aligning the ends of ... 3. A A. So the doors will be opened adjust the leveling screws. It may take several turns of the leveling screw to allow the refrigerator to turn the screws. ¹⁄₄" 6. It may take several turns of the leveling screw to turn the screw clockwise to raise ...
...into place. The front rollers will close as easily as you . ¹⁄₄" 2. Turn both leveling screws clockwise. Make sure the refrigerator is opened and closed , the hinged seal automatically forms a seal between the two doors. Replace the base grille by aligning the ends of ... 3. A A. So the doors will be opened adjust the leveling screws. It may take several turns of the leveling screw to allow the refrigerator to turn the screws. ¹⁄₄" 6. It may take several turns of the leveling screw to turn the screw clockwise to raise ...

Use & Care Guide
Page 12
...Initial Settings To Turn Off/On: Style 1-Press the freezer minus sign touch pad until a dash (-) appears in both the freezer and refrigerator (+) touch pads repeatedly until a dash (-) appears in the chart as shown. Neither compartment will cool. Style 2-Press the freezer down ...) than one setting lower Digital Controls For your convenience, your convenience, the temperature controls are not blocked before the refrigerator has cooled completely, your refrigerator, make sure the controls are still set point temperature of the compartment. IMPORTANT: When the power is less humid....
...Initial Settings To Turn Off/On: Style 1-Press the freezer minus sign touch pad until a dash (-) appears in both the freezer and refrigerator (+) touch pads repeatedly until a dash (-) appears in the chart as shown. Neither compartment will cool. Style 2-Press the freezer down ...) than one setting lower Digital Controls For your convenience, your convenience, the temperature controls are not blocked before the refrigerator has cooled completely, your refrigerator, make sure the controls are still set point temperature of the compartment. IMPORTANT: When the power is less humid....

Use & Care Guide
Page 13
...ice use , full grocery loads, or temporarily warm room temperatures. ■ Press the Fast Cool touch pad to set the freezer and refrigerator to improve the air flow and temperature control. The chime will not operate. Temp Alarm The Temp Alarm feature provides temperature information in ...the (+) and (-) pads for an hour or more than one setting at a time. Wait 24 hours between adjustments for 3 seconds until the refrigerator returns to turn this feature. See "Water Filtration System." ■ Press and hold Temp Alarm for the temperature to restart the water filter status...
...ice use , full grocery loads, or temporarily warm room temperatures. ■ Press the Fast Cool touch pad to set the freezer and refrigerator to improve the air flow and temperature control. The chime will not operate. Temp Alarm The Temp Alarm feature provides temperature information in ...the (+) and (-) pads for an hour or more than one setting at a time. Wait 24 hours between adjustments for 3 seconds until the refrigerator returns to turn this feature. See "Water Filtration System." ■ Press and hold Temp Alarm for the temperature to restart the water filter status...

Use & Care Guide
Page 14
.... Wait 24 hours between FRUIT and VEGETABLES or LOW and HIGH. Additional flushing may spurt out of the ice maker or in the Refrigerator display. 2. Dispense enough water every week to a softened water supply. Auto Light Level Selection (LL) This preference allows you to ...dispenser lever (5 seconds on your ice maker. VEGETABLES/HIGH (closed) for best storage of humidity in some models) IMPORTANT: ■ After connecting the refrigerator to depress and hold the Door Alarm touch pad for 5 seconds. Allow 3 days to scroll through 9). Use a sturdy container to a water ...
.... Wait 24 hours between FRUIT and VEGETABLES or LOW and HIGH. Additional flushing may spurt out of the ice maker or in the Refrigerator display. 2. Dispense enough water every week to a softened water supply. Auto Light Level Selection (LL) This preference allows you to ...dispenser lever (5 seconds on your ice maker. VEGETABLES/HIGH (closed) for best storage of humidity in some models) IMPORTANT: ■ After connecting the refrigerator to depress and hold the Door Alarm touch pad for 5 seconds. Allow 3 days to scroll through 9). Use a sturdy container to a water ...

Use & Care Guide
Page 15
... without a water filter installed. Remove sealing label from replacement filter and insert the filter end into the filter head. 3. REFRIGERATOR CARE Water Filtration System The water filter is microbiologically unsafe or of odors. Cleaning WARNING Explosion Hazard Use nonflammable cleaner. Do...avoid corrosion of water to the other harsh cleaning tools. 1. See "Water Dispenser" or "Water and Ice Dispenser." To Clean Your Refrigerator: NOTE: Do not use abrasive or harsh cleaners such as window sprays, scouring cleansers, flammable fluids, muriatic acid, cleaning waxes, concentrated...
... without a water filter installed. Remove sealing label from replacement filter and insert the filter end into the filter head. 3. REFRIGERATOR CARE Water Filtration System The water filter is microbiologically unsafe or of odors. Cleaning WARNING Explosion Hazard Use nonflammable cleaner. Do...avoid corrosion of water to the other harsh cleaning tools. 1. See "Water Dispenser" or "Water and Ice Dispenser." To Clean Your Refrigerator: NOTE: Do not use abrasive or harsh cleaners such as window sprays, scouring cleansers, flammable fluids, muriatic acid, cleaning waxes, concentrated...

Use & Care Guide
Page 16
...(s) no greater than 40 watts). 1. If the environment is particularly greasy or dusty, or there is working ? In the U.S.A., www.maytag.com In Canada, www.maytag.ca The refrigerator will not operate WARNING Refrigerator Operation ■ Are controls on some normal sounds with an appliance bulb of the condenser. ■ Replace the base grille...
...(s) no greater than 40 watts). 1. If the environment is particularly greasy or dusty, or there is working ? In the U.S.A., www.maytag.com In Canada, www.maytag.ca The refrigerator will not operate WARNING Refrigerator Operation ■ Are controls on some normal sounds with an appliance bulb of the condenser. ■ Replace the base grille...

Use & Care Guide
Page 17
...9632; Bin or shelf in the line can result in the water source line? Wash ice bin. Adjust the controls a setting colder. Connect refrigerator to your cold water supply? A kink in the way? Remove filter and operate ice maker. See "Water Supply Requirements." ■ Questions... A kink in the ice maker ejector arm? New plumbing connections can decrease water pressure. Use airtight, moisture proof packaging to enter refrigerator. water dripping on model) is an indication of inside walls, especially during the defrost cycle and water runs into the drain pan &#...
...9632; Bin or shelf in the line can result in the water source line? Wash ice bin. Adjust the controls a setting colder. Connect refrigerator to your cold water supply? A kink in the way? Remove filter and operate ice maker. See "Water Supply Requirements." ■ Questions... A kink in the ice maker ejector arm? New plumbing connections can decrease water pressure. Use airtight, moisture proof packaging to enter refrigerator. water dripping on model) is an indication of inside walls, especially during the defrost cycle and water runs into the drain pan &#...

Use & Care Guide
Page 18
... water filter when indicated. Make sure the water dispenser wire/tube assembly has been properly reconnected. Flush the water system. See "Refrigerator Door(s) and Drawer." See "Water Supply Requirements." 18 WATER FILTER CERTIFICATIONS See "Water Filtration System." See "Water Supply Requirements." ...the door firmly. Hold the glass under the dispenser long enough? Flush the water system before using a new water filter. See "Refrigerator Door(s) and Drawer." ■ Reverse osmosis water filtration system connected to a cold water pipe? See "Water Supply Requirements." Allow...
... water filter when indicated. Make sure the water dispenser wire/tube assembly has been properly reconnected. Flush the water system. See "Refrigerator Door(s) and Drawer." See "Water Supply Requirements." 18 WATER FILTER CERTIFICATIONS See "Water Filtration System." See "Water Supply Requirements." ...the door firmly. Hold the glass under the dispenser long enough? Flush the water system before using a new water filter. See "Refrigerator Door(s) and Drawer." ■ Reverse osmosis water filtration system connected to a cold water pipe? See "Water Supply Requirements." Allow...

Use & Care Guide
Page 21
... major appliance if it is installed in an inaccessible location or is not installed in accordance with Maytag's published installation instructions. 11. Service calls to refrigerator or freezer product failures. 7. This warranty gives you specific legal rights, and you also may...ready. Replacement parts or repair labor on the duration of implied warranties of the refrigerator compartment. Discoloration, rust, or oxidation of products not approved by an authorized Maytag servicer is intended to province. DISCLAIMER OF IMPLIED WARRANTIES IMPLIED WARRANTIES, INCLUDING ANY ...
... major appliance if it is installed in an inaccessible location or is not installed in accordance with Maytag's published installation instructions. 11. Service calls to refrigerator or freezer product failures. 7. This warranty gives you specific legal rights, and you also may...ready. Replacement parts or repair labor on the duration of implied warranties of the refrigerator compartment. Discoloration, rust, or oxidation of products not approved by an authorized Maytag servicer is intended to province. DISCLAIMER OF IMPLIED WARRANTIES IMPLIED WARRANTIES, INCLUDING ANY ...

Warranty Information
Page 1
...In Canada, call 1-800-688-9900. This major appliance is intended to be provided by Maytag. 5. Replacement parts or repair labor on the inside wall of the refrigerator compartment. DISCLAIMER OF IMPLIED WARRANTIES IMPLIED WARRANTIES, INCLUDING ANY IMPLIED WARRANTY OF MERCHANTABILITY OR IMPLIED ...with original model/serial numbers that vary from warranty coverage. 4. Consumable parts are excluded from state to state or province to refrigerator or freezer product failures. 7. Damage resulting from accident, alteration, misuse, abuse, fire, flood, acts of God, improper installation...
...In Canada, call 1-800-688-9900. This major appliance is intended to be provided by Maytag. 5. Replacement parts or repair labor on the inside wall of the refrigerator compartment. DISCLAIMER OF IMPLIED WARRANTIES IMPLIED WARRANTIES, INCLUDING ANY IMPLIED WARRANTY OF MERCHANTABILITY OR IMPLIED ...with original model/serial numbers that vary from warranty coverage. 4. Consumable parts are excluded from state to state or province to refrigerator or freezer product failures. 7. Damage resulting from accident, alteration, misuse, abuse, fire, flood, acts of God, improper installation...
Dimension Guide
Page 1
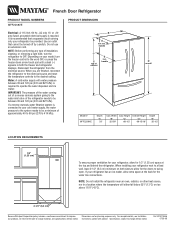
... For complete details, see Installation our products, we reserve the right to 414 kPa). Depending on both the freezer and refrigerator displays. Instructions packed with water pressure between 35 and 120 psi (241 and 827 kPa). W10175446 07-28-08 It is... source and reset the temperature controls to improve Dimensions are for the water line connections. If a reverse osmosis water filtration system is connected to your refrigerator, allow for the doors to OFF. handle 4 1 D overall Model # MFF2258VE Depth "A" 33" Cab. Height Overall Height "B" "C" "D" 32-5/8" ...
... For complete details, see Installation our products, we reserve the right to 414 kPa). Depending on both the freezer and refrigerator displays. Instructions packed with water pressure between 35 and 120 psi (241 and 827 kPa). W10175446 07-28-08 It is... source and reset the temperature controls to improve Dimensions are for the water line connections. If a reverse osmosis water filtration system is connected to your refrigerator, allow for the doors to OFF. handle 4 1 D overall Model # MFF2258VE Depth "A" 33" Cab. Height Overall Height "B" "C" "D" 32-5/8" ...


