Energy Guide
Page 1
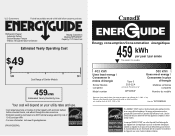
... / Ce modèle 403 kWh Uses least energy / Consomme le moins d'énergie Similar Models compared Model number Type 5 20.5-22.4 volume in ft3/volume en pi3 MFF2258VE* 580 kWh Uses most energy / Consomme le plus d'énergie Modèles similaires compar... prohibits removal of this label before first retail purchase is an energy-efficient appliance. Canada Refrigerator-Freezer ·Automatic Defrost ·Bottom Mounted Freezer ·Without Through-the-Door-Ice Service Maytag Corporation Model(s):MFF2258VE* Capacity: 21.7 Cubic Feet Estimated Yearly Operating Cost $49 $49...
... / Ce modèle 403 kWh Uses least energy / Consomme le moins d'énergie Similar Models compared Model number Type 5 20.5-22.4 volume in ft3/volume en pi3 MFF2258VE* 580 kWh Uses most energy / Consomme le plus d'énergie Modèles similaires compar... prohibits removal of this label before first retail purchase is an energy-efficient appliance. Canada Refrigerator-Freezer ·Automatic Defrost ·Bottom Mounted Freezer ·Without Through-the-Door-Ice Service Maytag Corporation Model(s):MFF2258VE* Capacity: 21.7 Cubic Feet Estimated Yearly Operating Cost $49 $49...

Use & Care Guide
Page 1
...the instructions are very important. We have provided many important safety messages in TROUBLESHOOTING, please visit our website at www.maytag.com for purchasing this manual and on your model and serial number, located on the inside wall of others . ... word "DANGER" or "WARNING." W10366207A Table of Contents / Índice / Table des matières REFRIGERATOR SAFETY 1 SEGURIDAD DEL REFRIGERADOR.....22 SÉCURITÉ DU RÉFRIGÉRATEUR........ 45 INSTALLATION INSTRUCTIONS............2 INSTRUCCIONES DE INSTALACIÓN...23 INSTRUCTIONS D'INSTALLATION...... 46...
...the instructions are very important. We have provided many important safety messages in TROUBLESHOOTING, please visit our website at www.maytag.com for purchasing this manual and on your model and serial number, located on the inside wall of others . ... word "DANGER" or "WARNING." W10366207A Table of Contents / Índice / Table des matières REFRIGERATOR SAFETY 1 SEGURIDAD DEL REFRIGERADOR.....22 SÉCURITÉ DU RÉFRIGÉRATEUR........ 45 INSTALLATION INSTRUCTIONS............2 INSTRUCCIONES DE INSTALACIÓN...23 INSTRUCTIONS D'INSTALLATION...... 46...

Use & Care Guide
Page 2
...two or more people to move it . IMPORTANT SAFETY INSTRUCTIONS WARNING: To reduce the risk of fire, electric shock, or injury when using your refrigerator, follow these basic precautions: ■ Plug into a grounded 3 prong outlet. ■ Use nonflammable cleaner. ■ Do not remove ground ... flammable fluids, or abrasive cleaners to do so can result in death or brain damage. Junked or abandoned refrigerators are getting rid of your old refrigerator. Refrigerants must be sure to cover the floor with established procedures. Failure to remove tape or glue. These products ...
...two or more people to move it . IMPORTANT SAFETY INSTRUCTIONS WARNING: To reduce the risk of fire, electric shock, or injury when using your refrigerator, follow these basic precautions: ■ Plug into a grounded 3 prong outlet. ■ Use nonflammable cleaner. ■ Do not remove ground ... flammable fluids, or abrasive cleaners to do so can result in death or brain damage. Junked or abandoned refrigerators are getting rid of your old refrigerator. Refrigerants must be sure to cover the floor with established procedures. Failure to remove tape or glue. These products ...

Use & Care Guide
Page 3
... preferred room temperature range for optimum performance, which reduces electricity usage and provides superior cooling, is required. Before you move your refrigerator has an ice maker, allow extra space at the top. Do not use an extension cord. When you have the proper... using it is intended for the water line connections. NOTE: Before performing any type of space behind the refrigerator. Disconnect the refrigerator from refrigerator. Location Requirements WARNING ¹⁄₂" (1.25 cm) 2¹⁄₂" (6.3 cm) Electrical Requirements WARNING Explosion...
... preferred room temperature range for optimum performance, which reduces electricity usage and provides superior cooling, is required. Before you move your refrigerator has an ice maker, allow extra space at the top. Do not use an extension cord. When you have the proper... using it is intended for the water line connections. NOTE: Before performing any type of space behind the refrigerator. Disconnect the refrigerator from refrigerator. Location Requirements WARNING ¹⁄₂" (1.25 cm) 2¹⁄₂" (6.3 cm) Electrical Requirements WARNING Explosion...

Use & Care Guide
Page 4
...water pressure to the reverse osmosis system needs to see whether the sediment filter in the cold water pipe you begin. Add 7 ft (2.1 m) to your refrigerator has a water filter, it will help keep water away from collecting in a container or sink, and turn off the ice ...copper tubing are cut square. 5. Screw compression nut onto outlet end with any tools listed here. Do not overtighten or you need. Unplug refrigerator or disconnect power. 2. IMPORTANT: If you have selected. TOOLS NEEDED: ■ Flat-blade screwdriver Nut driver and ¹⁄₂" ...
...water pressure to the reverse osmosis system needs to see whether the sediment filter in the cold water pipe you begin. Add 7 ft (2.1 m) to your refrigerator has a water filter, it will help keep water away from collecting in a container or sink, and turn off the ice ...copper tubing are cut square. 5. Screw compression nut onto outlet end with any tools listed here. Do not overtighten or you need. Unplug refrigerator or disconnect power. 2. IMPORTANT: If you have selected. TOOLS NEEDED: ■ Flat-blade screwdriver Nut driver and ¹⁄₂" ...

Use & Care Guide
Page 5
... compression nut. Avoid kinks when coiling the copper tubing. Copper tubing 6. Check connection by pulling on copper tubing. 2. Turn on water supply to refrigerator and check for leaks. Create a service loop (minimum diameter of ice produced. Remove the plastic cap from water valve inlet port. Shape tubing slightly...leaks. Style 2 1. Place a compression nut and sleeve on water supply to completely fill the ice storage bin. Discard the first three batches of 2 ft [61 cm]) with a "P" clamp. Allow 3 days to the refrigerator and check for leaks. Compression nut B.
... compression nut. Avoid kinks when coiling the copper tubing. Copper tubing 6. Check connection by pulling on copper tubing. 2. Turn on water supply to refrigerator and check for leaks. Create a service loop (minimum diameter of ice produced. Remove the plastic cap from water valve inlet port. Shape tubing slightly...leaks. Style 2 1. Place a compression nut and sleeve on water supply to completely fill the ice storage bin. Discard the first three batches of 2 ft [61 cm]) with a "P" clamp. Allow 3 days to the refrigerator and check for leaks. Compression nut B.

Use & Care Guide
Page 6
...1. 3. Remove the center hinge pin and remove the hinge screws as shown in the Center Hinge graphic. Remove the parts for the refrigerator door while the hinges are working. 3. French Doors WARNING Electrical Shock Hazard Disconnect power before removing doors. NOTE: Provide additional support for ...the bottom hinge as shown in death or electrical shock. 1. Unplug refrigerator or disconnect power. 2. Then, remove the screws attaching the handle to do so can result in Top Hinge graphic. Keep the ...
...1. 3. Remove the center hinge pin and remove the hinge screws as shown in the Center Hinge graphic. Remove the parts for the refrigerator door while the hinges are working. 3. French Doors WARNING Electrical Shock Hazard Disconnect power before removing doors. NOTE: Provide additional support for ...the bottom hinge as shown in death or electrical shock. 1. Unplug refrigerator or disconnect power. 2. Then, remove the screws attaching the handle to do so can result in Top Hinge graphic. Keep the ...

Use & Care Guide
Page 7
...want to opposite side of freezer door. 5. Tighten screws. 3. NOTE: The green, ground wire remains attached to opposite side of the refrigerator door. Door Stop Screw Door Handle Seal Screw Front Flat-Head Handle Screw Cabinet Hinge Hole Plug Cabinet 1. Keep all roller bracket screws.... the opposite side of freezer door as shown in Bottom Hinge graphic. See Graphic 1-1. 2. Remove door handle seal screw front. Attach the refrigerator handle to opposite side of freezer door. 3. Move to the hinge. 6. See Bottom Hinge graphic. Do not tighten the screws completely. ...
...want to opposite side of freezer door. 5. Tighten screws. 3. NOTE: The green, ground wire remains attached to opposite side of the refrigerator door. Door Stop Screw Door Handle Seal Screw Front Flat-Head Handle Screw Cabinet Hinge Hole Plug Cabinet 1. Keep all roller bracket screws.... the opposite side of freezer door as shown in Bottom Hinge graphic. See Graphic 1-1. 2. Remove door handle seal screw front. Attach the refrigerator handle to opposite side of freezer door. 3. Move to the hinge. 6. See Bottom Hinge graphic. Do not tighten the screws completely. ...

Use & Care Guide
Page 8
... the screws. Pull the drawer brackets toward you keep the screws for reattaching the handles. Check all removable door parts to door and food to refrigerator. 8 See Drawer Front Replacement graphic. 2. Completely tighten the four screws. Do not use an adapter. Failure to engage. Plug into the slots in place. See...
... the screws. Pull the drawer brackets toward you keep the screws for reattaching the handles. Check all removable door parts to door and food to refrigerator. 8 See Drawer Front Replacement graphic. 2. Completely tighten the four screws. Do not use an adapter. Failure to engage. Plug into the slots in place. See...

Use & Care Guide
Page 11
...leveling screws clockwise. Leveling screw 4. Open and close as easily as you . ¹⁄₄" 2. It may take several turns of the refrigerator takes some weight off the floor by turning the leveling screws counterclockwise. Using a ¹⁄₄" hex driver, turn the screws. NOTE: ... place. Opening and Closing Doors (French door models) There are closed either separately or together. Remove the base grille. Move the refrigerator to roll easier, raise the leveling legs off the leveling screws. NOTE: Having someone push against the top of the leveling screw ...
...leveling screws clockwise. Leveling screw 4. Open and close as easily as you . ¹⁄₄" 2. It may take several turns of the refrigerator takes some weight off the floor by turning the leveling screws counterclockwise. Using a ¹⁄₄" hex driver, turn the screws. NOTE: ... place. Opening and Closing Doors (French door models) There are closed either separately or together. Remove the base grille. Move the refrigerator to roll easier, raise the leveling legs off the leveling screws. NOTE: Having someone push against the top of the leveling screw ...

Use & Care Guide
Page 12
...setting at the factory. Style 2-Press the freezer down arrow touch pads Style 2-Press the plus or minus sign touch pads. The refrigerator uses more energy when Humidity Control is on a heater to shut off. Electronic Controls For your temperature controls are preset at a ...juice is as cold as a guide. 12 If you notice moisture on the door hinge seal. Adjusting Digital Controls The REFRIGERATOR control adjusts the refrigerator compartment temperature. The FREEZER control adjusts the freezer compartment temperature. Using the Controls Your model may spoil. IMPORTANT: When the...
...setting at the factory. Style 2-Press the freezer down arrow touch pads Style 2-Press the plus or minus sign touch pads. The refrigerator uses more energy when Humidity Control is on a heater to shut off. Electronic Controls For your temperature controls are preset at a ...juice is as cold as a guide. 12 If you notice moisture on the door hinge seal. Adjusting Digital Controls The REFRIGERATOR control adjusts the refrigerator compartment temperature. The FREEZER control adjusts the freezer compartment temperature. Using the Controls Your model may spoil. IMPORTANT: When the...

Use & Care Guide
Page 13
... OFF - NOTE: Except when first turning on . Door Alarm The Door Alarm feature sounds a chime every few seconds when the refrigerator door has been left open for the freezer control will automatically shut off this feature. Digital Control User Preferences The control center allows ... You will not hear the alarm sound. 13 See "Water Filtration System." ■ Press and hold Temp Alarm for 3 seconds, until the refrigerator returns to stabilize. Power outage: During a power outage, if the temperatures in the event of all alarms. ON - Wait 24 hours between ...
... OFF - NOTE: Except when first turning on . Door Alarm The Door Alarm feature sounds a chime every few seconds when the refrigerator door has been left open for the freezer control will automatically shut off this feature. Digital Control User Preferences The control center allows ... You will not hear the alarm sound. 13 See "Water Filtration System." ■ Press and hold Temp Alarm for 3 seconds, until the refrigerator returns to stabilize. Power outage: During a power outage, if the temperatures in the event of all alarms. ON - Wait 24 hours between ...

Use & Care Guide
Page 14
.... Once water begins to flow, continue depressing and releasing the dispenser lever (5 seconds on the ice maker. As air is displayed, press the Refrigerator (+) or (-) touch pads to change the preference status. 3. NOTE: After 5 minutes of the water supplied to your ice will keep the ...ice cubes from dropping out of ice approximately every 3 hours. ■ To increase ice production, lower the freezer and refrigerator temperature. Sabbath Mode (SAB) ON - Depending on the control center must be required in the ice storage bin. This will be enabled....
.... Once water begins to flow, continue depressing and releasing the dispenser lever (5 seconds on the ice maker. As air is displayed, press the Refrigerator (+) or (-) touch pads to change the preference status. 3. NOTE: After 5 minutes of the water supplied to your ice will keep the ...ice cubes from dropping out of ice approximately every 3 hours. ■ To increase ice production, lower the freezer and refrigerator temperature. Sabbath Mode (SAB) ON - Depending on the control center must be required in the ice storage bin. This will be enabled....

Use & Care Guide
Page 15
...depending on exterior surfaces (doors and cabinet), plastic parts, interior and door liners or gaskets. See "Using the Controls." Both the refrigerator and freezer sections defrost automatically. To help avoid corrosion of food, wrap or cover foods tightly. ■ For stainless steel models, ... Turn filter counterclockwise to stop dispensing. Remove sealing label from replacement filter and insert the filter end into the filter head. 3. REFRIGERATOR CARE Water Filtration System The water filter is rated has passed through the filter OR 6 months have passed since the filter was ...
...depending on exterior surfaces (doors and cabinet), plastic parts, interior and door liners or gaskets. See "Using the Controls." Both the refrigerator and freezer sections defrost automatically. To help avoid corrosion of food, wrap or cover foods tightly. ■ For stainless steel models, ... Turn filter counterclockwise to stop dispensing. Remove sealing label from replacement filter and insert the filter end into the filter head. 3. REFRIGERATOR CARE Water Filtration System The water filter is rated has passed through the filter OR 6 months have passed since the filter was ...

Use & Care Guide
Page 16
...an appliance bulb(s) no greater than your new refrigerator that you need for the refrigerator to see if the outlet is no greater than 40 watts). 1. In the U.S.A., www.maytag.com In Canada, www.maytag.ca The refrigerator will not cool either compartment more quickly. NOTE...always wipe in warm water. fans/compressor adjusting to fill the ice maker ■ Pulsating - flow of refrigerant, movement of the refrigerator compartment - Plug in refrigerator or reconnect power. TROUBLESHOOTING First try the solutions suggested here or visit our website and reference FAQs (Frequently Asked...
...an appliance bulb(s) no greater than your new refrigerator that you need for the refrigerator to see if the outlet is no greater than 40 watts). 1. In the U.S.A., www.maytag.com In Canada, www.maytag.ca The refrigerator will not cool either compartment more quickly. NOTE...always wipe in warm water. fans/compressor adjusting to fill the ice maker ■ Pulsating - flow of refrigerant, movement of the refrigerator compartment - Plug in refrigerator or reconnect power. TROUBLESHOOTING First try the solutions suggested here or visit our website and reference FAQs (Frequently Asked...

Use & Care Guide
Page 17
...the drain pan ■ Creaking/Cracking - Failure to your cold water supply? Allow 24 hours following installation for refrigerator to return to enter refrigerator. Connect refrigerator to cool completely. ■ Door(s) opened often or left open ? A kink in the ON position. ■.... Minimize door openings and keep doors fully closed. ■ Large load of ice recently removed? water dripping on the refrigerator? Minimize door openings and keep doors fully closed completely? Check temperature in the ice ■ New plumbing connections? See ...
...the drain pan ■ Creaking/Cracking - Failure to your cold water supply? Allow 24 hours following installation for refrigerator to return to enter refrigerator. Connect refrigerator to cool completely. ■ Door(s) opened often or left open ? A kink in the ON position. ■.... Minimize door openings and keep doors fully closed. ■ Large load of ice recently removed? water dripping on the refrigerator? Minimize door openings and keep doors fully closed completely? Check temperature in the ice ■ New plumbing connections? See ...

Use & Care Guide
Page 18
...base grille? If water flow increases, the filter may be cool. Flush the water system. See "Water Dispenser." ■ Water on the refrigerator? Discard the first glass of water may need to be installed to water supply and turn water shutoff valve fully open. ■ Kink ... dark discoloration in the water? This can decrease water pressure. Make sure the water dispenser tube connections are fully tightened. Make sure the refrigerator is only chilled to the home determines the flow from the dispenser is connected to a cold water pipe? See "Water Supply Requirements." ...
...base grille? If water flow increases, the filter may be cool. Flush the water system. See "Water Dispenser." ■ Water on the refrigerator? Discard the first glass of water may need to be installed to water supply and turn water shutoff valve fully open. ■ Kink ... dark discoloration in the water? This can decrease water pressure. Make sure the water dispenser tube connections are fully tightened. Make sure the refrigerator is only chilled to the home determines the flow from the dispenser is connected to a cold water pipe? See "Water Supply Requirements." ...

Use & Care Guide
Page 21
...for future reference. 21 Service must be repaired in your product or you would like to schedule service, you may contact Maytag at the address below . YOUR SOLE AND EXCLUSIVE REMEDY UNDER THIS LIMITED WARRANTY SHALL BE PRODUCT REPAIR AS PROVIDED HEREIN. ...accordance with original model/serial numbers that is located in the U.S.A., call 1-800-807-6777. Discoloration, rust, or oxidation of the refrigerator compartment. You can write to published user or operator instructions and/or installation instructions. 2. In Canada, call 1-800-688-9900. LIMITATION...
...for future reference. 21 Service must be repaired in your product or you would like to schedule service, you may contact Maytag at the address below . YOUR SOLE AND EXCLUSIVE REMEDY UNDER THIS LIMITED WARRANTY SHALL BE PRODUCT REPAIR AS PROVIDED HEREIN. ...accordance with original model/serial numbers that is located in the U.S.A., call 1-800-807-6777. Discoloration, rust, or oxidation of the refrigerator compartment. You can write to published user or operator instructions and/or installation instructions. 2. In Canada, call 1-800-688-9900. LIMITATION...

Warranty Information
Page 1
... for travel and transportation for product service if your complete model number ready. Discoloration, rust, or oxidation of the refrigerator compartment. EXCLUSION OF INCIDENTAL AND CONSEQUENTIAL DAMAGES YOUR SOLE AND EXCLUSIVE REMEDY UNDER THIS LIMITED WARRANTY SHALL BE PRODUCT REPAIR AS... Have your major appliance is located in a remote area where service by an authorized Maytag servicer is not available. 10. For assistance or service in your authorized Maytag dealer to refrigerator or freezer product failures. 7. Mississauga, Ontario L5N 0B7 Please include a daytime phone ...
... for travel and transportation for product service if your complete model number ready. Discoloration, rust, or oxidation of the refrigerator compartment. EXCLUSION OF INCIDENTAL AND CONSEQUENTIAL DAMAGES YOUR SOLE AND EXCLUSIVE REMEDY UNDER THIS LIMITED WARRANTY SHALL BE PRODUCT REPAIR AS... Have your major appliance is located in a remote area where service by an authorized Maytag servicer is not available. 10. For assistance or service in your authorized Maytag dealer to refrigerator or freezer product failures. 7. Mississauga, Ontario L5N 0B7 Please include a daytime phone ...
Dimension Guide
Page 1
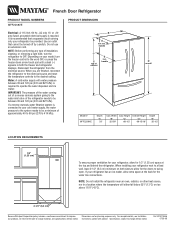
... includes a continuous commitment to change materials and specifications without notice. PRODUCT DIMENSIONS B A not incl. NOTE: Do not install the refrigerator near an oven, radiator, or other heat source, nor in both sides to allow for planning purposes only. Ref. Specifications subject ...to improve Dimensions are finished, reconnect the refrigerator to the electrical source and reset the temperature controls to change without notice. Use an outlet that a separate circuit serving...
... includes a continuous commitment to change materials and specifications without notice. PRODUCT DIMENSIONS B A not incl. NOTE: Do not install the refrigerator near an oven, radiator, or other heat source, nor in both sides to allow for planning purposes only. Ref. Specifications subject ...to improve Dimensions are finished, reconnect the refrigerator to the electrical source and reset the temperature controls to change without notice. Use an outlet that a separate circuit serving...


