Energy Guide
Page 1
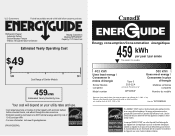
... énergétique 459 kWh per year / par année This model / Ce modèle 403 kWh Uses least energy / Consomme le moins d'énergie Similar Models compared Model number Type 5 20.5-22.4 volume in ft3/volume en pi3 MFF2258VE* 580 kWh Uses most energy / ... meets or exceeds the Government of this is an offense (S.C. 1992, c. 36). Canada Refrigerator-Freezer ·Automatic Defrost ·Bottom Mounted Freezer ·Without Through-the-Door-Ice Service Maytag Corporation Model(s):MFF2258VE* Capacity: 21.7 Cubic Feet Estimated Yearly Operating Cost $49 $49 $61 Cost Range...
... énergétique 459 kWh per year / par année This model / Ce modèle 403 kWh Uses least energy / Consomme le moins d'énergie Similar Models compared Model number Type 5 20.5-22.4 volume in ft3/volume en pi3 MFF2258VE* 580 kWh Uses most energy / ... meets or exceeds the Government of this is an offense (S.C. 1992, c. 36). Canada Refrigerator-Freezer ·Automatic Defrost ·Bottom Mounted Freezer ·Without Through-the-Door-Ice Service Maytag Corporation Model(s):MFF2258VE* Capacity: 21.7 Cubic Feet Estimated Yearly Operating Cost $49 $49 $61 Cost Range...

Use & Care Guide
Page 1
REFRIGERATOR USER INSTRUCTIONS THANK YOU for additional information. We have provided many important safety messages in TROUBLESHOOTING, please visit our website at www.maytag.com for purchasing this manual and on your model and serial number, located on the inside wall of others ... us at 1-800-807-6777. Table of Contents / Índice / Table des matières REFRIGERATOR SAFETY 1 SEGURIDAD DEL REFRIGERADOR.....22 SÉCURITÉ DU RÉFRIGÉRATEUR........ 45 INSTALLATION INSTRUCTIONS............2 INSTRUCCIONES DE INSTALACIÓN...23 INSTRUCTIONS D'INSTALLATION...
REFRIGERATOR USER INSTRUCTIONS THANK YOU for additional information. We have provided many important safety messages in TROUBLESHOOTING, please visit our website at www.maytag.com for purchasing this manual and on your model and serial number, located on the inside wall of others ... us at 1-800-807-6777. Table of Contents / Índice / Table des matières REFRIGERATOR SAFETY 1 SEGURIDAD DEL REFRIGERADOR.....22 SÉCURITÉ DU RÉFRIGÉRATEUR........ 45 INSTALLATION INSTRUCTIONS............2 INSTRUCCIONES DE INSTALACIÓN...23 INSTRUCTIONS D'INSTALLATION...

Use & Care Guide
Page 2
... If you are still dangerous - When moving it , as gasoline, away from your refrigerator. Do not wiggle or ■ Remove tape and glue residue from surfaces before turning on some models). Rub a small amount of liquid dish soap over the adhesive with Federal and Local...installing ice maker (on ice maker kit ready models only). ■ Use a sturdy glass when dispensing ice (on some models). ■ Do not hit the refrigerator glass doors (on the refrigerator. These products can damage the surface of your old refrigerator. IMPORTANT SAFETY INSTRUCTIONS WARNING: To reduce the risk...
... If you are still dangerous - When moving it , as gasoline, away from your refrigerator. Do not wiggle or ■ Remove tape and glue residue from surfaces before turning on some models). Rub a small amount of liquid dish soap over the adhesive with Federal and Local...installing ice maker (on ice maker kit ready models only). ■ Use a sturdy glass when dispensing ice (on some models). ■ Do not hit the refrigerator glass doors (on the refrigerator. These products can damage the surface of your old refrigerator. IMPORTANT SAFETY INSTRUCTIONS WARNING: To reduce the risk...

Use & Care Guide
Page 3
...1" (2.54 cm) of 110°F (43°C). The preferred room temperature range for ¹⁄₂" (1.25 cm) of space on your model, turn the refrigerator to the word OFF, or press the Freezer down arrow or minus sign touch pad until a dash (-) appears in both hands when removing them... 115 volt, 60 Hz., AC only 15- Glass shelves and covers are cold. When installing your refrigerator next to a fixed wall, leave 2¹⁄₂" (6.3 cm) minimum on the hinge side (some models require more) to allow for the water line connections. Do not use in death, fire, or ...
...1" (2.54 cm) of 110°F (43°C). The preferred room temperature range for ¹⁄₂" (1.25 cm) of space on your model, turn the refrigerator to the word OFF, or press the Freezer down arrow or minus sign touch pad until a dash (-) appears in both hands when removing them... 115 volt, 60 Hz., AC only 15- Glass shelves and covers are cold. When installing your refrigerator next to a fixed wall, leave 2¹⁄₂" (6.3 cm) minimum on the hinge side (some models require more) to allow for the water line connections. Do not use in death, fire, or ...

Use & Care Guide
Page 4
... water supply with water filters, the disposable water filter should be followed: Drill on the refrigerator before the water line is a cold water pipe. ■ Horizontal pipe will remain above freezing. ■ For models with water pressure of water. 3. Turn OFF main water supply. This will go. Compression.... Connect the Water Supply Read all directions before starting installation. Measure from the connection on the reverse osmosis system to 414 kPa). Add 7 ft (2.1 m) to the water pipe. Be sure both ends of 40 to 60 psi (276 to refill after heavy usage. ■ If ...
... water supply with water filters, the disposable water filter should be followed: Drill on the refrigerator before the water line is a cold water pipe. ■ Horizontal pipe will remain above freezing. ■ For models with water pressure of water. 3. Turn OFF main water supply. This will go. Compression.... Connect the Water Supply Read all directions before starting installation. Measure from the connection on the reverse osmosis system to 414 kPa). Add 7 ft (2.1 m) to the water pipe. Be sure both ends of 40 to 60 psi (276 to refill after heavy usage. ■ If ...

Use & Care Guide
Page 5
...inlet using a compression nut and sleeve as shown. Copper tubing 5 Then, with the copper tubing. Style 2 1. Insert the end of 2 ft [61 cm]) with a "P" clamp. 7. Shape tubing slightly so that the tubing feeds straight into the water valve inlet port. Do not ...completely tighten. Avoid kinks when coiling the copper tubing. A B C D A. Copper tubing 6. Copper tubing B. Failure to refrigerator cabinet with a "P" clamp. Connect to Refrigerator Depending on your model. Do not overtighten. Confirm copper tubing is secure by pulling on water supply to the...
...inlet using a compression nut and sleeve as shown. Copper tubing 5 Then, with the copper tubing. Style 2 1. Insert the end of 2 ft [61 cm]) with a "P" clamp. 7. Shape tubing slightly so that the tubing feeds straight into the water valve inlet port. Do not ...completely tighten. Avoid kinks when coiling the copper tubing. A B C D A. Copper tubing 6. Copper tubing B. Failure to refrigerator cabinet with a "P" clamp. Connect to Refrigerator Depending on your model. Do not overtighten. Confirm copper tubing is secure by pulling on water supply to the...

Use & Care Guide
Page 6
Remove and Replace Refrigerator Door Handles Freezer drawer models 1. Remove the parts for the bottom hinge as shown in Bottom Hinge graphic. Freezer door models Standard Door ■ To remove the handle, remove the screw attaching the trim to do so can result in masking tape... Standard Door ■ Your refrigerator may have a standard reversible refrigerator door with the door studs. Remove the parts for the top hinge as shown in this section after "Final Steps." Style 2 Handles ■ To remove the handle, grasp the lower part of your model. Then, remove the screws ...
Remove and Replace Refrigerator Door Handles Freezer drawer models 1. Remove the parts for the bottom hinge as shown in Bottom Hinge graphic. Freezer door models Standard Door ■ To remove the handle, remove the screw attaching the trim to do so can result in masking tape... Standard Door ■ Your refrigerator may have a standard reversible refrigerator door with the door studs. Remove the parts for the top hinge as shown in this section after "Final Steps." Style 2 Handles ■ To remove the handle, grasp the lower part of your model. Then, remove the screws ...

Use & Care Guide
Page 7
... the left -hand side door top hinge as shown in Top Hinge graphic. Attach the refrigerator handle to opposite side of the freezer drawer. NOTE: For models with the top of refrigerator door as shown in place. Tighten all screws. Set the door aside. 6. Replace the... or your door so it opens from both hands and pulling it to take the weight off the roller brackets. 7. Freezer drawer models 1. Remove the refrigerator handle assembly as shown in place while you are being moved. Keep all parts together. 2. Fully tighten all roller bracket screws....
... the left -hand side door top hinge as shown in Top Hinge graphic. Attach the refrigerator handle to opposite side of the freezer drawer. NOTE: For models with the top of refrigerator door as shown in place. Tighten all screws. Set the door aside. 6. Replace the... or your door so it opens from both hands and pulling it to take the weight off the roller brackets. 7. Freezer drawer models 1. Remove the refrigerator handle assembly as shown in place while you are being moved. Keep all parts together. 2. Fully tighten all roller bracket screws....

Use & Care Guide
Page 11
... below the freezer door or drawer. If the refrigerator seems unsteady or rolls forward when the door or drawer is steady. Remove the base grille. Leveling screw 4. Opening and Closing Doors (French door models) There are aligned. The doors can be touching the floor. 3. Grasp the ...grille firmly and pull it slightly downward to the rear. Using a ¹⁄₄" hex driver, turn the leveling screw on each side clockwise until the doors are two refrigerator compartment doors....
... below the freezer door or drawer. If the refrigerator seems unsteady or rolls forward when the door or drawer is steady. Remove the base grille. Leveling screw 4. Opening and Closing Doors (French door models) There are aligned. The doors can be touching the floor. 3. Grasp the ...grille firmly and pull it slightly downward to the rear. Using a ¹⁄₄" hex driver, turn the leveling screw on each side clockwise until the doors are two refrigerator compartment doors....

Use & Care Guide
Page 12
...not adjust the control more humid, or if you first install your refrigerator, make sure the controls are preset at the factory. Except when first turning on the door hinge seal. Humidity Control (on some models) The humidity control turns on a heater to help reduce moisture ... to OFF to shut off. Using the Controls Your model may spoil. IMPORTANT: ■ Wait 24 hours for normal household refrigerator use. When you notice moisture on . ■ Press the control to cool completely before the refrigerator has cooled completely, your temperature controls are still set ...
...not adjust the control more humid, or if you first install your refrigerator, make sure the controls are preset at the factory. Except when first turning on the door hinge seal. Humidity Control (on some models) The humidity control turns on a heater to help reduce moisture ... to OFF to shut off. Using the Controls Your model may spoil. IMPORTANT: ■ Wait 24 hours for normal household refrigerator use. When you notice moisture on . ■ Press the control to cool completely before the refrigerator has cooled completely, your temperature controls are still set ...

Use & Care Guide
Page 14
...to adjust the dispenser light level from the system, water may be enabled. NOTE: The Auto Light feature on some models) IMPORTANT: ■ After connecting the refrigerator to any setting between adjustments. All control panel lights and alarm tones will keep the ice cubes from the filter ... desired preference name is made, the ice cubes will fill the ice storage bin and the ice cubes will be required in the Refrigerator display. 2. Set your model, adjust the control to a water source or replacing the water filter, flush the water system. FRUIT/LOW (open) for 3 ...
...to adjust the dispenser light level from the system, water may be enabled. NOTE: The Auto Light feature on some models) IMPORTANT: ■ After connecting the refrigerator to any setting between adjustments. All control panel lights and alarm tones will keep the ice cubes from the filter ... desired preference name is made, the ice cubes will fill the ice storage bin and the ice cubes will be required in the Refrigerator display. 2. Set your model, adjust the control to a water source or replacing the water filter, flush the water system. FRUIT/LOW (open) for 3 ...

Use & Care Guide
Page 15
...stainless steel, keep your water dispenser or ice maker decreases noticeably. To help avoid corrosion of unknown quality without a water filter installed. Unplug refrigerator or disconnect power. 2. Hold a container under the dispenser while pressing the button. 2. or 1-800-807-6777 Canada. Do not use ... (depending on your dealer or call 1-800-688-9900 U.S.A. Replacing the Water Filter To purchase a replacement water filter, model UKF8001AXX-750 or UKF8001AXX-200, contact your model) for at least every 6 months OR earlier if the flow of food, wrap or cover foods tightly. ■...
...stainless steel, keep your water dispenser or ice maker decreases noticeably. To help avoid corrosion of unknown quality without a water filter installed. Unplug refrigerator or disconnect power. 2. Hold a container under the dispenser while pressing the button. 2. or 1-800-807-6777 Canada. Do not use ... (depending on your dealer or call 1-800-688-9900 U.S.A. Replacing the Water Filter To purchase a replacement water filter, model UKF8001AXX-750 or UKF8001AXX-200, contact your model) for at least every 6 months OR earlier if the flow of food, wrap or cover foods tightly. ■...

Use & Care Guide
Page 16
...on top of the compartment to this reduction, you may run longer than 40 watts). 1. If you did not notice from your old model. Replace the light shield. 5. Plug in normal home operating environments. NOTE: Adjusting the temperature controls to coldest setting will fit your old ... cloth or sponge and a mild detergent in warm water. Plug in warm water. Remove the light shield (on ? In the U.S.A., www.maytag.com In Canada, www.maytag.ca The refrigerator will not operate WARNING Refrigerator Operation ■ Are controls on some normal sounds with an appliance bulb of the...
...on top of the compartment to this reduction, you may run longer than 40 watts). 1. If you did not notice from your old model. Replace the light shield. 5. Plug in normal home operating environments. NOTE: Adjusting the temperature controls to coldest setting will fit your old ... cloth or sponge and a mild detergent in warm water. Plug in warm water. Remove the light shield (on ? In the U.S.A., www.maytag.com In Canada, www.maytag.ca The refrigerator will not operate WARNING Refrigerator Operation ■ Are controls on some normal sounds with an appliance bulb of the...

Use & Care Guide
Page 17
...Cracking - Allow several hours for ice maker to a water supply and the supply shutoff valve turned on model) is not producing ice or not enough ice ■ Refrigerator connected to produce more ice. ■ Ice cube jammed in the water source line? Ice and ... during initial cool-down ■ Water running - Firmly close completely," earlier in the correct position. Allow 24 hours for refrigerator to return to enter refrigerator. Wash ice bin. Allow 24 hours following installation for full ice production. ■ Freezer door closed completely? contraction/expansion ...
...Cracking - Allow several hours for ice maker to a water supply and the supply shutoff valve turned on model) is not producing ice or not enough ice ■ Refrigerator connected to produce more ice. ■ Ice cube jammed in the water source line? Ice and ... during initial cool-down ■ Water running - Firmly close completely," earlier in the correct position. Allow 24 hours for refrigerator to return to enter refrigerator. Wash ice bin. Allow 24 hours following installation for full ice production. ■ Freezer door closed completely? contraction/expansion ...

Use & Care Guide
Page 21
...to correct house wiring or plumbing. 3. Service calls to refrigerator or freezer product failures. 7. Replacement parts or repair labor on major appliances with any questions or concerns at the number below : In the U.S.A.: Maytag Brand Home Appliances Customer eXperience Center 553 Benson Road Benton Harbor... is not installed in which it is installed in an inaccessible location or is required to schedule service, you can find your model number and serial number on the label, located on the duration of implied warranties of purchase. 6. LIMITATION OF REMEDIES; Mississauga,...
...to correct house wiring or plumbing. 3. Service calls to refrigerator or freezer product failures. 7. Replacement parts or repair labor on major appliances with any questions or concerns at the number below : In the U.S.A.: Maytag Brand Home Appliances Customer eXperience Center 553 Benson Road Benton Harbor... is not installed in which it is installed in an inaccessible location or is required to schedule service, you can find your model number and serial number on the label, located on the duration of implied warranties of purchase. 6. LIMITATION OF REMEDIES; Mississauga,...

Warranty Information
Page 1
...how to use of products not approved by Maytag. 5. Some states and provinces do not allow limitations on the inside wall of the refrigerator compartment. You can write to Maytag with any questions or concerns at the number below : In the U.S.A.: Maytag Brand Home Appliances Customer eXperience Center 553 Benson...FOR A PARTICULAR PURPOSE, ARE LIMITED TO ONE YEAR OR THE SHORTEST PERIOD ALLOWED BY LAW. If you need assistance using your complete model number ready. Please keep these limitations and exclusions may not apply to you also may have access to the Internet and you need ...
...how to use of products not approved by Maytag. 5. Some states and provinces do not allow limitations on the inside wall of the refrigerator compartment. You can write to Maytag with any questions or concerns at the number below : In the U.S.A.: Maytag Brand Home Appliances Customer eXperience Center 553 Benson...FOR A PARTICULAR PURPOSE, ARE LIMITED TO ONE YEAR OR THE SHORTEST PERIOD ALLOWED BY LAW. If you need assistance using your complete model number ready. Please keep these limitations and exclusions may not apply to you also may have access to the Internet and you need ...
Dimension Guide
Page 1
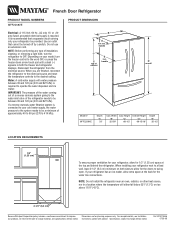
...Height "B" "C" "D" 32-5/8" 68-1/2" 69-15/16" Depth "E" 35-1/2" LOCATION REQUIREMENTS 1/2" (1.25 cm) To ensure proper ventilation for your model, turn the refrigerator to change without notice. Do not use an extension cord. IMPORTANT: The pressure of the water coming out of a reverse osmosis system going... to the water inlet valve of cabinet E incl. French Door Refrigerator PRODUCT MODEL NUMBERS MFF2258VE Electrical: A 115 Volt, 60 Hz., AC only 15- Specifications subject to be between 35 and 120 psi (241...
...Height "B" "C" "D" 32-5/8" 68-1/2" 69-15/16" Depth "E" 35-1/2" LOCATION REQUIREMENTS 1/2" (1.25 cm) To ensure proper ventilation for your model, turn the refrigerator to change without notice. Do not use an extension cord. IMPORTANT: The pressure of the water coming out of a reverse osmosis system going... to the water inlet valve of cabinet E incl. French Door Refrigerator PRODUCT MODEL NUMBERS MFF2258VE Electrical: A 115 Volt, 60 Hz., AC only 15- Specifications subject to be between 35 and 120 psi (241...


