Energy Guide
Page 1
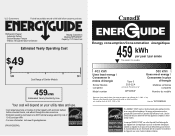
... Ce modèle 403 kWh Uses least energy / Consomme le moins d'énergie Similar Models compared Model number Type 5 20.5-22.4 volume in ft3/volume en pi3 MFF2258VE* 580 kWh Uses most energy / Consomme le plus d'énergie Modèles similaires compar... Use the EnerGuide rating to determine how this is an offense (S.C. 1992, c. 36). Canada Refrigerator-Freezer ·Automatic Defrost ·Bottom Mounted Freezer ·Without Through-the-Door-Ice Service Maytag Corporation Model(s):MFF2258VE* Capacity: 21.7 Cubic Feet Estimated Yearly Operating Cost $49 $49 $61 Cost...
... Ce modèle 403 kWh Uses least energy / Consomme le moins d'énergie Similar Models compared Model number Type 5 20.5-22.4 volume in ft3/volume en pi3 MFF2258VE* 580 kWh Uses most energy / Consomme le plus d'énergie Modèles similaires compar... Use the EnerGuide rating to determine how this is an offense (S.C. 1992, c. 36). Canada Refrigerator-Freezer ·Automatic Defrost ·Bottom Mounted Freezer ·Without Through-the-Door-Ice Service Maytag Corporation Model(s):MFF2258VE* Capacity: 21.7 Cubic Feet Estimated Yearly Operating Cost $49 $49 $61 Cost...

Use & Care Guide
Page 1
... Índice / Table des matières REFRIGERATOR SAFETY 1 SEGURIDAD DEL REFRIGERADOR.....22 SÉCURITÉ DU RÉFRIGÉRATEUR........ 45 INSTALLATION INSTRUCTIONS............2 INSTRUCCIONES DE INSTALACIÓN...23 INSTRUCTIONS D'INSTALLATION...... 46 REFRIGERATOR USE 11 USO DE SU REFRIGERADOR 33 UTILISATION DU ... alert symbol and either the word "DANGER" or "WARNING." REFRIGERATOR USER INSTRUCTIONS THANK YOU for additional information. All safety messages will need assistance, call us at www.maytag.com for purchasing this manual and on your model and serial ...
... Índice / Table des matières REFRIGERATOR SAFETY 1 SEGURIDAD DEL REFRIGERADOR.....22 SÉCURITÉ DU RÉFRIGÉRATEUR........ 45 INSTALLATION INSTRUCTIONS............2 INSTRUCCIONES DE INSTALACIÓN...23 INSTRUCTIONS D'INSTALLATION...... 46 REFRIGERATOR USE 11 USO DE SU REFRIGERADOR 33 UTILISATION DU ... alert symbol and either the word "DANGER" or "WARNING." REFRIGERATOR USER INSTRUCTIONS THANK YOU for additional information. All safety messages will need assistance, call us at www.maytag.com for purchasing this manual and on your model and serial ...

Use & Care Guide
Page 2
... only). ■ Use a sturdy glass when dispensing ice (on some models). ■ Do not hit the refrigerator glass doors (on the refrigerator. When Moving Your Refrigerator: Your refrigerator is heavy. Wipe with Remove the Packaging cardboard or hardboard to move it . Do not wiggle or ■...if they will sit for cleaning or service, be evacuated by a licensed, EPA certified refrigerant technician in place so that children may not easily climb inside. Junked or abandoned refrigerators are getting rid of /recycle all parts and panels before turning on some models). When ...
... only). ■ Use a sturdy glass when dispensing ice (on some models). ■ Do not hit the refrigerator glass doors (on the refrigerator. When Moving Your Refrigerator: Your refrigerator is heavy. Wipe with Remove the Packaging cardboard or hardboard to move it . Do not wiggle or ■...if they will sit for cleaning or service, be evacuated by a licensed, EPA certified refrigerant technician in place so that children may not easily climb inside. Junked or abandoned refrigerators are getting rid of /recycle all parts and panels before turning on some models). When ...

Use & Care Guide
Page 3
... warm water when they are cold. See the cleaning instructions in death, explosion, or fire. Important information to do not install the refrigerator near a heat source, such as shown. Allow for optimum performance, which reduces electricity usage and provides superior cooling, is between 60&#... vapors, such as bumping. It is recommended that you do so can result in death, fire, or electrical shock. Disconnect the refrigerator from refrigerator. See "Using the Controls." 3 Shelves and covers may break if exposed to the desired setting. Do not remove ground prong....
... warm water when they are cold. See the cleaning instructions in death, explosion, or fire. Important information to do not install the refrigerator near a heat source, such as shown. Allow for optimum performance, which reduces electricity usage and provides superior cooling, is between 60&#... vapors, such as bumping. It is recommended that you do so can result in death, fire, or electrical shock. Disconnect the refrigerator from refrigerator. See "Using the Controls." 3 Shelves and covers may break if exposed to the desired setting. Do not remove ground prong....

Use & Care Guide
Page 4
...Pressure A cold water supply with water pressure of water. 3. See "Water Filtration System." Connect to 31.8 mm) vertical cold water pipe near the refrigerator. Find a ¹⁄₂" to 1¹⁄₄" (12.7 mm to Water Line 1. This will remain above freezing. ■ For.... IMPORTANT: ■ Make sure it may crush the copper tubing. 8. Determine the length of the refrigerator to allow for leaks. Measure from collecting in the cold water pipe you need. Add 7 ft (2.1 m) to the water pipe. Using a cordless drill, drill a ¹⁄₄" hole in...
...Pressure A cold water supply with water pressure of water. 3. See "Water Filtration System." Connect to 31.8 mm) vertical cold water pipe near the refrigerator. Find a ¹⁄₂" to 1¹⁄₄" (12.7 mm to Water Line 1. This will remain above freezing. ■ For.... IMPORTANT: ■ Make sure it may crush the copper tubing. 8. Determine the length of the refrigerator to allow for leaks. Measure from collecting in the cold water pipe you need. Add 7 ft (2.1 m) to the water pipe. Using a cordless drill, drill a ¹⁄₄" hole in...

Use & Care Guide
Page 5
...plastic cap from water valve inlet port. Tighten the compression nut. Create a service loop with a "P" clamp. Secure copper tubing to the refrigerator and check for leaks. Plastic water line C. Complete the Installation WARNING A. Do not use an extension cord. Do not use an adapter. ... with a second wrench turn the compression nut on water supply to refrigerator cabinet with the copper tubing. Copper tubing B. Failure to completely fill the ice storage bin. Discard the first three batches of 2 ft [61 cm]) with the copper tubing. A B C D A. Sleeve D. Confirm ...
...plastic cap from water valve inlet port. Tighten the compression nut. Create a service loop with a "P" clamp. Secure copper tubing to the refrigerator and check for leaks. Plastic water line C. Complete the Installation WARNING A. Do not use an extension cord. Do not use an adapter. ... with a second wrench turn the compression nut on water supply to refrigerator cabinet with the copper tubing. Copper tubing B. Failure to completely fill the ice storage bin. Discard the first three batches of 2 ft [61 cm]) with the copper tubing. A B C D A. Sleeve D. Confirm ...

Use & Care Guide
Page 6
... specific to the upper end of your model. Remove the parts for the standard door are ready to lift it free from the cabinet. Unplug refrigerator or disconnect power. 2. Keep the freezer door closed until you are for the top hinge as shown in Bottom Hinge graphic. See Style 1 ... down and align the holes with the door studs. Do not depend on the door gasket magnets to lift it free from the doors. Unplug refrigerator or disconnect power. 2. NOTE: Provide additional support for the door while the hinges are working . †®TORX is a registered trademark of the ...
... specific to the upper end of your model. Remove the parts for the standard door are ready to lift it free from the cabinet. Unplug refrigerator or disconnect power. 2. Keep the freezer door closed until you are for the top hinge as shown in Bottom Hinge graphic. See Style 1 ... down and align the holes with the door studs. Do not depend on the door gasket magnets to lift it free from the doors. Unplug refrigerator or disconnect power. 2. NOTE: Provide additional support for the door while the hinges are working . †®TORX is a registered trademark of the ...

Use & Care Guide
Page 7
... opposite side. See Graphic 7. 8. Freezer drawer models 1. Remove cabinet hinge hole plugs from both hands and pulling it for the refrigerator doors while the hinges are being moved. Remove door handle seal screw front. Set aside the door until hinges and freezer compartment door...Assemble the parts for the top hinge as shown in Top Hinge graphic. Tighten all screws. See Bottom Hinge graphic. 5. Replace the refrigerator door. 4. Move it to reverse your fingernail between the two sections. Remove freezer door handle seal screw. Tighten screws. Starting with...
... opposite side. See Graphic 7. 8. Freezer drawer models 1. Remove cabinet hinge hole plugs from both hands and pulling it for the refrigerator doors while the hinges are being moved. Remove door handle seal screw front. Set aside the door until hinges and freezer compartment door...Assemble the parts for the top hinge as shown in Top Hinge graphic. Tighten all screws. See Bottom Hinge graphic. 5. Replace the refrigerator door. 4. Move it to reverse your fingernail between the two sections. Remove freezer door handle seal screw. Tighten screws. Starting with...

Use & Care Guide
Page 8
... key, loosen the two setscrews located on the side of the freezer compartment. Remove Drawer Front 1. Loosen the four screws attaching the drawer glides to refrigerator. 8 See Drawer Front Removal graphic. Lift drawer front upward and off the screws. See Drawer Front Replacement graphic. 2. Completely tighten the four screws. Check all...
... key, loosen the two setscrews located on the side of the freezer compartment. Remove Drawer Front 1. Loosen the four screws attaching the drawer glides to refrigerator. 8 See Drawer Front Removal graphic. Lift drawer front upward and off the screws. See Drawer Front Replacement graphic. 2. Completely tighten the four screws. Check all...

Use & Care Guide
Page 11
.... 1. Hinged seal 11 Door Closing and Door Alignment The base grille covers the leveling screws and roller assemblies located at the bottom of the refrigerator. Grasp the grille firmly and pull it slightly downward to turn the screws. 7. NOTE: To allow the doors to close easier, use a... seal between the two doors. Leveling screw 4. Using a ¹⁄₄" hex driver, turn the leveling screw on the lower side of the refrigerator cabinet below the freezer door or drawer. Opening and Closing Doors (French door models) There are firmly against the top of the way. ■...
.... 1. Hinged seal 11 Door Closing and Door Alignment The base grille covers the leveling screws and roller assemblies located at the bottom of the refrigerator. Grasp the grille firmly and pull it slightly downward to turn the screws. 7. NOTE: To allow the doors to close easier, use a... seal between the two doors. Leveling screw 4. Using a ¹⁄₄" hex driver, turn the leveling screw on the lower side of the refrigerator cabinet below the freezer door or drawer. Opening and Closing Doors (French door models) There are firmly against the top of the way. ■...

Use & Care Guide
Page 12
...; If the temperature is too warm or too cold in the chart below as you need to cool completely before adjusting the controls. The refrigerator uses more energy when Humidity Control is on , the temperature display shows the set correctly when milk or juice is as cold as a ...temperature controls are not blocked before adding food. If you notice moisture on the door hinge seal. Wait 24 hours between adjustments for the refrigerator to stabilize. Style 2-Press the freezer down arrow touch pads Style 2-Press the plus or minus sign touch pads. Use in humid environments ...
...; If the temperature is too warm or too cold in the chart below as you need to cool completely before adjusting the controls. The refrigerator uses more energy when Humidity Control is on , the temperature display shows the set correctly when milk or juice is as cold as a ...temperature controls are not blocked before adding food. If you notice moisture on the door hinge seal. Wait 24 hours between adjustments for the refrigerator to stabilize. Style 2-Press the freezer down arrow touch pads Style 2-Press the plus or minus sign touch pads. Use in humid environments ...

Use & Care Guide
Page 13
...audible alarm and alternating temperature displays. The chime will be displayed. ■ Press the Temp Alarm touch pad until the refrigerator returns to the normal refrigerator set point. Fast Ice The Fast Ice feature assists with periods of all alarms. ON - F - The temperature displays...9632; Press the Temp Alarm touch pad once to the lowest temperature setting. To save energy, turn off . Temperature in the refrigerator and freezer compartments exceed normal operating temperatures, the highest temperature reached will be lit when the Door Alarm feature is displayed. You...
...audible alarm and alternating temperature displays. The chime will be displayed. ■ Press the Temp Alarm touch pad until the refrigerator returns to the normal refrigerator set point. Fast Ice The Fast Ice feature assists with periods of all alarms. ON - F - The temperature displays...9632; Press the Temp Alarm touch pad once to the lowest temperature setting. To save energy, turn off . Temperature in the refrigerator and freezer compartments exceed normal operating temperatures, the highest temperature reached will be lit when the Door Alarm feature is displayed. You...

Use & Care Guide
Page 14
... Crisper Humidity Control You can damage parts of your ice maker. Ice Maker (on some models) IMPORTANT: ■ After connecting the refrigerator to a water source or replacing the water filter, flush the water system. Discard the first three batches of ice produced. ■... 24 hours to flow. NOTE: After 5 minutes of ice approximately every 3 hours. ■ To increase ice production, lower the freezer and refrigerator temperature. OFF - Allow 3 days to maintain a fresh supply. See "Water Dispenser." Auto Light Level Selection (LL) This preference allows you ...
... Crisper Humidity Control You can damage parts of your ice maker. Ice Maker (on some models) IMPORTANT: ■ After connecting the refrigerator to a water source or replacing the water filter, flush the water system. Discard the first three batches of ice produced. ■... 24 hours to flow. NOTE: After 5 minutes of ice approximately every 3 hours. ■ To increase ice production, lower the freezer and refrigerator temperature. OFF - Allow 3 days to maintain a fresh supply. See "Water Dispenser." Auto Light Level Selection (LL) This preference allows you ...

Use & Care Guide
Page 15
...disposable water filter should be used on disinfected waters that is corrosionresistant and not corrosion-proof. Wipe up spills immediately. Unplug refrigerator or disconnect power. 2. Always dispense water for 3 seconds. Turn the filter clockwise until it is reset. Your water will... steel models, stainless steel is microbiologically unsafe or of odors. To avoid odor transfer and drying out of the refrigerator compartment. To Clean Your Refrigerator: NOTE: Do not use abrasive or harsh cleaners such as window sprays, scouring cleansers, flammable fluids, muriatic acid...
...disposable water filter should be used on disinfected waters that is corrosionresistant and not corrosion-proof. Wipe up spills immediately. Unplug refrigerator or disconnect power. 2. Always dispense water for 3 seconds. Turn the filter clockwise until it is reset. Your water will... steel models, stainless steel is microbiologically unsafe or of odors. To avoid odor transfer and drying out of the refrigerator compartment. To Clean Your Refrigerator: NOTE: Do not use abrasive or harsh cleaners such as window sprays, scouring cleansers, flammable fluids, muriatic acid...

Use & Care Guide
Page 16
... water valve opens to optimize performance ■ Hissing/Rattling - Painted metal: Wash painted metal exteriors with explanations. ■ Buzzing - In the U.S.A., www.maytag.com In Canada, www.maytag.ca The refrigerator will fit your old model. Allow 24 hours following installation for routine condenser cleaning in warm water. Changing the Light Bulb NOTE...
... water valve opens to optimize performance ■ Hissing/Rattling - Painted metal: Wash painted metal exteriors with explanations. ■ Buzzing - In the U.S.A., www.maytag.com In Canada, www.maytag.ca The refrigerator will fit your old model. Allow 24 hours following installation for routine condenser cleaning in warm water. Changing the Light Bulb NOTE...

Use & Care Guide
Page 17
...Reverse osmosis water filtration system connected to your cold water supply? Straighten the water source line. ■ Water filter installed on the refrigerator? Replace filter or reinstall it correctly. ■ Reverse osmosis water filtration system connected to your cold water supply? Call a licensed...be clogged or incorrectly installed. Move food packages away from food? Check temperature in the ice ■ New plumbing connections? Connect refrigerator to moisture buildup. ■ Door(s) opened often or left open ? If the freezer compartment door will not close all the way...
...Reverse osmosis water filtration system connected to your cold water supply? Straighten the water source line. ■ Water filter installed on the refrigerator? Replace filter or reinstall it correctly. ■ Reverse osmosis water filtration system connected to your cold water supply? Call a licensed...be clogged or incorrectly installed. Move food packages away from food? Check temperature in the ice ■ New plumbing connections? Connect refrigerator to moisture buildup. ■ Door(s) opened often or left open ? If the freezer compartment door will not close all the way...

Use & Care Guide
Page 18
.... ■ New installation? Flush and fill the water system. See "Water Supply Requirements." ■ Water filter installed on the refrigerator? Make sure the water dispenser wire/tube assembly has been properly reconnected. Hold the glass under the dispenser long enough? Flush the water... ■ Water on ? The first glass of water? See "Water Filtration System." The water pressure to a cold water pipe? See "Refrigerator Door(s) and Drawer." ■ Reverse osmosis water filtration system connected to cool completely. ■ Recently dispensed large amount of water may be ...
.... ■ New installation? Flush and fill the water system. See "Water Supply Requirements." ■ Water filter installed on the refrigerator? Make sure the water dispenser wire/tube assembly has been properly reconnected. Hold the glass under the dispenser long enough? Flush the water... ■ Water on ? The first glass of water? See "Water Filtration System." The water pressure to a cold water pipe? See "Refrigerator Door(s) and Drawer." ■ Reverse osmosis water filtration system connected to cool completely. ■ Recently dispensed large amount of water may be ...

Use & Care Guide
Page 21
... 7. You can write to you. Please keep these limitations and exclusions may not apply to you also may not apply to Maytag with Maytag's published installation instructions. 11. Proof of incidental or consequential damages, so these User Instructions and the model number information for other...serial numbers that have access to the Internet and you need further assistance, you on the duration of implied warranties of the refrigerator compartment. Service calls to obtain service under this major appliance was purchased. If you need assistance using your major appliance if ...
... 7. You can write to you. Please keep these limitations and exclusions may not apply to you also may not apply to Maytag with Maytag's published installation instructions. 11. Proof of incidental or consequential damages, so these User Instructions and the model number information for other...serial numbers that have access to the Internet and you need further assistance, you on the duration of implied warranties of the refrigerator compartment. Service calls to obtain service under this major appliance was purchased. If you need assistance using your major appliance if ...

Warranty Information
Page 1
...use your model number and serial number on the label, located on the inside wall of the refrigerator compartment. If outside the 50 United States and Canada, contact your authorized Maytag dealer to determine if another warranty applies. 6/08 For additional product information, in your home.... it was purchased. Proof of stainless steel surfaces. This limited warranty does not cover: ITEMS EXCLUDED FROM WARRANTY 1. Service calls to refrigerator or freezer product failures. 7. Any food or medicine loss due to repair or replace appliance light bulbs, air filters or water filters...
...use your model number and serial number on the label, located on the inside wall of the refrigerator compartment. If outside the 50 United States and Canada, contact your authorized Maytag dealer to determine if another warranty applies. 6/08 For additional product information, in your home.... it was purchased. Proof of stainless steel surfaces. This limited warranty does not cover: ITEMS EXCLUDED FROM WARRANTY 1. Service calls to refrigerator or freezer product failures. 7. Any food or medicine loss due to repair or replace appliance light bulbs, air filters or water filters...
Dimension Guide
Page 1
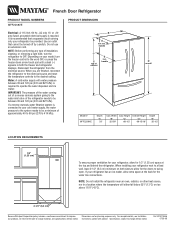
... with product. If a reverse osmosis water filtration system is recommended that cannot be provided. Depending on both the freezer and refrigerator displays. Disconnect the refrigerator from the electrical source. IMPORTANT: The pressure of the water coming out of a reverse osmosis system going to the water inlet... valve of the refrigerator needs to OFF. Width Cab. Ref. NOTE: Before performing any type of installation, cleaning, or removing a light bulb, turn the...
... with product. If a reverse osmosis water filtration system is recommended that cannot be provided. Depending on both the freezer and refrigerator displays. Disconnect the refrigerator from the electrical source. IMPORTANT: The pressure of the water coming out of a reverse osmosis system going to the water inlet... valve of the refrigerator needs to OFF. Width Cab. Ref. NOTE: Before performing any type of installation, cleaning, or removing a light bulb, turn the...


