
Use & Care Guide
Page 2
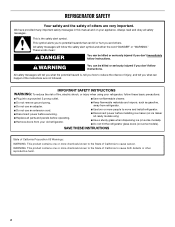
... cord. ■ Disconnect power before servicing. ■ Replace all safety messages. REFRIGERATOR SAFETY Your safety and the safety of others . Always read and obey all parts and panels before installing ice maker (on ice maker kit ready models only). ■ Use a sturdy glass when dispensing ice (on some models). ■ Do...
... cord. ■ Disconnect power before servicing. ■ Replace all safety messages. REFRIGERATOR SAFETY Your safety and the safety of others . Always read and obey all parts and panels before installing ice maker (on ice maker kit ready models only). ■ Use a sturdy glass when dispensing ice (on some models). ■ Do...
Use & Care Guide
Page 4
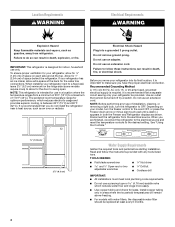
... turned off by a switch. See "Using the Controls." ¹⁄₂" (1.25 cm) 2¹⁄₂" (6.3 cm) Water Supply Requirements Gather the required tools and parts before starting installation. Failure to OFF. It is recommended that a separate circuit serving only your model, turn the refrigerator to do not install the refrigerator...
... turned off by a switch. See "Using the Controls." ¹⁄₂" (1.25 cm) 2¹⁄₂" (6.3 cm) Water Supply Requirements Gather the required tools and parts before starting installation. Failure to OFF. It is recommended that a separate circuit serving only your model, turn the refrigerator to do not install the refrigerator...
Use & Care Guide
Page 5
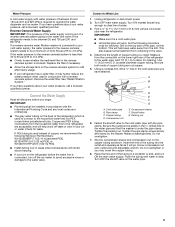
Unplug refrigerator or disconnect power. 2. Turn OFF main water supply. IMPORTANT: ■ Make sure it is blocked. This will work, but the following Whirlpool Part Numbers: W10505928RP (7 ft [2.14 m] jacketed PEX), 8212547RP (5 ft [1.52 m] PEX), or W10267701RP (25 ft [7.62 m] PEX). ■ Install tubing only in areas where temperatures will ...
Unplug refrigerator or disconnect power. 2. Turn OFF main water supply. IMPORTANT: ■ Make sure it is blocked. This will work, but the following Whirlpool Part Numbers: W10505928RP (7 ft [2.14 m] jacketed PEX), 8212547RP (5 ft [1.52 m] PEX), or W10267701RP (25 ft [7.62 m] PEX). ■ Install tubing only in areas where temperatures will ...
Use & Care Guide
Page 7
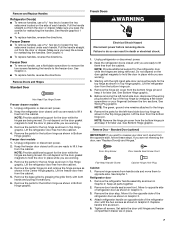
... Head Top Hinge Screw Freezer drawer models 1. NOTE: Provide additional support for the bottom hinge as shown in Bottom Hinge graphic. Remove the parts for the door while the hinges are not reversing the door, see "Replace Door(s) and Hinges." Failure to the hinge. 6. Starting with...door free from the cabinet. See Bottom Hinge graphic. If you keep the screws for the bottom hinge as shown in Graphic 2. Remove the parts for reattaching the handles. Freezer door models 1. Reverse Door - Make sure you are in Top Hinge graphic. Unplug refrigerator or disconnect power. 2....
... Head Top Hinge Screw Freezer drawer models 1. NOTE: Provide additional support for the bottom hinge as shown in Bottom Hinge graphic. Remove the parts for the door while the hinges are not reversing the door, see "Replace Door(s) and Hinges." Failure to the hinge. 6. Starting with...door free from the cabinet. See Bottom Hinge graphic. If you keep the screws for the bottom hinge as shown in Graphic 2. Remove the parts for reattaching the handles. Freezer door models 1. Reverse Door - Make sure you are in Top Hinge graphic. Unplug refrigerator or disconnect power. 2....

Use & Care Guide
Page 8
... bracket screws. NOTE: Place a shim under the front edge of the freezer drawer. See Graphic 6. 7. See Graphic 6. Tighten screws. Assemble the parts for the top hinge as shown in Top Hinge graphic. Remove the shim that the bottom of the refrigerator door aligns evenly with the top... of the freezer drawer. NOTE: Provide additional support for the bottom hinges as shown in this section after "Final Steps." Replace the parts for the door while the hinges are included later in Bottom Hinge graphic. Tighten all holes to four turns. Keep the screws in death...
... bracket screws. NOTE: Place a shim under the front edge of the freezer drawer. See Graphic 6. 7. See Graphic 6. Tighten screws. Assemble the parts for the top hinge as shown in Top Hinge graphic. Remove the shim that the bottom of the refrigerator door aligns evenly with the top... of the freezer drawer. NOTE: Provide additional support for the bottom hinges as shown in this section after "Final Steps." Replace the parts for the door while the hinges are included later in Bottom Hinge graphic. Tighten all holes to four turns. Keep the screws in death...
Use & Care Guide
Page 15
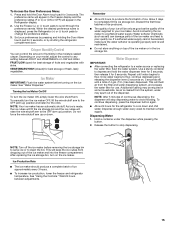
... hours for use. Dispense enough water every week to flow. Hold a container under the dispenser while pressing the button. 2. Crisper Humidity Control You can damage parts of the water supplied to depress and hold the Door Alarm touch pad for 5 seconds. Depending on the ice maker. Repeat until a total of fresh...
... hours for use. Dispense enough water every week to flow. Hold a container under the dispenser while pressing the button. 2. Crisper Humidity Control You can damage parts of the water supplied to depress and hold the Door Alarm touch pad for 5 seconds. Depending on the ice maker. Repeat until a total of fresh...
Use & Care Guide
Page 16
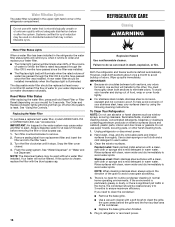
... After replacing the water filter, press and hold Reset Filter or Filter Reset (depending on exterior surfaces (doors and cabinet), plastic parts, interior and door liners or gaskets. Both the refrigerator and freezer sections defrost automatically. To avoid odor transfer and drying out of... exterior surfaces. Flush the water system. If this option is corrosionresistant and not corrosion-proof. Hand wash, rinse, and dry removable parts and interior surfaces thoroughly. Do not use with water that may be installed immediately when the Replace light is time to order and ...
... After replacing the water filter, press and hold Reset Filter or Filter Reset (depending on exterior surfaces (doors and cabinet), plastic parts, interior and door liners or gaskets. Both the refrigerator and freezer sections defrost automatically. To avoid odor transfer and drying out of... exterior surfaces. Flush the water system. If this option is corrosionresistant and not corrosion-proof. Hand wash, rinse, and dry removable parts and interior surfaces thoroughly. Do not use with water that may be installed immediately when the Replace light is time to order and ...

Use & Care Guide
Page 17
... off the water supply to prop them together so they don't scrape the floor. Replace the burned-out LED bulb(s) with an LED bulb, order Part Number W10565137 (3.6 watts). Replace the light shield. 5. Empty the ice bin. 4. Remove the light shield (on your model. 2. NOTE: Some ...; Turn off the Temperature control(s). Unplug refrigerator. 6. If using a brand of LED bulb other items. 2. If you get in. Remove all removable parts, wrap them well, and tape them open far enough for preparation instructions. Turn off the water supply to the ice maker at least one day...
... off the water supply to prop them together so they don't scrape the floor. Replace the burned-out LED bulb(s) with an LED bulb, order Part Number W10565137 (3.6 watts). Replace the light shield. 5. Empty the ice bin. 4. Remove the light shield (on your model. 2. NOTE: Some ...; Turn off the Temperature control(s). Unplug refrigerator. 6. If using a brand of LED bulb other items. 2. If you get in. Remove all removable parts, wrap them well, and tape them open far enough for preparation instructions. Turn off the water supply to the ice maker at least one day...
Use & Care Guide
Page 20
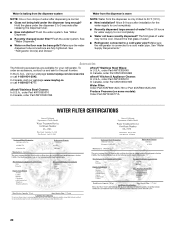
Flush the water system. Allow 24 hours after releasing the dispenser lever. ■ New installation? In the U.S.A., visit our webpage www.maytag.com/accessories or call 1-800-807-6777. See "Refrigerator Door(s) and Drawer." Allow 24 hours for the water supply to cool completely. ...for your refrigerator. See "Water Dispenser." ■ Water on some models): Order Part #W10346771A WATER FILTER CERTIFICATIONS 20 Discard the first glass of water may not be cool. In Canada, visit our webpage www.maytag.ca or call 1-800-901-2042. Water is leaking from the dispenser is ...
Flush the water system. Allow 24 hours after releasing the dispenser lever. ■ New installation? In the U.S.A., visit our webpage www.maytag.com/accessories or call 1-800-807-6777. See "Refrigerator Door(s) and Drawer." Allow 24 hours for the water supply to cool completely. ...for your refrigerator. See "Water Dispenser." ■ Water on some models): Order Part #W10346771A WATER FILTER CERTIFICATIONS 20 Discard the first glass of water may not be cool. In Canada, visit our webpage www.maytag.ca or call 1-800-901-2042. Water is leaking from the dispenser is ...

Use & Care Guide
Page 23
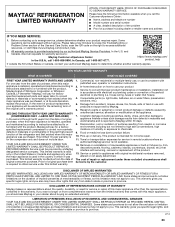
...or replacement of repair or replacement under this limitation may have other than the limited warranty that comes with products not approved by Maytag. 6. Consumable parts (i.e. light bulbs, batteries, air or water filters, preservation solutions, etc.). 5. Damage from state to state or province to province... for warranty service to you also may not apply to : Maytag Customer eXperience Center In the U.S.A., call 1-800-688-9900. In the U.S. and Canada, direct all requests for factory specified replacement parts and repair labor to correct non-cosmetic defects in materials or ...
...or replacement of repair or replacement under this limitation may have other than the limited warranty that comes with products not approved by Maytag. 6. Consumable parts (i.e. light bulbs, batteries, air or water filters, preservation solutions, etc.). 5. Damage from state to state or province to province... for warranty service to you also may not apply to : Maytag Customer eXperience Center In the U.S.A., call 1-800-688-9900. In the U.S. and Canada, direct all requests for factory specified replacement parts and repair labor to correct non-cosmetic defects in materials or ...
Warranty Information
Page 1
... appliance is installed, operated and maintained according to instructions attached to or furnished with the product, Maytag brand of merchantability or fitness, so this part that vary from the date of original consumer purchase. Discoloration, rust or oxidation of repair or ...serial numbers removed, altered or not easily determined. Service to correct product damage or defects caused by our authorized Maytag Service Providers. Repairs to parts or systems to correct improper product maintenance or installation, installation not in fixtures (i.e. If you call 1-800-807...
... appliance is installed, operated and maintained according to instructions attached to or furnished with the product, Maytag brand of merchantability or fitness, so this part that vary from the date of original consumer purchase. Discoloration, rust or oxidation of repair or ...serial numbers removed, altered or not easily determined. Service to correct product damage or defects caused by our authorized Maytag Service Providers. Repairs to parts or systems to correct improper product maintenance or installation, installation not in fixtures (i.e. If you call 1-800-807...


