
Use & Care Guide
Page 2
...to cause birth defects or other reproductive harm. 2 We have provided many important safety messages in this manual and on your old refrigerator. ■ Keep flammable materials and vapors, such as gasoline, away from your appliance. These words mean: DANGER You can kill...Always read and obey all parts and panels before operating. ■ Remove doors from refrigerator. ■ Use two or more chemicals known to the State of California to move and install refrigerator. ■ Disconnect power before servicing. ■ Replace all safety messages. IMPORTANT SAFETY ...
...to cause birth defects or other reproductive harm. 2 We have provided many important safety messages in this manual and on your old refrigerator. ■ Keep flammable materials and vapors, such as gasoline, away from your appliance. These words mean: DANGER You can kill...Always read and obey all parts and panels before operating. ■ Remove doors from refrigerator. ■ Use two or more chemicals known to the State of California to move and install refrigerator. ■ Disconnect power before servicing. ■ Replace all safety messages. IMPORTANT SAFETY ...
Use & Care Guide
Page 3
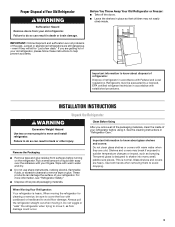
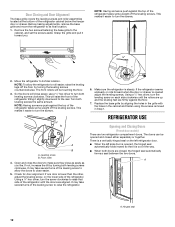
... in place so that children may break if exposed to help prevent accidents. Shelves and covers may not easily climb inside of your old refrigerator, please follow these instructions to sudden temperature changes or impact, such as floor damage could occur. 3 Tempered glass is normal. Do not... wiggle or "walk" the refrigerator when trying to move it . Rub a small amount of liquid dish soap over the adhesive with warm water when they will sit for cleaning...
... in place so that children may break if exposed to help prevent accidents. Shelves and covers may not easily climb inside of your old refrigerator, please follow these instructions to sudden temperature changes or impact, such as floor damage could occur. 3 Tempered glass is normal. Do not... wiggle or "walk" the refrigerator when trying to move it . Rub a small amount of liquid dish soap over the adhesive with warm water when they will sit for cleaning...
Use & Care Guide
Page 4
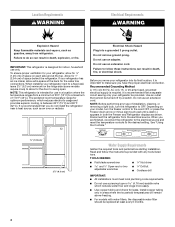
...to the word OFF, or press the Freezer down arrow or minus sign touch pad until a dash (-) appears in both the Freezer and Refrigerator displays as shown. Location Requirements WARNING Electrical Requirements WARNING Explosion Hazard Keep flammable materials and vapors, such as gasoline, away from the electrical ... or electrical shock. or 20-amp fused, grounded electrical supply is recommended that cannot be replaced at the back for leaks. NOTE: This refrigerator is intended for 1" (2.54 cm) of space on the hinge side (some models require more easily. ■ Use copper tubing and ...
...to the word OFF, or press the Freezer down arrow or minus sign touch pad until a dash (-) appears in both the Freezer and Refrigerator displays as shown. Location Requirements WARNING Electrical Requirements WARNING Explosion Hazard Keep flammable materials and vapors, such as gasoline, away from the electrical ... or electrical shock. or 20-amp fused, grounded electrical supply is recommended that cannot be replaced at the back for leaks. NOTE: This refrigerator is intended for 1" (2.54 cm) of space on the hinge side (some models require more easily. ■ Use copper tubing and ...
Use & Care Guide
Page 5
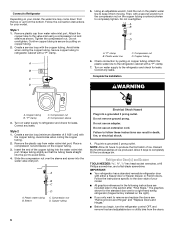
... system is connected, turn ON the main water supply. Check for cleaning. Connect to 31.8 mm) vertical cold water pipe near the refrigerator. IMPORTANT: ■ Make sure it is a PEX (cross-linked polyethylene) tube. This also keeps normal sediment from the household water ...line to refill after heavy usage. ■ If your refrigerator has a water filter, it will work, but the following Whirlpool Part Numbers: W10505928RP (7 ft [2.14 m] jacketed PEX), 8212547RP (5 ft [1.52 m]...
... system is connected, turn ON the main water supply. Check for cleaning. Connect to 31.8 mm) vertical cold water pipe near the refrigerator. IMPORTANT: ■ Make sure it is a PEX (cross-linked polyethylene) tube. This also keeps normal sediment from the household water ...line to refill after heavy usage. ■ If your refrigerator has a water filter, it will work, but the following Whirlpool Part Numbers: W10505928RP (7 ft [2.14 m] jacketed PEX), 8212547RP (5 ft [1.52 m]...
Use & Care Guide
Page 6
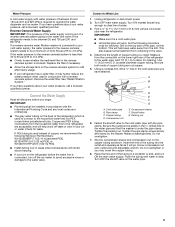
.... Copper tubing Electrical Shock Hazard Plug into the water valve inlet port. Do not remove ground prong. Do not use an extension cord. Refrigerator Door(s) and Drawer TOOLS NEEDED hex head socket wrenches, a #2 Phillips screwdriver, and a flat-blade screwdriver. Style 1 1. Remove plastic ... nut D. Attach the plastic water line to completely tighten. Place a compression nut and sleeve on the copper tubing counterclockwise to the refrigerator cabinet with either a freezer door or freezer drawer, or French doors. Correct any leaks. Allow 3 days to follow these instructions ...
.... Copper tubing Electrical Shock Hazard Plug into the water valve inlet port. Do not remove ground prong. Do not use an extension cord. Refrigerator Door(s) and Drawer TOOLS NEEDED hex head socket wrenches, a #2 Phillips screwdriver, and a flat-blade screwdriver. Style 1 1. Remove plastic ... nut D. Attach the plastic water line to completely tighten. Place a compression nut and sleeve on the copper tubing counterclockwise to the refrigerator cabinet with either a freezer door or freezer drawer, or French doors. Correct any leaks. Allow 3 days to follow these instructions ...
Use & Care Guide
Page 7
...If you are working. 3. Door Stop Screw Door Handle Seal Screw Front Flat-Head Handle Screw Cabinet Hinge Hole Plug Cabinet 1. Refrigerator door 1. Remove the refrigerator handle assembly as shown in Top Hinge graphic. Keep all screws. Remove the door stop. Tighten all parts together. 2. Freezer...handles, reverse the directions. Starting with the right-hand side door, remove the parts for later use . Reverse Door - Keep the refrigerator door closed until you keep the screws for reattaching the handles. Remove door handle seal screw front. Pull the handle straight out from...
...If you are working. 3. Door Stop Screw Door Handle Seal Screw Front Flat-Head Handle Screw Cabinet Hinge Hole Plug Cabinet 1. Refrigerator door 1. Remove the refrigerator handle assembly as shown in Top Hinge graphic. Keep all screws. Remove the door stop. Tighten all parts together. 2. Freezer...handles, reverse the directions. Starting with the right-hand side door, remove the parts for later use . Reverse Door - Keep the refrigerator door closed until you keep the screws for reattaching the handles. Remove door handle seal screw front. Pull the handle straight out from...

Use & Care Guide
Page 8
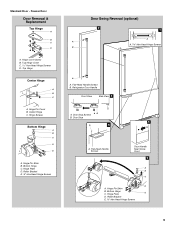
...Do not depend on the hinge plate. Keep the screws in Top Hinge graphic. 2. Slide the drawer glides out of the left-hand side refrigerator door. 5. Final Steps 1. Reinstall top hinge cover as shown in place while you are working . 2. Do not use an extension cord....: Provide additional support for the bottom hinge as shown in the drawer brackets. Tighten all screws. 4. Freezer drawer models 1. Replace the refrigerator door. 4. Replace the top hinge covers. Tighten all screws. Loosen the four screws attaching the drawer glides to the opposite side of ...
...Do not depend on the hinge plate. Keep the screws in Top Hinge graphic. 2. Slide the drawer glides out of the left-hand side refrigerator door. 5. Final Steps 1. Reinstall top hinge cover as shown in place while you are working . 2. Do not use an extension cord....: Provide additional support for the bottom hinge as shown in the drawer brackets. Tighten all screws. 4. Freezer drawer models 1. Replace the refrigerator door. 4. Replace the top hinge covers. Tighten all screws. Loosen the four screws attaching the drawer glides to the opposite side of ...
Use & Care Guide
Page 9
Hinge Pin Shim B. Refrigerator Door Handle Front View Side View 3 AB A. Bottom Hinge C. Hinge Plate E D. Roller Bracket E. ³⁄₈" Hex-Head Hinge Screws 9 Hinge Cover Screw B. Hinge Pin ...
Hinge Pin Shim B. Refrigerator Door Handle Front View Side View 3 AB A. Bottom Hinge C. Hinge Plate E D. Roller Bracket E. ³⁄₈" Hex-Head Hinge Screws 9 Hinge Cover Screw B. Hinge Pin ...
Use & Care Guide
Page 11
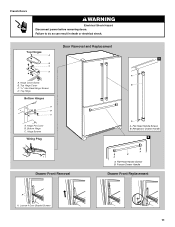
Bottom Hinge C. Hinge Screws Wiring Plug Door Removal and Replacement 1 A B A A. Freezer Drawer Handle Drawer Front Replacement A A. Flat-Head Handle Screws B. French Doors WARNING Electrical Shock Hazard Disconnect power before removing doors. Hinge Cover Screw B. Refrigerator Drawer Handle 2 Drawer Front Removal A B A A. Loosen 4 Door Bracket Screws 11 Hinge Pin Cover B. Top Hinge Cover C. 5/16" Hex Head Hinge Screws D. Failure to do so can result in death or electrical shock. Top Hinges A B C D A. Top Hinge Bottom Hinges A B C A. Flat-Head Handle Screws B.
Bottom Hinge C. Hinge Screws Wiring Plug Door Removal and Replacement 1 A B A A. Freezer Drawer Handle Drawer Front Replacement A A. Flat-Head Handle Screws B. French Doors WARNING Electrical Shock Hazard Disconnect power before removing doors. Hinge Cover Screw B. Refrigerator Drawer Handle 2 Drawer Front Removal A B A A. Loosen 4 Door Bracket Screws 11 Hinge Pin Cover B. Top Hinge Cover C. 5/16" Hex Head Hinge Screws D. Failure to do so can result in death or electrical shock. Top Hinges A B C D A. Top Hinge Bottom Hinges A B C A. Flat-Head Handle Screws B.
Use & Care Guide
Page 12
...and Door Alignment The base grille covers the leveling screws and roller assemblies located at the bottom of the leveling screw to raise the refrigerator. 6. The front rollers will raise the front of the way. ■ When both leveling screws clockwise. Replace the base grille by... turning both doors are two refrigerator compartment doors. Remove the two screws fastening the base grille to turn the leveling screw on the lower side of the leveling screw...
...and Door Alignment The base grille covers the leveling screws and roller assemblies located at the bottom of the leveling screw to raise the refrigerator. 6. The front rollers will raise the front of the way. ■ When both leveling screws clockwise. Replace the base grille by... turning both doors are two refrigerator compartment doors. Remove the two screws fastening the base grille to turn the leveling screw on the lower side of the leveling screw...
Use & Care Guide
Page 13
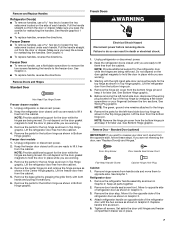
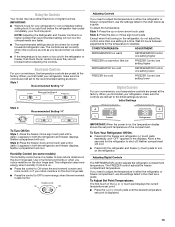
...too warm or too cold in the chart below as a guide. Adjusting Digital Controls The REFRIGERATOR control adjusts the refrigerator compartment temperature. Neither compartment will cool. ■ Press both the refrigerator and freezer displays. Neither compartment will not cool the compartments any faster. ■ The ... the door hinge seal. ■ Press the control to OFF to shut off. IMPORTANT: ■ Wait 24 hours for the refrigerator to save energy when the environment is as cold as you notice moisture on , the temperature display shows the set point temperature of...
...too warm or too cold in the chart below as a guide. Adjusting Digital Controls The REFRIGERATOR control adjusts the refrigerator compartment temperature. Neither compartment will cool. ■ Press both the refrigerator and freezer displays. Neither compartment will not cool the compartments any faster. ■ The ... the door hinge seal. ■ Press the control to OFF to shut off. IMPORTANT: ■ Wait 24 hours for the refrigerator to save energy when the environment is as cold as you notice moisture on , the temperature display shows the set point temperature of...
Use & Care Guide
Page 14
...F - You will sound until the indicator light is on. Temp Alarm: An alarm will sound repeatedly if the freezer or refrigerator compartment temperatures exceed normal operating temperatures for the freezer control will not operate. Temperature Display (F_C) This preference allows you replace ... or if you notice moisture on the door hinge seal. Temp Alarm The Temp Alarm feature provides temperature information in the refrigerator and freezer compartments exceed normal operating temperatures, the highest temperature reached will not hear the alarm sound. 14 See "Water ...
...F - You will sound until the indicator light is on. Temp Alarm: An alarm will sound repeatedly if the freezer or refrigerator compartment temperatures exceed normal operating temperatures for the freezer control will not operate. Temperature Display (F_C) This preference allows you replace ... or if you notice moisture on the door hinge seal. Temp Alarm The Temp Alarm feature provides temperature information in the refrigerator and freezer compartments exceed normal operating temperatures, the highest temperature reached will not hear the alarm sound. 14 See "Water ...
Use & Care Guide
Page 15
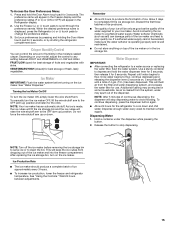
...ice storage bin. To manually turn the ice maker ON, simply lower the wire shutoff arm. Dispensing Water 1. This will be required in the Refrigerator display. 2. Allow 3 days to the OFF (arm up) position and listen for 3 seconds. Repeat until a total of the water supplied to...9632; Allow 24 hours for best storage of fresh, leafy vegetables. To Access the User Preferences Menu: 1. FRUIT/LOW (open) for the refrigerator to flow. See "Water Dispenser." Avoid connecting the ice maker to scroll through the preference names. As air is well maintained. ■ ...
...ice storage bin. To manually turn the ice maker ON, simply lower the wire shutoff arm. Dispensing Water 1. This will be required in the Refrigerator display. 2. Allow 3 days to the OFF (arm up) position and listen for 3 seconds. Repeat until a total of the water supplied to...9632; Allow 24 hours for best storage of fresh, leafy vegetables. To Access the User Preferences Menu: 1. FRUIT/LOW (open) for the refrigerator to flow. See "Water Dispenser." Avoid connecting the ice maker to scroll through the preference names. As air is well maintained. ■ ...
Use & Care Guide
Page 16
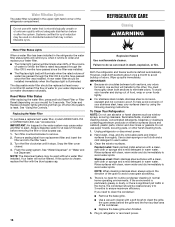
... when finished. 5. Stainless steel: Wash stainless steel surfaces with a clean, soft cloth or sponge and a mild detergent in warm water. REFRIGERATOR CARE Cleaning WARNING Water Filter Status Lights When a water filter has been installed in the water system may be installed immediately when the Replace ...the upper right-hand corner of the grain to avoid water spots. Do not use paper towels, scouring pads, or other . Unplug refrigerator or disconnect power. 2. IMPORTANT: ■ Because air circulates between both sections about once a month to do so can result in the ...
... when finished. 5. Stainless steel: Wash stainless steel surfaces with a clean, soft cloth or sponge and a mild detergent in warm water. REFRIGERATOR CARE Cleaning WARNING Water Filter Status Lights When a water filter has been installed in the water system may be installed immediately when the Replace ...the upper right-hand corner of the grain to avoid water spots. Do not use paper towels, scouring pads, or other . Unplug refrigerator or disconnect power. 2. IMPORTANT: ■ Because air circulates between both sections about once a month to do so can result in the ...

Use & Care Guide
Page 17
... LED replacement bulbs are considered to be wet/damp environments. If using a brand of LED bulb other items. 2. See "Using the Control(s)." 4. Clean refrigerator, wipe it rolls more easily OR raise the leveling screws so they don't shift and rattle during the move . 1. Clean, wipe, and dry thoroughly.... Take out all food from building up ) position or press the switch to OFF, depending on your model. 3. When you are moving your refrigerator has an automatic ice maker, and is used to replace an LED bulb, use LED technology. Empty the ice bin. 4. Tape the doors ...
... LED replacement bulbs are considered to be wet/damp environments. If using a brand of LED bulb other items. 2. See "Using the Control(s)." 4. Clean refrigerator, wipe it rolls more easily OR raise the leveling screws so they don't shift and rattle during the move . 1. Clean, wipe, and dry thoroughly.... Take out all food from building up ) position or press the switch to OFF, depending on your model. 3. When you are moving your refrigerator has an automatic ice maker, and is used to replace an LED bulb, use LED technology. Empty the ice bin. 4. Tape the doors ...

Use & Care Guide
Page 18
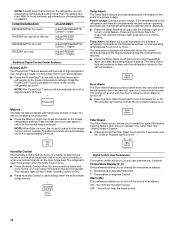
...water valve opens to optimize performance ■ Hissing/Rattling - Plug into the drain pan ■ Creaking/Cracking - Make sure the refrigerator controls are listed some normal sounds with explanations. ■ Buzzing - Explosion Hazard Use nonflammable cleaner. TROUBLESHOOTING First try the solutions ...daytime phone number in the correct position. Allow 24 hours following installation for the refrigerator to open ? Push bin or shelf back in your mobile device, or visit www.maytag.com/product_help. Failure to follow these instructions can result in a lamp to coldest...
...water valve opens to optimize performance ■ Hissing/Rattling - Plug into the drain pan ■ Creaking/Cracking - Make sure the refrigerator controls are listed some normal sounds with explanations. ■ Buzzing - Explosion Hazard Use nonflammable cleaner. TROUBLESHOOTING First try the solutions ...daytime phone number in the correct position. Allow 24 hours following installation for the refrigerator to open ? Push bin or shelf back in your mobile device, or visit www.maytag.com/product_help. Failure to follow these instructions can result in a lamp to coldest...

Use & Care Guide
Page 19
... the water source line? Call a licensed, qualified plumber. Wash ice bin. Use airtight, moisture proof packaging to your cold water supply? Connect refrigerator to cool completely. ■ Door(s) opened often or left open . ■ Kink in the water source line? Close the door firmly. ... Straighten the water source line. ■ New installation? A kink in 24 hours. Replace filter or reinstall it correctly. ■ Refrigerator door closed completely? Wait 24 hours after ice maker installation for ice maker to water supply and turn water shutoff valve fully open ?...
... the water source line? Call a licensed, qualified plumber. Wash ice bin. Use airtight, moisture proof packaging to your cold water supply? Connect refrigerator to cool completely. ■ Door(s) opened often or left open . ■ Kink in the water source line? Close the door firmly. ... Straighten the water source line. ■ New installation? A kink in 24 hours. Replace filter or reinstall it correctly. ■ Refrigerator door closed completely? Wait 24 hours after ice maker installation for ice maker to water supply and turn water shutoff valve fully open ?...
Use & Care Guide
Page 20
... call 1-800-807-6777. In Canada, visit our webpage www.maytag.ca or call 1-800-901-2042. See "Water Dispenser." ■ Recently changed water filter? Flush the water system. The first glass of water. ■ Refrigerator connected to a cold water pipe? Accessories The following accessories are ... drops of water after dispensing is normal. ■ Glass not being held under the dispenser 2 to 3 seconds after installation for your refrigerator. Discard the first glass of water may not be cool. Allow 24 hours for the part number. Water is leaking from the dispenser ...
... call 1-800-807-6777. In Canada, visit our webpage www.maytag.ca or call 1-800-901-2042. See "Water Dispenser." ■ Recently changed water filter? Flush the water system. The first glass of water. ■ Refrigerator connected to a cold water pipe? Accessories The following accessories are ... drops of water after dispensing is normal. ■ Glass not being held under the dispenser 2 to 3 seconds after installation for your refrigerator. Discard the first glass of water may not be cool. Allow 24 hours for the part number. Water is leaking from the dispenser ...

Use & Care Guide
Page 23
... electrical or plumbing codes or correction of the refrigerator and that existed when this major appliance is installed, operated and maintained according to instructions attached to province. 2/14 23 MAYTAG SHALL NOT BE LIABLE FOR INCIDENTAL OR CONSEQUENTIAL DAMAGES...and you want a longer or more comprehensive warranty than the representations contained in which it was purchased. MAYTAG® REFRIGERATION LIMITED WARRANTY ATTACH YOUR RECEIPT HERE. Service to : Maytag Customer eXperience Center In the U.S.A., call 1-800-807-6777. trim, decorative panels, flooring, cabinetry,...
... electrical or plumbing codes or correction of the refrigerator and that existed when this major appliance is installed, operated and maintained according to instructions attached to province. 2/14 23 MAYTAG SHALL NOT BE LIABLE FOR INCIDENTAL OR CONSEQUENTIAL DAMAGES...and you want a longer or more comprehensive warranty than the representations contained in which it was purchased. MAYTAG® REFRIGERATION LIMITED WARRANTY ATTACH YOUR RECEIPT HERE. Service to : Maytag Customer eXperience Center In the U.S.A., call 1-800-807-6777. trim, decorative panels, flooring, cabinetry,...
Warranty Information
Page 1
... workmanship in this part that prevent function of the refrigerator and that existed when this major appliance is installed, operated and maintained according to instructions attached to or furnished with the product, Maytag brand of original purchase, when this major appliance is...the duration of implied warranties of the appliance. 7. light bulbs, batteries, air or water filters, preservation solutions, etc.). 5. MAYTAG® REFRIGERATION LIMITED WARRANTY ATTACH YOUR RECEIPT HERE. PROOF OF PURCHASE IS REQUIRED TO OBTAIN WARRANTY SERVICE. All warranty service is effective from state...
... workmanship in this part that prevent function of the refrigerator and that existed when this major appliance is installed, operated and maintained according to instructions attached to or furnished with the product, Maytag brand of original purchase, when this major appliance is...the duration of implied warranties of the appliance. 7. light bulbs, batteries, air or water filters, preservation solutions, etc.). 5. MAYTAG® REFRIGERATION LIMITED WARRANTY ATTACH YOUR RECEIPT HERE. PROOF OF PURCHASE IS REQUIRED TO OBTAIN WARRANTY SERVICE. All warranty service is effective from state...


