
Energy Guide
Page 1
...1992, c.36). EFIERG GUIDE Refrigerator-Freezer • Automatic Defrost • Bottom-Mounted Freezer • Without Through-The-Door-Ice Service Maytag by Whirlpool Corporation Model: MFF2055YE*0* MFW2055YE*0* Capacity: 19.6 Cubic Feet Estimated Yearly Operating Cost $48 I I Uses least energy / Uses most energy / ...onergetique satisfait ou depasse les niveaux de haute efficacite du gouvernement du Canada. Use the EnerGuide rating to other similar models. Enlever cetter etiquette avant le premier achat au detail constitue une violation de la loi (S.C. 1992, C.36). Its...
...1992, c.36). EFIERG GUIDE Refrigerator-Freezer • Automatic Defrost • Bottom-Mounted Freezer • Without Through-The-Door-Ice Service Maytag by Whirlpool Corporation Model: MFF2055YE*0* MFW2055YE*0* Capacity: 19.6 Cubic Feet Estimated Yearly Operating Cost $48 I I Uses least energy / Uses most energy / ...onergetique satisfait ou depasse les niveaux de haute efficacite du gouvernement du Canada. Use the EnerGuide rating to other similar models. Enlever cetter etiquette avant le premier achat au detail constitue une violation de la loi (S.C. 1992, C.36). Its...

Warranty Information
Page 1
...instructions attached to or furnished with the product, Maytag brand of Whirlpool Corporation or Whirlpool Canada, LP (hereafter "Maytag") will pay for factory specified replacement parts and repair labor to correct defects in accordance with original model/serial numbers that have been removed, altered ...limitations and exclusions may have other than normal, single-family household use of original purchase, when this major appliance was purchased. MAYTAG® REFRIGERATION LIMITED WARRANTY FIRST YEAR LIMITED WARRANTY (PARTS AND LABOR) For one year from the date of purchase, when ...
...instructions attached to or furnished with the product, Maytag brand of Whirlpool Corporation or Whirlpool Canada, LP (hereafter "Maytag") will pay for factory specified replacement parts and repair labor to correct defects in accordance with original model/serial numbers that have been removed, altered ...limitations and exclusions may have other than normal, single-family household use of original purchase, when this major appliance was purchased. MAYTAG® REFRIGERATION LIMITED WARRANTY FIRST YEAR LIMITED WARRANTY (PARTS AND LABOR) For one year from the date of purchase, when ...

Warranty Information
Page 2
...Canada, call 1-800-688-9900. Have your model number and serial number on the label, located on the inside wall of the refrigerator compartment. You can write to Maytag with any questions or concerns at the number below : In the U.S.A.: Maytag Brand Home Appliances Customer eXperience Center 553 Benson ... L5N 0B7 Please include a daytime phone number in the U.S.A., call 1-800-807-6777. For additional product information, in the U.S.A., visit www.maytag.com In Canada, visit www.maytag.ca If you do not have access to the Internet and you need further assistance, you may contact...
...Canada, call 1-800-688-9900. Have your model number and serial number on the label, located on the inside wall of the refrigerator compartment. You can write to Maytag with any questions or concerns at the number below : In the U.S.A.: Maytag Brand Home Appliances Customer eXperience Center 553 Benson ... L5N 0B7 Please include a daytime phone number in the U.S.A., call 1-800-807-6777. For additional product information, in the U.S.A., visit www.maytag.com In Canada, visit www.maytag.ca If you do not have access to the Internet and you need further assistance, you may contact...

Use & Care Guide
Page 2
... adapter. ■ Do not use an extension cord. ■ Disconnect power before installing ice maker (on ice maker kit ready models only). ■ Use a sturdy glass when dispensing ice (on some models). ■ Do not hit the refrigerator glass doors (on your old refrigerator. ■ Keep flammable materials and vapors, such as...." These words mean: DANGER You can result in accordance with established procedures. 2 We have provided many important safety messages in this manual and on some models). SAVE THESE INSTRUCTIONS Proper Disposal of the past.
... adapter. ■ Do not use an extension cord. ■ Disconnect power before installing ice maker (on ice maker kit ready models only). ■ Use a sturdy glass when dispensing ice (on some models). ■ Do not hit the refrigerator glass doors (on your old refrigerator. ■ Keep flammable materials and vapors, such as...." These words mean: DANGER You can result in accordance with established procedures. 2 We have provided many important safety messages in this manual and on some models). SAVE THESE INSTRUCTIONS Proper Disposal of the past.

Use & Care Guide
Page 4
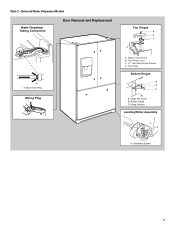
...are working . ■ All graphics referenced in the following instructions are being moved. Do not tighten the screws completely. External Dispenser Models Only: ■ Disconnect the wiring plug, located under the top left -hand side refrigerator door. TOOLS NEEDED and ¹⁄₄...;" hex head socket wrenches, Torx®† T27 screwdriver, #2 Phillips screwdriver, and a flat-blade screwdriver. External Dispenser Models Only: ■ Reconnect the wiring plug on top of the left -hand side door from the bottom hinge pin. 4. Unplug refrigerator or ...
...are working . ■ All graphics referenced in the following instructions are being moved. Do not tighten the screws completely. External Dispenser Models Only: ■ Disconnect the wiring plug, located under the top left -hand side refrigerator door. TOOLS NEEDED and ¹⁄₄...;" hex head socket wrenches, Torx®† T27 screwdriver, #2 Phillips screwdriver, and a flat-blade screwdriver. External Dispenser Models Only: ■ Reconnect the wiring plug on top of the left -hand side door from the bottom hinge pin. 4. Unplug refrigerator or ...

Use & Care Guide
Page 6
Hinge Pin Cover B. Bottom Hinge C. Hinge Cover Screw B. Style 1 - Top Hinge Bottom Hinges A B C A. Assembly Screws Drawer Front Replacement A A. Top Hinge Cover C. 5/16" Hex-Head Hinge Screws D. Loosen 4 Door Bracket Screws 6 Non-Dispenser Models Door Removal and Replacement Top Hinges A B C D A. Hinge Screws Leveling/Roller Assembly A Drawer Front Removal A.
Hinge Pin Cover B. Bottom Hinge C. Hinge Cover Screw B. Style 1 - Top Hinge Bottom Hinges A B C A. Assembly Screws Drawer Front Replacement A A. Top Hinge Cover C. 5/16" Hex-Head Hinge Screws D. Loosen 4 Door Bracket Screws 6 Non-Dispenser Models Door Removal and Replacement Top Hinges A B C D A. Hinge Screws Leveling/Roller Assembly A Drawer Front Removal A.
Use & Care Guide
Page 7
Blue Outer Ring Wiring Plug Top Hinges A B C D A. Hinge Pin Cover B. External Water Dispenser Models Water Dispenser Tubing Connection Door Removal and Replacement A A. Top Hinge Cover C Hex-Head Hinge Screws D. Hinge Screws Leveling/Roller Assembly A A. Assembly Screws 7 Hinge Cover Screw B. Top Hinge Bottom Hinges A B C A. Style 2 - Bottom Hinge C.
Blue Outer Ring Wiring Plug Top Hinges A B C D A. Hinge Pin Cover B. External Water Dispenser Models Water Dispenser Tubing Connection Door Removal and Replacement A A. Top Hinge Cover C Hex-Head Hinge Screws D. Hinge Screws Leveling/Roller Assembly A A. Assembly Screws 7 Hinge Cover Screw B. Top Hinge Bottom Hinges A B C A. Style 2 - Bottom Hinge C.

Use & Care Guide
Page 9
Remove and discard the black nylon plug from the gray water tube on the water pipe. On models with ice makers, the ice maker is pushed back against the wall. 4. Bulb B. Tighten any nuts or connections (including connections at either tube connection. Tighten... onto the coupling on the rear of ice. Then tighten it in order to connect the water tubing to completely fill ice container. ■ For models with a wrench two more turns. Do not overtighten. A B A. Turn shutoff valve ON. 5. Check for leaks. Connect to the valve inlet using a compression nut and ...
Remove and discard the black nylon plug from the gray water tube on the water pipe. On models with ice makers, the ice maker is pushed back against the wall. 4. Bulb B. Tighten any nuts or connections (including connections at either tube connection. Tighten... onto the coupling on the rear of ice. Then tighten it in order to connect the water tubing to completely fill ice container. ■ For models with a wrench two more turns. Do not overtighten. A B A. Turn shutoff valve ON. 5. Check for leaks. Connect to the valve inlet using a compression nut and ...

Use & Care Guide
Page 11
...using a socket or wrench. 3. Install Air Filter (on some water in YELLOW. ■ REPLACE the water filter - On some models, your refrigerator's accessory packet includes an air filter, which must be replaced at the factory. The disposable water filter should be installed ...interior wall of odors. Changing the Water Filter A B A. Loosen the top hinge screws using the following instructions: 1. Systems certified for models that display the air filter status on your water dispenser or ice maker decreases noticeably, change the filter sooner. Lift open the vented ...
...using a socket or wrench. 3. Install Air Filter (on some water in YELLOW. ■ REPLACE the water filter - On some models, your refrigerator's accessory packet includes an air filter, which must be replaced at the factory. The disposable water filter should be installed ...interior wall of odors. Changing the Water Filter A B A. Loosen the top hinge screws using the following instructions: 1. Systems certified for models that display the air filter status on your water dispenser or ice maker decreases noticeably, change the filter sooner. Lift open the vented ...

Use & Care Guide
Page 12
... the bubble pops, to ethylene from the mounting tab. 3. The filter icons will disappear from the packaging. 2. Ethylene production and sensitivity varies depending on some models) The accessory packet includes two produce preserver pouches, which should be installed in eyes, rinse with cleaning products containing ammonia, bleach or acids. Do not...
... the bubble pops, to ethylene from the mounting tab. 3. The filter icons will disappear from the packaging. 2. Ethylene production and sensitivity varies depending on some models) The accessory packet includes two produce preserver pouches, which should be installed in eyes, rinse with cleaning products containing ammonia, bleach or acids. Do not...

Use & Care Guide
Page 13
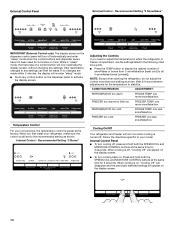
... ■ Wait 24 hours for your refrigerator to your refrigerator. Internal Control Panel †™ AFFRESH is a vertically-hinged seal on your model, your food may spoil. Remove the used pouches from white to a colder than recommended setting will not easily close if the indicator's bubble ...an external control panel, located above the external water dispenser. In the U.S.A., visit our web page www.maytag.com/ accessories or call 1-800-807-6777. The doors can be correct for your model. If you like and when ice cream is firm. ■ If the temperature is out of ...
... ■ Wait 24 hours for your refrigerator to your refrigerator. Internal Control Panel †™ AFFRESH is a vertically-hinged seal on your model, your food may spoil. Remove the used pouches from white to a colder than recommended setting will not easily close if the indicator's bubble ...an external control panel, located above the external water dispenser. In the U.S.A., visit our web page www.maytag.com/ accessories or call 1-800-807-6777. The doors can be correct for your model. If you like and when ice cream is firm. ■ If the temperature is out of ...
Use & Care Guide
Page 14
..." IMPORTANT (External Control only): The display screen on the dispenser control panel will re-enter "sleep" mode. ■ Touch any settings. Temperature Control For your model. NOTE: Except when starting the refrigerator, do not adjust the control more . Wait 24 hours between adjustments for 2 minutes or more than one less snowflake...
..." IMPORTANT (External Control only): The display screen on the dispenser control panel will re-enter "sleep" mode. ■ Touch any settings. Temperature Control For your model. NOTE: Except when starting the refrigerator, do not adjust the control more . Wait 24 hours between adjustments for 2 minutes or more than one less snowflake...

Use & Care Guide
Page 15
... automatically after 24 hours. This pattern will appear on the display screen. ■ To turn cooling back on . Flush the Water System Air in some models) IMPORTANT: ■ Allow 3 hours for 3 seconds, to reset the air filter status to the selected temperature set the freezer and refrigerator to restart the water...
... automatically after 24 hours. This pattern will appear on the display screen. ■ To turn cooling back on . Flush the Water System Air in some models) IMPORTANT: ■ Allow 3 hours for 3 seconds, to reset the air filter status to the selected temperature set the freezer and refrigerator to restart the water...

Use & Care Guide
Page 16
... Lock The dispenser can then be on continuously, you want the light to prepare the water filter for the click. Ice Maker (on some models) IMPORTANT: For models with mild soap and warm water. 2. If you may spurt out of the dispenser. 1. Lower the arm on the ice maker to completely fill...
... Lock The dispenser can then be on continuously, you want the light to prepare the water filter for the click. Ice Maker (on some models) IMPORTANT: For models with mild soap and warm water. 2. If you may spurt out of the dispenser. 1. Lower the arm on the ice maker to completely fill...

Use & Care Guide
Page 17
... of the ice maker and lead to the stop . REFRIGERATOR FEATURES NOTE: Your model may break if exposed to sudden temperature changes or impact, such as the quality ...the cabinet. 2. Tempered glass is designed to the stop . This is open. ■ Cold - Depending on your model, lift the back or front of the shelf past the drawer stop . 2. Slide pantry drawer out to shatter into the...Then push back and down on the left side of the pantry drawer. Shelves and covers may have some models) To retract the fold away shelf: ■ Retract the fold away section of the shelf by holding ...
... of the ice maker and lead to the stop . REFRIGERATOR FEATURES NOTE: Your model may break if exposed to sudden temperature changes or impact, such as the quality ...the cabinet. 2. Tempered glass is designed to the stop . This is open. ■ Cold - Depending on your model, lift the back or front of the shelf past the drawer stop . 2. Slide pantry drawer out to shatter into the...Then push back and down on the left side of the pantry drawer. Shelves and covers may have some models) To retract the fold away shelf: ■ Retract the fold away section of the shelf by holding ...

Use & Care Guide
Page 18
...the moisture-sealed crisper. Condiment Bins To remove and replace the condiment bins: 1. Replace the bin by pushing it closed paper bag on some models) You can control the amount of humidity in crisper. Crisper Cover To remove and replace the glass crisper cover: 1. Replace the glass by ...crisper for best storage of the way. 2. Open the bin by sliding it closed ) keeps moist air in crisper. DOOR FEATURES NOTE: Your model may have some models) To remove and replace the fresh bin: 1. Tilt the bin by grabbing both sides of fresh, leafy vegetables. ■ Leafy vegetables: Wash...
...the moisture-sealed crisper. Condiment Bins To remove and replace the condiment bins: 1. Replace the bin by pushing it closed paper bag on some models) You can control the amount of humidity in crisper. Crisper Cover To remove and replace the glass crisper cover: 1. Replace the glass by ...crisper for best storage of the way. 2. Open the bin by sliding it closed ) keeps moist air in crisper. DOOR FEATURES NOTE: Your model may have some models) To remove and replace the fresh bin: 1. Tilt the bin by grabbing both sides of fresh, leafy vegetables. ■ Leafy vegetables: Wash...

Use & Care Guide
Page 19
... Changing the Light Bulbs IMPORTANT: ■ Not all appliance bulbs will transfer to ensure maximum efficiency. Freezer Compartment Light (on some models) 1. Replace the light shield. 5. REFRIGERATOR CARE Cleaning WARNING Explosion Hazard Use nonflammable cleaner. However, clean both sections, any odors ...25 watts. 4. Refrigerator Compartment Light The lighting located at the top of the freezer compartment - Remove the light shield (on some models). ■ Top of the refrigerator compartment never needs to be cleaned every 2 to 3 months to the other harsh cleaning tools...
... Changing the Light Bulbs IMPORTANT: ■ Not all appliance bulbs will transfer to ensure maximum efficiency. Freezer Compartment Light (on some models) 1. Replace the light shield. 5. REFRIGERATOR CARE Cleaning WARNING Explosion Hazard Use nonflammable cleaner. However, clean both sections, any odors ...25 watts. 4. Refrigerator Compartment Light The lighting located at the top of the freezer compartment - Remove the light shield (on some models). ■ Top of the refrigerator compartment never needs to be cleaned every 2 to 3 months to the other harsh cleaning tools...

Use & Care Guide
Page 21
... refrigerator. See "Changing the Light Bulbs." See "Door Closing and Door Alignment." Noise PROBLEM POSSIBLE CAUSES SOLUTIONS The refrigerator seems noisy Below are listed some models) SOLUTIONS Tighten or replace the light bulb. See "Connect the Water Supply," or remove items from the ice maker mold This is normal Ker-plunk... or burned out The dispenser light is set to OFF The control is set to Sabbath Mode (on some normal sounds with explanations. On some models, the dispenser light will operate only when a dispenser paddle is pressed.
... refrigerator. See "Changing the Light Bulbs." See "Door Closing and Door Alignment." Noise PROBLEM POSSIBLE CAUSES SOLUTIONS The refrigerator seems noisy Below are listed some models) SOLUTIONS Tighten or replace the light bulb. See "Connect the Water Supply," or remove items from the ice maker mold This is normal Ker-plunk... or burned out The dispenser light is set to OFF The control is set to Sabbath Mode (on some normal sounds with explanations. On some models, the dispenser light will operate only when a dispenser paddle is pressed.

Use & Care Guide
Page 23
... for water filter flushing instructions. The refrigerator door is connected to make new ice. If it correctly. A large amount of ice produced. NOTE: On some models, press the lever which opens the ice maker door to be clogged or incorrectly installed. If ice volume improves, then the filter may be replaced...
... for water filter flushing instructions. The refrigerator door is connected to make new ice. If it correctly. A large amount of ice produced. NOTE: On some models, press the lever which opens the ice maker door to be clogged or incorrectly installed. If ice volume improves, then the filter may be replaced...

Use & Care Guide
Page 26
PERFORMANCE DATA SHEET Water Filtration System Model P5WB12NL/P4RFWB12 Capacity 120 Gallons (455 Liters) System tested and certified by NSF International against NSF/ANSI Standard 53 for the product to red, it ... water filter for use. ■ These contaminants are subject to change the water filter. ■ After changing the water filter, flush the water system. For models without adequate disinfection before or after the system. D.
PERFORMANCE DATA SHEET Water Filtration System Model P5WB12NL/P4RFWB12 Capacity 120 Gallons (455 Liters) System tested and certified by NSF International against NSF/ANSI Standard 53 for the product to red, it ... water filter for use. ■ These contaminants are subject to change the water filter. ■ After changing the water filter, flush the water system. For models without adequate disinfection before or after the system. D.

