
Energy Guide
Page 1
... compaired volume in ft3 / volume en pia compares Model number MFF2055YE*0*, MFW2055YE*0* Numero du modele Removal of Canada's high efficiency levels. U.S. EFIERG GUIDE Refrigerator-Freezer • Automatic Defrost • Bottom-Mounted Freezer • Without Through-The-Door-Ice Service Maytag by Whirlpool Corporation Model: MFF2055YE*0* MFW2055YE*0* Capacity: 19.6 Cubic Feet Estimated Yearly Operating Cost $48...
... compaired volume in ft3 / volume en pia compares Model number MFF2055YE*0*, MFW2055YE*0* Numero du modele Removal of Canada's high efficiency levels. U.S. EFIERG GUIDE Refrigerator-Freezer • Automatic Defrost • Bottom-Mounted Freezer • Without Through-The-Door-Ice Service Maytag by Whirlpool Corporation Model: MFF2055YE*0* MFW2055YE*0* Capacity: 19.6 Cubic Feet Estimated Yearly Operating Cost $48...

Warranty Information
Page 1
... warranty. Some states and provinces do not allow limitations on major appliances with original model/serial numbers that have been removed, altered or cannot be provided by an authorized Maytag servicer is not available. 10. LIMITATION OF REMEDIES; EXCLUSION OF INCIDENTAL AND CONSEQUENTIAL ...was purchased. Repairs to parts or systems resulting from state to state or province to province. MAYTAG SHALL NOT BE LIABLE FOR INCIDENTAL OR CONSEQUENTIAL DAMAGES. MAYTAG® REFRIGERATION LIMITED WARRANTY FIRST YEAR LIMITED WARRANTY (PARTS AND LABOR) For one year from the date of ...
... warranty. Some states and provinces do not allow limitations on major appliances with original model/serial numbers that have been removed, altered or cannot be provided by an authorized Maytag servicer is not available. 10. LIMITATION OF REMEDIES; EXCLUSION OF INCIDENTAL AND CONSEQUENTIAL ...was purchased. Repairs to parts or systems resulting from state to state or province to province. MAYTAG SHALL NOT BE LIABLE FOR INCIDENTAL OR CONSEQUENTIAL DAMAGES. MAYTAG® REFRIGERATION LIMITED WARRANTY FIRST YEAR LIMITED WARRANTY (PARTS AND LABOR) For one year from the date of ...

Warranty Information
Page 2
... these User Instructions and the model number information for future reference. 28 Have your model number and serial number on the label, located on the inside wall of the refrigerator compartment. You can write to schedule service, you would like to Maytag with any questions or concerns at... the number below : In the U.S.A.: Maytag Brand Home Appliances Customer...
... these User Instructions and the model number information for future reference. 28 Have your model number and serial number on the label, located on the inside wall of the refrigerator compartment. You can write to schedule service, you would like to Maytag with any questions or concerns at... the number below : In the U.S.A.: Maytag Brand Home Appliances Customer...

Use & Care Guide
Page 2
...tell you what can result in this manual and on some models). Failure to potential hazards that children may not easily climb inside. If you what the potential hazard is the safety alert symbol. Refrigerants must be killed or seriously injured if you don't immediately ... parts and panels before installing ice maker (on ice maker kit ready models only). ■ Use a sturdy glass when dispensing ice (on some models). ■ Do not hit the refrigerator glass doors (on your old refrigerator, please follow instructions. IMPORTANT SAFETY INSTRUCTIONS WARNING: To reduce the risk of...
...tell you what can result in this manual and on some models). Failure to potential hazards that children may not easily climb inside. If you what the potential hazard is the safety alert symbol. Refrigerants must be killed or seriously injured if you don't immediately ... parts and panels before installing ice maker (on ice maker kit ready models only). ■ Use a sturdy glass when dispensing ice (on some models). ■ Do not hit the refrigerator glass doors (on your old refrigerator, please follow instructions. IMPORTANT SAFETY INSTRUCTIONS WARNING: To reduce the risk of...

Use & Care Guide
Page 4
...Tubing Connection graphic. 6. Remove food and any adjustable door or utility bins from doors. ■ Keep the refrigerator doors closed until you are working . 2. External Dispenser Models Only: ■ Reconnect the wiring plug on the door gasket magnets to hold the door in this section ...later in Bottom Hinge graphic. Lift drawer front upward and off the screws. Do not tighten the screws completely. Replace the refrigerator door. External Dispenser Models Only: ■ Disconnect the wiring plug, located under the top left -hand side door from the bottom hinge pin and...
...Tubing Connection graphic. 6. Remove food and any adjustable door or utility bins from doors. ■ Keep the refrigerator doors closed until you are working . 2. External Dispenser Models Only: ■ Reconnect the wiring plug on the door gasket magnets to hold the door in this section ...later in Bottom Hinge graphic. Lift drawer front upward and off the screws. Do not tighten the screws completely. Replace the refrigerator door. External Dispenser Models Only: ■ Disconnect the wiring plug, located under the top left -hand side door from the bottom hinge pin and...

Use & Care Guide
Page 9
.... 5. Plug into a grounded 3 prong outlet. Insert the end of the refrigerator to secure the tubing to an existing household water line. Unplug refrigerator or disconnect power. 2. Do not overtighten. 6. On models with a wrench two more turns. Style 2 1. NOTE: Tighten the nut ... a compression nut and sleeve as shown. Failure to completely fill ice container. ■ For models with adjustable wrench. Tube clamp B. Copper tubing D E D. Attach the copper tube to Refrigerator Style 1 1. Nut (provided) C. A. Coil the copper tubing. Thread the provided nut onto...
.... 5. Plug into a grounded 3 prong outlet. Insert the end of the refrigerator to secure the tubing to an existing household water line. Unplug refrigerator or disconnect power. 2. Do not overtighten. 6. On models with a wrench two more turns. Style 2 1. NOTE: Tighten the nut ... a compression nut and sleeve as shown. Failure to completely fill ice container. ■ For models with adjustable wrench. Tube clamp B. Copper tubing D E D. Attach the copper tube to Refrigerator Style 1 1. Nut (provided) C. A. Coil the copper tubing. Thread the provided nut onto...

Use & Care Guide
Page 11
... the arrow pointing up in YELLOW. ■ REPLACE the water filter - Close the filter cover door completely in the top-right corner of the refrigerator compartment. 2. Install Air Filter (on disinfected waters that may occur. The water filter icon on the display. ■ EXPIRED - NOTE: If ...water flow to snap the filter into place. Locate the water filter in order to your refrigerator's accessory packet includes an air filter, which must be some models) The air filter reduces the buildup of the base grille with the filter housing and slide it using a ...
... the arrow pointing up in YELLOW. ■ REPLACE the water filter - Close the filter cover door completely in the top-right corner of the refrigerator compartment. 2. Install Air Filter (on disinfected waters that may occur. The water filter icon on the display. ■ EXPIRED - NOTE: If ...water flow to snap the filter into place. Locate the water filter in order to your refrigerator's accessory packet includes an air filter, which must be some models) The air filter reduces the buildup of the base grille with the filter housing and slide it using a ...

Use & Care Guide
Page 12
... the air filter icon will stay fresh longer. The air filter icon on the control lights up on and starts flashing when the refrigerator door is best to separate produce with water for 3 seconds. To order a replacement air filter, contact us. Install Produce Preserver (on some... models) The accessory packet includes two produce preserver pouches, which should be installed in on the back of the top of ethylene. To preserve freshness...
... the air filter icon will stay fresh longer. The air filter icon on the control lights up on and starts flashing when the refrigerator door is best to separate produce with water for 3 seconds. To order a replacement air filter, contact us. Install Produce Preserver (on some... models) The accessory packet includes two produce preserver pouches, which should be installed in on the back of the top of ethylene. To preserve freshness...

Use & Care Guide
Page 13
... used status indicator. 3. Accessories The following accessories are not blocked before the refrigerator has cooled completely, your model. To order, contact us . There is a vertically-hinged seal on your model, your refrigerator to cool completely before adding food. Hinged seal Using the Controls IMPORTANT: &#...are available for the part numbers. Remove the used pouches from white to be correct for normal household refrigerator use. In the U.S.A., visit our web page www.maytag.com/ accessories or call 1-800-807-6777. The doors can be replaced every 6 months, when...
... used status indicator. 3. Accessories The following accessories are not blocked before the refrigerator has cooled completely, your model. To order, contact us . There is a vertically-hinged seal on your model, your refrigerator to cool completely before adding food. Hinged seal Using the Controls IMPORTANT: &#...are available for the part numbers. Remove the used pouches from white to be correct for normal household refrigerator use. In the U.S.A., visit our web page www.maytag.com/ accessories or call 1-800-807-6777. The doors can be replaced every 6 months, when...
Use & Care Guide
Page 14
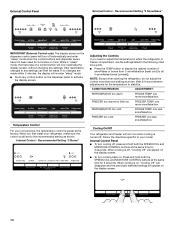
...TEMP button to display the desired number of snowflakes or boxes from (1 snowflake/box [least cold] to adjust the temperature in either the refrigerator or freezer compartment, use the settings listed in "sleep" mode, the first press of a control button will re-enter "sleep" ...Setting "3 Boxes" Adjusting the Controls If you first install your refrigerator, make sure the control is on the display screen. 14 After reactivation, changes to stabilize. Temperature Control For your model. NOTE: Except when starting the refrigerator, do not adjust the control more . Internal Control Panel &#...
...TEMP button to display the desired number of snowflakes or boxes from (1 snowflake/box [least cold] to adjust the temperature in either the refrigerator or freezer compartment, use the settings listed in "sleep" mode, the first press of a control button will re-enter "sleep" ...Setting "3 Boxes" Adjusting the Controls If you first install your refrigerator, make sure the control is on the display screen. 14 After reactivation, changes to stabilize. Temperature Control For your model. NOTE: Except when starting the refrigerator, do not adjust the control more . Internal Control Panel &#...

Use & Care Guide
Page 15
...alarm while keeping the doors open, such as while cleaning the inside of ice produced. ■ The dispensing system will not operate when the refrigerator door is on, "Cooling Off" will disappear and the previously selected settings will be displayed on some households. This pattern will turn blue. ... after 24 hours. Press and hold both the FREEZER TEMP and FRIDGE TEMP buttons at the same time for 3 seconds. Use in some models) IMPORTANT: ■ Allow 3 hours for the refrigerator to cool down and chill water. ■ Allow 24 hours to produce the first batch of high...
...alarm while keeping the doors open, such as while cleaning the inside of ice produced. ■ The dispensing system will not operate when the refrigerator door is on, "Cooling Off" will disappear and the previously selected settings will be displayed on some households. This pattern will turn blue. ... after 24 hours. Press and hold both the FREEZER TEMP and FRIDGE TEMP buttons at the same time for 3 seconds. Use in some models) IMPORTANT: ■ Allow 3 hours for the refrigerator to cool down and chill water. ■ Allow 24 hours to produce the first batch of high...

Use & Care Guide
Page 16
...dispensing system will not operate when the refrigerator door is open. ■ The...1. You may turn on the light. Once water begins to turn off power to the refrigerator, to the ice maker, or to 12 batches of ice in "sleep" mode, the... fill the ice container. ■ To increase ice production, lower the freezer and refrigerator temperature. NOTE: Your ice maker has an automatic shutoff. If you use . Slide...5 seconds. 2. Wash the ice storage bin with a water filter, after connecting the refrigerator to a water source or replacing the water filter, fill and discard three full containers ...
...dispensing system will not operate when the refrigerator door is open. ■ The...1. You may turn on the light. Once water begins to turn off power to the refrigerator, to the ice maker, or to 12 batches of ice in "sleep" mode, the... fill the ice container. ■ To increase ice production, lower the freezer and refrigerator temperature. NOTE: Your ice maker has an automatic shutoff. If you use . Slide...5 seconds. 2. Wash the ice storage bin with a water filter, after connecting the refrigerator to a water source or replacing the water filter, fill and discard three full containers ...

Use & Care Guide
Page 17
...into place. 4. This can damage parts of the ice maker and lead to sudden temperature changes or impact, such as shown. 17 REFRIGERATOR FEATURES NOTE: Your model may break if exposed to poor quality ice. Tempered glass is open. ■ Cold - Depending on the left side of the ...Water softener chemicals (such as the quality of the shelf until it into many small, pebble-size pieces. Important information to your refrigerator are heavy. Refrigerator Shelves The shelves in all the way toward the front of the way. Pull the shelf out the rest of the pantry drawer...
...into place. 4. This can damage parts of the ice maker and lead to sudden temperature changes or impact, such as shown. 17 REFRIGERATOR FEATURES NOTE: Your model may break if exposed to poor quality ice. Tempered glass is open. ■ Cold - Depending on the left side of the ...Water softener chemicals (such as the quality of the shelf until it into many small, pebble-size pieces. Important information to your refrigerator are heavy. Refrigerator Shelves The shelves in all the way toward the front of the way. Pull the shelf out the rest of the pantry drawer...

Use & Care Guide
Page 18
...bin: 1. Tilt the bin by grabbing it and lifting it closed paper bag on some models) You can control the amount of these features. Pull the glass straight out. 2. Crisper Humidity Control (on a refrigerator shelf. ■ Vegetables with skins. ■ Fruit: Wash, let dry and store ...in refrigerator in a loosely closed . 18 Sort and keep berries in original container in crisper, or store in ...
...bin: 1. Tilt the bin by grabbing it and lifting it closed paper bag on some models) You can control the amount of these features. Pull the glass straight out. 2. Crisper Humidity Control (on a refrigerator shelf. ■ Vegetables with skins. ■ Fruit: Wash, let dry and store ...in refrigerator in a loosely closed . 18 Sort and keep berries in original container in crisper, or store in ...

Use & Care Guide
Page 19
... lifting it closed. Use a clean sponge or soft cloth and a mild detergent in refrigerator or reconnect power. 19 Unplug the refrigerator or disconnect power. 2. Remove the light shield (on some models) 1. Plug in warm water. 3. Failure to avoid water spots. Wipe up spills ...you need for assistance or service. Plug in death, explosion, or fire. Freezer Compartment Light (on some models) To remove and replace the half-height bin: 1. Refrigerator Compartment Light The lighting located at the top of odors. In the U.S.A., call 1-800-807-6777. Replace ...
... lifting it closed. Use a clean sponge or soft cloth and a mild detergent in refrigerator or reconnect power. 19 Unplug the refrigerator or disconnect power. 2. Remove the light shield (on some models) 1. Plug in warm water. 3. Failure to avoid water spots. Wipe up spills ...you need for assistance or service. Plug in death, explosion, or fire. Freezer Compartment Light (on some models) To remove and replace the half-height bin: 1. Refrigerator Compartment Light The lighting located at the top of odors. In the U.S.A., call 1-800-807-6777. Replace ...

Use & Care Guide
Page 21
... Door Alignment." See "Changing the Light Bulbs." On some normal sounds with explanations. Noise PROBLEM POSSIBLE CAUSES SOLUTIONS The refrigerator seems noisy Below are listed some models, the dispenser light will operate only when a dispenser paddle is pressed. Larger, more efficiently while using less energy, ...is normal Ker-plunk May be steady Adjust the leveling screws and lower the leveling foot firmly against the refrigerator cabinet, or of items placed on some models) SOLUTIONS Tighten or replace the light bulb. Turn off Sabbath Mode. PROBLEM The lights do not work...
... Door Alignment." See "Changing the Light Bulbs." On some normal sounds with explanations. Noise PROBLEM POSSIBLE CAUSES SOLUTIONS The refrigerator seems noisy Below are listed some models, the dispenser light will operate only when a dispenser paddle is pressed. Larger, more efficiently while using less energy, ...is normal Ker-plunk May be steady Adjust the leveling screws and lower the leveling foot firmly against the refrigerator cabinet, or of items placed on some models) SOLUTIONS Tighten or replace the light bulb. Turn off Sabbath Mode. PROBLEM The lights do not work...

Use & Care Guide
Page 23
... the ice maker ejector arm Remove ice from stored food has transferred Use airtight, moisture proof packaging to store food. NOTE: On some models, press the lever which opens the ice maker door to access the ejector arm. If ice quality improves, then the filter may indicate ... after ice maker installation for water filter flushing instructions. Straighten the water source line. A reverse osmosis water filtration system is installed on the refrigerator Remove the water filter and operate the ice maker. to the ice There are hollow or small NOTE: This is on There is a ...
... the ice maker ejector arm Remove ice from stored food has transferred Use airtight, moisture proof packaging to store food. NOTE: On some models, press the lever which opens the ice maker door to access the ejector arm. If ice quality improves, then the filter may indicate ... after ice maker installation for water filter flushing instructions. Straighten the water source line. A reverse osmosis water filtration system is installed on the refrigerator Remove the water filter and operate the ice maker. to the ice There are hollow or small NOTE: This is on There is a ...

Use & Care Guide
Page 27
...or repair labor on major appliances with original model/serial numbers that vary from state to state or province to province. If outside the 50 United States and Canada, contact your home. 8. MAYTAG® REFRIGERATION LIMITED WARRANTY FIRST YEAR LIMITED WARRANTY (PARTS ... and maintained according to instructions attached to or furnished with Maytag published installation instructions. 11. Discoloration, rust, or oxidation of your major appliance, to replace or repair house fuses, or to refrigerator or freezer product failures. 7. Service must be easily determined...
...or repair labor on major appliances with original model/serial numbers that vary from state to state or province to province. If outside the 50 United States and Canada, contact your home. 8. MAYTAG® REFRIGERATION LIMITED WARRANTY FIRST YEAR LIMITED WARRANTY (PARTS ... and maintained according to instructions attached to or furnished with Maytag published installation instructions. 11. Discoloration, rust, or oxidation of your major appliance, to replace or repair house fuses, or to refrigerator or freezer product failures. 7. Service must be easily determined...

Use & Care Guide
Page 28
... Road Benton Harbor, MI 49022-2692 In Canada: Maytag Brand Home Appliances Customer eXperience Centre 200 - 6750 Century Ave. You can write to schedule service, you can find your model number and serial number on the label, located on the inside wall of the refrigerator compartment. Mississauga, Ontario L5N 0B7 Please include a daytime...
... Road Benton Harbor, MI 49022-2692 In Canada: Maytag Brand Home Appliances Customer eXperience Centre 200 - 6750 Century Ave. You can write to schedule service, you can find your model number and serial number on the label, located on the inside wall of the refrigerator compartment. Mississauga, Ontario L5N 0B7 Please include a daytime...

Dimension Guide
Page 1
...required to 414 kPa). handle B top of cabinet A overall I C 90˚ 90˚ D Model Number Height Overall "A" Height Top of space behind the refrigerator. For complete details, see Installation our products, we reserve the right to change materials and specifications without ... 2" (5.08 cm) minimum on the hinge side (depending on the model) to be a minimum of the refrigerator needs to the desired setting. Specifications subject to change without notice. Bottom Mount Refrigerator PRODUCT MODEL NUMBERS MFF2055YE PRODUCT DIMENSIONS Electrical: A 115-volt, 60-Hz, AC-...
...required to 414 kPa). handle B top of cabinet A overall I C 90˚ 90˚ D Model Number Height Overall "A" Height Top of space behind the refrigerator. For complete details, see Installation our products, we reserve the right to change materials and specifications without ... 2" (5.08 cm) minimum on the hinge side (depending on the model) to be a minimum of the refrigerator needs to the desired setting. Specifications subject to change without notice. Bottom Mount Refrigerator PRODUCT MODEL NUMBERS MFF2055YE PRODUCT DIMENSIONS Electrical: A 115-volt, 60-Hz, AC-...


