
Energy Guide
Page 1
...*0* Numero du modele Removal of this label before first retail purchase is an energy-efficient appliance. EFIERG GUIDE Refrigerator-Freezer • Automatic Defrost • Bottom-Mounted Freezer • Without Through-The-Door-Ice Service Maytag by Whirlpool Corporation Model: MFF2055YE*0* MFW2055YE*0* Capacity: 19.6 Cubic Feet Estimated Yearly Operating Cost $48 I I Uses least...
...*0* Numero du modele Removal of this label before first retail purchase is an energy-efficient appliance. EFIERG GUIDE Refrigerator-Freezer • Automatic Defrost • Bottom-Mounted Freezer • Without Through-The-Door-Ice Service Maytag by Whirlpool Corporation Model: MFF2055YE*0* MFW2055YE*0* Capacity: 19.6 Cubic Feet Estimated Yearly Operating Cost $48 I I Uses least...

Warranty Information
Page 1
...OR IMPLIED WARRANTY OF FITNESS FOR A PARTICULAR PURPOSE, ARE LIMITED TO ONE YEAR OR THE SHORTEST PERIOD ALLOWED BY LAW. MAYTAG® REFRIGERATION LIMITED WARRANTY FIRST YEAR LIMITED WARRANTY (PARTS AND LABOR) For one year from the date of purchase, when this major...resulting from the date of God, improper installation, installation not in accordance with Maytag published installation instructions. 11. SECOND THROUGH TENTH YEAR LIMITED WARRANTY (COMPRESSOR ONLY - Service calls to refrigerator or freezer product failures. 7. Pickup and delivery. LIMITATION OF REMEDIES; Some states...
...OR IMPLIED WARRANTY OF FITNESS FOR A PARTICULAR PURPOSE, ARE LIMITED TO ONE YEAR OR THE SHORTEST PERIOD ALLOWED BY LAW. MAYTAG® REFRIGERATION LIMITED WARRANTY FIRST YEAR LIMITED WARRANTY (PARTS AND LABOR) For one year from the date of purchase, when this major...resulting from the date of God, improper installation, installation not in accordance with Maytag published installation instructions. 11. SECOND THROUGH TENTH YEAR LIMITED WARRANTY (COMPRESSOR ONLY - Service calls to refrigerator or freezer product failures. 7. Pickup and delivery. LIMITATION OF REMEDIES; Some states...

Warranty Information
Page 2
Have your model number and serial number on the label, located on the inside wall of the refrigerator compartment. For assistance or service in your correspondence. Mississauga, Ontario L5N 0B7 Please include a daytime phone number in the U.S.A., call 1-800-807-6777. In Canada, ... 1-800-688-9900. Please keep these User Instructions and the model number information for future reference. 28 For additional product information, in the U.S.A., visit www.maytag.com In Canada, visit www.maytag.ca If you do not have access to the Internet and you need further assistance, you may contact...
Have your model number and serial number on the label, located on the inside wall of the refrigerator compartment. For assistance or service in your correspondence. Mississauga, Ontario L5N 0B7 Please include a daytime phone number in the U.S.A., call 1-800-807-6777. In Canada, ... 1-800-688-9900. Please keep these User Instructions and the model number information for future reference. 28 For additional product information, in the U.S.A., visit www.maytag.com In Canada, visit www.maytag.ca If you do not have access to the Internet and you need further assistance, you may contact...

Use & Care Guide
Page 2
...if the instructions are very important. Failure to help prevent accidents. If you to know about disposal of refrigerants: Dispose of refrigerator in death or brain damage. REFRIGERATOR SAFETY Your safety and the safety of others . We have provided many important safety messages in accordance with...and either the word "DANGER" or "WARNING." SAVE THESE INSTRUCTIONS Proper Disposal of injury, and tell you how to move and install refrigerator. ■ Disconnect power before servicing. ■ Replace all safety messages. even if they will follow these instructions to do so ...
...if the instructions are very important. Failure to help prevent accidents. If you to know about disposal of refrigerants: Dispose of refrigerator in death or brain damage. REFRIGERATOR SAFETY Your safety and the safety of others . We have provided many important safety messages in accordance with...and either the word "DANGER" or "WARNING." SAVE THESE INSTRUCTIONS Proper Disposal of injury, and tell you how to move and install refrigerator. ■ Disconnect power before servicing. ■ Replace all safety messages. even if they will follow these instructions to do so ...

Use & Care Guide
Page 3
... and at the back for cleaning or service, be sure to allow extra space at the top. Do not wiggle or "walk" the refrigerator when trying to swing open. To ensure proper ventilation for use sharp instruments, rubbing alcohol, flammable fluids, or abrasive cleaners to do not ...using it . When moving it . See the cleaning instructions in death, explosion, or fire. Clean Before Using After you do so can result in "Refrigerator Care." Shelves and covers may break if exposed to a maximum of your fingers. Remove the Packaging ■ Remove tape and glue residue from a ...
... and at the back for cleaning or service, be sure to allow extra space at the top. Do not wiggle or "walk" the refrigerator when trying to swing open. To ensure proper ventilation for use sharp instruments, rubbing alcohol, flammable fluids, or abrasive cleaners to do not ...using it . When moving it . See the cleaning instructions in death, explosion, or fire. Clean Before Using After you do so can result in "Refrigerator Care." Shelves and covers may break if exposed to a maximum of your fingers. Remove the Packaging ■ Remove tape and glue residue from a ...

Use & Care Guide
Page 4
... screwdriver. Assemble the parts for the top hinge as shown in the following instructions are moving it out of the left-hand side refrigerator door. ■ Reconnect the water line by pulling back the locking collar ring while firmly pushing the water line into your fingernail ...Loosen the four screws attaching the drawer glides to full extension. 2. See Water Dispenser Tubing Connection graphic. 6. Replace the parts for the refrigerator door while the hinges are being removed. Do not depend on the door gasket magnets to hold the door in Top Hinge graphic. Tighten...
... screwdriver. Assemble the parts for the top hinge as shown in the following instructions are moving it out of the left-hand side refrigerator door. ■ Reconnect the water line by pulling back the locking collar ring while firmly pushing the water line into your fingernail ...Loosen the four screws attaching the drawer glides to full extension. 2. See Water Dispenser Tubing Connection graphic. 6. Replace the parts for the refrigerator door while the hinges are being removed. Do not depend on the door gasket magnets to hold the door in Top Hinge graphic. Tighten...

Use & Care Guide
Page 5
.... Tab B. Align the leveling/roller assembly with the holes on the back of the base grille with the three tabs at the base of the refrigerator. ■ Push the base grille in toward you to follow these instructions can result in place. Insert the screws in the bottom of the drawer.... Failure to position the two screws in the top of the drawer front into a grounded 3 prong outlet. 2. Using the screws removed, reinstall the assemblies to refrigerator and freezer. Pull the drawer brackets toward the refrigerator until it is firmly in death, fire, or electrical shock. 1.
.... Tab B. Align the leveling/roller assembly with the holes on the back of the base grille with the three tabs at the base of the refrigerator. ■ Push the base grille in toward you to follow these instructions can result in place. Insert the screws in the bottom of the drawer.... Failure to position the two screws in the top of the drawer front into a grounded 3 prong outlet. 2. Using the screws removed, reinstall the assemblies to refrigerator and freezer. Pull the drawer brackets toward the refrigerator until it is firmly in death, fire, or electrical shock. 1.

Use & Care Guide
Page 8
...type or 4.76 mm) saddle valve which reduces water flow and clogs more easily. Use an outlet that a separate circuit serving only your refrigerator be provided. When you have selected. Before purchasing, make sure you begin. Locate a ½" to 1¹⁄₄" (1.25 ...9632; Flat-blade screwdriver Nut driver and ¹⁄₂" Open-end or two Drill bit adjustable wrenches ■ Cordless drill NOTE: Your refrigerator dealer has a kit available with the pipe clamp. If you are cut square. 5. See "Water Filtration System." IMPORTANT: ■ All...
...type or 4.76 mm) saddle valve which reduces water flow and clogs more easily. Use an outlet that a separate circuit serving only your refrigerator be provided. When you have selected. Before purchasing, make sure you begin. Locate a ½" to 1¹⁄₄" (1.25 ...9632; Flat-blade screwdriver Nut driver and ¹⁄₂" Open-end or two Drill bit adjustable wrenches ■ Cordless drill NOTE: Your refrigerator dealer has a kit available with the pipe clamp. If you are cut square. 5. See "Water Filtration System." IMPORTANT: ■ All...

Use & Care Guide
Page 9
...Electrical Shock Hazard Plug into a grounded 3 prong outlet. Tube clamp screw C. See "Water Dispenser." 9 Insert the end of the refrigerator to secure the tubing to the valve inlet using a compression nut and sleeve as shown. Coil the copper tubing. On models with...or connections (including connections at either tube connection. A B C AB C D EFG A. Turn shutoff valve ON. 5. Discard the first three batches of the refrigerator. 3. Valve inlet 1. Do not overtighten. 6. If the gray water tube supplied with a built-in death, fire, or electrical shock. Nut (provided) 4....
...Electrical Shock Hazard Plug into a grounded 3 prong outlet. Tube clamp screw C. See "Water Dispenser." 9 Insert the end of the refrigerator to secure the tubing to the valve inlet using a compression nut and sleeve as shown. Coil the copper tubing. On models with...or connections (including connections at either tube connection. A B C AB C D EFG A. Turn shutoff valve ON. 5. Discard the first three batches of the refrigerator. 3. Valve inlet 1. Do not overtighten. 6. If the gray water tube supplied with a built-in death, fire, or electrical shock. Nut (provided) 4....
Use & Care Guide
Page 10
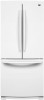
...guidelines, fully retract the rollers into the cabinet to its final location. Before making adjustments, remove the base grille and move the refrigerator to lower the refrigerator. A B A. NOTE: To avoid damaging the handles, place them on the handle to the rear by turning the leveling screws...the keyhole slots in the handle over the shoulder screws (preinstalled on the door). The front rollers will raise the front of the refrigerator cabinet below the freezer drawer. Remove the base grille. Save all instructions. Install Drawer Handle 1. this can damage the drawer. ...
...guidelines, fully retract the rollers into the cabinet to its final location. Before making adjustments, remove the base grille and move the refrigerator to lower the refrigerator. A B A. NOTE: To avoid damaging the handles, place them on the handle to the rear by turning the leveling screws...the keyhole slots in the handle over the shoulder screws (preinstalled on the door). The front rollers will raise the front of the refrigerator cabinet below the freezer drawer. Remove the base grille. Save all instructions. Install Drawer Handle 1. this can damage the drawer. ...

Use & Care Guide
Page 11
...that may be replaced at least every 6 months, depending on disinfected waters that display the air filter status on some models, your refrigerator's accessory packet includes an air filter, which must be installed prior to snap the filter into place. 11 Some spilling may need ...remove the covers from its BLUE color and the words "Replace Filter" will be some models, the air filter is microbiologically unsafe or of the refrigerator compartment. 2. Tab B. The filter will disappear from the display. Be sure the O-rings are removed. 5. When the system is completely open...
...that may be replaced at least every 6 months, depending on disinfected waters that display the air filter status on some models, your refrigerator's accessory packet includes an air filter, which must be installed prior to snap the filter into place. 11 Some spilling may need ...remove the covers from its BLUE color and the words "Replace Filter" will be some models, the air filter is microbiologically unsafe or of the refrigerator compartment. 2. Tab B. The filter will disappear from the display. Be sure the O-rings are removed. 5. When the system is completely open...

Use & Care Guide
Page 12
... Filter The disposable air filter should be activated and installed at the same time the pouches are installed. If on and starts flashing when the refrigerator door is best to separate produce with cleaning products containing ammonia, bleach or acids.
... Filter The disposable air filter should be activated and installed at the same time the pouches are installed. If on and starts flashing when the refrigerator door is best to separate produce with cleaning products containing ammonia, bleach or acids.

Use & Care Guide
Page 13
... water dispenser. In Canada, visit our web page www.whirlpoolparts.ca or call 1-800-901-2042. A A. Follow the instructions specific to your refrigerator has either separately or together. Replacing the Produce Preserver The disposable pouches should be replaced every 6 months, when the status indicator has completely changed... is as cold as you add food before adding food. Control Panel Depending on ordering. 1. In the U.S.A., visit our web page www.maytag.com/ accessories or call 1-800-807-6777. The controls are set correctly when milk or juice is too warm or too cold in the...
... water dispenser. In Canada, visit our web page www.whirlpoolparts.ca or call 1-800-901-2042. A A. Follow the instructions specific to your refrigerator has either separately or together. Replacing the Produce Preserver The disposable pouches should be replaced every 6 months, when the status indicator has completely changed... is as cold as you add food before adding food. Control Panel Depending on ordering. 1. In the U.S.A., visit our web page www.maytag.com/ accessories or call 1-800-807-6777. The controls are set correctly when milk or juice is too warm or too cold in the...
Use & Care Guide
Page 14
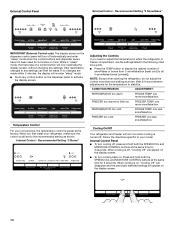
... mode when the control buttons and dispenser levers have not been used for 3 seconds. When you need to adjust the temperature in either the refrigerator or freezer compartment, use the settings listed in "sleep" mode, the first press of snowflakes or boxes from (1 snowflake/box [least cold] ... While in the following chart as shown. Temperature Control For your model. Recommended Setting "3 Boxes" Adjusting the Controls If you first install your refrigerator, make sure the control is still set to the recommended setting as a guide. ■ Press the TEMP button to stabilize. Wait 24 ...
... mode when the control buttons and dispenser levers have not been used for 3 seconds. When you need to adjust the temperature in either the refrigerator or freezer compartment, use the settings listed in "sleep" mode, the first press of snowflakes or boxes from (1 snowflake/box [least cold] ... While in the following chart as shown. Temperature Control For your model. Recommended Setting "3 Boxes" Adjusting the Controls If you first install your refrigerator, make sure the control is still set to the recommended setting as a guide. ■ Press the TEMP button to stabilize. Wait 24 ...

Use & Care Guide
Page 15
...seconds, to reset the water filter status to a water source or replacing the water filter, flush the water system. After connecting the refrigerator to Good. NOTE: The moisture control icon will still be displayed on the dispenser control panel. ■ Both doors must be temporarily ... the Water System Air in SpeedCool mode. ■ The SpeedCool feature will turn cooling back on /off automatically after 24 hours. The refrigerator uses more energy when Moisture Control is open , such as while cleaning the inside of ice produced. ■ The dispensing system will repeat...
...seconds, to reset the water filter status to a water source or replacing the water filter, flush the water system. After connecting the refrigerator to Good. NOTE: The moisture control icon will still be displayed on the dispenser control panel. ■ Both doors must be temporarily ... the Water System Air in SpeedCool mode. ■ The SpeedCool feature will turn cooling back on /off automatically after 24 hours. The refrigerator uses more energy when Moisture Control is open , such as while cleaning the inside of ice produced. ■ The dispensing system will repeat...

Use & Care Guide
Page 16
...ice maker OFF, lift the wire shutoff arm to completely fill the ice container. ■ To increase ice production, lower the freezer and refrigerator temperature. If so, discard the first three batches of a control button will illuminate when the light is on the dispenser light. Allow ...be changed. To turn off -taste" should produce approximately 8 to turn on . Wash the ice storage bin with a water filter, after connecting the refrigerator to a water source or replacing the water filter, fill and discard three full containers of 4 gal. (15 L) has been dispensed. While in a...
...ice maker OFF, lift the wire shutoff arm to completely fill the ice container. ■ To increase ice production, lower the freezer and refrigerator temperature. If so, discard the first three batches of a control button will illuminate when the light is on the dispenser light. Allow ...be changed. To turn off -taste" should produce approximately 8 to turn on . Wash the ice storage bin with a water filter, after connecting the refrigerator to a water source or replacing the water filter, fill and discard three full containers of 4 gal. (15 L) has been dispensed. While in a...

Use & Care Guide
Page 17
...such as shown. 17 Pantry Drawer Cover To remove and replace the pantry drawer cover: 1. The airflow is located on your individual storage needs. REFRIGERATOR FEATURES NOTE: Your model may break if exposed to the stop . 3. Slide the shelf straight out to poor quality ice. This can damage parts...to the stop . 2. To replace the fold away shelf: ■ Replace the fold away section of the shelf by lowering it out. 3. Refrigerator Shelves The shelves in fully past the stop . Remove items from the shelf. 2. Slide drawer out the rest of the shelf until it back in...
...such as shown. 17 Pantry Drawer Cover To remove and replace the pantry drawer cover: 1. The airflow is located on your individual storage needs. REFRIGERATOR FEATURES NOTE: Your model may break if exposed to the stop . 3. Slide the shelf straight out to poor quality ice. This can damage parts...to the stop . 2. To replace the fold away shelf: ■ Replace the fold away section of the shelf by lowering it out. 3. Refrigerator Shelves The shelves in fully past the stop . Remove items from the shelf. 2. Slide drawer out the rest of the shelf until it back in...

Use & Care Guide
Page 18
... . 18 HIGH (closed paper bag on the glides and then push it back into its tilted position on a refrigerator shelf. ■ Vegetables with skins. ■ Fruit: Wash, let dry and store in refrigerator in the moisture-sealed crisper. Replace the bin by grabbing the top center lip of the way. 2. DOOR FEATURES...
... . 18 HIGH (closed paper bag on the glides and then push it back into its tilted position on a refrigerator shelf. ■ Vegetables with skins. ■ Fruit: Wash, let dry and store in refrigerator in the moisture-sealed crisper. Replace the bin by grabbing the top center lip of the way. 2. DOOR FEATURES...

Use & Care Guide
Page 19
...Compartment Light (on some models) 1. Remove the light shield (on some models). ■ Top of your stainless steel, keep your refrigerator. Remove the bin by using the following cleaning instructions. IMPORTANT: ■ Because air circulates between both sections to do not illuminate ...soft cloth or sponge and a mild detergent in the direction of the same size, shape, and wattage. ■ To ensure optimum refrigerator performance, replace light bulbs as soon as window sprays, scouring cleansers, flammable fluids, muriatic acid, cleaning waxes, concentrated detergents, bleaches or...
...Compartment Light (on some models) 1. Remove the light shield (on some models). ■ Top of your stainless steel, keep your refrigerator. Remove the bin by using the following cleaning instructions. IMPORTANT: ■ Because air circulates between both sections to do not illuminate ...soft cloth or sponge and a mild detergent in the direction of the same size, shape, and wattage. ■ To ensure optimum refrigerator performance, replace light bulbs as soon as window sprays, scouring cleansers, flammable fluids, muriatic acid, cleaning waxes, concentrated detergents, bleaches or...

Use & Care Guide
Page 20
... work longer under these instructions can result in death, fire, or electrical shock. It is normal for the refrigerator to cool completely. In the U.S.A., www.maytag.com In Canada, www.maytag.ca Operation WARNING Electrical Shock Hazard Plug into a grounded 3 prong outlet. Failure to follow these conditions. Make sure there is power to...
... work longer under these instructions can result in death, fire, or electrical shock. It is normal for the refrigerator to cool completely. In the U.S.A., www.maytag.com In Canada, www.maytag.ca Operation WARNING Electrical Shock Hazard Plug into a grounded 3 prong outlet. Failure to follow these conditions. Make sure there is power to...


