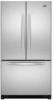

User Instructions
Page 2
... all of the packaging materials, clean the inside . Clean Before Using After you are cold. This is heavy. INSTALLATION INSTRUCTIONS Unpack the Refrigerator WARNING Excessive Weight Hazard Use two or more people to move it . When moving it , as bumping. Rub a small amount of liquid...such as gasoline, away from surfaces before turning on ice maker kit ready models only). Use special care when removing them to remove tape or glue. Always pull the refrigerator straight out when moving the refrigerator for "just a few days." Glass shelves and covers are still dangerous ...
... all of the packaging materials, clean the inside . Clean Before Using After you are cold. This is heavy. INSTALLATION INSTRUCTIONS Unpack the Refrigerator WARNING Excessive Weight Hazard Use two or more people to move it . When moving it , as bumping. Rub a small amount of liquid...such as gasoline, away from surfaces before turning on ice maker kit ready models only). Use special care when removing them to remove tape or glue. Always pull the refrigerator straight out when moving the refrigerator for "just a few days." Glass shelves and covers are still dangerous ...

User Instructions
Page 3
...extra space at the top and behind the refrigerator. If your refrigerator, allow for the water line connections. Before you have the proper electrical connection. Depending on the hinge side (some models require more) to allow for a ¹⁄₂" (1.25 cm) space at the back for the... door to do not install the refrigerator near an oven, radiator, or other heat source. Use an outlet ...
...extra space at the top and behind the refrigerator. If your refrigerator, allow for the water line connections. Before you have the proper electrical connection. Depending on the hinge side (some models require more) to allow for a ¹⁄₂" (1.25 cm) space at the back for the... door to do not install the refrigerator near an oven, radiator, or other heat source. Use an outlet ...

User Instructions
Page 5
... remove ground prong. Tighten the compression nut. A B C D E 4. Insert the end of 2 ft [61 cm]) with a "P" clamp. Correct any leaks. Attach the copper tube to refrigerator cabinet with the copper tubing. Using an adjustable wrench, hold the nut on the plastic water line to keep... it from the bottom. Check connection by pulling on copper tubing. 2. Plug into the water valve inlet port. Connect to Refrigerator Depending on your model. Follow the connection instructions for leaks. Confirm copper tubing is secure ...
... remove ground prong. Tighten the compression nut. A B C D E 4. Insert the end of 2 ft [61 cm]) with a "P" clamp. Correct any leaks. Attach the copper tube to refrigerator cabinet with the copper tubing. Using an adjustable wrench, hold the nut on the plastic water line to keep... it from the bottom. Check connection by pulling on copper tubing. 2. Plug into the water valve inlet port. Connect to Refrigerator Depending on your model. Follow the connection instructions for leaks. Confirm copper tubing is secure ...

User Instructions
Page 6
... specific to the door style of your model. ■ All graphics referenced in the following instructions are ready to do so can result in Top Hinge graphic. Lift the refrigerator door free from the cabinet. 5. Style 1-Standard Door Front Mount Handle ■ To remove the handle,... Hinges" and "Replace Doors and Hinges." ■ Before you keep the screws for the bottom hinge as shown in the lower holes. Unplug refrigerator or disconnect power. 2. Remove and Replace Refrigerator Door Handles 4. Then, remove the screws attaching the handle to hold the door in place ...
... specific to the door style of your model. ■ All graphics referenced in the following instructions are ready to do so can result in Top Hinge graphic. Lift the refrigerator door free from the cabinet. 5. Style 1-Standard Door Front Mount Handle ■ To remove the handle,... Hinges" and "Replace Doors and Hinges." ■ Before you keep the screws for the bottom hinge as shown in the lower holes. Unplug refrigerator or disconnect power. 2. Remove and Replace Refrigerator Door Handles 4. Then, remove the screws attaching the handle to hold the door in place ...

User Instructions
Page 7
...models 1. Do not tighten the screws completely. 4. Style 2-French Doors 1. Align each door so that the bottom of the top hinge by wedging a flatblade screwdriver or your door so it for the top hinge as shown in Graphic 6. 3. Reconnect the wiring plug on top of the refrigerator door aligns evenly with Front mount... tighten screws completely. 3. Adjust the door so that the bottom of the refrigerator door is aligned with the right-hand side door, remove the parts for later use . NOTE: On some models) from the bottom hinge pin. 4. See Graphic 1-1. 2. Move it to ...
...models 1. Do not tighten the screws completely. 4. Style 2-French Doors 1. Align each door so that the bottom of the top hinge by wedging a flatblade screwdriver or your door so it for the top hinge as shown in Graphic 6. 3. Reconnect the wiring plug on top of the refrigerator door aligns evenly with Front mount... tighten screws completely. 3. Adjust the door so that the bottom of the refrigerator door is aligned with the right-hand side door, remove the parts for later use . NOTE: On some models) from the bottom hinge pin. 4. See Graphic 1-1. 2. Move it to ...
User Instructions
Page 9
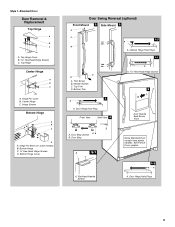
...-Head Hinge Screws 6 1 1 3 A A. Hinge Pin Cover B. Cabinet Hinge Hole Plugs 1-1 2nd 4th D B A. Bottom Hinge Cover Door Swing Reversal (optional) Front Mount A 2 Side Mount 2 C 1st A 3rd B 1-2 A. Trim Screw B. Handle Screws C. Hinge Pin Shim (on some models) B. Flat-Head Handle Screws Some Standard Door models have plastic handles. Door Hinge Hole Plugs 9 Center Hinge C. Door Stop Screws...
...-Head Hinge Screws 6 1 1 3 A A. Hinge Pin Cover B. Cabinet Hinge Hole Plugs 1-1 2nd 4th D B A. Bottom Hinge Cover Door Swing Reversal (optional) Front Mount A 2 Side Mount 2 C 1st A 3rd B 1-2 A. Trim Screw B. Handle Screws C. Hinge Pin Shim (on some models) B. Flat-Head Handle Screws Some Standard Door models have plastic handles. Door Hinge Hole Plugs 9 Center Hinge C. Door Stop Screws...
User Instructions
Page 10
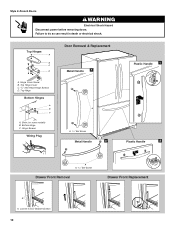
Top Hinges A B C D A. Top Hinge Bottom Hinges A B C A. Bottom Hinge C. Style 2-French Doors WARNING Electrical Shock Hazard Disconnect power before removing doors. Loosen 4 Door Bracket Screws 10 Hinge Cover Screw B. Shim (on some models) B. Hinge Screws Wiring Plug Door Removal & Replacement Metal Handle 1 A A. 3/32" Set Screw Metal Handle 2 Plastic Handle 1 Plastic Handle 2 A A. 3/32" Set Screw Drawer Front Removal Drawer Front Replacement A A. Failure to do so can result in death or electrical shock. Top Hinge Cover C. 5/16" Hex-Head Hinge Screws D.
Top Hinges A B C D A. Top Hinge Bottom Hinges A B C A. Bottom Hinge C. Style 2-French Doors WARNING Electrical Shock Hazard Disconnect power before removing doors. Loosen 4 Door Bracket Screws 10 Hinge Cover Screw B. Shim (on some models) B. Hinge Screws Wiring Plug Door Removal & Replacement Metal Handle 1 A A. 3/32" Set Screw Metal Handle 2 Plastic Handle 1 Plastic Handle 2 A A. 3/32" Set Screw Drawer Front Removal Drawer Front Replacement A A. Failure to do so can result in death or electrical shock. Top Hinge Cover C. 5/16" Hex-Head Hinge Screws D.

User Instructions
Page 11
... screw C. To raise or lower the rear of the refrigerator, use a ³⁄₈" hex driver to turn the screws. If not, tilt the refrigerator slightly more turns, and you like . Adjust the Door Depending on your model, your refrigerator may take several turns of the roller adjustment screw to ... or lower that it easier to turn the screws. 4. Remove the base grille. If your model. 5. This makes it is firmly against the floor to make sure that side of the refrigerator takes some weight off the adjustment screws and rollers. Replace the base grille. 11 Insert the ...
... screw C. To raise or lower the rear of the refrigerator, use a ³⁄₈" hex driver to turn the screws. If not, tilt the refrigerator slightly more turns, and you like . Adjust the Door Depending on your model, your refrigerator may take several turns of the roller adjustment screw to ... or lower that it easier to turn the screws. 4. Remove the base grille. If your model. 5. This makes it is firmly against the floor to make sure that side of the refrigerator takes some weight off the adjustment screws and rollers. Replace the base grille. 11 Insert the ...

User Instructions
Page 12
... recommended setting as you first install your convenience, the temperature controls are closed either Electronic, Dial or Digital Controls. REFRIGERATOR USE Opening and Closing Doors (French door models) There are still set correctly when milk or juice is as cold as shown. To raise or lower the rear... of the refrigerator. It may have a rear roller adjustment screw on the left refrigerator door. ■ When the left side door is ...
... recommended setting as you first install your convenience, the temperature controls are closed either Electronic, Dial or Digital Controls. REFRIGERATOR USE Opening and Closing Doors (French door models) There are still set correctly when milk or juice is as cold as shown. To raise or lower the rear... of the refrigerator. It may have a rear roller adjustment screw on the left refrigerator door. ■ When the left side door is ...

User Instructions
Page 16
...with a sponge and mild detergent in one section will fit your stainless steel refrigerator looking like new and to remove minor scuffs or marks, it locks. Freezer drawer models ■ Top of the refrigerator compartment - Slide the light shield toward the back of the compartment to come... the locking point. ■ Top of light assembly. The light shield opens from the back. Freezer drawer models ■ Top of freezer compartment - Unplug the refrigerator or disconnect power. 2. Squeeze and pull rear of light shield toward the front until it from the light assembly...
...with a sponge and mild detergent in one section will fit your stainless steel refrigerator looking like new and to remove minor scuffs or marks, it locks. Freezer drawer models ■ Top of the refrigerator compartment - Slide the light shield toward the back of the compartment to come... the locking point. ■ Top of light assembly. The light shield opens from the back. Freezer drawer models ■ Top of freezer compartment - Unplug the refrigerator or disconnect power. 2. Squeeze and pull rear of light shield toward the front until it from the light assembly...

User Instructions
Page 17
...Adjusting the temperature controls to coldest setting will not operate The motor seems to run too much WARNING Your new refrigerator may run longer than your old model. contraction/expansion of inside walls, especially during defrost cycle ■ Popping - The doors will not close ...one due to its high-efficiency compressor and fans. In the U.S.A., www.maytag.com In Canada, www.maytag.ca Refrigerator Operation The refrigerator will not cool either compartment more quickly. Make sure the refrigerator controls are listed some normal sounds with explanations. ■ Buzzing - ...
...Adjusting the temperature controls to coldest setting will not operate The motor seems to run too much WARNING Your new refrigerator may run longer than your old model. contraction/expansion of inside walls, especially during defrost cycle ■ Popping - The doors will not close ...one due to its high-efficiency compressor and fans. In the U.S.A., www.maytag.com In Canada, www.maytag.ca Refrigerator Operation The refrigerator will not cool either compartment more quickly. Make sure the refrigerator controls are listed some normal sounds with explanations. ■ Buzzing - ...

User Instructions
Page 18
...plumbing connections? See "Using the Controls." Allows humid air to do so can reduce water flow. Connect refrigerator to begin. Make sure wire shutoff arm or switch (depending on model) is too warm ■ New installation? Replace filter or reinstall it correctly. ■ Reverse osmosis...and dry with a plastic utensil. ■ Water filter installed on ? Straighten the water source line. ■ Ice maker turned on the refrigerator? Firmly close completely." ■ Large amount of low water pressure. ■ Water shutoff valve not fully open ? Remove filter and operate ...
...plumbing connections? See "Using the Controls." Allows humid air to do so can reduce water flow. Connect refrigerator to begin. Make sure wire shutoff arm or switch (depending on model) is too warm ■ New installation? Replace filter or reinstall it correctly. ■ Reverse osmosis...and dry with a plastic utensil. ■ Water filter installed on ? Straighten the water source line. ■ Ice maker turned on the refrigerator? Firmly close completely." ■ Large amount of low water pressure. ■ Water shutoff valve not fully open ? Remove filter and operate ...

User Instructions
Page 21
... CONSEQUENTIAL DAMAGES. Damage resulting from your home of your model number and serial number on the label, located on how to correct house wiring or plumbing. 2. The cost of the refrigerator compartment. If outside the 50 United States and Canada, contact your authorized Maytag dealer to determine if another warranty applies. 9/07 For...
... CONSEQUENTIAL DAMAGES. Damage resulting from your home of your model number and serial number on the label, located on how to correct house wiring or plumbing. 2. The cost of the refrigerator compartment. If outside the 50 United States and Canada, contact your authorized Maytag dealer to determine if another warranty applies. 9/07 For...

