Use and Care Guide
Page 2
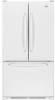
... in severe personal injury or death. If you throw away your old refrigerator, please follow basic precautions, including the following: Important: Child entrapment and suffocation are getting rid of your old refrigerator or freezer: • Take off the doors. • Leave the shelves in... a standard two-prong wall receptacle is equipped with three-prong grounded plug Properly grounded type wall receptacle 1 Junked or abandoned refrigerators are not meant to have it provides the proper use an adapter plug. Important Safety Instructions Installer: Please leave this guide with...
... in severe personal injury or death. If you throw away your old refrigerator, please follow basic precautions, including the following: Important: Child entrapment and suffocation are getting rid of your old refrigerator or freezer: • Take off the doors. • Leave the shelves in... a standard two-prong wall receptacle is equipped with three-prong grounded plug Properly grounded type wall receptacle 1 Junked or abandoned refrigerators are not meant to have it provides the proper use an adapter plug. Important Safety Instructions Installer: Please leave this guide with...
Use and Care Guide
Page 3
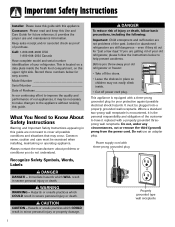
...presence of explosive fumes. 19. Always read and follow manufacturer's storage and ideal environment instructions for water, electrical power and grounding must comply with refrigerator controls. 12. Children should not be made by licensed personnel when required. 15. Do not modify plug on power cord. If plug does... not fit wall receptacle, have refrigerator checked by grasping the plug, not the cord. 1. Do not use a two-prong adapter, extension cord or power strip. 10. Do not...
...presence of explosive fumes. 19. Always read and follow manufacturer's storage and ideal environment instructions for water, electrical power and grounding must comply with refrigerator controls. 12. Children should not be made by licensed personnel when required. 15. Do not modify plug on power cord. If plug does... not fit wall receptacle, have refrigerator checked by grasping the plug, not the cord. 1. Do not use a two-prong adapter, extension cord or power strip. 10. Do not...
Use and Care Guide
Page 4
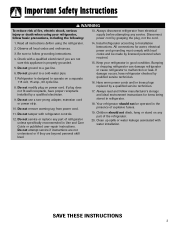
... in the rear) for approximately 30 minutes before leveling. • Some models only have adjustment screws (A). CAUTION To protect property and refrigerator from damage, observe the following: • Protect vinyl or other flooring with cardboard, rugs, or other heat source. Notes: •... door reversal, panel installation and/or a water supply connection before plugging it in immediately may dent or damage outside finish of the refrigerator is completely covered, use power tools when performing leveling procedure. AB BA C C 3. Some clearance may occur at top and 1&#...
... in the rear) for approximately 30 minutes before leveling. • Some models only have adjustment screws (A). CAUTION To protect property and refrigerator from damage, observe the following: • Protect vinyl or other flooring with cardboard, rugs, or other heat source. Notes: •... door reversal, panel installation and/or a water supply connection before plugging it in immediately may dent or damage outside finish of the refrigerator is completely covered, use power tools when performing leveling procedure. AB BA C C 3. Some clearance may occur at top and 1&#...
Use and Care Guide
Page 5
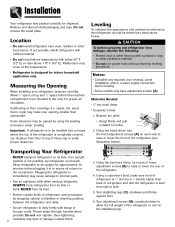
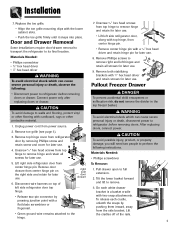
...personal injury or death, observe the following instructions. Remove toe grille (see page 3). 3. Remove top hinge cover from top hinge to refrigerator before removing doors or drawer. After replacing doors, connect power. Materials Needed: • Phillips screwdriver 5. right side door closure To ... entrapment or suffocation risk, do not remove the divider in the top freezer basket. Unplug power cord from the side bracket. with cardboard, rugs or other protective material. 1. Lift right side refrigerator door from center hinge pin on top of the rails. 4 bracket ...
...personal injury or death, observe the following instructions. Remove toe grille (see page 3). 3. Remove top hinge cover from top hinge to refrigerator before removing doors or drawer. After replacing doors, connect power. Materials Needed: • Phillips screwdriver 5. right side door closure To ... entrapment or suffocation risk, do not remove the divider in the top freezer basket. Unplug power cord from the side bracket. with cardboard, rugs or other protective material. 1. Lift right side refrigerator door from center hinge pin on top of the rails. 4 bracket ...
Use and Care Guide
Page 6
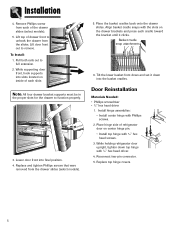
Pull both rails out to remove. Tilt the lower basket front down and set it clicks. While holding refrigerator door upright, tighten down into the basket cradles. Remove Phillips screw from each cradle toward the bracket until it down top hinge with Phillips screws. 2.... bracket supports must be in the proper slots for the drawer to unhook the drawer from the drawer slides (select models). 5. Place hinge side of refrigerator door on center hinge pin. • Install top hinge with the slots on inside of each slide. Installation 4. Lower door front into slots located on...
Pull both rails out to remove. Tilt the lower basket front down and set it clicks. While holding refrigerator door upright, tighten down into the basket cradles. Remove Phillips screw from each cradle toward the bracket until it down top hinge with Phillips screws. 2.... bracket supports must be in the proper slots for the drawer to unhook the drawer from the drawer slides (select models). 5. Place hinge side of refrigerator door on center hinge pin. • Install top hinge with the slots on inside of each slide. Installation 4. Lower door front into slots located on...

Use and Care Guide
Page 7
... are to the back of the fresh food section or attached to be oriented as shown. 2. Ensure the large hole in the interior of your refrigerator. To Remove: 1. Rotate the handle so that the handle is positioned down . Door Stud 6 Grasp the handle firmly and slide down on both ends of...
... are to the back of the fresh food section or attached to be oriented as shown. 2. Ensure the large hole in the interior of your refrigerator. To Remove: 1. Rotate the handle so that the handle is positioned down . Door Stud 6 Grasp the handle firmly and slide down on both ends of...
Use and Care Guide
Page 8
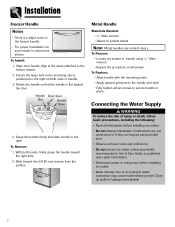
...flat against the door. Slide toward the right side. 2. Metal Handle Materials Needed: • 3⁄32" Allen wrench • Gloves to the freezer drawer. 2. To Replace: • Align handle with the mounting posts. • Apply upward pressure to the handle and hold. • Fully ...Handle Base 4. To Remove: • Loosen set screws in Use & Care Guide or published user-repair instructions. • Disconnect power to refrigerator before installing ice maker. • Do not attempt installation if instructions are not understood or if they are beyond personal skill level. •...
...flat against the door. Slide toward the right side. 2. Metal Handle Materials Needed: • 3⁄32" Allen wrench • Gloves to the freezer drawer. 2. To Replace: • Align handle with the mounting posts. • Apply upward pressure to the handle and hold. • Fully ...Handle Base 4. To Remove: • Loosen set screws in Use & Care Guide or published user-repair instructions. • Disconnect power to refrigerator before installing ice maker. • Do not attempt installation if instructions are not understood or if they are beyond personal skill level. •...

Use and Care Guide
Page 9
...valve (requires a 1⁄4" hole to reach water supply for installation. so B that tubing feeds straight into water supply line before placing refrigerator into final position to its permanent location. 7. Slide brass nut over -tighten. Check for 24 hours. Place brass nut (A) and sleeve... (B) on water supply. Recheck for two to three hours prior to moving the C refrigerator to check and correct any water leaks. Reminder: Do not use plastic tubing. 2' diameter minimum 2. Using second adjustable wrench turn...
...valve (requires a 1⁄4" hole to reach water supply for installation. so B that tubing feeds straight into water supply line before placing refrigerator into final position to its permanent location. 7. Slide brass nut over -tighten. Check for 24 hours. Place brass nut (A) and sleeve... (B) on water supply. Recheck for two to three hours prior to moving the C refrigerator to check and correct any water leaks. Reminder: Do not use plastic tubing. 2' diameter minimum 2. Using second adjustable wrench turn...

Use and Care Guide
Page 10
... seal There is a vertically-hinged section on the left door is out of the way. Installation Opening and Closing Your Fresh Food Doors Your new refrigerator is folded against the edge of the door prior to remove the hinged seal from the fresh food section. WARNING To avoid electrical shock which...
... seal There is a vertically-hinged section on the left door is out of the way. Installation Opening and Closing Your Fresh Food Doors Your new refrigerator is folded against the edge of the door prior to remove the hinged seal from the fresh food section. WARNING To avoid electrical shock which...
Use and Care Guide
Page 11
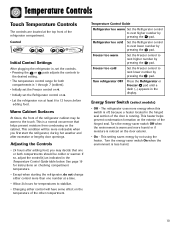
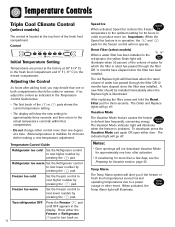
...19 for instructions on checking compartment temperature. • Except when starting the refrigerator, do not change either control more humid or if moisture is less humid. 10 Freezer too warm Set the Freezer control to next lower number by pressing the pad. Energy Saver Switch ... and more than one or both compartments is running. Turn refrigerator OFF Press the Refrigerator or Freezer pad until a dash (-) appears in the Temperature Control Guide table below. Refrigerator too cold Set the Refrigerator control to next higher number by not using the heater. ...
...19 for instructions on checking compartment temperature. • Except when starting the refrigerator, do not change either control more humid or if moisture is less humid. 10 Freezer too warm Set the Freezer control to next lower number by pressing the pad. Energy Saver Switch ... and more than one or both compartments is running. Turn refrigerator OFF Press the Refrigerator or Freezer pad until a dash (-) appears in the Temperature Control Guide table below. Refrigerator too cold Set the Refrigerator control to next higher number by not using the heater. ...
Use and Care Guide
Page 12
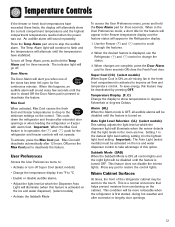
... temperature adjustment. To deactivate, press the Vacation Mode pad again OR open either the Freezer or Refrigerator pad to turn back on. 11 Speed Ice When activated, Speed Ice reduces the freezer temperature to next lower number by pressing the pad. Notes: • Door openings ...through the filter OR 12 months have elapsed since the filter was installed. Turn refrigerator OFF Press the Freezer pad until OFF appears in the freezer compartment. Refrigerator too warm Set the Refrigerator control to the actual temperature currently within that one or both compartments should be...
... temperature adjustment. To deactivate, press the Vacation Mode pad again OR open either the Freezer or Refrigerator pad to turn back on. 11 Speed Ice When activated, Speed Ice reduces the freezer temperature to next lower number by pressing the pad. Notes: • Door openings ...through the filter OR 12 months have elapsed since the filter was installed. Turn refrigerator OFF Press the Freezer pad until OFF appears in the freezer compartment. Refrigerator too warm Set the Refrigerator control to the actual temperature currently within that one or both compartments should be...
Use and Care Guide
Page 13
...Alarm will alert you when one of this happens, an audible alarm will deactivate automatically after extended door openings or when loading the refrigerator or freezer with warm food. This is turned OFF. The indicator light will sound repeatedly. When this option. Important: When the Max ...once to change the status. 3. Max Cool When activated, Max Cool causes the fresh food and freezer temperatures to drop to deactivate the feature. This cools down the refrigerator and freezer after 12 hours, OR press the Max Cool pad to the minimum settings on the cabinet. ...
...Alarm will alert you when one of this happens, an audible alarm will deactivate automatically after extended door openings or when loading the refrigerator or freezer with warm food. This is turned OFF. The indicator light will sound repeatedly. When this option. Important: When the Max ...once to change the status. 3. Max Cool When activated, Max Cool causes the fresh food and freezer temperatures to drop to deactivate the feature. This cools down the refrigerator and freezer after 12 hours, OR press the Max Cool pad to the minimum settings on the cabinet. ...
Use and Care Guide
Page 14
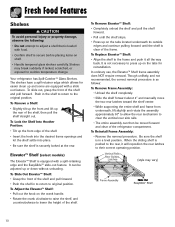
...: • Grasp the front of the shelf and pull forward. • Push the shelf in to return to lower the height of the refrigerator compartment. To Remove a Shelf: • Slightly tilt up the front and lift up the rear of the shelf and pull forward. To Adjust... retainer edge which allows for reinstallation. Be sure the shelf is equipped with a spill-retaining edge and the EasyGlide™ slide-out feature. Your refrigerator has Spill-CatcherTM Glass Shelves. To Replace Elevator™ Shelf: • Align the shelf to the original position. Shelves may vary) Slide Out...
...: • Grasp the front of the shelf and pull forward. • Push the shelf in to return to lower the height of the refrigerator compartment. To Remove a Shelf: • Slightly tilt up the front and lift up the rear of the shelf and pull forward. To Adjust... retainer edge which allows for reinstallation. Be sure the shelf is equipped with a spill-retaining edge and the EasyGlide™ slide-out feature. Your refrigerator has Spill-CatcherTM Glass Shelves. To Replace Elevator™ Shelf: • Align the shelf to the original position. Shelves may vary) Slide Out...
Use and Care Guide
Page 15
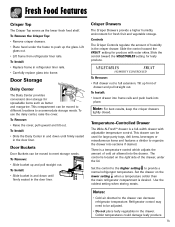
... can be moved to different locations to accommodate storage needs. To Install: • Slide bucket in and down until firmly seated in refrigerator liner rails. • Carefully replace glass into place. Slide the control toward the VEGETABLES setting for spreadable items such as the lower ...the drawer can be adjusted. • Do not place leafy vegetables in the crisper drawer. Lift glass out. • Lift frame from refrigerator liner rails. To use the dairy center, raise the cover. Fresh Food Features Crisper Top The Crisper Top serves as butter and margarine. ...
... can be moved to different locations to accommodate storage needs. To Install: • Slide bucket in and down until firmly seated in refrigerator liner rails. • Carefully replace glass into place. Slide the control toward the VEGETABLES setting for spreadable items such as the lower ...the drawer can be adjusted. • Do not place leafy vegetables in the crisper drawer. Lift glass out. • Lift frame from refrigerator liner rails. To use the dairy center, raise the cover. Fresh Food Features Crisper Top The Crisper Top serves as butter and margarine. ...
Use and Care Guide
Page 16
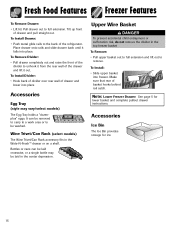
...Egg Tray (style may be washed. To Install: • Slide upper basket into place. Note: Lower Freezer Drawer: See page 5 for ice. 15 Tilt up front of the refrigerator. Place drawer onto rails and slide drawer back until it out. Accessories Ice Bin The Ice Bin provides ...storage for lower basket and complete pullout drawer instructions. Fresh Food Features Freezer Features To Remove Drawer: • Lift lid. To...
...Egg Tray (style may be washed. To Install: • Slide upper basket into place. Note: Lower Freezer Drawer: See page 5 for ice. 15 Tilt up front of the refrigerator. Place drawer onto rails and slide drawer back until it out. Accessories Ice Bin The Ice Bin provides ...storage for lower basket and complete pullout drawer instructions. Fresh Food Features Freezer Features To Remove Drawer: • Lift lid. To...

Use and Care Guide
Page 17
... storage bin periodically and wash it is for quick chilling. To avoid the ice maker dumping ice while the bin is pushed down . • After freezer section reaches between 0° to 2° F (-17° to malfunction. • Turn off . • Certain sounds may be placed in the ice storage bin ... become cloudy, shrink, stick together and taste stale. These items can be shut off by lowering the ice maker arm. Proper water flow and a level refrigerator are ejected it in place and ice maker arm is to make ice until arm is removed, turn the ice maker off for optimal ice...
... storage bin periodically and wash it is for quick chilling. To avoid the ice maker dumping ice while the bin is pushed down . • After freezer section reaches between 0° to 2° F (-17° to malfunction. • Turn off . • Certain sounds may be placed in the ice storage bin ... become cloudy, shrink, stick together and taste stale. These items can be shut off by lowering the ice maker arm. Proper water flow and a level refrigerator are ejected it in place and ice maker arm is to make ice until arm is removed, turn the ice maker off for optimal ice...
Use and Care Guide
Page 18
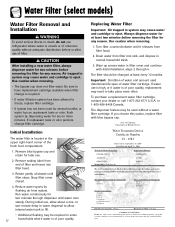
... into filter head. 3. If water use . 2. Water Filter (select models) Water Filter Removal and Installation WARNING To avoid serious illness or death, do not use refrigerator where water is unsafe or of unknown quality without a water filter cartridge. Run water continuously for any reason. Remove sealing label from system. During initial...
... into filter head. 3. If water use . 2. Water Filter (select models) Water Filter Removal and Installation WARNING To avoid serious illness or death, do not use refrigerator where water is unsafe or of unknown quality without a water filter cartridge. Run water continuously for any reason. Remove sealing label from system. During initial...
Use and Care Guide
Page 19
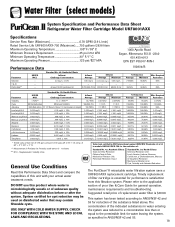
... ± 1 NTU*** Cysts 99.5% Reduction Minimum 50,000/L Asbestos 99% Reduction 107 108 fibers/L; Water Filter (select models) System Specification and Performance Data Sheet TM Refrigerator Water Filter Cartridge Model UKF8001AXX Specifications Service Flow Rate (Maximum 0.78 GPM (2.9 L/min) Rated Service Life UKF8001AXX-750 (Maximum) ......750 gallons /2838 liters Maximum Operating...
... ± 1 NTU*** Cysts 99.5% Reduction Minimum 50,000/L Asbestos 99% Reduction 107 108 fibers/L; Water Filter (select models) System Specification and Performance Data Sheet TM Refrigerator Water Filter Cartridge Model UKF8001AXX Specifications Service Flow Rate (Maximum 0.78 GPM (2.9 L/min) Rated Service Life UKF8001AXX-750 (Maximum) ......750 gallons /2838 liters Maximum Operating...
Use and Care Guide
Page 20
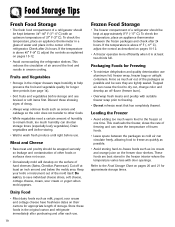
... Freezing • To minimize dehydration and quality deterioration use . 19 Frozen Food Storage • The freezer compartment of a refrigerator should be kept at one time. Loading the Freezer • Avoid adding too much humidity can raise the temperature of frozen foods. • Leave space... and check after 24 hours. Food Storage Tips Fresh Food Storage • The fresh food compartment of a refrigerator should be kept between 34°-40° F (1°-4° C) with suitable freezer wrap prior to freezing. • Do not refreeze meat that has completely thawed.
... Freezing • To minimize dehydration and quality deterioration use . 19 Frozen Food Storage • The freezer compartment of a refrigerator should be kept at one time. Loading the Freezer • Avoid adding too much humidity can raise the temperature of frozen foods. • Leave space... and check after 24 hours. Food Storage Tips Fresh Food Storage • The fresh food compartment of a refrigerator should be kept between 34°-40° F (1°-4° C) with suitable freezer wrap prior to freezing. • Do not refreeze meat that has completely thawed.
Use and Care Guide
Page 21
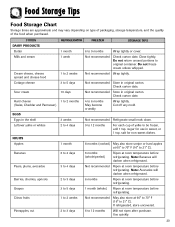
... Store in the shell Leftover yolks or whites FRUITS Apples Bananas Pears, plums, avocados Berries, cherries, apricots Grapes Citrus fruits Pineapples, cut REFRIGERATOR FREEZER STORAGE TIPS 1 month 1 week 1 to 2 weeks 6 to 9 months Wrap tightly or cover. FOODS DAIRY PRODUCTS Butter Milk and ...apples at 60° to 70° F (16° to 21° C). 6 months (whole/peeled) Ripen at room temperature before refrigerating. If refrigerated, store uncovered. 6 to original container. Not recommended Store in sweet, or 1 tsp. Check carton date. 4 to 6 months May become ...
... Store in the shell Leftover yolks or whites FRUITS Apples Bananas Pears, plums, avocados Berries, cherries, apricots Grapes Citrus fruits Pineapples, cut REFRIGERATOR FREEZER STORAGE TIPS 1 month 1 week 1 to 2 weeks 6 to 9 months Wrap tightly or cover. FOODS DAIRY PRODUCTS Butter Milk and ...apples at 60° to 70° F (16° to 21° C). 6 months (whole/peeled) Ripen at room temperature before refrigerating. If refrigerated, store uncovered. 6 to original container. Not recommended Store in sweet, or 1 tsp. Check carton date. 4 to 6 months May become ...


