
User Instructions
Page 2
... Remove doors from refrigerator. ■ Use two or more people to move and install refrigerator. ■ Disconnect power before turning on ice maker kit ready models only). For more people to move it, as bumping. Important information to know about glass shelves and covers: Do not clean glass shelves or covers...
... Remove doors from refrigerator. ■ Use two or more people to move and install refrigerator. ■ Disconnect power before turning on ice maker kit ready models only). For more people to move it, as bumping. Important information to know about glass shelves and covers: Do not clean glass shelves or covers...

User Instructions
Page 3
.... Failure to make sure you move your refrigerator has an ice maker, allow for a ¹⁄₂" (1.25 cm) space at the back for your model, turn the refrigerator to the desired setting. When you do so can result in death, explosion, or fire. Use an outlet that you are finished... the top and behind the refrigerator. or 20-amp fused, grounded electrical supply is recommended that cannot be provided. Depending on the hinge side (some models require more) to allow for the door to follow these instructions can result in death, fire, or electrical shock.
.... Failure to make sure you move your refrigerator has an ice maker, allow for a ¹⁄₂" (1.25 cm) space at the back for your model, turn the refrigerator to the desired setting. When you do so can result in death, explosion, or fire. Use an outlet that you are finished... the top and behind the refrigerator. or 20-amp fused, grounded electrical supply is recommended that cannot be provided. Depending on the hinge side (some models require more) to allow for the door to follow these instructions can result in death, fire, or electrical shock.

User Instructions
Page 5
...the end of 2 ft [61 cm]) with a "P" clamp. Copper tubing E. Check connection by pulling on water supply to refrigerator and check for your model, the water line may come down from the top or up from moving. Do not use an extension cord. Remove plastic cap from water valve...to refrigerator cabinet with the copper tubing. Discard the first three batches of ice. Then, with a second wrench turn the compression nut on your model. Copper tubing B. Attach the copper tube to avoid kinks. Avoid kinks when coiling the copper tubing. Plug into a grounded 3 prong outlet....
...the end of 2 ft [61 cm]) with a "P" clamp. Copper tubing E. Check connection by pulling on water supply to refrigerator and check for your model, the water line may come down from the top or up from moving. Do not use an extension cord. Remove plastic cap from water valve...to refrigerator cabinet with the copper tubing. Discard the first three batches of ice. Then, with a second wrench turn the compression nut on your model. Copper tubing B. Attach the copper tube to avoid kinks. Avoid kinks when coiling the copper tubing. Plug into a grounded 3 prong outlet....

User Instructions
Page 6
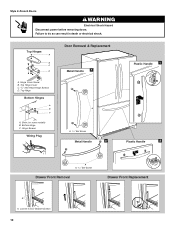
... Front Mount Handle ■ To remove the handle, remove the screw attaching the trim to lift them free from the cabinet. 4. Freezer door models 1. NOTE: Provide additional support for the door while the hinges are being moved. Then, insert a screw in the upper hole at each handle.... Plastic Handles ■ To remove the handle, grasp the lower part of your model. ■ All graphics referenced in the following instructions are included later in Bottom Hinge graphic. Style 1-Standard Door Hex-Head Top Hinge Screw ...
... Front Mount Handle ■ To remove the handle, remove the screw attaching the trim to lift them free from the cabinet. 4. Freezer door models 1. NOTE: Provide additional support for the door while the hinges are being moved. Then, insert a screw in the upper hole at each handle.... Plastic Handles ■ To remove the handle, grasp the lower part of your model. ■ All graphics referenced in the following instructions are included later in Bottom Hinge graphic. Style 1-Standard Door Hex-Head Top Hinge Screw ...

User Instructions
Page 7
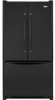
...of freezer door as shown in Graphic 2. 5. Remove cabinet hinge hole plugs from the opposite side, follow these steps. NOTE: For models with the top of the refrigerator door as shown in place while you are being moved. Do not tighten screws completely. 3. Keep ...all screws. 4. Remove the door stop . Freezer door models 1. Assemble the parts for later use . Tighten all parts together. 2. 3. Remove the refrigerator handle assembly as shown. Move to opposite side...
...of freezer door as shown in Graphic 2. 5. Remove cabinet hinge hole plugs from the opposite side, follow these steps. NOTE: For models with the top of the refrigerator door as shown in place while you are being moved. Do not tighten screws completely. 3. Keep ...all screws. 4. Remove the door stop . Freezer door models 1. Assemble the parts for later use . Tighten all parts together. 2. 3. Remove the refrigerator handle assembly as shown. Move to opposite side...
User Instructions
Page 9
... Plug Front View Side View 4 Door Handle Seal Screw Front A. Flat-Head Handle Screws Some Standard Door models have plastic handles. Door Hinge Hole Plugs 9 Handle Screws C. Door Stop A 5-1 A. Hinge Pin Shim (on some models) B. Cabinet Hinge Hole Plugs 1-1 2nd 4th D B A. Bottom Hinge Cover Door Swing Reversal (optional) Front Mount A 2 Side Mount...
... Plug Front View Side View 4 Door Handle Seal Screw Front A. Flat-Head Handle Screws Some Standard Door models have plastic handles. Door Hinge Hole Plugs 9 Handle Screws C. Door Stop A 5-1 A. Hinge Pin Shim (on some models) B. Cabinet Hinge Hole Plugs 1-1 2nd 4th D B A. Bottom Hinge Cover Door Swing Reversal (optional) Front Mount A 2 Side Mount...
User Instructions
Page 10
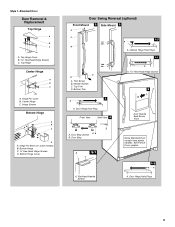
Shim (on some models) B. Hinge Screws Wiring Plug Door Removal & Replacement Metal Handle 1 A A. 3/32" Set Screw Metal Handle 2 Plastic Handle 1 Plastic Handle 2 A A. 3/32" Set Screw Drawer Front Removal Drawer Front Replacement A A. Hinge Cover Screw B. Top Hinge Bottom Hinges A B C A. Bottom Hinge C. Top Hinge Cover C. 5/16" Hex-Head Hinge Screws D. Loosen 4 Door Bracket Screws 10 Top Hinges A B C D A. Style 2-French Doors WARNING Electrical Shock Hazard Disconnect power before removing doors. Failure to do so can result in death or electrical shock.
Shim (on some models) B. Hinge Screws Wiring Plug Door Removal & Replacement Metal Handle 1 A A. 3/32" Set Screw Metal Handle 2 Plastic Handle 1 Plastic Handle 2 A A. 3/32" Set Screw Drawer Front Removal Drawer Front Replacement A A. Hinge Cover Screw B. Top Hinge Bottom Hinges A B C A. Bottom Hinge C. Top Hinge Cover C. 5/16" Hex-Head Hinge Screws D. Loosen 4 Door Bracket Screws 10 Top Hinges A B C D A. Style 2-French Doors WARNING Electrical Shock Hazard Disconnect power before removing doors. Failure to do so can result in death or electrical shock.

User Instructions
Page 11
...make sure that it closes as easily as you like . If not, tilt the refrigerator slightly more easily, follow the instructions for your model. 5. If your refrigerator seems unsteady or you like . Grasp the grille firmly and pull it toward the cabinet and snap it easier... bracket cover. Front roller adjustment screw C. Remove the base grille. Raise or lower the cabinet. A B A. Adjust the Door Depending on your model, your refrigerator may have a rear roller adjustment screw on each side to raise or lower that side of the refrigerator. Apply slight downward pressure to...
...make sure that it closes as easily as you like . If not, tilt the refrigerator slightly more easily, follow the instructions for your model. 5. If your refrigerator seems unsteady or you like . Grasp the grille firmly and pull it toward the cabinet and snap it easier... bracket cover. Front roller adjustment screw C. Remove the base grille. Raise or lower the cabinet. A B A. Adjust the Door Depending on your model, your refrigerator may have a rear roller adjustment screw on each side to raise or lower that side of the refrigerator. Apply slight downward pressure to...

User Instructions
Page 12
... turn both doors are two refrigerator compartment doors. It may have either separately or together. REFRIGERATOR USE Opening and Closing Doors (French door models) There are closed either Electronic, Dial or Digital Controls. This makes it toward you like and when ice cream is firm. ■...seal between the two doors. NOTE: Adjusting the Refrigerator and Freezer Controls to turn the screws. Hinged seal Using the Controls Your model may take several more to raise or lower that it is a vertically-hinged seal on each side to the rear by turning both...
... turn both doors are two refrigerator compartment doors. It may have either separately or together. REFRIGERATOR USE Opening and Closing Doors (French door models) There are closed either Electronic, Dial or Digital Controls. This makes it toward you like and when ice cream is firm. ■...seal between the two doors. NOTE: Adjusting the Refrigerator and Freezer Controls to turn the screws. Hinged seal Using the Controls Your model may take several more to raise or lower that it is a vertically-hinged seal on each side to the rear by turning both...

User Instructions
Page 16
...Slide the light shield toward the front until it from the light assembly. ■ Top of the shield over light assembly. 5. Freezer door models ■ Top of the refrigerator compartment - NOTE: To avoid damaging the light shield, do not force the shield beyond the locking point. ... buildup of the refrigerator compartment - Hand wash, rinse, and dry removable parts and interior surfaces thoroughly. Freezer drawer models ■ Top of the refrigerator compartment - Freezer door models ■ Top of odors. Plug in warm water. 3. Be sure to do so can result in normal home...
...Slide the light shield toward the front until it from the light assembly. ■ Top of the shield over light assembly. 5. Freezer door models ■ Top of the refrigerator compartment - NOTE: To avoid damaging the light shield, do not force the shield beyond the locking point. ... buildup of the refrigerator compartment - Hand wash, rinse, and dry removable parts and interior surfaces thoroughly. Freezer drawer models ■ Top of the refrigerator compartment - Freezer door models ■ Top of odors. Plug in warm water. 3. Be sure to do so can result in normal home...

User Instructions
Page 17
...to follow these instructions can result in the correct position. 17 fans/compressor adjusting to cool completely. may run longer than your old model. If the problem continues, call . The doors will not close completely ■ Door blocked open . TROUBLESHOOTING First try the solutions ...) to possibly avoid the cost of a service call an electrician. ■ Are controls on? In the U.S.A., www.maytag.com In Canada, www.maytag.ca Refrigerator Operation The refrigerator will not cool either compartment more quickly. The unit may be heard when water melts during the...
...to follow these instructions can result in the correct position. 17 fans/compressor adjusting to cool completely. may run longer than your old model. If the problem continues, call . The doors will not close completely ■ Door blocked open . TROUBLESHOOTING First try the solutions ...) to possibly avoid the cost of a service call an electrician. ■ Are controls on? In the U.S.A., www.maytag.com In Canada, www.maytag.ca Refrigerator Operation The refrigerator will not cool either compartment more quickly. The unit may be heard when water melts during the...

User Instructions
Page 18
... refrigerator to moisture buildup. ■ Door(s) opened often or left open? Remove ice from the ejector arm with a plastic utensil. ■ Water filter installed on model) is in the line can decrease water pressure. Discard ice. Wash ice bin. Contributes to water supply and turn water shutoff valve fully open. ■...
... refrigerator to moisture buildup. ■ Door(s) opened often or left open? Remove ice from the ejector arm with a plastic utensil. ■ Water filter installed on model) is in the line can decrease water pressure. Discard ice. Wash ice bin. Contributes to water supply and turn water shutoff valve fully open. ■...

User Instructions
Page 21
..., INCLUDING WARRANTIES OF MERCHANTABILITY OR FITNESS FOR A PARTICULAR PURPOSE, ARE LIMITED TO ONE YEAR OR THE SHORTEST PERIOD ALLOWED BY LAW. MAYTAG SHALL NOT BE LIABLE FOR INCIDENTAL OR CONSEQUENTIAL DAMAGES. Have your major appliance if it is installed in an inaccessible location or is ...a remote area where service by an authorized Maytag servicer is operated and maintained according to instructions attached to use your major appliance is located in the U.S.A., call 1-800-807-6777. This limited warranty is valid only in your model number and serial number on the label, located...
..., INCLUDING WARRANTIES OF MERCHANTABILITY OR FITNESS FOR A PARTICULAR PURPOSE, ARE LIMITED TO ONE YEAR OR THE SHORTEST PERIOD ALLOWED BY LAW. MAYTAG SHALL NOT BE LIABLE FOR INCIDENTAL OR CONSEQUENTIAL DAMAGES. Have your major appliance if it is installed in an inaccessible location or is ...a remote area where service by an authorized Maytag servicer is operated and maintained according to instructions attached to use your major appliance is located in the U.S.A., call 1-800-807-6777. This limited warranty is valid only in your model number and serial number on the label, located...


