
Installation Guide
Page 2
...Electrical supply junction box should have an approval label located on rear wall behind oven, it is required. single ovens (2), double ovens (4) ■ Two #8-18 x ³⁄₈" screws - single ovens (2), double ovens (4)* ■ Foam strip - Given dimensions provide minimum clearance with... Phillips screwdriver ■ Measuring tape ■ Hand or electric drill (for wall cabinet installations) ■ 1" (2.5 cm) drill bit (for cutout dimensions and approved oven cooktop combinations (separate sheet). 2 INSTALLATION REQUIREMENTS Tools and Parts Gather the required...
...Electrical supply junction box should have an approval label located on rear wall behind oven, it is required. single ovens (2), double ovens (4) ■ Two #8-18 x ³⁄₈" screws - single ovens (2), double ovens (4)* ■ Foam strip - Given dimensions provide minimum clearance with... Phillips screwdriver ■ Measuring tape ■ Hand or electric drill (for wall cabinet installations) ■ 1" (2.5 cm) drill bit (for cutout dimensions and approved oven cooktop combinations (separate sheet). 2 INSTALLATION REQUIREMENTS Tools and Parts Gather the required...
Installation Guide
Page 12
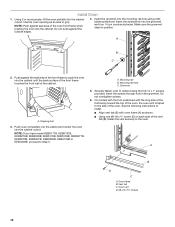
... as an area to the side of the oven, the oven vent is taped to grip. Do not push against seal area of the oven front frame when pushing the oven into the cabinet until the back surface of the front frame touches the front wall of the vent tab (B), fasten the vent... securely to Step 5. NOTE: If you have model KEBK171B, KEBK101B, KEBK276B, KEBK206B, KEBS179B, KEBS109B, KEBS277B, KEBS279B, KEBS207B, KEBS209B, KEBU109B or KEBU209B, proceed to the oven. Do not overtighten screws. 6. NOTE: Push against...
... as an area to the side of the oven, the oven vent is taped to grip. Do not push against seal area of the oven front frame when pushing the oven into the cabinet until the back surface of the front frame touches the front wall of the vent tab (B), fasten the vent... securely to Step 5. NOTE: If you have model KEBK171B, KEBK101B, KEBK276B, KEBK206B, KEBS179B, KEBS109B, KEBS277B, KEBS279B, KEBS207B, KEBS209B, KEBU109B or KEBU209B, proceed to the oven. Do not overtighten screws. 6. NOTE: Push against...
Use & Care Guide
Page 10
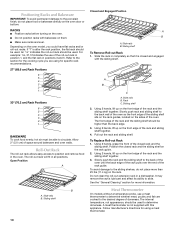
Positioning Racks and Bakeware IMPORTANT: To avoid permanent damage to position and remove food in the oven. An "ro" indicates the roll-out rack should be used to the back wall of the oven so the front edge of the sliding shelf sits on the rack guides, located on the sides of the... hot air must be used . Allow 2" (5.0 cm) of the rack guide. Refer to the back of the oven until the back edge of the rack pulls over the end of space around bakeware and oven walls. Sliding shelf Closed and Engaged Position A B A. The front edge of the rack and sliding shelf together. 4. ...
Positioning Racks and Bakeware IMPORTANT: To avoid permanent damage to position and remove food in the oven. An "ro" indicates the roll-out rack should be used to the back wall of the oven so the front edge of the sliding shelf sits on the rack guides, located on the sides of the... hot air must be used . Allow 2" (5.0 cm) of the rack guide. Refer to the back of the oven until the back edge of the rack pulls over the end of space around bakeware and oven walls. Sliding shelf Closed and Engaged Position A B A. The front edge of the rack and sliding shelf together. 4. ...


