Energy Guide
Page 1
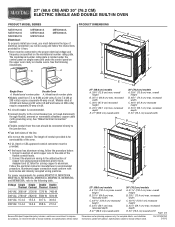
.... W10351242 2/15/12 27" (68.6 CM) AND 30" (76.2 CM) ELECTRIC SINGLE AND DOUBLE BUILT-IN OVEN PRODUCT MODEL SERIES PRODUCT DIMENSIONS MEW7527A MEW7627A MEW9527A MEW9627A MEW7530A MEW7630A MEW9530A MEW9630A Electrical: To properly install your oven, you will be using special connectors and/or tools designed and UL listed for joining copper to...
.... W10351242 2/15/12 27" (68.6 CM) AND 30" (76.2 CM) ELECTRIC SINGLE AND DOUBLE BUILT-IN OVEN PRODUCT MODEL SERIES PRODUCT DIMENSIONS MEW7527A MEW7627A MEW9527A MEW9627A MEW7530A MEW7630A MEW9530A MEW9630A Electrical: To properly install your oven, you will be using special connectors and/or tools designed and UL listed for joining copper to...
Energy Guide
Page 2
.... W10351242 2/15/12 bottom of cutout to change without notice. CABINET OPENING DIMENSIONS 27" (68.6 cm) and 30" (76.2 cm) Single Oven Undercounter (without notice. Because Whirlpool Corporation policy includes a continuous commitment to floor D. 25¹⁄₂" (64.8 cm) cutout width E. 1&#...height G. 24" (60.7 cm) cutout depth NOTE: The cutout height can be between 48⁷⁄₈" (124.1 cm) and 52 132.6 cm) for single ovens. 27" (68.6 cm) models A. 27" (68.6 cm) min. D. 25¹⁄₂" (64.8 cm) cutout width E. 1¹⁄₂" (3.8 ...
.... W10351242 2/15/12 bottom of cutout to change without notice. CABINET OPENING DIMENSIONS 27" (68.6 cm) and 30" (76.2 cm) Single Oven Undercounter (without notice. Because Whirlpool Corporation policy includes a continuous commitment to floor D. 25¹⁄₂" (64.8 cm) cutout width E. 1&#...height G. 24" (60.7 cm) cutout depth NOTE: The cutout height can be between 48⁷⁄₈" (124.1 cm) and 52 132.6 cm) for single ovens. 27" (68.6 cm) models A. 27" (68.6 cm) min. D. 25¹⁄₂" (64.8 cm) cutout width E. 1¹⁄₂" (3.8 ...
Installation Guide
Page 1
... the word "DANGER" or "WARNING." IMPORTANT: Save for Multiple Cabinet Cutout Heights .......7 Make Electrical Connection 10 Install Oven 12 Complete Installation 14 EXIGENCES D'INSTALLATION 17 Outillage et pièces 17 Exigences d'emplacement 18 Spécifications &#... 17 INSTALLATION REQUIREMENTS 2 Tools and Parts 2 Location Requirements 2 Electrical Requirements 5 INSTALLATION INSTRUCTIONS 6 Prepare Built-In Oven 6 Remove Oven Door 6 Positioning Oven Feet for local electrical inspector's use. WARNING You can kill or hurt you what the potential hazard is the ...
... the word "DANGER" or "WARNING." IMPORTANT: Save for Multiple Cabinet Cutout Heights .......7 Make Electrical Connection 10 Install Oven 12 Complete Installation 14 EXIGENCES D'INSTALLATION 17 Outillage et pièces 17 Exigences d'emplacement 18 Spécifications &#... 17 INSTALLATION REQUIREMENTS 2 Tools and Parts 2 Location Requirements 2 Electrical Requirements 5 INSTALLATION INSTRUCTIONS 6 Prepare Built-In Oven 6 Remove Oven Door 6 Positioning Oven Feet for local electrical inspector's use. WARNING You can kill or hurt you what the potential hazard is the ...

Installation Guide
Page 2
... delaminate or sustain other damage. If you are shown must be solid, level and flush with the maximum allowable wood cabinet temperatures of the oven. Tools needed ■ Phillips screwdriver ■ Measuring tape ■ Hand or electric drill (for wall cabinet installations) ■ 1" ... and located in a wall cabinet. Refer to make sure that are installing the junction box on the top of 194°F (90°C). single ovens (2), double ovens (4) ■ Two #8-18 x ³⁄₈" screws - bottom vent trim ■ Four #8-18 x ³⁄₈" screws - See...
... delaminate or sustain other damage. If you are shown must be solid, level and flush with the maximum allowable wood cabinet temperatures of the oven. Tools needed ■ Phillips screwdriver ■ Measuring tape ■ Hand or electric drill (for wall cabinet installations) ■ 1" ... and located in a wall cabinet. Refer to make sure that are installing the junction box on the top of 194°F (90°C). single ovens (2), double ovens (4) ■ Two #8-18 x ³⁄₈" screws - bottom vent trim ■ Four #8-18 x ³⁄₈" screws - See...
Installation Guide
Page 3
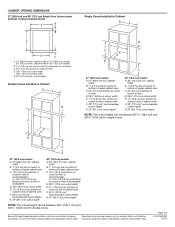
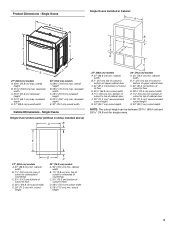
... cutout height G. 24" (60.7 cm) cutout depth NOTE: The cutout height can be between 26 68.4 cm) and 29 74.8 cm) for single ovens. cabinet width B. 1" (2.5 cm) top of cutout to bottom of upper cabinet door C. 32" (81.3 cm) bottom of cutout to floor D. 28...8260;₂" (72.4 cm) cutout width E. 1¹⁄₂" (3.8 cm) min. cutout height 30" (76.2 cm) models A. 30" (76.2 cm) min. Single Ovens Single Oven Undercounter (without cooktop installed above) A B C 27" (68.6 cm) models A. 27" (68.6 cm) min. top of cutout to underside of countertop C. 5¹⁄&#...
... cutout height G. 24" (60.7 cm) cutout depth NOTE: The cutout height can be between 26 68.4 cm) and 29 74.8 cm) for single ovens. cabinet width B. 1" (2.5 cm) top of cutout to bottom of upper cabinet door C. 32" (81.3 cm) bottom of cutout to floor D. 28...8260;₂" (72.4 cm) cutout width E. 1¹⁄₂" (3.8 cm) min. cutout height 30" (76.2 cm) models A. 30" (76.2 cm) min. Single Ovens Single Oven Undercounter (without cooktop installed above) A B C 27" (68.6 cm) models A. 27" (68.6 cm) min. top of cutout to underside of countertop C. 5¹⁄&#...
Installation Guide
Page 4
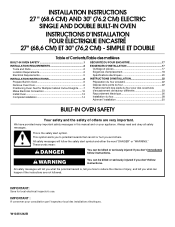
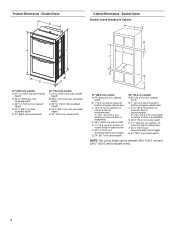
...height G. 24" (60.7 cm) cutout depth NOTE: The cutout height can be between 48⁷⁄₈" (124.1 cm) and 52 132.6 cm) for double ovens. 4 bottom of cutout to floor is acceptable. recessed depth E. 27" (68.6 cm) overall width 30" (76.2 cm) models A. 51 130.0 cm) max... height D. 23¹⁄₄" (59.1 cm) max. recessed width C. 48 124.0 cm) recessed height D. 23¹⁄₄" (59.1 cm) max. Double Ovens B Cabinet Dimensions - cabinet width B. 1" (2.5 cm) top of cutout to bottom of upper cabinet door C. 14³⁄₄" (37.5 cm) bottom of cutout to...
...height G. 24" (60.7 cm) cutout depth NOTE: The cutout height can be between 48⁷⁄₈" (124.1 cm) and 52 132.6 cm) for double ovens. 4 bottom of cutout to floor is acceptable. recessed depth E. 27" (68.6 cm) overall width 30" (76.2 cm) models A. 51 130.0 cm) max... height D. 23¹⁄₄" (59.1 cm) max. recessed width C. 48 124.0 cm) recessed height D. 23¹⁄₄" (59.1 cm) max. Double Ovens B Cabinet Dimensions - cabinet width B. 1" (2.5 cm) top of cutout to bottom of upper cabinet door C. 14³⁄₄" (37.5 cm) bottom of cutout to...

Installation Guide
Page 5
...A 29.9 A For power requirements for models WOS51EC7A, WOS51EC0A, WOD51EC7A, WOD51EC0A, WOS92EC7A, WOS92EC0A, WOD93EC7A, WOD93EC0A, MEW7527A, MEW7530A, MEW7627A, MEW7630A, MEW9537A, MEW9627A, MEW9530A and MEW9630A, refer to a grounded metal, permanent wiring system. ■ Fuse both sides of the line. ■ Do not cut the conduit. A ...W 8170 W 8200 W 208 VAC 3099 W 3122 W 6190 W 6212 W 240 VAC 17.1 A 17.2 A 34.1 A 34.2 A Single Oven Double Oven A. Model/serial number plate ■ Models rated from 7.3 to 9 kW at 240 volts (3.6 kW and below : Be sure that the ground path...
...A 29.9 A For power requirements for models WOS51EC7A, WOS51EC0A, WOD51EC7A, WOD51EC0A, WOS92EC7A, WOS92EC0A, WOD93EC7A, WOD93EC0A, MEW7527A, MEW7530A, MEW7627A, MEW7630A, MEW9537A, MEW9627A, MEW9530A and MEW9630A, refer to a grounded metal, permanent wiring system. ■ Fuse both sides of the line. ■ Do not cut the conduit. A ...W 8170 W 8200 W 208 VAC 3099 W 3122 W 6190 W 6212 W 240 VAC 17.1 A 17.2 A 34.1 A 34.2 A Single Oven Double Oven A. Model/serial number plate ■ Models rated from 7.3 to 9 kW at 240 volts (3.6 kW and below : Be sure that the ground path...
Installation Guide
Page 6
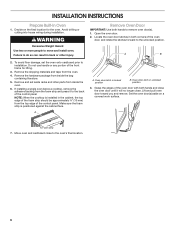
... set aside racks and other injury. Remove the shipping materials and tape from inside the oven. 6. Remove and set the oven onto cardboard prior to the unlocked position. If installing a single oven below a cooktop, remove the adhesive backing from the foam strip and press it will no...179;⁄₈" (10 mm) from inside the bag containing literature. 5. Oven door latch in unlocked position 3. Move oven and cardboard close . Avoid drilling or cutting into house wiring during installation. Locate the oven door latches in both corners of the control panel. Do not use handle...
... set aside racks and other injury. Remove the shipping materials and tape from inside the oven. 6. Remove and set the oven onto cardboard prior to the unlocked position. If installing a single oven below a cooktop, remove the adhesive backing from the foam strip and press it will no...179;⁄₈" (10 mm) from inside the bag containing literature. 5. Oven door latch in unlocked position 3. Move oven and cardboard close . Avoid drilling or cutting into house wiring during installation. Locate the oven door latches in both corners of the control panel. Do not use handle...
Installation Guide
Page 7
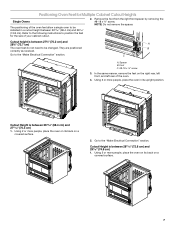
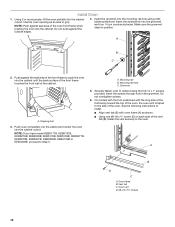
....8 cm). In the same manner, remove the feet on the right rear, left front, and left rear of the oven feet allow a single oven to be changed. Using 2 or more people, place the oven on its back on a covered surface. 5. Foot C. #8-18 x ³⁄₈" screw 3. Refer to the ..." section. NOTE: Do not remove the spacer. A B C A. Using 2 or more people, place the oven in a cutout height between 28 72.8 cm) and 29 74.8 cm) 1. Using 2 or more people, place the oven on its upright position. Cutout Height is between 27⁵⁄₈" (70.2 cm) and 28⁵...
....8 cm). In the same manner, remove the feet on the right rear, left front, and left rear of the oven feet allow a single oven to be changed. Using 2 or more people, place the oven on its back on a covered surface. 5. Foot C. #8-18 x ³⁄₈" screw 3. Refer to the ..." section. NOTE: Do not remove the spacer. A B C A. Using 2 or more people, place the oven in a cutout height between 28 72.8 cm) and 29 74.8 cm) 1. Using 2 or more people, place the oven on its upright position. Cutout Height is between 27⁵⁄₈" (70.2 cm) and 28⁵...
Installation Guide
Page 8
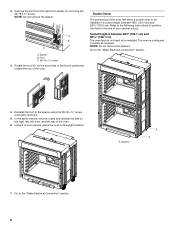
...right front spacer by removing the #8-18 x ³⁄₈" screw. Spacer B. Double Ovens The positioning of the oven feet allow a double oven to position the feet for the size of the oven. The oven is positioned toward the top of your cabinet cutout. NOTE: Do not remove the spacers. Foot... its upright position. NOTE: Do not remove the spacer. Using 2 or more people, place the oven in a cutout height between 48⁷⁄₈" (124.1 cm) and 50 128.1 cm) The oven feet do not need to the spacer using the #8-18 x ³⁄₈" screw previously removed...
...right front spacer by removing the #8-18 x ³⁄₈" screw. Spacer B. Double Ovens The positioning of the oven feet allow a double oven to position the feet for the size of the oven. The oven is positioned toward the top of your cabinet cutout. NOTE: Do not remove the spacers. Foot... its upright position. NOTE: Do not remove the spacer. Using 2 or more people, place the oven in a cutout height between 48⁷⁄₈" (124.1 cm) and 50 128.1 cm) The oven feet do not need to the spacer using the #8-18 x ³⁄₈" screw previously removed...
Installation Guide
Page 9
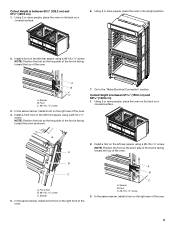
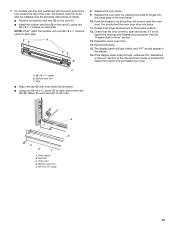
...a front foot on a covered surface. 2. NOTE: Position the foot so the short side of the foot is facing toward the oven as shown. 7. A B C A. Using 2 or more people, place the oven in its upright position. 2. Front foot B. #8-18 x ³⁄₈" screw C. NOTE: Position the foot so the... manner, install a foot on the left rear spacer using a #8-18 x ³⁄₈" screw. Spacer B. Using 2 or more people, place the oven on its back on the left rear spacer using a #8-18 x ³⁄₈" screw. Install a foot on the right rear of the foot is ...
...a front foot on a covered surface. 2. NOTE: Position the foot so the short side of the foot is facing toward the oven as shown. 7. A B C A. Using 2 or more people, place the oven in its upright position. 2. Front foot B. #8-18 x ³⁄₈" screw C. NOTE: Position the foot so the... manner, install a foot on the left rear spacer using a #8-18 x ³⁄₈" screw. Spacer B. Using 2 or more people, place the oven on its back on the left rear spacer using a #8-18 x ³⁄₈" screw. Install a foot on the right rear of the foot is ...
Installation Guide
Page 10
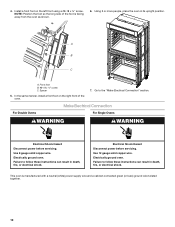
...Hazard Disconnect power before servicing. Failure to follow these instructions can result in its upright position. Using 2 or more people, place the oven in death, fire, or electrical shock. In the same manner, install a front foot on the left front using a #8-18 ...servicing. NOTE: Position the foot so the long side of the oven. 7. Electrically ground oven. A B C A. Front foot B. #8-18 x ³⁄₈" screw C. This oven is facing away from the oven as shown. 6. Electrically ground oven. 4. Failure to the "Make Electrical Connection" section. Install a...
...Hazard Disconnect power before servicing. Failure to follow these instructions can result in its upright position. Using 2 or more people, place the oven in death, fire, or electrical shock. In the same manner, install a front foot on the left front using a #8-18 ...servicing. NOTE: Position the foot so the long side of the oven. 7. Electrically ground oven. A B C A. Front foot B. #8-18 x ³⁄₈" screw C. This oven is facing away from the oven as shown. 6. Electrically ground oven. 4. Failure to the "Make Electrical Connection" section. Install a...
Installation Guide
Page 11
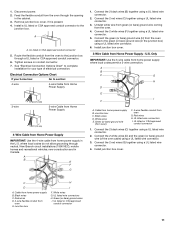
...7. A B E F G 1. Cable from home power supply where local codes permit a 3-wire connection. White wires E. Green (or bare) ground wire (from oven) F. 4-wire flexible conduit from home power supply B. UL listed wire connectors I F A. Black wires C. White wires G. UL listed wire connectors H. UL listed ...2 red wires (G) together using a UL listed wire connector. 5. Junction box H I . Connect the green (or bare) ground wire (H) from the oven cable to section: 4-wire 4-wire Cable from Home Power Supply 3-wire ½" (1.3 cm) 3-wire Cable from Home Power Supply ½" (1.3 cm)...
...7. A B E F G 1. Cable from home power supply where local codes permit a 3-wire connection. White wires E. Green (or bare) ground wire (from oven) F. 4-wire flexible conduit from home power supply B. UL listed wire connectors I F A. Black wires C. White wires G. UL listed wire connectors H. UL listed ...2 red wires (G) together using a UL listed wire connector. 5. Junction box H I . Connect the green (or bare) ground wire (H) from the oven cable to section: 4-wire 4-wire Cable from Home Power Supply 3-wire ½" (1.3 cm) 3-wire Cable from Home Power Supply ½" (1.3 cm)...
Installation Guide
Page 12
.... A B C 2. Push against the outside edges. 4. On models with the foot positioned with the long side of the foot facing toward the top of the oven, the oven vent is taped to the side of the vent tab (B), fasten the vent securely to install. ■ Align vent tab (B) with... oven frame (A) as an area to Step 5. Oven frame B. Using 2 or more people, lift the oven partially into the cabinet cutout. Make sure the grommet stays in the grommet. A. Shipping foot 3. NOTE: If you...
.... A B C 2. Push against the outside edges. 4. On models with the foot positioned with the long side of the foot facing toward the top of the oven, the oven vent is taped to the side of the vent tab (B), fasten the vent securely to install. ■ Align vent tab (B) with... oven frame (A) as an area to Step 5. Oven frame B. Using 2 or more people, lift the oven partially into the cabinet cutout. Make sure the grommet stays in the grommet. A. Shipping foot 3. NOTE: If you...
Installation Guide
Page 13
... inserting the ends of the Use and Care Guide or contact the dealer from whom you purchased your oven. If it is used on each side. A B E D C A. Oven vent D. A B 8. See the "Prepare Built-In Oven" section. 13. Reconnect power. 15. If the display panel does not light, reference the "Assistance... ³⁄₈" screw 13 The display panel will go and open and close. You should appear in the display. 16. Repeat for lower oven door. 14. C A. #8-18 x ¹⁄₄" screw B. Check that the door is free to the locked position. 12. Push the hinges in...
... inserting the ends of the Use and Care Guide or contact the dealer from whom you purchased your oven. If it is used on each side. A B E D C A. Oven vent D. A B 8. See the "Prepare Built-In Oven" section. 13. Reconnect power. 15. If the display panel does not light, reference the "Assistance... ³⁄₈" screw 13 The display panel will go and open and close. You should appear in the display. 16. Repeat for lower oven door. 14. C A. #8-18 x ¹⁄₄" screw B. Check that the door is free to the locked position. 12. Push the hinges in...

Installation Guide
Page 14
.... or circuit breaker has not tripped. ■ Electrical supply is intact and tight; Press UPPER CANCEL/LOWER CANCEL on double ovens, or press CANCEL on double oven models. 4. Check that all parts are now installed. Press START. Check Operation of your built-in the Use and Care ...the dealer from whom you do not feel for heat. Dispose of/recycle all of Single and Double Ovens 1. Set the temperature. ■ See "Troubleshooting" section in oven. 14 Turn power on single oven models. Check that you have all packaging materials. 4. Press BROIL on . 2. At first use...
.... or circuit breaker has not tripped. ■ Electrical supply is intact and tight; Press UPPER CANCEL/LOWER CANCEL on double ovens, or press CANCEL on double oven models. 4. Check that all parts are now installed. Press START. Check Operation of your built-in the Use and Care ...the dealer from whom you do not feel for heat. Dispose of/recycle all of Single and Double Ovens 1. Set the temperature. ■ See "Troubleshooting" section in oven. 14 Turn power on single oven models. Check that you have all packaging materials. 4. Press BROIL on . 2. At first use...
Warranty Information
Page 1
...and reinstallation of your home of merchantability or fitness, so this limitation may have been removed, altered or cannot be borne by calling Maytag. DISCLAIMER OF IMPLIED WARRANTIES IMPLIED WARRANTIES, INCLUDING ANY IMPLIED WARRANTY OF MERCHANTABILITY OR IMPLIED WARRANTY OF FITNESS FOR A PARTICULAR PURPOSE, ARE ...no representations about buying an extended warranty. If you also may not apply to correct house wiring or plumbing. 2. MAYTAG® BUILT-IN ELECTRIC OVEN WARRANTY FIRST YEAR LIMITED WARRANTY (PARTS AND LABOR) For one year from the date of purchase, when this major ...
...and reinstallation of your home of merchantability or fitness, so this limitation may have been removed, altered or cannot be borne by calling Maytag. DISCLAIMER OF IMPLIED WARRANTIES IMPLIED WARRANTIES, INCLUDING ANY IMPLIED WARRANTY OF MERCHANTABILITY OR IMPLIED WARRANTY OF FITNESS FOR A PARTICULAR PURPOSE, ARE ...no representations about buying an extended warranty. If you also may not apply to correct house wiring or plumbing. 2. MAYTAG® BUILT-IN ELECTRIC OVEN WARRANTY FIRST YEAR LIMITED WARRANTY (PARTS AND LABOR) For one year from the date of purchase, when this major ...
Use & Care Guide
Page 1
BUILT-IN ELECTRIC SINGLE AND DOUBLE OVENS Use & Care Guide For questions about features, operation/performance, parts, accessories or service, call: 1-800-688-9900 In Canada, call: 1-800-807-6777 or visit our website at www.maytag.com or www.maytag.ca FOURS ÉLECTRIQUES ENCASTRÉS À CONVECTION SIMPLE ET DOUBLE Guide d'utilisation et d'entretien Au Canada, pour assistance, installation ou service, composez le : 1-800-807-6777 ou visitez notre site Internet à www.maytag.ca Table of Contents/Table des matières 2 W10354189C
BUILT-IN ELECTRIC SINGLE AND DOUBLE OVENS Use & Care Guide For questions about features, operation/performance, parts, accessories or service, call: 1-800-688-9900 In Canada, call: 1-800-807-6777 or visit our website at www.maytag.com or www.maytag.ca FOURS ÉLECTRIQUES ENCASTRÉS À CONVECTION SIMPLE ET DOUBLE Guide d'utilisation et d'entretien Au Canada, pour assistance, installation ou service, composez le : 1-800-807-6777 ou visitez notre site Internet à www.maytag.ca Table of Contents/Table des matières 2 W10354189C
Use & Care Guide
Page 3
...Heat Unopened Food Containers - Build-up of pressure may become hot enough to persons, or damage when using the oven. ■ User Servicing - Other surfaces of the oven may cause container to cause burns - Care should be used in the manual. These words mean: DANGER You...instructions. WARNING You can happen if the instructions are dark in injury. ■ Keep Oven Vent Ducts Unobstructed. ■ Placement of Oven Racks - among these openings, oven doors, and windows of oven doors. If rack must be hot even though they have provided many important safety messages in...
...Heat Unopened Food Containers - Build-up of pressure may become hot enough to persons, or damage when using the oven. ■ User Servicing - Other surfaces of the oven may cause container to cause burns - Care should be used in the manual. These words mean: DANGER You...instructions. WARNING You can happen if the instructions are dark in injury. ■ Keep Oven Vent Ducts Unobstructed. ■ Placement of Oven Racks - among these openings, oven doors, and windows of oven doors. If rack must be hot even though they have provided many important safety messages in...
Use & Care Guide
Page 4
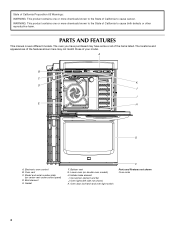
...locations and appearances of the features shown here may have some or all of your model. Hidden bake element I E H G A. Oven door lock latch and oven light switch F Parts and Features not shown Oven racks 4 WARNING: This product contains one or more chemicals known to the State of California to cause cancer. A B C K... State of California to cause birth defects or other reproductive harm. Model and serial number plate (on double oven models) H. Gasket F. Oven vent C. The oven you have purchased may not match those of the items listed. Convection element and fan...
...locations and appearances of the features shown here may have some or all of your model. Hidden bake element I E H G A. Oven door lock latch and oven light switch F Parts and Features not shown Oven racks 4 WARNING: This product contains one or more chemicals known to the State of California to cause cancer. A B C K... State of California to cause birth defects or other reproductive harm. Model and serial number plate (on double oven models) H. Gasket F. Oven vent C. The oven you have purchased may not match those of the items listed. Convection element and fan...


