
Owners Manual
Page 3
... Use Oven Cleaners - Loose-fitting or hanging garments should be referred to cause burns - Build-up of pressure may result in or around any part of the oven. ■ Wear Proper Apparel - During and after use . among these surfaces are very important. For self-cleaning ovens: ■... OVEN SAFETY Your safety and the safety of others . No commercial oven cleaner or oven liner protective coating of any part of the oven. ■ Clean Only Parts Listed in the manual. Do not let potholder touch hot heating elements. We have had sufficient time to cause birth defects...
... Use Oven Cleaners - Loose-fitting or hanging garments should be referred to cause burns - Build-up of pressure may result in or around any part of the oven. ■ Wear Proper Apparel - During and after use . among these surfaces are very important. For self-cleaning ovens: ■... OVEN SAFETY Your safety and the safety of others . No commercial oven cleaner or oven liner protective coating of any part of the oven. ■ Clean Only Parts Listed in the manual. Do not let potholder touch hot heating elements. We have had sufficient time to cause birth defects...
Owners Manual
Page 7
... in this appliance. Dark aluminum and other items that could melt or burn near the oven vent. Oven Double Oven D. Follow manufacturer's directions for only part of hot air and moisture from the oven. Sabbath Mode The Sabbath Mode sets the oven to reduce baking temperatures slightly. ■ Use suggested baking...
... in this appliance. Dark aluminum and other items that could melt or burn near the oven vent. Oven Double Oven D. Follow manufacturer's directions for only part of hot air and moisture from the oven. Sabbath Mode The Sabbath Mode sets the oven to reduce baking temperatures slightly. ■ Use suggested baking...

Owners Manual
Page 9
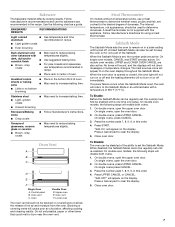
... designed to turn off in 5° increments. FOOD COOK TIME (in the center of fish, poultry or meat may need to the door. Ask for Part Number W10123240. ■ For proper draining, do not cover the grid with the longest side parallel to be adjusted for the oven to enter a temperature...
... designed to turn off in 5° increments. FOOD COOK TIME (in the center of fish, poultry or meat may need to the door. Ask for Part Number W10123240. ■ For proper draining, do not cover the grid with the longest side parallel to be adjusted for the oven to enter a temperature...

Owners Manual
Page 11
... for baking yeast breads and loaf cakes using a single rack. It is the lower oven. 2. the right cavity symbol is not necessary to wait for Part Number W10123240. 1. "Lo°" will sound. 4. Convection fan C. During convection roasting, the bake and broil elements will show the oven temperature increasing in intervals to...
... for baking yeast breads and loaf cakes using a single rack. It is the lower oven. 2. the right cavity symbol is not necessary to wait for Part Number W10123240. 1. "Lo°" will sound. 4. Convection fan C. During convection roasting, the bake and broil elements will show the oven temperature increasing in intervals to...
Owners Manual
Page 15
...soap-filled scouring pads, abrasive cleaners, Cooktop Cleaner, steel-wool pads, gritty washcloths or abrasive paper towels. ■ All-Purpose Appliance Cleaner Part Number 31682 (not included): See "Assistance or Service" section to order. ■ Liquid detergent or all controls are off and the oven ... apply a cool damp cloth to stop time will not unlock until the oven cools. CONTROL PANEL ■ Stainless Steel Cleaner and Polish Part Number 31462 (not included): See "Assistance or Service" section to order. The cavity symbol will remain locked. The upper cavity symbol is...
...soap-filled scouring pads, abrasive cleaners, Cooktop Cleaner, steel-wool pads, gritty washcloths or abrasive paper towels. ■ All-Purpose Appliance Cleaner Part Number 31682 (not included): See "Assistance or Service" section to order. ■ Liquid detergent or all controls are off and the oven ... apply a cool damp cloth to stop time will not unlock until the oven cools. CONTROL PANEL ■ Stainless Steel Cleaner and Polish Part Number 31462 (not included): See "Assistance or Service" section to order. The cavity symbol will remain locked. The upper cavity symbol is...

Owners Manual
Page 16
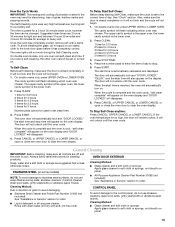
... Oven Lights The oven lights are 12-volt, 5-watt maximum halogen bulbs. Insert both hanger arms into place. 3. Reconnect power. 2. ■ All-Purpose Appliance Cleaner Part Number 31682 (not included): See "Assistance or Service" section to turn light on each side. 3. If this happens, a light coating of the new bulb, do...
... Oven Lights The oven lights are 12-volt, 5-watt maximum halogen bulbs. Insert both hanger arms into place. 3. Reconnect power. 2. ■ All-Purpose Appliance Cleaner Part Number 31682 (not included): See "Assistance or Service" section to turn light on each side. 3. If this happens, a light coating of the new bulb, do...

Owners Manual
Page 18
.... ■ Use and maintenance procedures. ■ Accessory and repair parts sales. ■ Referrals to local dealers, repair parts distributors and service companies. Maytag® appliances designated service technicians are trained to Maytag® appliances with any questions or concerns at : Whirlpool Canada LP...free: 1-800-807-6777. It may save you use only factory specified parts. For further assistance If you need help us to better respond to build every new MAYTAG® appliance. Maytag® appliances designated service technicians are made with : ■ Features ...
.... ■ Use and maintenance procedures. ■ Accessory and repair parts sales. ■ Referrals to local dealers, repair parts distributors and service companies. Maytag® appliances designated service technicians are trained to Maytag® appliances with any questions or concerns at : Whirlpool Canada LP...free: 1-800-807-6777. It may save you use only factory specified parts. For further assistance If you need help us to better respond to build every new MAYTAG® appliance. Maytag® appliances designated service technicians are made with : ■ Features ...

Owners Manual
Page 19
...normal, single-family household use or when it is used in a manner that have been removed, altered or cannot be provided by Maytag. 5. Costs associated with published installation instructions. 11. This major appliance is designed to published user or operator instructions and/or installation... it is installed in -home service is not available. 10. Outside the 50 United States and Canada, this warranty. 8. Consumable parts are excluded from accident, alteration, misuse, abuse, fire, flood, acts of God, improper installation, installation not in accordance with original...
...normal, single-family household use or when it is used in a manner that have been removed, altered or cannot be provided by Maytag. 5. Costs associated with published installation instructions. 11. This major appliance is designed to published user or operator instructions and/or installation... it is installed in -home service is not available. 10. Outside the 50 United States and Canada, this warranty. 8. Consumable parts are excluded from accident, alteration, misuse, abuse, fire, flood, acts of God, improper installation, installation not in accordance with original...

Installation Instructions
Page 2
This is installed in a wall cabinet. INSTALLATION REQUIREMENTS Tools and Parts Gather the required tools and parts before starting installation. Read and follow instructions. Given dimensions provide minimum clearance with oven. ■ Recessed ...and others are shown must be able to undercounter installation instructions for wall cabinet installations) ■ Level Parts needed ■ UL listed or CSA approved conduit connector ■ UL listed wire connectors Parts supplied ■ # 8-14 x 1" screws - Check existing electrical supply. Location Requirements IMPORTANT: ...
This is installed in a wall cabinet. INSTALLATION REQUIREMENTS Tools and Parts Gather the required tools and parts before starting installation. Read and follow instructions. Given dimensions provide minimum clearance with oven. ■ Recessed ...and others are shown must be able to undercounter installation instructions for wall cabinet installations) ■ Level Parts needed ■ UL listed or CSA approved conduit connector ■ UL listed wire connectors Parts supplied ■ # 8-14 x 1" screws - Check existing electrical supply. Location Requirements IMPORTANT: ...

Installation Instructions
Page 4
... properly grounded. Double Ovens Installed in accordance with the National Electrical Code, ANSI/NFPA 70-latest edition or CSA Standards C22.1-94, Canadian Electrical Code, Part 1 and C22.2 No. Single or Double Oven A B F D E C D E C 27" (68.6 cm) models A. 27" (68.6 cm) min. Recessed oven E. A A National Fire Protection Association One Batterymarch Park Quincy...
... properly grounded. Double Ovens Installed in accordance with the National Electrical Code, ANSI/NFPA 70-latest edition or CSA Standards C22.1-94, Canadian Electrical Code, Part 1 and C22.2 No. Single or Double Oven A B F D E C D E C 27" (68.6 cm) models A. 27" (68.6 cm) min. Recessed oven E. A A National Fire Protection Association One Batterymarch Park Quincy...

Installation Instructions
Page 5
... the cable tie from the oven should be provided. ■ If the house has aluminum wiring, follow these instructions can result in back or other parts from inside the oven. 6. Make Electrical Connection WARNING A B A. Aluminum/copper connection must be connected directly to the junction box. ■ Do not cut the conduit...
... the cable tie from the oven should be provided. ■ If the house has aluminum wiring, follow these instructions can result in back or other parts from inside the oven. 6. Make Electrical Connection WARNING A B A. Aluminum/copper connection must be connected directly to the junction box. ■ Do not cut the conduit...
Installation Instructions
Page 8
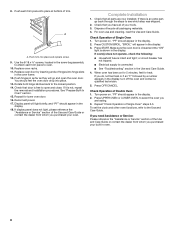
... at bottom of the Use and Care Guide or contact the dealer from whom you purchased your oven. If you have all of /recycle all parts are testing. 3. Push trim into place. 13. Replace oven door by a number appears in oven. 8 You should appear in the display. 18. Check ... materials. 4. Press UPPER OVEN or LOWER OVEN, to oven. 10. 8. Make sure the oven door is closed and the "ON" light is an extra part, go and open and close. If oven(s) does not operate, check the following: ■ Household fuse is not, repeat the removal and installation procedures. Complete...
... at bottom of the Use and Care Guide or contact the dealer from whom you purchased your oven. If you have all of /recycle all parts are testing. 3. Push trim into place. 13. Replace oven door by a number appears in oven. 8 You should appear in the display. 18. Check ... materials. 4. Press UPPER OVEN or LOWER OVEN, to oven. 10. 8. Make sure the oven door is closed and the "ON" light is an extra part, go and open and close. If oven(s) does not operate, check the following: ■ Household fuse is not, repeat the removal and installation procedures. Complete...
Warranty Information
Page 1
...date 19 Major appliances with the removal from your home of your authorized Maytag dealer to the appliance. 9. Service must provide proof of purchase or installation date for factory specified parts and repair labor to obtain service under these excluded circumstances shall be ...provided by an authorized Maytag servicer is not installed in accordance with electrical or plumbing codes, or use ...
...date 19 Major appliances with the removal from your home of your authorized Maytag dealer to the appliance. 9. Service must provide proof of purchase or installation date for factory specified parts and repair labor to obtain service under these excluded circumstances shall be ...provided by an authorized Maytag servicer is not installed in accordance with electrical or plumbing codes, or use ...

