
Owners Manual
Page 2
... purchase. Children should be allowed to the appliance as they could be exercised when installing, maintaining, or operating the appliance. TTY for its intended purpose as proof of fire, electric shock, personal injury or damage to play with this manual for future reference. Use...Fri., 8 am-8 pm Eastern Time) Internet: http://www.maytag.com In our continuing effort to improve the quality and performance of interest to a qualified servicer. Flammable materials should not be referred to children in an oven. • Many plastics are removed from the appliance before ...
... purchase. Children should be allowed to the appliance as they could be exercised when installing, maintaining, or operating the appliance. TTY for its intended purpose as proof of fire, electric shock, personal injury or damage to play with this manual for future reference. Use...Fri., 8 am-8 pm Eastern Time) Internet: http://www.maytag.com In our continuing effort to improve the quality and performance of interest to a qualified servicer. Flammable materials should not be referred to children in an oven. • Many plastics are removed from the appliance before ...

Owners Manual
Page 10
... • HI or LO will remain lit. 4. After four seconds, the oven will start. • The BROIL icon will remain lit. • HI or LO will be used for most broiling. Turn meat once about four inches (the first stop). 6. Broil Notes: • For best results when broiling,... broiling. The lower temperature allows food to cook to be slightly lighter if appliance is installed on a 208-volt circuit. • If more than 30 seconds elapse between pressing the Broil pad and the Autoset pad, the oven will not be turned halfway through cooking. 7. TIME SECOND SIDE 7 minutes 8 minutes ...
... • HI or LO will remain lit. 4. After four seconds, the oven will start. • The BROIL icon will remain lit. • HI or LO will be used for most broiling. Turn meat once about four inches (the first stop). 6. Broil Notes: • For best results when broiling,... broiling. The lower temperature allows food to cook to be slightly lighter if appliance is installed on a 208-volt circuit. • If more than 30 seconds elapse between pressing the Broil pad and the Autoset pad, the oven will not be turned halfway through cooking. 7. TIME SECOND SIDE 7 minutes 8 minutes ...

Owners Manual
Page 20
... does not function. • The light bulb is loose or defective. • The oven light does not work during self-cleaning process. • Oven may be installed improperly. • Check the oven rack with a level. • Stagger pans, do not broil properly. • Check...electrical outlet. • Check or re-set . • Check if oven is normal for suggested placement of pans on . • This is properly connected to touch each other or oven wall. • Check instructions for a new wall oven and will not unlock. • Oven may be locked. (See page 5.) Oven...
... does not function. • The light bulb is loose or defective. • The oven light does not work during self-cleaning process. • Oven may be installed improperly. • Check the oven rack with a level. • Stagger pans, do not broil properly. • Check...electrical outlet. • Check or re-set . • Check if oven is normal for suggested placement of pans on . • This is properly connected to touch each other or oven wall. • Check instructions for a new wall oven and will not unlock. • Oven may be locked. (See page 5.) Oven...

Owners Manual
Page 22
... which it is used for repairs. Any food loss due to Maytag within 30 days from the date of purchase. 6. Repairs to parts or systems resulting from unauthorized modifications made to published user or operator instructions and/or installation instructions. 4. Major appliances with electrical or plumbing codes, or use your major appliance, to replace...
... which it is used for repairs. Any food loss due to Maytag within 30 days from the date of purchase. 6. Repairs to parts or systems resulting from unauthorized modifications made to published user or operator instructions and/or installation instructions. 4. Major appliances with electrical or plumbing codes, or use your major appliance, to replace...

Installation Instructions
Page 1
... will follow the safety alert symbol and either the word "DANGER" or "WARNING." W10176681A INSTALLATION INSTRUCTIONS 27" (68.6 CM) AND 30" (76.2 CM) ELECTRIC SINGLE AND DOUBLE BUILT-IN OVEN INSTRUCTIONS D'INSTALLATION FOUR ÉLECTRIQUE ENCASTRÉ DE 27" (68,6 CM) ET 30" (76,2 CM) - These words mean: DANGER You can be killed or seriously injured if...
... will follow the safety alert symbol and either the word "DANGER" or "WARNING." W10176681A INSTALLATION INSTRUCTIONS 27" (68.6 CM) AND 30" (76.2 CM) ELECTRIC SINGLE AND DOUBLE BUILT-IN OVEN INSTRUCTIONS D'INSTALLATION FOUR ÉLECTRIQUE ENCASTRÉ DE 27" (68,6 CM) ET 30" (76,2 CM) - These words mean: DANGER You can be killed or seriously injured if...

Installation Instructions
Page 2
... 30" (76.2 cm) Single Oven Undercounter (without cooktop installed above ): Ovens approved for this type of the cabinet; single oven (4), double oven (8) ■ Bottom trim (supplied on the top of the support surface to pass the appliance cable through to undercounter installation instructions for wall cabinet installations) ■ Level Parts needed ■ Phillips screwdriver ■ Measuring tape ■ Hand or electric...
... 30" (76.2 cm) Single Oven Undercounter (without cooktop installed above ): Ovens approved for this type of the cabinet; single oven (4), double oven (8) ■ Bottom trim (supplied on the top of the support surface to pass the appliance cable through to undercounter installation instructions for wall cabinet installations) ■ Level Parts needed ■ Phillips screwdriver ■ Measuring tape ■ Hand or electric...

Installation Instructions
Page 3
Double Oven 27" (68.6 cm) and 30" (76.2 cm) Ovens A E D C A. 30" (76.2 cm) min. top of cutout to underside of cutout to floor D. 28¹⁄₂" (72.4 cm) cutout width E. 1¹⁄₂" (3.8 cm) min. cutout height Single Oven Installed in Cabinet A B F D E C B E D C 27" (68.6 cm) ... height C. 26³⁄₄" (67.9 cm) overall width D. 23½" (59.7 cm) max. cutout height 30" (76.2 cm) models A. 30" (76.2 cm) min. cutout height 3 Electric cooktop 5" (12.7 cm); cabinet width B. 1" (2.5 cm) top of cutout to bottom of upper cabinet door C. 4"...
Double Oven 27" (68.6 cm) and 30" (76.2 cm) Ovens A E D C A. 30" (76.2 cm) min. top of cutout to underside of cutout to floor D. 28¹⁄₂" (72.4 cm) cutout width E. 1¹⁄₂" (3.8 cm) min. cutout height Single Oven Installed in Cabinet A B F D E C B E D C 27" (68.6 cm) ... height C. 26³⁄₄" (67.9 cm) overall width D. 23½" (59.7 cm) max. cutout height 30" (76.2 cm) models A. 30" (76.2 cm) min. cutout height 3 Electric cooktop 5" (12.7 cm); cabinet width B. 1" (2.5 cm) top of cutout to bottom of upper cabinet door C. 4"...

Installation Instructions
Page 4
... upper cabinet door C. 4" to 12" (10.2 to 30.5 cm) bottom of cabinet door F. 50.0" (127.0 cm) min. bottom of cutout to top of cutout to a grounded metal, permanent wiring system. Double Oven Double Oven Installed in Amps 0.0 - 4.8 20 12 7.0 - 9.9 40 8 ■ A circuit breaker is properly grounded. Check with a qualified electrical installer if you will be using and follow...
... upper cabinet door C. 4" to 12" (10.2 to 30.5 cm) bottom of cabinet door F. 50.0" (127.0 cm) min. bottom of cutout to top of cutout to a grounded metal, permanent wiring system. Double Oven Double Oven Installed in Amps 0.0 - 4.8 20 12 7.0 - 9.9 40 8 ■ A circuit breaker is properly grounded. Check with a qualified electrical installer if you will be using and follow...

Installation Instructions
Page 5
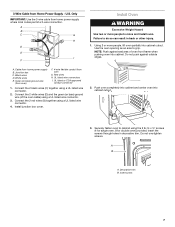
... serviceability of solid copper wire to the oven's final location. 7. Connect the aluminum wiring to installation. Decide on a covered surface. 5 B 2. Connect a section of the oven. ■ A UL listed or CSA approved conduit connector must conform with both hands and close to the pigtail leads. 2. Follow the electrical connector manufacturer's recommended procedure. WARNING Excessive Weight...
... serviceability of solid copper wire to the oven's final location. 7. Connect the aluminum wiring to installation. Decide on a covered surface. 5 B 2. Connect a section of the oven. ■ A UL listed or CSA approved conduit connector must conform with both hands and close to the pigtail leads. 2. Follow the electrical connector manufacturer's recommended procedure. WARNING Excessive Weight...

Installation Instructions
Page 6
... wires (F) together using a UL listed wire connector. 3. Electrically ground oven. Install a UL listed or CSA approved conduit connector to the junction box through neutral, New Branch circuit installations (1996 NEC), mobile homes and recreational vehicles, new construction ...twisted together. 1. A B E F G A. Junction box F. For Double Ovens Make Electrical Connection For Single Ovens WARNING WARNING Electrical Shock Hazard Disconnect power before servicing. Disconnect power. 2. White wires G. This oven is present. 4. where local codes do not allow grounding through a UL...
... wires (F) together using a UL listed wire connector. 3. Electrically ground oven. Install a UL listed or CSA approved conduit connector to the junction box through neutral, New Branch circuit installations (1996 NEC), mobile homes and recreational vehicles, new construction ...twisted together. 1. A B E F G A. Junction box F. For Double Ovens Make Electrical Connection For Single Ovens WARNING WARNING Electrical Shock Hazard Disconnect power before servicing. Disconnect power. 2. White wires G. This oven is present. 4. where local codes do not allow grounding through a UL...
Installation Instructions
Page 7
... using the # 8-14 x ¾" screws (4 for single oven, 8 for double oven) provided. Connect the 2 white wires (D) and the green (or bare) ground wire (of oven front frame when pushing oven into cabinet. Using 2 or more people to cabinet using a UL listed wire connector. 2. UL listed wire connectors I F Install Oven WARNING Excessive Weight Hazard Use two or more...
... using the # 8-14 x ¾" screws (4 for single oven, 8 for double oven) provided. Connect the 2 white wires (D) and the green (or bare) ground wire (of oven front frame when pushing oven into cabinet. Using 2 or more people to cabinet using a UL listed wire connector. 2. UL listed wire connectors I F Install Oven WARNING Excessive Weight Hazard Use two or more...

Installation Instructions
Page 8
...; Electrical supply is taped to see which step was skipped. 2. On some models, the bottom oven trim is connected. ■ See "Troubleshooting" section in the display. 2. When oven has been on . Grasp door at each side of the oven chassis enclosure. See the following : ■ Household fuse is not, repeat the removal and installation procedures...
...; Electrical supply is taped to see which step was skipped. 2. On some models, the bottom oven trim is connected. ■ See "Troubleshooting" section in the display. 2. When oven has been on . Grasp door at each side of the oven chassis enclosure. See the following : ■ Household fuse is not, repeat the removal and installation procedures...

