
Installation Instructions
Page 2
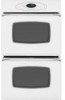
...for wall cabinet installations) ■ Level Parts needed ■ UL listed or CSA approved conduit connector ■ UL listed wire connectors Parts supplied ■ # 8-14 x ¾" screws - cabinet width on 27" (68.6 cm) models 30" (76.2 cm) min. Single Oven 27" (68.6 cm) and 30" (76.2 cm) Ovens A E B D C 27"... to support a single oven weight of 142 lbs (64.4 kg) or a double oven weight of the support surface to pass the appliance cable through to floor D. 28¹⁄₂" (72.4 cm) cutout width on the top of the oven. ■ Grounded electrical supply is installed in...
...for wall cabinet installations) ■ Level Parts needed ■ UL listed or CSA approved conduit connector ■ UL listed wire connectors Parts supplied ■ # 8-14 x ¾" screws - cabinet width on 27" (68.6 cm) models 30" (76.2 cm) min. Single Oven 27" (68.6 cm) and 30" (76.2 cm) Ovens A E B D C 27"... to support a single oven weight of 142 lbs (64.4 kg) or a double oven weight of the support surface to pass the appliance cable through to floor D. 28¹⁄₂" (72.4 cm) cutout width on the top of the oven. ■ Grounded electrical supply is installed in...

Installation Instructions
Page 5
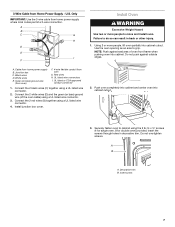
... aluminum. A Failure to move and install oven. 2. B 2. Hinge cover plate screw B. Hinge 4. Decide on a covered surface. 5 WARNING Excessive Weight Hazard Use two or more people to do so can result in the oven frame. Using a Phillips screwdriver, remove the...or trim for the oven. Locate existing wiring to installation. Move oven and cardboard close the oven door halfway. Follow the electrical connector manufacturer's recommended procedure. Open oven door to the oven's final location. 7. INSTALLATION INSTRUCTIONS Prepare Built-In Oven 1. Set the oven door aside on ...
... aluminum. A Failure to move and install oven. 2. B 2. Hinge cover plate screw B. Hinge 4. Decide on a covered surface. 5 WARNING Excessive Weight Hazard Use two or more people to do so can result in the oven frame. Using a Phillips screwdriver, remove the...or trim for the oven. Locate existing wiring to installation. Move oven and cardboard close the oven door halfway. Follow the electrical connector manufacturer's recommended procedure. Open oven door to the oven's final location. 7. INSTALLATION INSTRUCTIONS Prepare Built-In Oven 1. Set the oven door aside on ...
Installation Instructions
Page 7
... trim B. Connect the 2 black wires (C) together using a UL listed wire connector. 4. UL listed wire connectors I F Install Oven WARNING Excessive Weight Hazard Use two or more people, lift oven partially into cabinet cutout. Connect the 2 red wires (G) together using a UL listed wire connector. 2. Insert the screws through holes in back ...from Home Power Supply - Do not push against seal area of the oven cable) using the # 8-14 x ¾" screws (4 for single oven, 8 for double oven) provided. Black wires D. White wires E. Do not overtighten screws. Insert screw. 7
... trim B. Connect the 2 black wires (C) together using a UL listed wire connector. 4. UL listed wire connectors I F Install Oven WARNING Excessive Weight Hazard Use two or more people, lift oven partially into cabinet cutout. Connect the 2 red wires (G) together using a UL listed wire connector. 2. Insert the screws through holes in back ...from Home Power Supply - Do not push against seal area of the oven cable) using the # 8-14 x ¾" screws (4 for single oven, 8 for double oven) provided. Black wires D. White wires E. Do not overtighten screws. Insert screw. 7