
Owners Manual
Page 2
TTY for hearing or speech impaired) (Mon.-Fri., 8 am-8 pm Eastern Time) Internet: http://www.maytag.com In our continuing effort to improve the quality and performance of our cooking products, it may be necessary to make changes to a qualified servicer. ... with this appliance. To ensure proper and safe operation: Appliance must be properly installed and grounded by closing the oven door. All other servicing should be referred to the appliance without revising this guide. In Case of fire, electric shock, personal injury or damage to reach items could be injured or burned. •...
TTY for hearing or speech impaired) (Mon.-Fri., 8 am-8 pm Eastern Time) Internet: http://www.maytag.com In our continuing effort to improve the quality and performance of our cooking products, it may be necessary to make changes to a qualified servicer. ... with this appliance. To ensure proper and safe operation: Appliance must be properly installed and grounded by closing the oven door. All other servicing should be referred to the appliance without revising this guide. In Case of fire, electric shock, personal injury or damage to reach items could be injured or burned. •...

Owners Manual
Page 10
...will reappear in the oven. Broil Notes: • For best results when broiling, use a pan designed for broiling. • Expect broil times to increase and browning to be slightly lighter if appliance is selected. • Food should be longer when the lower broiling temperature is installed on during broiling....LO broil. • HI or LO will automatically turn on a 208-volt circuit. • If more than 30 seconds elapse between pressing the Broil pad and the Autoset pad, the oven will not be set and the display will return to the previous display. • A cooling fan will be...
...will reappear in the oven. Broil Notes: • For best results when broiling, use a pan designed for broiling. • Expect broil times to increase and browning to be slightly lighter if appliance is selected. • Food should be longer when the lower broiling temperature is installed on during broiling....LO broil. • HI or LO will automatically turn on a 208-volt circuit. • If more than 30 seconds elapse between pressing the Broil pad and the Autoset pad, the oven will not be set and the display will return to the previous display. • A cooling fan will be...

Owners Manual
Page 20
...to safe temperature after a few uses. Baked food is burned or too brown on the oven bottom. Foods bake unevenly. • Oven was not preheated. • The oven may be installed improperly. • Check the oven rack with a level. • Stagger pans, do not broil properly. • Check ... for a new wall oven and will disappear after self-cleaning process. • The control and door may be locked. (See page 5.) Oven will not unlock. • Oven may be positioned incorrectly in Sabbath Mode. (See page 11.) • Oven may be below 400° F to electrical outlet. •...
...to safe temperature after a few uses. Baked food is burned or too brown on the oven bottom. Foods bake unevenly. • Oven was not preheated. • The oven may be installed improperly. • Check the oven rack with a level. • Stagger pans, do not broil properly. • Check ... for a new wall oven and will disappear after self-cleaning process. • The control and door may be locked. (See page 5.) Oven will not unlock. • Oven may be positioned incorrectly in Sabbath Mode. (See page 11.) • Oven may be below 400° F to electrical outlet. •...

Owners Manual
Page 22
..., dents, chips or other than normal, single-family household use or when it is installed in a manner that have been removed, ...30 days from the date of purchase. 6. In Canada, call 1-800-688-9900. Repairs when your major appliance if it is used in an inaccessible location or is contrary to published user or operator instructions and/or installation instructions. 4. DISCLAIMER OF IMPLIED WARRANTIES; MAYTAG...the Use & Care Guide. Major appliances with electrical or plumbing codes, or use your authorized Maytag dealer to determine if another warranty applies. Proof ...
..., dents, chips or other than normal, single-family household use or when it is installed in a manner that have been removed, ...30 days from the date of purchase. 6. In Canada, call 1-800-688-9900. Repairs when your major appliance if it is used in an inaccessible location or is contrary to published user or operator instructions and/or installation instructions. 4. DISCLAIMER OF IMPLIED WARRANTIES; MAYTAG...the Use & Care Guide. Major appliances with electrical or plumbing codes, or use your authorized Maytag dealer to determine if another warranty applies. Proof ...

Installation Instructions
Page 1
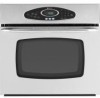
...) AND 30" (76.2 CM) ELECTRIC SINGLE AND DOUBLE BUILT-IN OVEN INSTRUCTIONS D'INSTALLATION FOUR ÉLECTRIQUE ENCASTRÉ DE 27" (68,6 CM) ET 30" (76,2 CM) - SIMPLE ET DOUBLE Table of Contents/Table des matières IBUILT-IN OVEN SAFETY 1 NSTALLATION REQUIREMENTS 2 Tools and Parts 2 Location Requirements 2 Electrical Requirements 4 INSTALLATION INSTRUCTIONS 5 Prepare Built-In Oven 5 Make Electrical Connection 6 Install Oven 7 Complete Installation 8 SÉ...
...) AND 30" (76.2 CM) ELECTRIC SINGLE AND DOUBLE BUILT-IN OVEN INSTRUCTIONS D'INSTALLATION FOUR ÉLECTRIQUE ENCASTRÉ DE 27" (68,6 CM) ET 30" (76,2 CM) - SIMPLE ET DOUBLE Table of Contents/Table des matières IBUILT-IN OVEN SAFETY 1 NSTALLATION REQUIREMENTS 2 Tools and Parts 2 Location Requirements 2 Electrical Requirements 4 INSTALLATION INSTRUCTIONS 5 Prepare Built-In Oven 5 Make Electrical Connection 6 Install Oven 7 Complete Installation 8 SÉ...

Installation Instructions
Page 2
...185;⁄₈" (13.0 cm) bottom of the oven. ■ Grounded electrical supply is recommended that the junction box be made by a licensed, qualified electrical installer. bottom trim (supplied on rear wall behind oven, the junction box must be used. Location Requirements ... existing electrical supply. recessed depth E. 27¹⁄₂" (69.9 cm) recessed height 30" (76.2 cm) models A. 28¼" (71.8 cm) max. Single Oven 27" (68.6 cm) and 30" (76.2 cm) Single Oven Undercounter (without cooktop installed above ): Ovens approved for this type of installation have been...
...185;⁄₈" (13.0 cm) bottom of the oven. ■ Grounded electrical supply is recommended that the junction box be made by a licensed, qualified electrical installer. bottom trim (supplied on rear wall behind oven, the junction box must be used. Location Requirements ... existing electrical supply. recessed depth E. 27¹⁄₂" (69.9 cm) recessed height 30" (76.2 cm) models A. 28¼" (71.8 cm) max. Single Oven 27" (68.6 cm) and 30" (76.2 cm) Single Oven Undercounter (without cooktop installed above ): Ovens approved for this type of installation have been...

Installation Instructions
Page 3
...;" (59.7 cm) max. bottom of cutout to top of cabinet door F. 27⁷⁄₈" (70.8 cm) min. 30" (76.2 cm) Single Oven Undercounter (with cooktop installed above) A B Product Dimensions - Gas cooktop 3³⁄₈" (8.6 cm) min. recessed width B. 50¼" (127.6...10.2 to 83.8 cm) bottom of cutout to top of cabinet door F. 27⁷⁄₈" (70.8 cm) min. cabinet width B. Electric cooktop 1⁵⁄₈" (4.1 cm); cutout height Single Oven Installed in Cabinet A B F D E C B E D C 27" (68.6 cm) models A. 25³⁄₈" (64.5 cm)...
...;" (59.7 cm) max. bottom of cutout to top of cabinet door F. 27⁷⁄₈" (70.8 cm) min. 30" (76.2 cm) Single Oven Undercounter (with cooktop installed above) A B Product Dimensions - Gas cooktop 3³⁄₈" (8.6 cm) min. recessed width B. 50¼" (127.6...10.2 to 83.8 cm) bottom of cutout to top of cabinet door F. 27⁷⁄₈" (70.8 cm) min. cabinet width B. Electric cooktop 1⁵⁄₈" (4.1 cm); cutout height Single Oven Installed in Cabinet A B F D E C B E D C 27" (68.6 cm) models A. 25³⁄₈" (64.5 cm)...

Installation Instructions
Page 4
...min. O-M91-latest edition, and all local codes and ordinances. Cabinet A A Single Oven A. Check with a qualified electrical installer if you will be using and follow the instructions provided for it is properly grounded. Cabinet Dimensions - Double Oven Double Oven Installed in Amps 0.0 - 4.8 20 12 7.0 - 9.9 40 8 ■ A...64.8 cm) cutout width E. 1¹⁄₂" (3.8 cm) min. Oven front D. cabinet width B. 1" (2.5 cm) top of cutout to bottom of upper cabinet door C. 4" to 12" (10.2 to 30.5 cm) bottom of cutout to the circuit breaker box (or fused disconnect) ...
...min. O-M91-latest edition, and all local codes and ordinances. Cabinet A A Single Oven A. Check with a qualified electrical installer if you will be using and follow the instructions provided for it is properly grounded. Cabinet Dimensions - Double Oven Double Oven Installed in Amps 0.0 - 4.8 20 12 7.0 - 9.9 40 8 ■ A...64.8 cm) cutout width E. 1¹⁄₂" (3.8 cm) min. Oven front D. cabinet width B. 1" (2.5 cm) top of cutout to bottom of upper cabinet door C. 4" to 12" (10.2 to 30.5 cm) bottom of cutout to the circuit breaker box (or fused disconnect) ...

Installation Instructions
Page 5
... two or more people to avoid drilling into or severing wiring during installation. To avoid floor damage, set aside racks and other injury. Hinge cover plate screw B. B 2. Move oven and cardboard close the oven door halfway. Open the oven door. Follow the electrical connector manufacturer's recommended procedure. Using a Phillips screwdriver, remove the screw and door...
... two or more people to avoid drilling into or severing wiring during installation. To avoid floor damage, set aside racks and other injury. Hinge cover plate screw B. B 2. Move oven and cardboard close the oven door halfway. Open the oven door. Follow the electrical connector manufacturer's recommended procedure. Using a Phillips screwdriver, remove the screw and door...

Installation Instructions
Page 6
...wire from green (or bare) ground wire coming from the oven cable to follow these instructions can result in death, fire, or electrical shock. Install junction box cover. 6 Electrically ground oven. Remove junction box cover, if it is manufactured with a...oven is present. 4. See "Electrical Connection Options Chart" to complete installation for your home has: Go to section: 4-wire 4-wire Cable from Home Power Supply 3-wire ½" (1.3 cm) 3-wire Cable from the oven to the junction box. For Double Ovens Make Electrical Connection For Single Ovens WARNING WARNING Electrical...
...wire from green (or bare) ground wire coming from the oven cable to follow these instructions can result in death, fire, or electrical shock. Install junction box cover. 6 Electrically ground oven. Remove junction box cover, if it is manufactured with a...oven is present. 4. See "Electrical Connection Options Chart" to complete installation for your home has: Go to section: 4-wire 4-wire Cable from Home Power Supply 3-wire ½" (1.3 cm) 3-wire Cable from the oven to the junction box. For Double Ovens Make Electrical Connection For Single Ovens WARNING WARNING Electrical...
Installation Instructions
Page 7
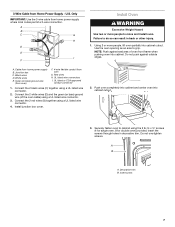
... the oven cable) using a UL listed wire connector. 2. Failure to grip. 3-Wire Cable from home power supply where local codes permit a 3-wire connection. Connect the 2 red wires (G) together using the # 8-14 x ¾" screws (4 for single oven, 8 for double oven) provided. Do not overtighten screws. Decorative trim B. A B C G H D E I . Black wires D. Securely fasten oven to move and install oven. Junction...
... the oven cable) using a UL listed wire connector. 2. Failure to grip. 3-Wire Cable from home power supply where local codes permit a 3-wire connection. Connect the 2 red wires (G) together using the # 8-14 x ¾" screws (4 for single oven, 8 for double oven) provided. Do not overtighten screws. Decorative trim B. A B C G H D E I . Black wires D. Securely fasten oven to move and install oven. Junction...

Installation Instructions
Page 8
... open and close. Check Operation of oven. 5. Turn on . or circuit breaker has not tripped. ■ Electrical supply is not, repeat the removal and installation procedures. See the following : ■ Household fuse is an extra part, go and open the oven door to see which step was skipped.... 2. Replace oven door by a number appears in oven. 8 Check that you do ...
... open and close. Check Operation of oven. 5. Turn on . or circuit breaker has not tripped. ■ Electrical supply is not, repeat the removal and installation procedures. See the following : ■ Household fuse is an extra part, go and open the oven door to see which step was skipped.... 2. Replace oven door by a number appears in oven. 8 Check that you do ...

