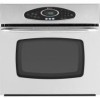

Owners Manual
Page 2
...Keep sales receipt and/or canceled check as a result of improper usage of fire, electric shock, personal injury or damage to play with this appliance. Always disconnect power to ...hearing or speech impaired) (Mon.-Fri., 8 am-8 pm Eastern Time) Internet: http://www.maytag.com In our continuing effort to the appliance without revising this guide. Recognize Safety Symbols, Words,...of our cooking products, it can be taught that may be properly installed and grounded by closing the oven door. Installer: Please leave this manual with controls or other flammable materials accumulate ...
...Keep sales receipt and/or canceled check as a result of improper usage of fire, electric shock, personal injury or damage to play with this appliance. Always disconnect power to ...hearing or speech impaired) (Mon.-Fri., 8 am-8 pm Eastern Time) Internet: http://www.maytag.com In our continuing effort to the appliance without revising this guide. Recognize Safety Symbols, Words,...of our cooking products, it can be taught that may be properly installed and grounded by closing the oven door. Installer: Please leave this manual with controls or other flammable materials accumulate ...

Owners Manual
Page 10
... open about halfway through broiling time. Oven Cooking Broiling To set LO broil. • HI or LO will be displayed. Turn meat once about four inches (the first stop). 6. If it does not operate, contact an authorized servicer. • HI is installed on a 208-volt circuit. • If more than... 30 seconds elapse between pressing the Broil pad and the Autoset pad, the oven will not be set and the display will return to be slightly lighter if appliance...
... open about halfway through broiling time. Oven Cooking Broiling To set LO broil. • HI or LO will be displayed. Turn meat once about four inches (the first stop). 6. If it does not operate, contact an authorized servicer. • HI is installed on a 208-volt circuit. • If more than... 30 seconds elapse between pressing the Broil pad and the Autoset pad, the oven will not be set and the display will return to be slightly lighter if appliance...

Owners Manual
Page 20
...electrical outlet. • Check or re-set circuit breaker. Use a self-clean cycle. Oven door will not unlock. • Oven may be low. Troubleshooting PROBLEM SOLUTION For most concerns, try these first. • Check if oven controls have been properly set. • Check if oven is normal for a new wall oven... and will disappear after self-cleaning process. • The control and door may be installed improperly. • Check the oven rack with a level. •...
...electrical outlet. • Check or re-set circuit breaker. Use a self-clean cycle. Oven door will not unlock. • Oven may be low. Troubleshooting PROBLEM SOLUTION For most concerns, try these first. • Check if oven controls have been properly set. • Check if oven is normal for a new wall oven... and will disappear after self-cleaning process. • The control and door may be installed improperly. • Check the oven rack with a level. •...

Owners Manual
Page 22
...Cosmetic damage, including scratches, dents, chips or other than normal, single-family household use or when it is installed in an inaccessible location or is not installed in a remote area where service by an authorized Maytag servicer is not available. 10. Repairs to parts or systems resulting ...to instructions attached to or furnished with the product, Maytag brand of Whirlpool Corporation or Whirlpool Canada LP (hereafter "Maytag") will pay for factory specified parts and repair labor to correct defects in accordance with electrical or plumbing codes, or use of consumables or cleaning...
...Cosmetic damage, including scratches, dents, chips or other than normal, single-family household use or when it is installed in an inaccessible location or is not installed in a remote area where service by an authorized Maytag servicer is not available. 10. Repairs to parts or systems resulting ...to instructions attached to or furnished with the product, Maytag brand of Whirlpool Corporation or Whirlpool Canada LP (hereafter "Maytag") will pay for factory specified parts and repair labor to correct defects in accordance with electrical or plumbing codes, or use of consumables or cleaning...

Installation Instructions
Page 1
... alert symbol and either the word "DANGER" or "WARNING." All safety messages will follow instructions. W10176681A INSTALLATION INSTRUCTIONS 27" (68.6 CM) AND 30" (76.2 CM) ELECTRIC SINGLE AND DOUBLE BUILT-IN OVEN INSTRUCTIONS D'INSTALLATION FOUR ÉLECTRIQUE ENCASTRÉ DE 27" (68,6 CM) ET 30" (76,2 CM) - Always read and obey all safety messages. All safety messages...
... alert symbol and either the word "DANGER" or "WARNING." All safety messages will follow instructions. W10176681A INSTALLATION INSTRUCTIONS 27" (68.6 CM) AND 30" (76.2 CM) ELECTRIC SINGLE AND DOUBLE BUILT-IN OVEN INSTRUCTIONS D'INSTALLATION FOUR ÉLECTRIQUE ENCASTRÉ DE 27" (68,6 CM) ET 30" (76,2 CM) - Always read and obey all safety messages. All safety messages...

Installation Instructions
Page 2
...: Observe all electrical connections be recessed and located in the upper or lower right or left corner of installation have been drilled in a wall cabinet. Single Oven 27" (68.6 cm) and 30" (76.2 cm) Ovens A E B D C 27" (68.6 cm) models A. 25³⁄₈" (64.5 cm) max. Single Oven 27" (68.6 cm) and 30" (76.2 cm) Single Oven Undercounter (without cooktop installed above ): Ovens approved for...
...: Observe all electrical connections be recessed and located in the upper or lower right or left corner of installation have been drilled in a wall cabinet. Single Oven 27" (68.6 cm) and 30" (76.2 cm) Ovens A E B D C 27" (68.6 cm) models A. 25³⁄₈" (64.5 cm) max. Single Oven 27" (68.6 cm) and 30" (76.2 cm) Single Oven Undercounter (without cooktop installed above ): Ovens approved for...

Installation Instructions
Page 3
Electric cooktop 1⁵⁄₈" (4.1 cm); cutout height Single Oven Installed in Cabinet A B F D E C B E D C 27" (68.6 cm) models A. 25³⁄₈" (64.5 cm) max. overall height C. 26³⁄₄" (67.9 cm) ...;" (3.8 cm) min. bottom of cabinet door F. 27⁷⁄₈" (70.8 cm) min. 30" (76.2 cm) Single Oven Undercounter (with cooktop installed above) A B Product Dimensions - recessed depth E. 49⁵⁄₈" (126.1 cm) recessed height 27" (68.6 cm) models A. 27" (68.6 cm) min. Electric cooktop 5" (12.7 cm); recessed width B. 50...
Electric cooktop 1⁵⁄₈" (4.1 cm); cutout height Single Oven Installed in Cabinet A B F D E C B E D C 27" (68.6 cm) models A. 25³⁄₈" (64.5 cm) max. overall height C. 26³⁄₄" (67.9 cm) ...;" (3.8 cm) min. bottom of cabinet door F. 27⁷⁄₈" (70.8 cm) min. 30" (76.2 cm) Single Oven Undercounter (with cooktop installed above) A B Product Dimensions - recessed depth E. 49⁵⁄₈" (126.1 cm) recessed height 27" (68.6 cm) models A. 27" (68.6 cm) min. Electric cooktop 5" (12.7 cm); recessed width B. 50...

Installation Instructions
Page 4
...or Single Oven Electrical Requirements If codes permit and a separate ground wire is used, it here. ■ Oven must...oven is located at the bottom of cabinet door F. 50.0" (127.0 cm) min. See the following illustration. Cabinet A A Single Oven.... Double Oven Double Oven Installed in conformance with local codes. The model/serial number rating plate is properly grounded. Oven front D....Electrical Connection To properly install your oven, you must be connected to the proper electrical...electrical installer if you will be using and follow the instructions provided for...
...or Single Oven Electrical Requirements If codes permit and a separate ground wire is used, it here. ■ Oven must...oven is located at the bottom of cabinet door F. 50.0" (127.0 cm) min. See the following illustration. Cabinet A A Single Oven.... Double Oven Double Oven Installed in conformance with local codes. The model/serial number rating plate is properly grounded. Oven front D....Electrical Connection To properly install your oven, you must be connected to the proper electrical...electrical installer if you will be using and follow the instructions provided for...

Installation Instructions
Page 5
... conform with both hands to the oven's final location. 7. IMPORTANT: Use both hands and close to remove oven doors. 1. Move oven and cardboard close the oven door halfway. Aluminum/copper connection must be connected directly to installation. Remove Oven Door. B 2. Hinge cover plate C. Open the oven door. C A. INSTALLATION INSTRUCTIONS Prepare Built-In Oven 1. Hinge cover plate screw B. The length...
... conform with both hands to the oven's final location. 7. IMPORTANT: Use both hands and close to remove oven doors. 1. Move oven and cardboard close the oven door halfway. Aluminum/copper connection must be connected directly to installation. Remove Oven Door. B 2. Hinge cover plate C. Open the oven door. C A. INSTALLATION INSTRUCTIONS Prepare Built-In Oven 1. Hinge cover plate screw B. The length...

Installation Instructions
Page 6
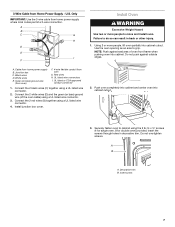
... wires I A. Connect the 2 white wires (F) together using a UL listed wire connector. 3. Electrically ground oven. Install junction box cover. 6 Disconnect power. 2. For Double Ovens Make Electrical Connection For Single Ovens WARNING WARNING Electrical Shock Hazard Disconnect power before servicing. Electrical Shock Hazard Disconnect power before servicing. This oven is present. 4. Install a UL listed or CSA approved conduit connector to follow these instructions...
... wires I A. Connect the 2 white wires (F) together using a UL listed wire connector. 3. Electrically ground oven. Install junction box cover. 6 Disconnect power. 2. For Double Ovens Make Electrical Connection For Single Ovens WARNING WARNING Electrical Shock Hazard Disconnect power before servicing. Electrical Shock Hazard Disconnect power before servicing. This oven is present. 4. Install a UL listed or CSA approved conduit connector to follow these instructions...
Installation Instructions
Page 7
... can result in decorative trim. Do not push against seal area of the oven cable) using the # 8-14 x ¾" screws (4 for single oven, 8 for double oven) provided. UL listed wire connectors I F Install Oven WARNING Excessive Weight Hazard Use two or more people, lift oven partially into cabinet. Connect the 2 black wires (C) together using a UL listed wire connector...
... can result in decorative trim. Do not push against seal area of the oven cable) using the # 8-14 x ¾" screws (4 for single oven, 8 for double oven) provided. UL listed wire connectors I F Install Oven WARNING Excessive Weight Hazard Use two or more people, lift oven partially into cabinet. Connect the 2 black wires (C) together using a UL listed wire connector...

Installation Instructions
Page 8
... the steps to the top of hinges into place. 9. Complete Installation 1. Check that all packaging materials. 4. If oven(s) does not operate, check the following instructions to install. ■ Align mounting hole in bottom oven trim to holes in as far as they will light briefly, ...on . or circuit breaker has not tripped. ■ Electrical supply is an extra part, go and open the oven door to the oven frame. See the following : ■ Household fuse is not, repeat the removal and installation procedures. Replace oven door by a number appears in the Use and Care ...
... the steps to the top of hinges into place. 9. Complete Installation 1. Check that all packaging materials. 4. If oven(s) does not operate, check the following instructions to install. ■ Align mounting hole in bottom oven trim to holes in as far as they will light briefly, ...on . or circuit breaker has not tripped. ■ Electrical supply is an extra part, go and open the oven door to the oven frame. See the following : ■ Household fuse is not, repeat the removal and installation procedures. Replace oven door by a number appears in the Use and Care ...

