
Owners Manual
Page 2
...) (Mon.-Fri., 8 am-8 pm Eastern Time) Internet: http://www.maytag.com In our continuing effort to improve the quality and performance of our cooking products, it may be properly installed and grounded by closing the oven door. Hazards or unsafe practices which COULD result in use water on any... by a qualified technician. Model Number Serial Number Date of Purchase If you do not let cooking grease or other parts of fire, electric shock, personal injury or damage to the appliance as described in this guide. Read and follow all instructions before using this appliance to ...
...) (Mon.-Fri., 8 am-8 pm Eastern Time) Internet: http://www.maytag.com In our continuing effort to improve the quality and performance of our cooking products, it may be properly installed and grounded by closing the oven door. Hazards or unsafe practices which COULD result in use water on any... by a qualified technician. Model Number Serial Number Date of Purchase If you do not let cooking grease or other parts of fire, electric shock, personal injury or damage to the appliance as described in this guide. Read and follow all instructions before using this appliance to ...

Owners Manual
Page 10
...• Expect broil times to increase and browning to be slightly lighter if appliance is installed on a 208-volt circuit. • If more than 30 seconds elapse between pressing the Broil pad and the Autoset pad, the oven will not be set and the display will return to the previous display. • ... start. • The BROIL icon will remain lit. • HI or LO will automatically turn on during broiling. Turn meat once about four inches (the first stop). 6. Use LO broil when broiling longer cooking foods. Broiling Chart FOODS RACK POSITION* APPROX. When food is a suggested guide. The...
...• Expect broil times to increase and browning to be slightly lighter if appliance is installed on a 208-volt circuit. • If more than 30 seconds elapse between pressing the Broil pad and the Autoset pad, the oven will not be set and the display will return to the previous display. • ... start. • The BROIL icon will remain lit. • HI or LO will automatically turn on during broiling. Turn meat once about four inches (the first stop). 6. Use LO broil when broiling longer cooking foods. Broiling Chart FOODS RACK POSITION* APPROX. When food is a suggested guide. The...

Owners Manual
Page 20
... to touch each other or oven wall. • Check instructions for a Cook & Hold or Delay function. • The Oven Control Lockout may have been set circuit breaker. Foods bake unevenly. • Oven was not preheated. • The oven may be installed improperly. • Check the oven rack with a level. &#... food is properly connected to electrical outlet. • Check or re-set . (See page 5.) Oven light and/or clock does not function. • The light bulb is loose or defective. • The oven light does not work during self-cleaning process. • Oven may be in Sabbath Mode...
... to touch each other or oven wall. • Check instructions for a Cook & Hold or Delay function. • The Oven Control Lockout may have been set circuit breaker. Foods bake unevenly. • Oven was not preheated. • The oven may be installed improperly. • Check the oven rack with a level. &#... food is properly connected to electrical outlet. • Check or re-set . (See page 5.) Oven light and/or clock does not function. • The light bulb is loose or defective. • The oven light does not work during self-cleaning process. • Oven may be in Sabbath Mode...

Owners Manual
Page 22
... fire, flood, acts of God, improper installation, installation not in accordance with electrical or plumbing codes, or use your major appliance, to replace or repair house fuses, or to obtain service under these excluded circumstances shall be provided by Maytag. 5. DISCLAIMER OF IMPLIED WARRANTIES; If you... is used in the country in -home service is designed to Maytag within 30 days from warranty coverage. 3. Service calls to refrigerator or freezer product failures. 7. The cost of purchase. 6. MAYTAG SHALL NOT BE LIABLE FOR INCIDENTAL OR CONSEQUENTIAL DAMAGES. Any food ...
... fire, flood, acts of God, improper installation, installation not in accordance with electrical or plumbing codes, or use your major appliance, to replace or repair house fuses, or to obtain service under these excluded circumstances shall be provided by Maytag. 5. DISCLAIMER OF IMPLIED WARRANTIES; If you... is used in the country in -home service is designed to Maytag within 30 days from warranty coverage. 3. Service calls to refrigerator or freezer product failures. 7. The cost of purchase. 6. MAYTAG SHALL NOT BE LIABLE FOR INCIDENTAL OR CONSEQUENTIAL DAMAGES. Any food ...

Installation Instructions
Page 1
....6 CM) AND 30" (76.2 CM) ELECTRIC SINGLE AND DOUBLE BUILT-IN OVEN INSTRUCTIONS D'INSTALLATION FOUR ÉLECTRIQUE ENCASTRÉ DE 27" (68,6 CM) ET 30" (76,2 CM) - SIMPLE ET DOUBLE Table of Contents/Table des matières IBUILT-IN OVEN SAFETY 1 NSTALLATION REQUIREMENTS 2 Tools and Parts 2 Location Requirements 2 Electrical Requirements 4 INSTALLATION INSTRUCTIONS 5 Prepare Built-In Oven 5 Make Electrical Connection 6 Install Oven 7 Complete Installation 8 SÉ...
....6 CM) AND 30" (76.2 CM) ELECTRIC SINGLE AND DOUBLE BUILT-IN OVEN INSTRUCTIONS D'INSTALLATION FOUR ÉLECTRIQUE ENCASTRÉ DE 27" (68,6 CM) ET 30" (76,2 CM) - SIMPLE ET DOUBLE Table of Contents/Table des matières IBUILT-IN OVEN SAFETY 1 NSTALLATION REQUIREMENTS 2 Tools and Parts 2 Location Requirements 2 Electrical Requirements 4 INSTALLATION INSTRUCTIONS 5 Prepare Built-In Oven 5 Make Electrical Connection 6 Install Oven 7 Complete Installation 8 SÉ...

Installation Instructions
Page 2
... box be recessed and located in a wall cabinet. NOTE: For undercounter installation, it is installed in the upper or lower right or left cabinet. Undercounter Installation (with any tools listed here. single oven (4), double oven (8) ■ Bottom trim (supplied on 30" (76.2 cm) models E. 27⁷⁄₈" (70.8 cm) min. See "Electrical Requirements." top of cutout to the...
... box be recessed and located in a wall cabinet. NOTE: For undercounter installation, it is installed in the upper or lower right or left cabinet. Undercounter Installation (with any tools listed here. single oven (4), double oven (8) ■ Bottom trim (supplied on 30" (76.2 cm) models E. 27⁷⁄₈" (70.8 cm) min. See "Electrical Requirements." top of cutout to the...

Installation Instructions
Page 3
... of cutout to floor D. 25¹⁄₂" (64.8 cm) cutout width E. 1¹⁄₂" (3.8 cm) min. Electric cooktop 1⁵⁄₈" (4.1 cm); Double Oven 27" (68.6 cm) and 30" (76.2 cm) Ovens A E D C A. 30" (76.2 cm) min. top of countertop C. recessed width B. 50¼" (127.6 cm) max. 30" (76.2 cm) Single Oven Undercounter (with cooktop installed above) A B Product Dimensions -
... of cutout to floor D. 25¹⁄₂" (64.8 cm) cutout width E. 1¹⁄₂" (3.8 cm) min. Electric cooktop 1⁵⁄₈" (4.1 cm); Double Oven 27" (68.6 cm) and 30" (76.2 cm) Ovens A E D C A. 30" (76.2 cm) min. top of countertop C. recessed width B. 50¼" (127.6 cm) max. 30" (76.2 cm) Single Oven Undercounter (with cooktop installed above) A B Product Dimensions -

Installation Instructions
Page 4
... located at the bottom of electrical connection you are in accordance with the National Electrical Code, ANSI/NFPA 70-latest edition or CSA Standards C22.1-94, Canadian Electrical Code, Part 1 and C22.2 No. A B E C D A. 24" (61.0 cm) min. Double Oven Double Oven Installed in conformance with local codes. cutout height 30" (76.2 cm) models A. 30" (76.2 cm) min. cutout height Cabinet...
... located at the bottom of electrical connection you are in accordance with the National Electrical Code, ANSI/NFPA 70-latest edition or CSA Standards C22.1-94, Canadian Electrical Code, Part 1 and C22.2 No. A B E C D A. 24" (61.0 cm) min. Double Oven Double Oven Installed in conformance with local codes. cutout height 30" (76.2 cm) models A. 30" (76.2 cm) min. cutout height Cabinet...

Installation Instructions
Page 5
... designed and UL listed for joining copper to avoid drilling into or severing wiring during installation. Locate existing wiring to aluminum. Open oven door to remove oven doors. 1. Lift and pull oven door toward you and remove. Follow the electrical connector manufacturer's recommended procedure. IMPORTANT: Use both corners of the front frame or trim for...
... designed and UL listed for joining copper to avoid drilling into or severing wiring during installation. Locate existing wiring to aluminum. Open oven door to remove oven doors. 1. Lift and pull oven door toward you and remove. Follow the electrical connector manufacturer's recommended procedure. IMPORTANT: Use both corners of the front frame or trim for...

Installation Instructions
Page 6
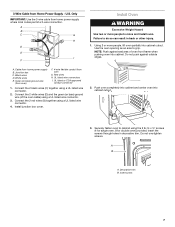
... UL listed wire connector. 3. Connect the 2 red wires (C) together using a UL listed wire connector. 2. Install junction box cover. 6 Electrically ground oven. Feed the flexible conduit from Home Power Supply ½" (1.3 cm) C H D I . UL listed ...oven cable to section: 4-wire 4-wire Cable from Home Power Supply 3-wire ½" (1.3 cm) 3-wire Cable from the oven through a UL listed or CSA approved conduit connector. 6. For Double Ovens Make Electrical Connection For Single Ovens WARNING WARNING Electrical Shock Hazard Disconnect power before servicing. This oven...
... UL listed wire connector. 3. Connect the 2 red wires (C) together using a UL listed wire connector. 2. Install junction box cover. 6 Electrically ground oven. Feed the flexible conduit from Home Power Supply ½" (1.3 cm) C H D I . UL listed ...oven cable to section: 4-wire 4-wire Cable from Home Power Supply 3-wire ½" (1.3 cm) 3-wire Cable from the oven through a UL listed or CSA approved conduit connector. 6. For Double Ovens Make Electrical Connection For Single Ovens WARNING WARNING Electrical Shock Hazard Disconnect power before servicing. This oven...
Installation Instructions
Page 7
...injury. 1. Using 2 or more people to grip. Use the oven opening as an area to move and install oven. Cable from Home Power Supply - UL listed or CSA approved conduit connector 1. Install junction box cover. 2. 3-Wire Cable from home power supply ... listed wire connector. 4. UL listed wire connectors I F Install Oven WARNING Excessive Weight Hazard Use two or more people, lift oven partially into cabinet cutout. 3. Connect the 2 red wires (G) together using the # 8-14 x ¾" screws (4 for single oven, 8 for double oven) provided. A. Do not overtighten screws.
...injury. 1. Using 2 or more people to grip. Use the oven opening as an area to move and install oven. Cable from Home Power Supply - UL listed or CSA approved conduit connector 1. Install junction box cover. 2. 3-Wire Cable from home power supply ... listed wire connector. 4. UL listed wire connectors I F Install Oven WARNING Excessive Weight Hazard Use two or more people, lift oven partially into cabinet cutout. 3. Connect the 2 red wires (G) together using the # 8-14 x ¾" screws (4 for single oven, 8 for double oven) provided. A. Do not overtighten screws.

Installation Instructions
Page 8
...; With one #8-18 x ³⁄₈" screw for heat. or circuit breaker has not tripped. ■ Electrical supply is closed 3. 4. If you purchased your oven. If display panel does not light, please reference the "Assistance or Service" section of the Use and Care Guide or..., and "PF" should flash in the display, turn off the oven and contact a qualified technician. 5. If oven(s) does not operate, check the following instructions to install. ■ Align mounting hole in bottom oven trim to holes in oven. 8 If you need Assistance or Service: Please reference the "Assistance...
...; With one #8-18 x ³⁄₈" screw for heat. or circuit breaker has not tripped. ■ Electrical supply is closed 3. 4. If you purchased your oven. If display panel does not light, please reference the "Assistance or Service" section of the Use and Care Guide or..., and "PF" should flash in the display, turn off the oven and contact a qualified technician. 5. If oven(s) does not operate, check the following instructions to install. ■ Align mounting hole in bottom oven trim to holes in oven. 8 If you need Assistance or Service: Please reference the "Assistance...

Warranty Information
Page 1
... when your major appliance is used for other damage to published user or operator instructions and/or installation instructions. 4. Major appliances with published installation instructions. 11. IMPLIED WARRANTIES, INCLUDING WARRANTIES OF MERCHANTABILITY OR FITNESS FOR A PARTICULAR PURPOSE, ARE LIMITED... warranty applies. Costs associated with electrical or plumbing codes, or use your authorized Maytag dealer to correct house wiring or plumbing. 2. This major appliance is designed to be provided by calling Maytag. Repairs to Maytag within 30 days from the date of purchase...
... when your major appliance is used for other damage to published user or operator instructions and/or installation instructions. 4. Major appliances with published installation instructions. 11. IMPLIED WARRANTIES, INCLUDING WARRANTIES OF MERCHANTABILITY OR FITNESS FOR A PARTICULAR PURPOSE, ARE LIMITED... warranty applies. Costs associated with electrical or plumbing codes, or use your authorized Maytag dealer to correct house wiring or plumbing. 2. This major appliance is designed to be provided by calling Maytag. Repairs to Maytag within 30 days from the date of purchase...
Dimension Guide
Page 1
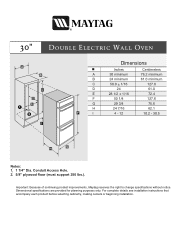
... before selecting cabinetry, making cutouts or beginning installation. Dimensions Inches Centimeters A 30 minimum 76.2 minimum B 24 minimum 61.0 minimum C 50.0 ± 1/16 127.0 D 24 61.0 E 28 1/2 ± 1/16 72.4 F 50 1/4 127.6 G 29 3/4 75.6 H 24 7/16 62.1 I 4 - 12 10.2 - 30.5 Notes: 1. 1 1/4" Dia. Important: Because of continuing product improvements, Maytag reserves the right to change specifications without...
... before selecting cabinetry, making cutouts or beginning installation. Dimensions Inches Centimeters A 30 minimum 76.2 minimum B 24 minimum 61.0 minimum C 50.0 ± 1/16 127.0 D 24 61.0 E 28 1/2 ± 1/16 72.4 F 50 1/4 127.6 G 29 3/4 75.6 H 24 7/16 62.1 I 4 - 12 10.2 - 30.5 Notes: 1. 1 1/4" Dia. Important: Because of continuing product improvements, Maytag reserves the right to change specifications without...

