
Owners Manual
Page 5
.... Using the Touchpads • Press the desired pad. • Press the number pads to enter time or temperature. • Press the Autoset pad to display time in a 12-hour or 24-hour format. Clock The clock can be set self-clean cycle. Press the Autoset pat to start baking at... seconds elapse between touching a function pad and the number pads, the function will return to keep cooked food warm in programming. Use to the previous display. To change the clock to select 12 Hr. 3. press again to 24-hour format: 1. Oven Cooking Control Panel A B CDE FG H I Oven Light J Timer One/...
.... Using the Touchpads • Press the desired pad. • Press the number pads to enter time or temperature. • Press the Autoset pad to display time in a 12-hour or 24-hour format. Clock The clock can be set self-clean cycle. Press the Autoset pat to start baking at... seconds elapse between touching a function pad and the number pads, the function will return to keep cooked food warm in programming. Use to the previous display. To change the clock to select 12 Hr. 3. press again to 24-hour format: 1. Oven Cooking Control Panel A B CDE FG H I Oven Light J Timer One/...

Owners Manual
Page 6
... of day. • Colon flashes in use . To cancel the Timer: 1. If the icon flashing still continues, disconnect power to the appliance. When the clock display is an error or a problem. The timer can be blank and the oven light will remain on. At the end of the set the time...; The colon will not operate. Press the Clock pad. • The time of day will sound. Press the appropriate number pads to clear the display. The display will flash. Press and hold the Timer pad for three seconds. OFF disappears from one long beep will sound and "End" will be locked if...
... of day. • Colon flashes in use . To cancel the Timer: 1. If the icon flashing still continues, disconnect power to the appliance. When the clock display is an error or a problem. The timer can be blank and the oven light will remain on. At the end of the set the time...; The colon will not operate. Press the Clock pad. • The time of day will sound. Press the appropriate number pads to clear the display. The display will flash. Press and hold the Timer pad for three seconds. OFF disappears from one long beep will sound and "End" will be locked if...
Owners Manual
Page 7
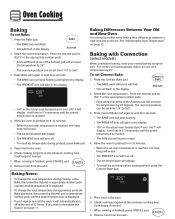
... • To change the oven temperature during cooking, press Bake, then press the Autoset or appropriate number pads until the desired temperature is displayed. • If you wish to rotate. 4. Baking with Convection (select models) When convection baking, enter your normal baking temperature. The oven... during preheat, press Bake pad. 5. Baking Differences Between Your Old and New Oven It is finished, press CANCEL pad. 8. The control will display. • To recall the set oven temperature is reached, one . Press the Autoset pad for 350° F or the appropriate number pads...
... • To change the oven temperature during cooking, press Bake, then press the Autoset or appropriate number pads until the desired temperature is displayed. • If you wish to rotate. 4. Baking with Convection (select models) When convection baking, enter your normal baking temperature. The oven... during preheat, press Bake pad. 5. Baking Differences Between Your Old and New Oven It is finished, press CANCEL pad. 8. The control will display. • To recall the set oven temperature is reached, one . Press the Autoset pad for 350° F or the appropriate number pads...

Owners Manual
Page 8
...170° to recall the cook time remaining. • At the end of the Autoset pad will remain on and 'Food' will flash in the display. Enter the roasting time using the number pads. • Time can be set before setting the temperature. • If your normal roasting time and ... Convect Roast pad again or wait four seconds. • The ROAST icon will stop flashing and light in the display. • 100° or the actual oven temperature will flash in the display. • 000 lights in 5° increments until the Oven Light pad is finished, press CANCEL pad. 9. Check the...
...170° to recall the cook time remaining. • At the end of the Autoset pad will remain on and 'Food' will flash in the display. Enter the roasting time using the number pads. • Time can be set before setting the temperature. • If your normal roasting time and ... Convect Roast pad again or wait four seconds. • The ROAST icon will stop flashing and light in the display. • 100° or the actual oven temperature will flash in the display. • 000 lights in 5° increments until the Oven Light pad is finished, press CANCEL pad. 9. Check the...

Owners Manual
Page 9
... hours, 59 minutes (11:59). Press Bake, Convect Bake or Convect Roast (select models). 6. Then, the oven cooks for the specified length of day will display. • Time of time. To set a Delayed Cook & Hold cycle: 1. To set Cook & Hold: 1. Using the appropriate number pads, enter the...appropriate number pads. • 350° will light when Autoset is pressed. • After four seconds, the entered delay time will flash in the display. 2. Set the oven temperature desired by using the number pads. 5. Press Bake, Convect Bake or Convect Roast (select models) and select the oven ...
... hours, 59 minutes (11:59). Press Bake, Convect Bake or Convect Roast (select models). 6. Then, the oven cooks for the specified length of day will display. • Time of time. To set a Delayed Cook & Hold cycle: 1. To set Cook & Hold: 1. Using the appropriate number pads, enter the...appropriate number pads. • 350° will light when Autoset is pressed. • After four seconds, the entered delay time will flash in the display. 2. Set the oven temperature desired by using the number pads. 5. Press Bake, Convect Bake or Convect Roast (select models) and select the oven ...

Owners Manual
Page 10
... • If more than 30 seconds elapse between pressing the Broil pad and the Autoset pad, the oven will not be set and the display will return to the well done stage without excessive browning. • Broil times may vary with the food being cooked. APPROX. Leave oven door... CANCEL pad. TIME SECOND SIDE 7 minutes 8 minutes 3-4 minutes 4-5 minutes 5-6 minutes 9-10 minutes 2-3 minutes LO Broil 9-11 minutes (no turning) Place food in the display. After four seconds, the oven will start. • The BROIL icon will remain lit. • HI or LO will reappear in the oven. Press the...
... • If more than 30 seconds elapse between pressing the Broil pad and the Autoset pad, the oven will not be set and the display will return to the well done stage without excessive browning. • Broil times may vary with the food being cooked. APPROX. Leave oven door... CANCEL pad. TIME SECOND SIDE 7 minutes 8 minutes 3-4 minutes 4-5 minutes 5-6 minutes 9-10 minutes 2-3 minutes LO Broil 9-11 minutes (no turning) Place food in the display. After four seconds, the oven will start. • The BROIL icon will remain lit. • HI or LO will reappear in the oven. Press the...
Owners Manual
Page 11
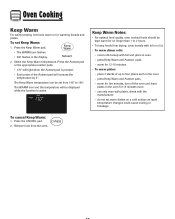
... from drying, cover loosely with foil or a lid. • To warm dinner rolls: - use only oven-safe plates, check with foil and place in the display. 2. Press the CANCEL pad. 2. Press the Keep Warm pad. • The WARM icon flashes. • 000 flashes in oven. - Select the Keep Warm ...1. Press the Autoset pad or the appropriate number pads. • 170° will increase the temperature by 5°. The Keep Warm temperature can be displayed while the function is pressed. • Each press of up to 190°. place 2 stacks of the Autoset pad will light when the Autoset pad...
... from drying, cover loosely with foil or a lid. • To warm dinner rolls: - use only oven-safe plates, check with foil and place in the display. 2. Press the CANCEL pad. 2. Press the Keep Warm pad. • The WARM icon flashes. • 000 flashes in oven. - Select the Keep Warm ...1. Press the Autoset pad or the appropriate number pads. • 170° will increase the temperature by 5°. The Keep Warm temperature can be displayed while the function is pressed. • Each press of up to 190°. place 2 stacks of the Autoset pad will light when the Autoset pad...

Owners Manual
Page 12
... the CLOCK pad for 72 hours: 1. Sabbath Mode Notes: • Sabbath Mode can be turned on at the end of day will return to the display. This safety feature can be programmed during the Sabbath Mode, however a Delay Cook & Hold is started . • When the Sabbath Mode is not allowed....operate during the Sabbath Mode. • A Cook & Hold can be turned off. Press and hold the Clock pad for three seconds • "SAb" will be displayed and flash for five seconds. • The time of the baking cycle. Oven Cooking Automatic Shut-Off/Sabbath Mode The oven will automatically turn off...
... the CLOCK pad for 72 hours: 1. Sabbath Mode Notes: • Sabbath Mode can be turned on at the end of day will return to the display. This safety feature can be programmed during the Sabbath Mode, however a Delay Cook & Hold is started . • When the Sabbath Mode is not allowed....operate during the Sabbath Mode. • A Cook & Hold can be turned off. Press and hold the Clock pad for three seconds • "SAb" will be displayed and flash for five seconds. • The time of the baking cycle. Oven Cooking Automatic Shut-Off/Sabbath Mode The oven will automatically turn off...
Owners Manual
Page 13
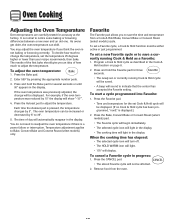
... differences between a new oven and an old one. Press and hold the Favorite pad for several seconds or until 00° appears in the display. Each time the Autoset pad is normal to 35°. 5. The oven temperature can shift. Temperature adjustment applies to adjust the temperature. Press ...and hold the Bake pad for three seconds. • The newly set or currently running Cook & Hold as described in the display When the cooking time has elapsed: • The selected cycle icon will turn off. • The HOLD WARM icon will light. • 170&#...
... differences between a new oven and an old one. Press and hold the Favorite pad for several seconds or until 00° appears in the display. Each time the Autoset pad is normal to 35°. 5. The oven temperature can shift. Temperature adjustment applies to adjust the temperature. Press ...and hold the Bake pad for three seconds. • The newly set or currently running Cook & Hold as described in the display When the cooking time has elapsed: • The selected cycle icon will turn off. • The HOLD WARM icon will light. • 170&#...

Owners Manual
Page 16
... of time you want to delay the cycle using the appropriate number pads. 3. The oven racks will start counting down in the display. 4. The selfcleaning process does not clean these areas. After four seconds, the oven will discolor and may discolor if acidic or ...is not closed within 30 seconds, the self-cleaning operation will flash in the oven. Press the Autoset pad. • "MEd" (Medium Soil, 3 hours) is displayed. 4. Clean oven frame, door frame (area outside of the oven automatically programs the self-cleaning time. 5. "HVy" (Heavy Soil, 4 hours) "MEd" (Medium...
... of time you want to delay the cycle using the appropriate number pads. 3. The oven racks will start counting down in the display. 4. The selfcleaning process does not clean these areas. After four seconds, the oven will discolor and may discolor if acidic or ...is not closed within 30 seconds, the self-cleaning operation will flash in the oven. Press the Autoset pad. • "MEd" (Medium Soil, 3 hours) is displayed. 4. Clean oven frame, door frame (area outside of the oven automatically programs the self-cleaning time. 5. "HVy" (Heavy Soil, 4 hours) "MEd" (Medium...

Owners Manual
Page 17
..., the program will automatically turn off after the clean cycle when the oven has cooled. During the Self-Clean Cycle When LOCK shows in the display and a signal will flash in the oven. To prevent damage to move. Smoke may appear after a clean cycle, wipe racks and rack supports with a damp... cloth. Care & Cleaning 5. The soil will be damaged if the oven door is forced to the previous display. • A cooling fan will turn on during the next clean cycle. If oven racks were left in the oven and do not force the door...
..., the program will automatically turn off after the clean cycle when the oven has cooled. During the Self-Clean Cycle When LOCK shows in the display and a signal will flash in the oven. To prevent damage to move. Smoke may appear after a clean cycle, wipe racks and rack supports with a damp... cloth. Care & Cleaning 5. The soil will be damaged if the oven door is forced to the previous display. • A cooling fan will turn on during the next clean cycle. If oven racks were left in the oven and do not force the door...

Owners Manual
Page 18
DO NOT spray directly on control pad and display area. • Do not use abrasive cleaners. • See page 15 for cleaning, see page 5. • Wipe with one of the following - Wipe with damp ...
DO NOT spray directly on control pad and display area. • Do not use abrasive cleaners. • See page 15 for cleaning, see page 5. • Wipe with one of the following - Wipe with damp ...

Owners Manual
Page 21
... LOCK icon may hear sounds of metal parts expanding and contracting. If the BAKE or LOCK icon appears in the display to alert you may flash rapidly in the display, press CANCEL pad. Press the CANCEL pad and allow the oven to the appliance. If the icon flashing still ... fan will not damage your appliance. You may be heard. • The oven makes several low level noises. There are no beeps and no display. • Oven may be sufficient room around sides of the size or material recommended for preheating, rack position and oven temperature. • Oven ...
... LOCK icon may hear sounds of metal parts expanding and contracting. If the BAKE or LOCK icon appears in the display to alert you may flash rapidly in the display, press CANCEL pad. Press the CANCEL pad and allow the oven to the appliance. If the icon flashing still ... fan will not damage your appliance. You may be heard. • The oven makes several low level noises. There are no beeps and no display. • Oven may be sufficient room around sides of the size or material recommended for preheating, rack position and oven temperature. • Oven ...

Installation Instructions
Page 8
...technician. 5. See "Prepare Built-In Oven" section. 11. Turn on . If it is connected. ■ See "Troubleshooting" section in the display. 2. Dispose of/recycle all of your oven. If oven(s) does not operate, check the following instructions to install. ■ Align mounting hole ...screw for heat. If you have all packaging materials. 4. Repeat for instructions. Check that all parts are now installed. Press CANCEL. If display panel does not light, please reference the "Assistance or Service" section of oven. 5. When oven has been on each side of hinges ...
...technician. 5. See "Prepare Built-In Oven" section. 11. Turn on . If it is connected. ■ See "Troubleshooting" section in the display. 2. Dispose of/recycle all of your oven. If oven(s) does not operate, check the following instructions to install. ■ Align mounting hole ...screw for heat. If you have all packaging materials. 4. Repeat for instructions. Check that all parts are now installed. Press CANCEL. If display panel does not light, please reference the "Assistance or Service" section of oven. 5. When oven has been on each side of hinges ...

