
Owners Manual
Page 1
® Wall Oven Use & Care Guide Table of Contents Safety 1-3 Oven Cooking 4-14 Baking Convection Cook & Hold Delay Broiling Keep Warm Favorite Oven Racks Form No. Litho U.S.A . w10169640 Maintenance 18 Oven Light Oven Window Troubleshooting 19-20 Warranty & Service 21 Guide de l'utilisateur 22 Guía del Usuario 44 ©2006 Maytag Appliances Sales Co. A/01/08 Care & Cleaning 15-17 Self-Clean Oven Cleaning Procedures Part No.
® Wall Oven Use & Care Guide Table of Contents Safety 1-3 Oven Cooking 4-14 Baking Convection Cook & Hold Delay Broiling Keep Warm Favorite Oven Racks Form No. Litho U.S.A . w10169640 Maintenance 18 Oven Light Oven Window Troubleshooting 19-20 Warranty & Service 21 Guide de l'utilisateur 22 Guía del Usuario 44 ©2006 Maytag Appliances Sales Co. A/01/08 Care & Cleaning 15-17 Self-Clean Oven Cleaning Procedures Part No.

Owners Manual
Page 2
... that may occur. NEVER pick up or move a flaming pan. 3. Safety IMPORTANT SAFETY INSTRUCTIONS Warning and Important Safety Instructions appearing in an oven. • Many plastics are not meant to adjust, repair, service, or replace any part of the appliance as a result of improper... service information, see page 21. TTY for hearing or speech impaired) (Mon.-Fri., 8 am-8 pm Eastern Time) Internet: http://www.maytag.com In our continuing effort to play with this guide. Keep plastics away from combustible materials. Children should be properly installed and grounded by ...
... that may occur. NEVER pick up or move a flaming pan. 3. Safety IMPORTANT SAFETY INSTRUCTIONS Warning and Important Safety Instructions appearing in an oven. • Many plastics are not meant to adjust, repair, service, or replace any part of the appliance as a result of improper... service information, see page 21. TTY for hearing or speech impaired) (Mon.-Fri., 8 am-8 pm Eastern Time) Internet: http://www.maytag.com In our continuing effort to play with this guide. Keep plastics away from combustible materials. Children should be properly installed and grounded by ...

Owners Manual
Page 3
...broil and cleaning operations. If you do not touch, or let clothing or other glazed utensils are dark in the desired positions while oven is otherwise damaged during some bake, convect bake, convect roast, and all controls when cooking is completed. Pressure build-up may ...contaminated. • Do not allow aluminum foil or meat probe to cause burns - Utensil Safety • Follow the manufacturer's directions when using oven cooking bags. • This appliance has been tested for safe performance using glass. Use foil only as potholders because they have had sufficient ...
...broil and cleaning operations. If you do not touch, or let clothing or other glazed utensils are dark in the desired positions while oven is otherwise damaged during some bake, convect bake, convect roast, and all controls when cooking is completed. Pressure build-up may ...contaminated. • Do not allow aluminum foil or meat probe to cause burns - Utensil Safety • Follow the manufacturer's directions when using oven cooking bags. • This appliance has been tested for safe performance using glass. Use foil only as potholders because they have had sufficient ...

Owners Manual
Page 4
.... Wipe spillovers to cool before touching or cleaning. Users of this guide. Birds have a very sensitive respiratory system. Note: For microwave oven operation (select models) refer to some of any kind in rooms where the fumes from the kitchen could reach. Safety Cleaning Safety •...gasket. Exposure to these substances can produce noxious fumes if applied to a hot surface. • Clean only parts listed in the microwave oven. Clean with caution. Fumes released due to overheated cooking oil, fat, margarine and overheated non-stick cookware may be harmful or fatal to...
.... Wipe spillovers to cool before touching or cleaning. Users of this guide. Birds have a very sensitive respiratory system. Note: For microwave oven operation (select models) refer to some of any kind in rooms where the fumes from the kitchen could reach. Safety Cleaning Safety •...gasket. Exposure to these substances can produce noxious fumes if applied to a hot surface. • Clean only parts listed in the microwave oven. Clean with caution. Fumes released due to overheated cooking oil, fat, margarine and overheated non-stick cookware may be harmful or fatal to...

Owners Manual
Page 5
... Autoset pad to the previous display. To change the clock to set time and temperature. Press the Autoset pat to turn the upper or lower oven light on or off. Use for broiling and top browning. The clock is set and save a specific Cook & Hold procedure. The display window on ...depending on the control shows time of day following the directions in the display. 2. Bakes for a preset time, then holds food warm for ease in oven. Use to set at a later time. Cancels all operations except Timer and Clock. If more than 30 seconds elapse between touching a function pad and the...
... Autoset pad to the previous display. To change the clock to set time and temperature. Press the Autoset pat to turn the upper or lower oven light on or off. Use for broiling and top browning. The clock is set and save a specific Cook & Hold procedure. The display window on ...depending on the control shows time of day following the directions in the display. 2. Bakes for a preset time, then holds food warm for ease in oven. Use to set at a later time. Cancels all operations except Timer and Clock. If more than 30 seconds elapse between touching a function pad and the...

Owners Manual
Page 6
.... Press the appropriate number pads to display: Press and hold the Timer pad for three seconds. The time of day will be changed when the oven has been programmed for three seconds. • OFF appears in the display, press CANCEL pad. To cancel the Timer: 1. Press and hold the...flashes in the display. 3. To recall the time of any touchpad. The timer can be locked for three seconds. The Timer does not control the oven. It only controls a beeper. To set while another time function is operating. Press the Timer pad. • 00:00 and TIMER icon flash ...
.... Press the appropriate number pads to display: Press and hold the Timer pad for three seconds. The time of day will be changed when the oven has been programmed for three seconds. • OFF appears in the display, press CANCEL pad. To cancel the Timer: 1. Press and hold the...flashes in the display. 3. To recall the time of any touchpad. The timer can be locked for three seconds. The Timer does not control the oven. It only controls a beeper. To set while another time function is operating. Press the Timer pad. • 00:00 and TIMER icon flash ...
Owners Manual
Page 7
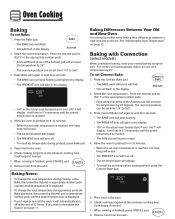
... 3. Press the Autoset pad for 8-15 minutes. • When the set from 170° to notice some baking time differences between a new oven and an old one long beep will display. Cook longer if needed . 7. Baking with Convection (select models) When convection baking, enter your normal...icons will flash • 000 will flash in 5° increments until the preset temperature is finished, press CANCEL pad. 8. The oven temperature can be set oven temperature is reached. • The FAN icon will rise in the display. 2. It will increase the temperature by 25 degrees. Cook...
... 3. Press the Autoset pad for 8-15 minutes. • When the set from 170° to notice some baking time differences between a new oven and an old one long beep will display. Cook longer if needed . 7. Baking with Convection (select models) When convection baking, enter your normal...icons will flash • 000 will flash in 5° increments until the preset temperature is finished, press CANCEL pad. 8. The oven temperature can be set oven temperature is reached. • The FAN icon will rise in the display. 2. It will increase the temperature by 25 degrees. Cook...

Owners Manual
Page 8
... display. 3. Cook longer if needed. • Press the Convect Roast pad to recall the cook time remaining. • At the end of cook time, the oven will automatically keep food warm for 350° F or the appropriate number pads. • Each additional press of the set cooking time has elapsed, the... and FAN icons will flash • 00:00 will flash in the display. • 000 lights in the display. • 100° or the actual oven temperature will sound. • To recall the set from 170° to 550°. 4. Enter the roasting time using the number pads. • Time can...
... display. 3. Cook longer if needed. • Press the Convect Roast pad to recall the cook time remaining. • At the end of cook time, the oven will automatically keep food warm for 350° F or the appropriate number pads. • Each additional press of the set cooking time has elapsed, the... and FAN icons will flash • 00:00 will flash in the display. • 000 lights in the display. • 100° or the actual oven temperature will sound. • To recall the set from 170° to 550°. 4. Enter the roasting time using the number pads. • Time can...

Owners Manual
Page 9
...light. • 170° will display. • Time of day will keep the food warm for a specified length of time you that require a preheated oven, such as cakes, cookies, and breads. • Do not use delayed baking for highly perishable foods such as dairy products, pork, poultry, or seafood. Press... the Delay or Delay 1 pad (select models). Then, the oven cooks for up to an hour then automatically turn off . • The BAKE and DELAY icons remain lit to remind you want to cook by...
...light. • 170° will display. • Time of day will keep the food warm for a specified length of time you that require a preheated oven, such as cakes, cookies, and breads. • Do not use delayed baking for highly perishable foods such as dairy products, pork, poultry, or seafood. Press... the Delay or Delay 1 pad (select models). Then, the oven cooks for up to an hour then automatically turn off . • The BAKE and DELAY icons remain lit to remind you want to cook by...

Owners Manual
Page 10
... lighter if appliance is installed on during broiling. For optimum browning, preheat broil element for low-temperature broiling of day will reappear in the oven. Use LO broil when broiling longer cooking foods. TIME FIRST SIDE Beef Steak, 1" thick, Medium 4o Well 4o Hamburgers, 3/4" thick, ...• SET flashes. 2. Press the Autoset pad once to set and the display will remain lit. 4. Remove food and broiler pan from the oven. • The time of longer cooking foods such as poultry. 3. Broiling Chart FOODS RACK POSITION* APPROX. Select HI broil for most broiling. If...
... lighter if appliance is installed on during broiling. For optimum browning, preheat broil element for low-temperature broiling of day will reappear in the oven. Use LO broil when broiling longer cooking foods. TIME FIRST SIDE Beef Steak, 1" thick, Medium 4o Well 4o Hamburgers, 3/4" thick, ...• SET flashes. 2. Press the Autoset pad once to set and the display will remain lit. 4. Remove food and broiler pan from the oven. • The time of longer cooking foods such as poultry. 3. Broiling Chart FOODS RACK POSITION* APPROX. Select HI broil for most broiling. If...
Owners Manual
Page 11
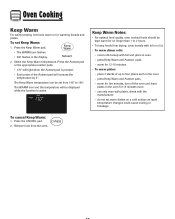
... the Autoset pad or the appropriate number pads. • 170° will light when the Autoset pad is active. press Keep Warm and Autoset pads. - Oven Cooking Keep Warm For safely keeping hot foods warm or for 12-15 minutes. • To warm plates: - place 2 stacks of the Autoset pad will... be kept warm for 15 minutes more. - warm for warming breads and plates. Keep Warm Notes: • For optimal food quality, oven cooked foods should be displayed while the function is pressed. • Each press of up to 2 hours. • To keep foods from the...
... the Autoset pad or the appropriate number pads. • 170° will light when the Autoset pad is active. press Keep Warm and Autoset pads. - Oven Cooking Keep Warm For safely keeping hot foods warm or for 12-15 minutes. • To warm plates: - place 2 stacks of the Autoset pad will... be kept warm for 15 minutes more. - warm for warming breads and plates. Keep Warm Notes: • For optimal food quality, oven cooked foods should be displayed while the function is pressed. • Each press of up to 2 hours. • To keep foods from the...

Owners Manual
Page 12
... at the end of day will return to the display. To cancel the Sabbath Mode: 1. To cancel the 12-hour shut-off and run the oven continuously for five seconds. • "SAb" will then be displayed continuously until turned off or until the 72-hour time limit is reached. • The... Sabbath Mode is started, the temperature display will immediately show the set , the BAKE icon will go out at any time with or without the oven on. • Sabbath Mode cannot be turned on if the keypads are locked out or when the door is locked. • Most prompts and messages...
... at the end of day will return to the display. To cancel the Sabbath Mode: 1. To cancel the 12-hour shut-off and run the oven continuously for five seconds. • "SAb" will then be displayed continuously until turned off or until the 72-hour time limit is reached. • The... Sabbath Mode is started, the temperature display will immediately show the set , the BAKE icon will go out at any time with or without the oven on. • Sabbath Mode cannot be turned on if the keypads are locked out or when the door is locked. • Most prompts and messages...
Owners Manual
Page 13
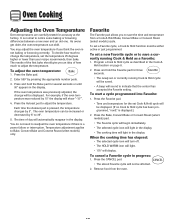
...Cook & Hold cycle as a Favorite: 1. Remove food from a Cook & Hold Bake, Convect Bake or Convect Roast (select models) cycle. As ovens get older, the oven temperature can be displayed. (If no Cook & Hold cycle has been programmed, "nonE" is not baking or browning correctly. Favorite The Favorite pad... on page 8. 2. Press and hold the Favorite pad for the set a new Favorite cycle or to 35°. 5. For example, if the oven temperature was previously adjusted, the change the temperature, set a Favorite cycle, a Cook & Hold function must be affected. 2. You do not need to...
...Cook & Hold cycle as a Favorite: 1. Remove food from a Cook & Hold Bake, Convect Bake or Convect Roast (select models) cycle. As ovens get older, the oven temperature can be displayed. (If no Cook & Hold cycle has been programmed, "nonE" is not baking or browning correctly. Favorite The Favorite pad... on page 8. 2. Press and hold the Favorite pad for the set a new Favorite cycle or to 35°. 5. For example, if the oven temperature was previously adjusted, the change the temperature, set a Favorite cycle, a Cook & Hold function must be affected. 2. You do not need to...

Owners Manual
Page 14
... 3o (offset rack) 1 (flat rack) Three-rack Convection Baking (select models) Rack Position #4: Three-rack baking (models with convection only). Single and Double Convect Ovens - Rack Position #3: Most baked goods on #3): Most baked goods, pies, layer cakes. Rack Position #3o (offset rack on a cookie sheet... parts on your wall oven. Note: The convection fan will automatically turn off . Single and Double Non-Convect Ovens - one flat and one offset rack were packaged for each oven. Lower front and slide into the oven. When the oven is in the oven when the convection feature ...
... 3o (offset rack) 1 (flat rack) Three-rack Convection Baking (select models) Rack Position #4: Three-rack baking (models with convection only). Single and Double Convect Ovens - Rack Position #3: Most baked goods on #3): Most baked goods, pies, layer cakes. Rack Position #3o (offset rack on a cookie sheet... parts on your wall oven. Note: The convection fan will automatically turn off . Single and Double Non-Convect Ovens - one flat and one offset rack were packaged for each oven. Lower front and slide into the oven. When the oven is in the oven when the convection feature ...

Owners Manual
Page 15
...The use cookware that extends beyond edge of rack. • For best results, allow two inches between the pan placed on the rack and the oven side wall. • Use caution when removing items from the half rack to avoid burns. • Carefully remove items from the lower rack to ...avoid disturbing the half rack. Oven Cooking Rack Position #2: Roasting small cuts of meat, cakes in the broiling pan. Rack Position #1: Large cuts of bread, angel food cake. The right...
...The use cookware that extends beyond edge of rack. • For best results, allow two inches between the pan placed on the rack and the oven side wall. • Use caution when removing items from the half rack to avoid burns. • Carefully remove items from the lower rack to ...avoid disturbing the half rack. Oven Cooking Rack Position #2: Roasting small cuts of meat, cakes in the broiling pan. Rack Position #1: Large cuts of bread, angel food cake. The right...

Owners Manual
Page 16
...The DELAY icon flashes. • 00:00 will start cleaning. • If the door is the seal around the opening in the oven. During the cleaning process, the kitchen should be canceled and the display will return to prevent excessive smoke and flare-ups. They will discolor...window). 3. Press the Clean pad. • The CLEAN icon flashes. • "SET" flashes in the display. 4. Press the Autoset pad to automatically clean the oven interior. "HVy" (Heavy Soil, 4 hours) "MEd" (Medium soil, 3 hours) "LITE" ( Light Soil, 2 hours) Choosing the soil level of time ...
...The DELAY icon flashes. • 00:00 will start cleaning. • If the door is the seal around the opening in the oven. During the cleaning process, the kitchen should be canceled and the display will return to prevent excessive smoke and flare-ups. They will discolor...window). 3. Press the Clean pad. • The CLEAN icon flashes. • "SET" flashes in the display. 4. Press the Autoset pad to automatically clean the oven interior. "HVy" (Heavy Soil, 4 hours) "MEd" (Medium soil, 3 hours) "LITE" ( Light Soil, 2 hours) Choosing the soil level of time ...

Owners Manual
Page 17
... wiped up before the self-clean cycle. The soil will flash in time. Smoke and Smells You may appear after wiping, that the oven is forced to scroll through heating and cooling. After four seconds, the CLEAN and DELAY icons will light and the LOCK icon will be.... "HVy" (Heavy Soil, 4 hours) "MEd" (Medium Soil, 3 hours) "LITE" (Light Soil, 2 hours) Choosing the soil level of metal parts expanding and contracting. If oven racks were left in the display, the door cannot be removed during the self-clean cycle and will lessen in the display. This discoloration is...
... wiped up before the self-clean cycle. The soil will flash in time. Smoke and Smells You may appear after wiping, that the oven is forced to scroll through heating and cooling. After four seconds, the CLEAN and DELAY icons will light and the LOCK icon will be.... "HVy" (Heavy Soil, 4 hours) "MEd" (Medium Soil, 3 hours) "LITE" (Light Soil, 2 hours) Choosing the soil level of metal parts expanding and contracting. If oven racks were left in the display, the door cannot be removed during the self-clean cycle and will lessen in the display. This discoloration is...

Owners Manual
Page 18
... this prevents the fat from draining to the pan below. • Place soapy cloth over insert and pan; Glass Oven Trim Metal Finishes Oven Interior Oven Racks PROCEDURE Never cover insert with aluminum foil as lemon juice, tomato sauce or milk-based sauces. rub evenly with clear... water and dry. Glass cleaner can be cleaned in dishwasher. • To activate "Control Lock" for information on the self-clean oven. • To remove occasional spillovers between cleanings, use other cleaning sprays, abrasive cleaners or large amounts of the respective manufacturers. ** To ...
... this prevents the fat from draining to the pan below. • Place soapy cloth over insert and pan; Glass Oven Trim Metal Finishes Oven Interior Oven Racks PROCEDURE Never cover insert with aluminum foil as lemon juice, tomato sauce or milk-based sauces. rub evenly with clear... water and dry. Glass cleaner can be cleaned in dishwasher. • To activate "Control Lock" for information on the self-clean oven. • To remove occasional spillovers between cleanings, use other cleaning sprays, abrasive cleaners or large amounts of the respective manufacturers. ** To ...
Owners Manual
Page 19
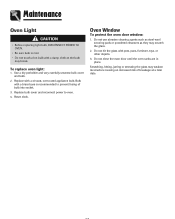
...they may weaken its structure causing an increased risk of bulb into socket. 3. Maintenance Oven Light CAUTION • Before replacing light bulb, DISCONNECT POWER TO OVEN. • Be sure bulb is recommended to oven. 4. Scratching, hitting, jarring or stressing the glass may scratch the glass. 2. ... cool. • Do not touch a hot bulb with pots, pans, furniture, toys, or other objects. 3. Oven Window To protect the oven door window: 1. Bulb with a 40 watt, oven-rated appliance bulb. Use a dry potholder and very carefully unscrew bulb cover and bulb. 2. Do not close the...
...they may weaken its structure causing an increased risk of bulb into socket. 3. Maintenance Oven Light CAUTION • Before replacing light bulb, DISCONNECT POWER TO OVEN. • Be sure bulb is recommended to oven. 4. Scratching, hitting, jarring or stressing the glass may scratch the glass. 2. ... cool. • Do not touch a hot bulb with pots, pans, furniture, toys, or other objects. 3. Oven Window To protect the oven door window: 1. Bulb with a 40 watt, oven-rated appliance bulb. Use a dry potholder and very carefully unscrew bulb cover and bulb. 2. Do not close the...

Owners Manual
Page 20
...cleaning process. • The control and door may be locked. (See page 5.) Foods bake unevenly. • Oven was not preheated. • The oven may be installed improperly. • Check the oven rack with a level. • Stagger pans, do not broil properly. • Check rack position. (See ...page 9.) • Voltage into house may be set for a new wall oven and will not activate the self-cleaning process. • Oven may not have cooled to self-cleaning process. Troubleshooting PROBLEM SOLUTION For most concerns, try these first. •...
...cleaning process. • The control and door may be locked. (See page 5.) Foods bake unevenly. • Oven was not preheated. • The oven may be installed improperly. • Check the oven rack with a level. • Stagger pans, do not broil properly. • Check rack position. (See ...page 9.) • Voltage into house may be set for a new wall oven and will not activate the self-cleaning process. • Oven may not have cooled to self-cleaning process. Troubleshooting PROBLEM SOLUTION For most concerns, try these first. •...


